
![[StepByStep Guide] How to Partition a Hard Drive on Windows 10/11](https://www.auslogics.com/en/articles/wp-content/uploads/2025/02/Step-By-Step-Guide-How-to-Partition-a-Hard-Drive-on-Windows-1011.webp)
- What Is Partitioning?
- Key Terms in Disk Partitioning and What They Mean
- Disk Partitioning Basics: Types of Partitions and Partition Styles
- How to Prepare for Hard Drive Partitioning
- How to Partition a Hard Drive on Windows 10/11
- How to Manage and Modify Partitions on a Hard Drive
- Why Partition a Hard Drive: Pros and Cons
- Take Caution When Partitioning Your Hard Drive
- FAQ
Partitioning a hard drive has many advantages, like making it easier to run different operating systems or creating smaller, more organized storage spaces. Besides, if you are on a tight budget, your partitions can act like multiple drives, removing the need to buy several drives.
Read on as we walk you through the step-by-step process of how to partition a hard drive on Windows 10 and 11. We will show you why partitioning is useful, the tools you need, and how to create and format partitions.
What Is Partitioning?
Partitioning is dividing your hard drive into two or more parts called partitions. The operating system treats each partition as a distinct drive. It assigns different letters to each volume to distinguish them.
Many new PCs are already partitioned out of the box. You might notice your PC has a larger C: drive and a smaller partition (often labeled D:). The C: is your main drive, while the smaller partition stores recovery files Windows can use when a problem occurs.
Key Terms in Disk Partitioning and What They Mean
When dealing with disk partitioning, you might come across several important terms. Here are some of them and their meanings:
- Partition: A partition is a section of a storage device like a hard drive or SSD created with a computer. It works like a separate space inside the drive, making it easier to organize and manage data.
- Volume: A volume is a storage unit that has been formatted with a file system and is ready for use. It can be created from a single partition or span multiple partitions. When a partition is formatted, it becomes a new simple volume. This allows the computer to recognize it and store files.
- File system: A file system is a method that a computer uses to organize and manage data on a partition. It decides how files are stored, named, and accessed. Common types include NTFS, exFAT, or FAT32.
- Unallocated space: This is empty space on a disk that hasn’t been set up for use. You can’t store files here until you create and format a partition. We will explain how to set up a hard drive in the following sections.
- Cluster: The smallest unit of space that a file system uses to store data. If a file is large, it will be stored in multiple clusters.
- Partition table: A record that keeps track of all partitions on a disk. It stores details like partition size, location, and file system type.
Disk Partitioning Basics: Types of Partitions and Partition Styles
Before you partition your hard drive, you need to decide on both the partition type and partition style to use.
Partition types
The partition type determines how storage space is divided and used within the drive. It affects whether the partition can hold an operating system, store data, or serve as a container for additional partitions.
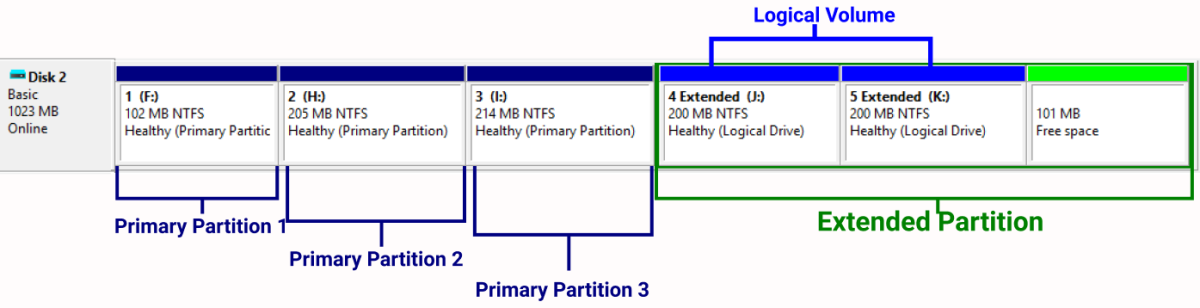
There are three main types of partitions: primary, extended, and logical.
Primary partition: This is the main section of your drive where you can install an operating system. You can have multiple operating systems, like Windows and Linux, on the same computer, each installed on a separate primary partition.
The amount of primary partitions you can have on a drive is limited by the style of partition, which can either be MBR or GPT. (We will explain these two in detail in the next section.)
Extended partitions: An extended partition acts like a container that houses logical partitions. It takes up one of the available primary partition slots, but it works differently because it cannot store data directly.
Instead of being restricted to a number of partitions, you can create one extended partition and then divide it into multiple logical partitions inside.
Logical partitions: Logical partitions are subdivisions in an extended partition that help organize files and programs better. Instead of keeping everything in one large space, you can create logical partitions to store different types of data separately within the extended partition. For example, you can have one for personal files, another for work documents, and another for software programs.
Finally, here is a comparison table for the three types of partitions:
| Feature | Primary partition | Extended partition | Logical partition |
|---|---|---|---|
| Bootable | ✅ Can be used to boot an OS | ❌ Cannot be used for booting | ❌ Cannot be used for booting |
| Data storage | ✅ Can store data and OS files | ❌ Cannot store data directly | ✅ Stores data within the extended partition |
| Partition limit | Limited by 4 primary partitions (MBR) or 128 primary partitions(GPT) | Only one extended partition per MBR drive | Multiple logical partitions can exist inside an extended partition |
| Usage | Used for OS installation and data storage | Used to bypass MBR’s partition limit by allowing logical partitions | Used for organizing data without taking up primary partition slots |
Partition styles
The partition style defines how the drive is structured and accessed by the system. It determines the number of partitions you can create, the maximum disk size supported, and compatibility with different system firmware (BIOS or UEFI).
There are two partition styles: MBR and GPT.
1. MBR (Master Boot Record)
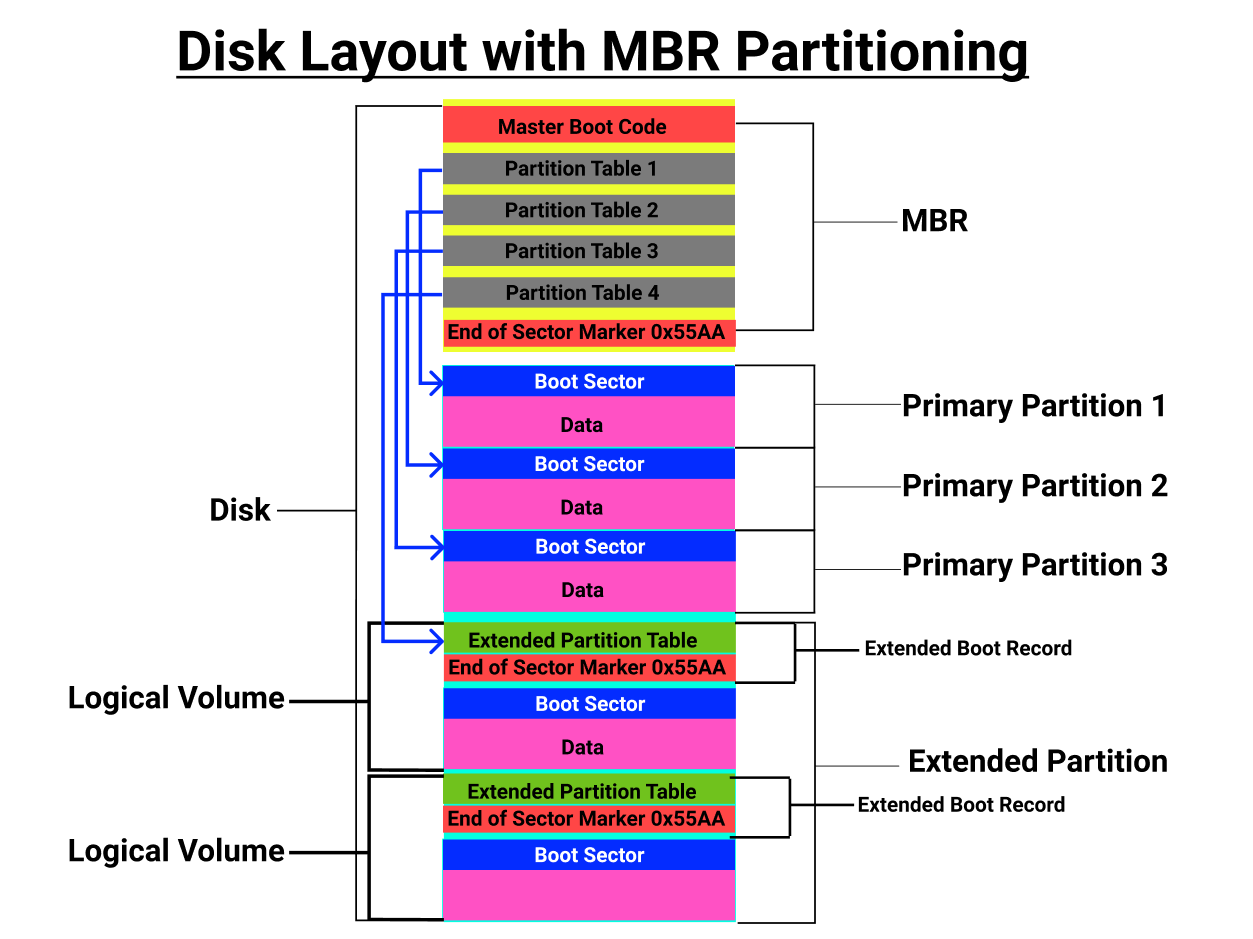
MBR is an older partitioning system that is widely compatible with most Windows versions. This makes it a suitable choice for older computers that were manufactured before the widespread adoption of UEFI and GPT, like Dell Inspiron 1525 or HP Pavilion dv6000.
Location on the drive
MBR stores partition information in a special section at the beginning of the drive. This section contains important data about how the drive is organized and how the operating system should boot. If this section gets damaged, the entire drive may become unreadable.
Size limitation
MBR only supports drives up to 2TB in size. If you use a larger drive, any space beyond 2TB will remain unusable. This makes MBR less suitable for modern storage needs, where larger hard drives are common.
Compatibility
MBR is designed to work with BIOS-based systems. If your computer uses an older BIOS firmware, MBR is required. However, newer computers that use UEFI firmware can take advantage of GPT, which offers more advanced features and better data protection.
Partition limits
With MBR, you can create up to four primary partitions on a single hard drive. If you need more than four partitions, you can create three primary partitions and one extended partition, which can hold multiple logical partitions. This allows for better organization of data but still comes with some limitations.
For example, imagine you have a 1TB hard drive, and want to set up multiple partitions to manage your data efficiently. Since MBR only supports up to four primary partitions, you have two options:
Option 1: Four primary partitions
- Partition 1 (200GB)—Windows OS
- Partition 2 (200GB)—Linux OS
- Partition 3 (300GB)—personal files
- Partition 4 (300GB)—work documents
Once you use all four primary partition slots, you cannot create more partitions unless you delete one.
Option 2: Three primary partitions + one extended partition
- Primary partition 1 (200GB)—Windows OS
- Primary partition 2 (200GB)—Linux OS
- Primary partition 3 (200GB)—software & programs
- Extended partition (400GB)—in this partition, you can create multiple logical partitions:
- Logical partition 1 (100GB)—personal files
- Logical partition 2 (100GB)—work documents
- Logical partition 3 (100GB)—backups
- Logical partition 4 (100GB)—multimedia
2. GPT (GUID Partition Table)
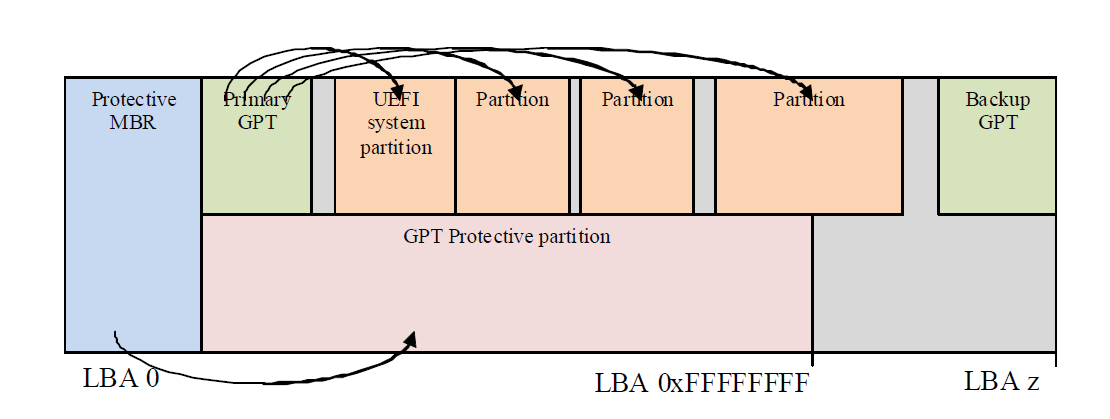
GPT is a modern partitioning system designed to replace MBR. It offers better performance, security, and flexibility, making it the preferred choice for modern computers. Unlike MBR, which has several limitations, GPT is built to handle larger storage devices and provides enhanced reliability.
No 2TB limit
One of the biggest advantages of GPT is that it does not have a 2TB limit. It can support much larger drives, up to 9.4 zettabytes, which is far beyond today’s storage needs. This makes GPT ideal for high-capacity hard drives.
Support for more partitions
GPT allows up to 128 primary partitions, whereas MBR only up to 4. This means you can have more separate storage areas for different types of data without using an extended partition.
Enhanced reliability
GPT is also more reliable because it stores multiple copies of partition data across the drive. If one section gets corrupted, the system can recover the data from a backup, reducing the risk of drive failure. This built-in redundancy makes GPT a safer option for storing important files.
Designed for UEFI systems
Another key benefit of GPT is that it is designed for UEFI-based systems, which provide faster boot times and better security features than traditional BIOS systems. UEFI also supports features like Secure Boot, which helps protect against malware attacks during startup.
Differences between MBR and GPT
Here’s a table outlining the differences between the MBR and GPT:
| Feature | MBR | GPT |
|---|---|---|
| Partition limit | Supports up to 4 primary partitions or 3 primary + 1 extended partitions | Supports up to 128 primary partitions |
| Drive size limit | Supports drives up to 2TB in size; anything larger will be unusable | Can handle much larger drives, up to 9.4 zettabytes |
| System compatibility | Works with BIOS-based systems | Works with UEFI-based systems |
| Data redundancy | No backup of partition data; if the MBR is corrupted, the data is lost | Stores multiple copies of partition data for redundancy, improving data integrity |
| Boot sector | The MBR is located in the first sector of the disk and contains partition information | The GPT uses a primary and backup header, ensuring data recovery in case of corruption |
| Security | The MBR lacks features like data integrity checks or encryption | The GPT includes CRC32 checks for data integrity and offers better security features |
| Supported operating systems | Compatible with older systems (Windows XP, Vista, etc.) and other legacy OS | Supported by modern systems (Windows 10/11, macOS, Linux, etc.) |
| Performance | Older technology, slower boot times, and limited capabilities | Faster boot times and better performance due to UEFI support |
| Partition structure | Partitions are mapped using a table located in the MBR sector | Uses GUIDs (globally unique identifiers) to map partitions |
| Usage | Best for older systems and small drives (under 2TB) | Ideal for new systems, large drives, and advanced setups |
How to Prepare for Hard Drive Partitioning
When getting ready to partition your hard drive, consider the following steps:
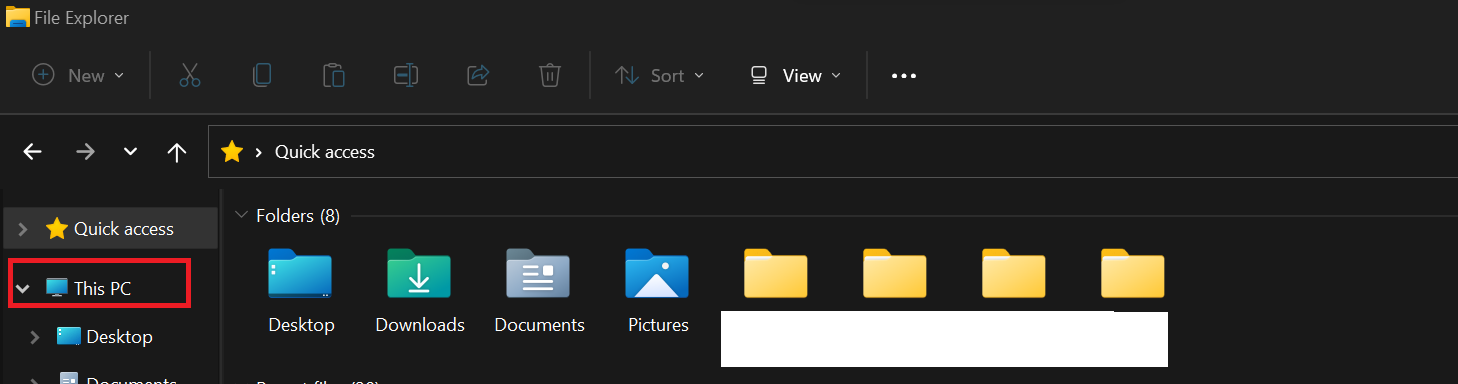
- Check available free space: Open File Explorer, click This PC, and check your C: drive to determine if you need to free up space or install a larger drive. You can also manually delete unnecessary files to get more space.
- Back up your data: Before partitioning, create a backup of all your important files and data. This ensures that even if something goes wrong during the partitioning process, your data remains safe.
- Defragment: Defragmenting your system helps to reorganize fragmented data on your hard drive. The process ensures that data is consolidated, reducing the risk of file corruption and maximizing available free space for a smoother partitioning process. Click Start, search for and open the Defragment and Optimize Drives utility, select your HDD, and click Optimize.
- Plan partition sizes: Determine the sizes you want to allocate to each partition based on your storage needs and the intended use of each partition. Consider factors like the operating system, programs, and data you plan to store on each partition.
- Choose a partitioning tool: Select a reliable partitioning tool that suits your needs. Popular options include Disk Management on Windows and third-party options like EaseUS Partition Master and MiniTool Partition Wizard. These tools provide user-friendly interfaces to help you create and manage partitions.
- Follow guidelines and tutorials: Refer to official documentation, guidelines, or tutorials provided by your chosen partitioning tool to ensure you follow the correct steps. These resources can guide you through the process and help you avoid potential pitfalls.
In the following steps, you will learn how to partition a hard drive on Windows 11 or 10 without stress.
How to Partition a Hard Drive on Windows 10/11
Step 1: Check drive health
The drive you want to use should be free of errors to avoid data loss or corruption of your data. So, it’s best to run a quick check on the disk health before you go further.
- Press
Windows + Eto open File Explorer and click on This PC.
- Right-click on the drive you intend to partition and click on Properties.
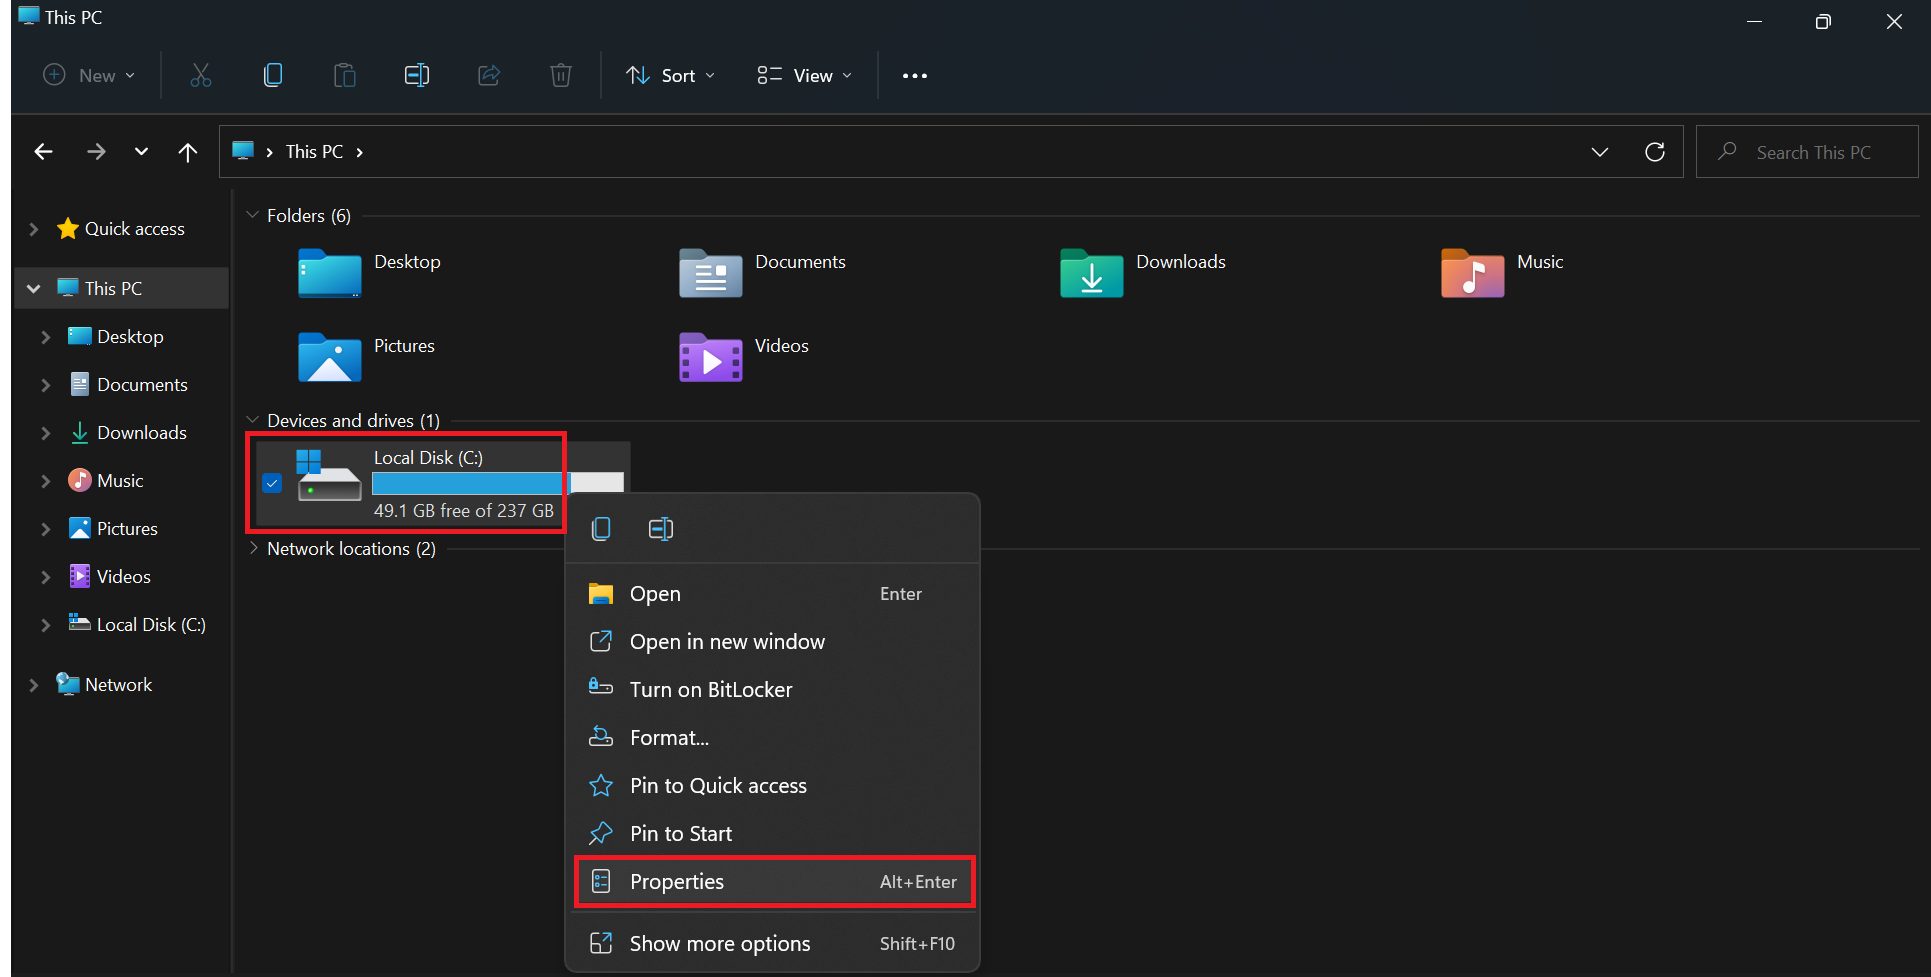
- Next, locate the Tools tab, and under it, click Check.
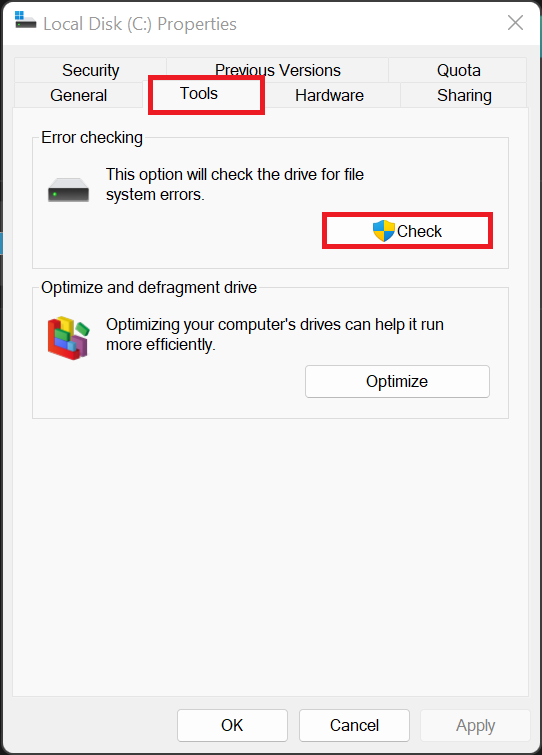
Windows will tell you if there are potential errors. However, we recommend that you scan the drive just to be sure.
After the scan, if you get the Repair this drive message, you should consider fixing the drive first before going further with the partition process.
Once you are sure the drive is free of errors, you can proceed to the next step.
Win + R, type cmd, and then press Ctrl + Shift + Enter. This will launch the Command Prompt with administrative privileges.
Next, enter the command chkdsk c: /F (replace c: with the appropriate drive letter) to initiate error correction. If the drive is currently in use, the system will schedule a disk check for the next restart. In that case, restart your computer before continuing.
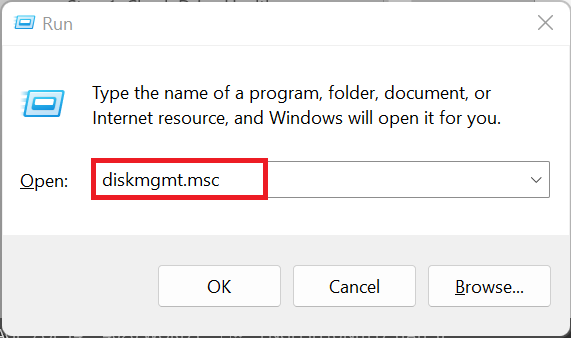
Step 2: Run the Disk Management tool
To begin the partition process properly, we need to open Disk Management first. This is the utility on Windows that handles disk-related tasks.
You can open it by pressing Win + R, typing diskmgmt.msc and hitting Enter.
Step 3: Shrink your drive (if necessary)
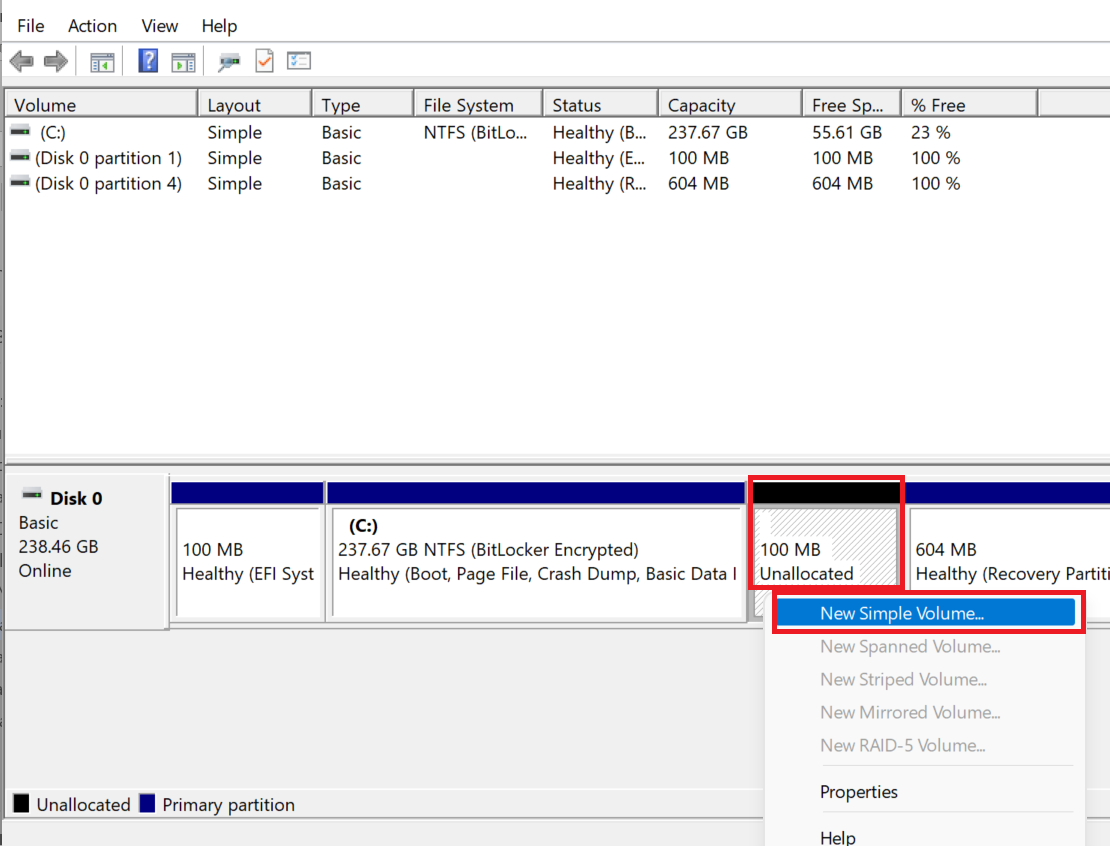
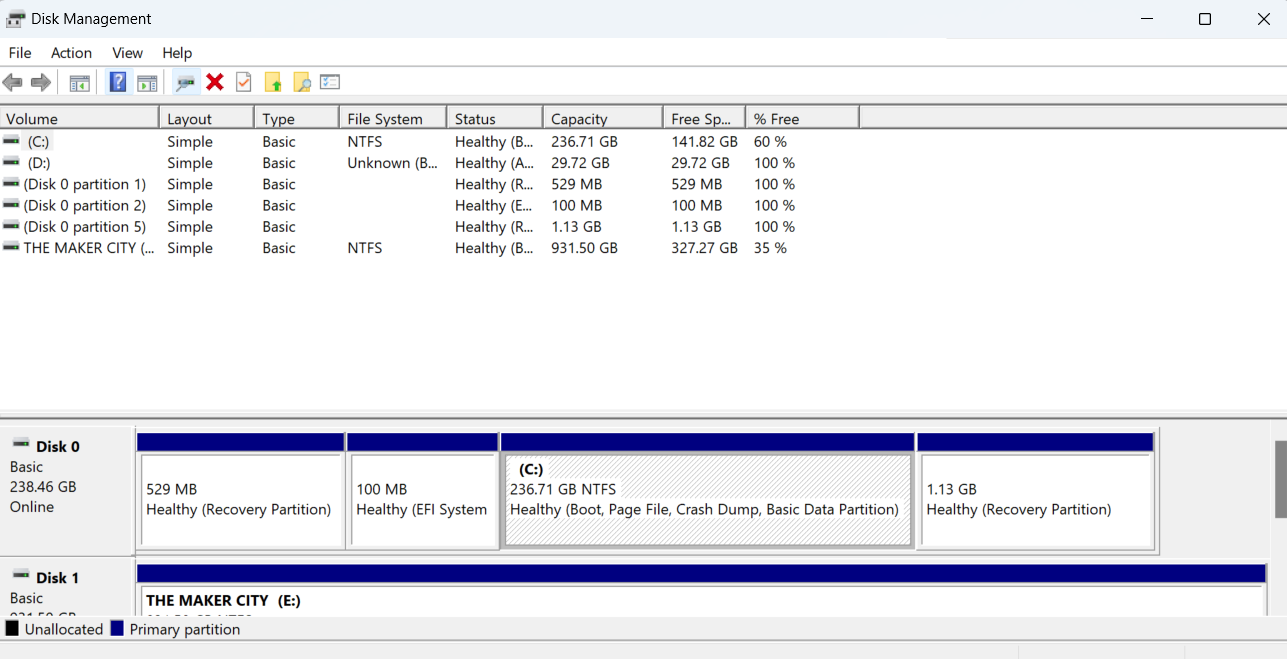
When Disk Management opens, you’ll be shown a list of drives and their partitions like in the image below.
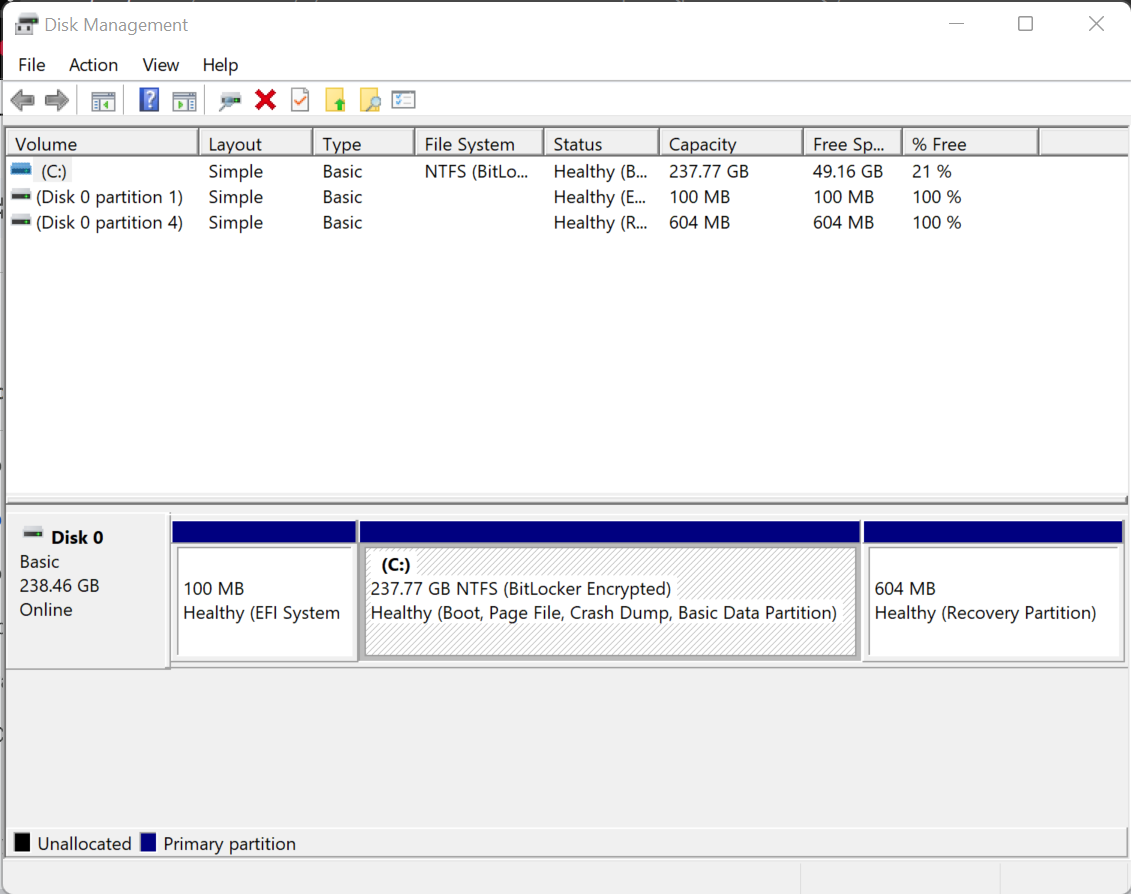
For existing hard drives
If you’re repartitioning an existing drive, locate the drive in the lower half of the Disk Management window. If a part of the space is already partitioned, you will see Unallocated next to that partition. However, if the partition uses all the available space on that drive, you will need to shrink the partition first.
Here’s how to shrink a hard drive:
- Right-click the drive and select Shrink Volume.
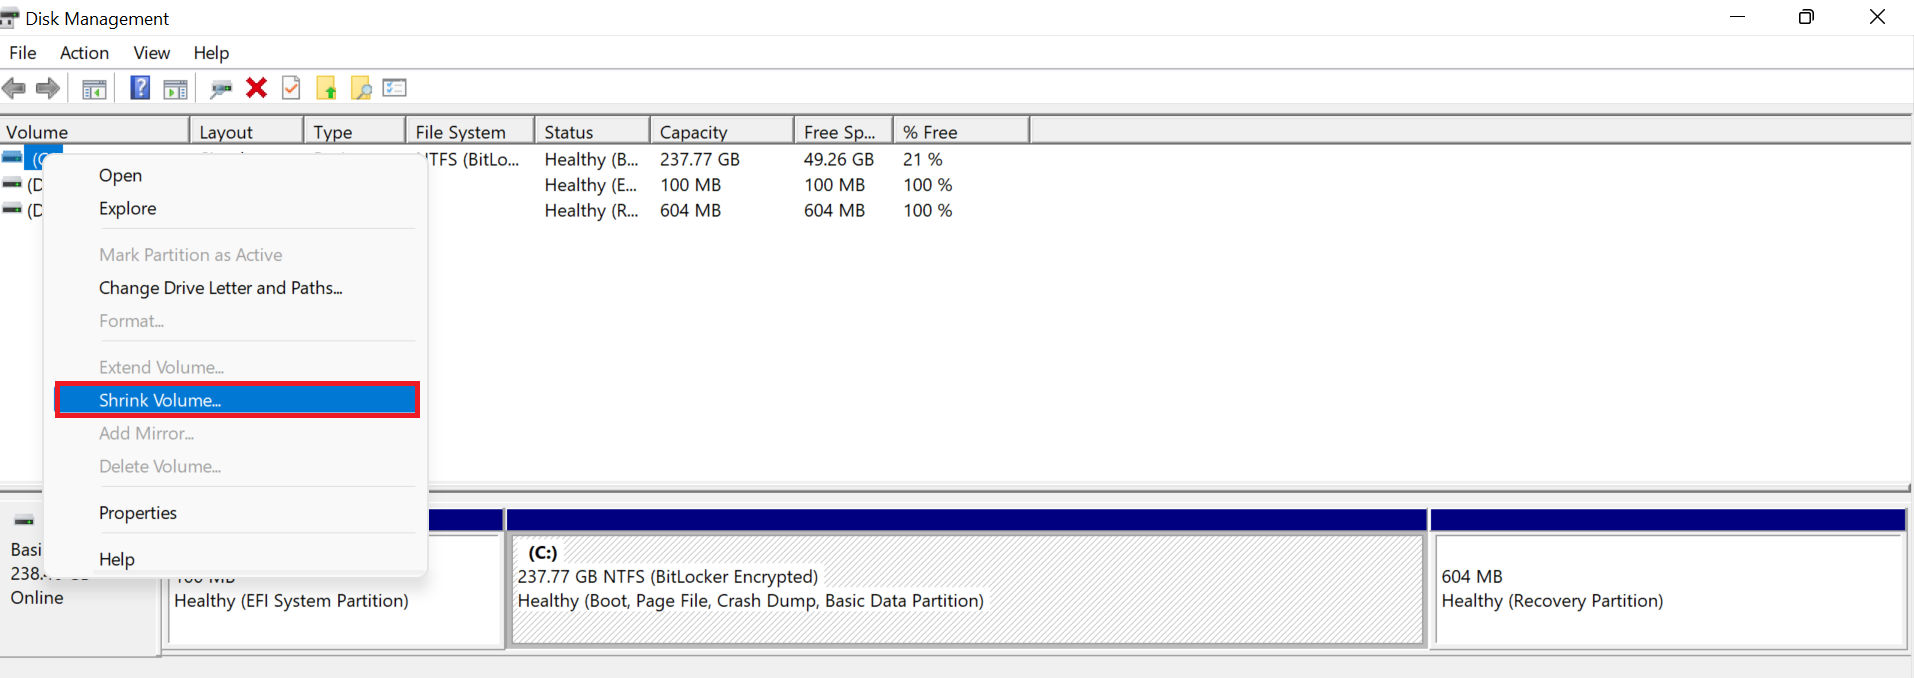
- In the Shrink dialog box, note the total space available to shrink. Enter the amount of space you want to create in MB (100,000 MB ≈ 100 GB) and click Shrink.
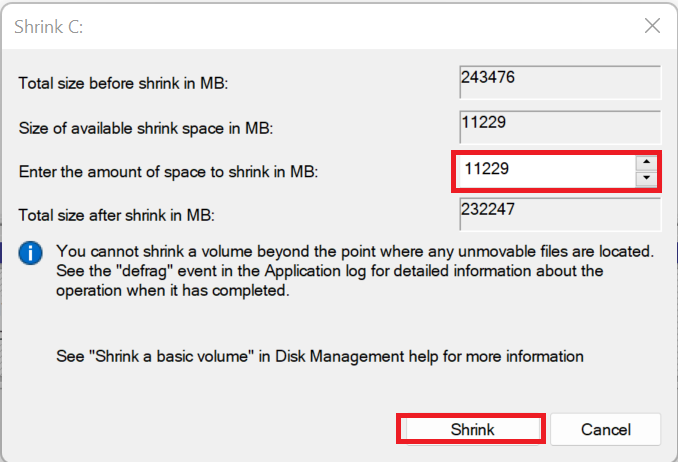
- Windows will now create the Unallocated space beside the existing partition. This might take a while, depending on the space you freed up.
For new drives
If you installed a new drive, you may get an Initialize Disk popup window asking you to choose a partition style for the drive. A good rule of thumb is to select GPT for drives of 2TB or greater and MBR for drives less than 2TB.
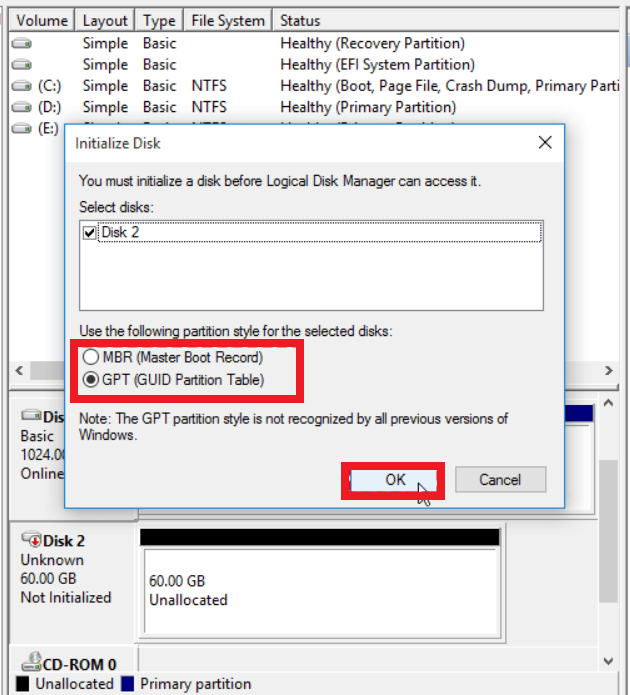
Locate the drive you want to partition in the lower half of the Disk Management window and select it. If it is a new drive, it will be labeled Unallocated. This means it hasn’t been formatted and cannot be used.
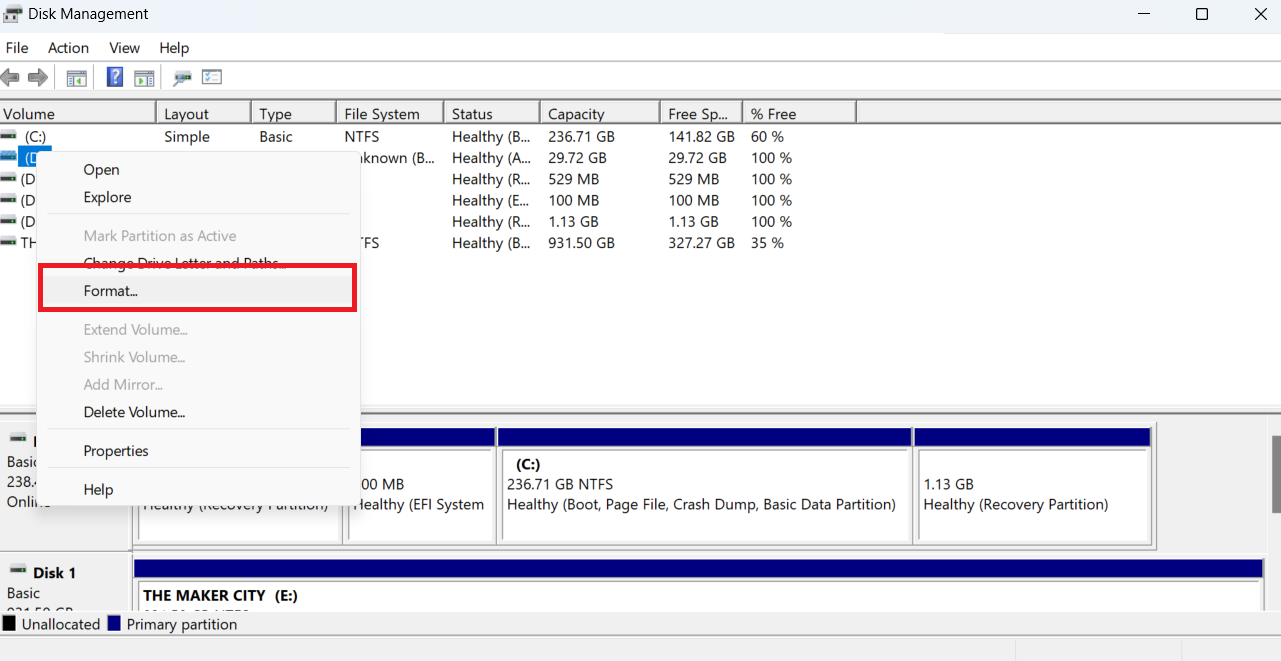
Step 4: Create a new partition
Now that you have the unallocated space, follow these steps to create a new partition:
- Right-click the unallocated space and select New Simple Volume.
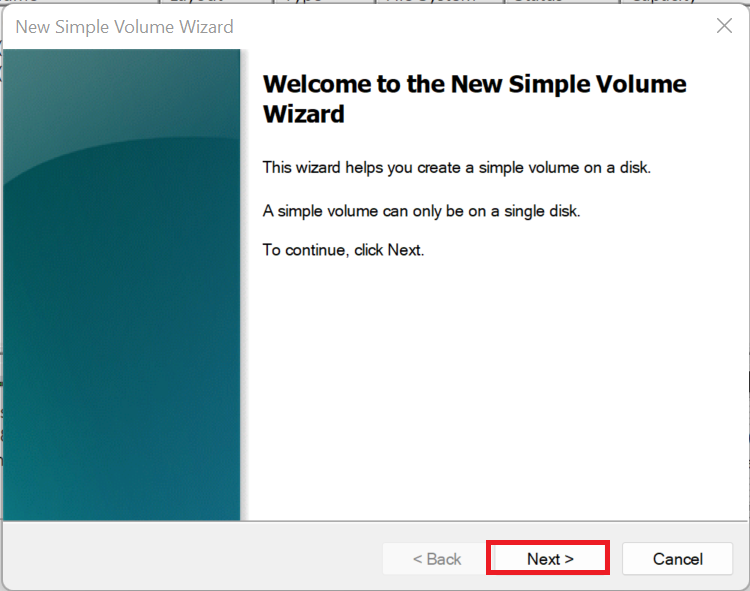
- In the New Simple Volume Wizard window, click Next.
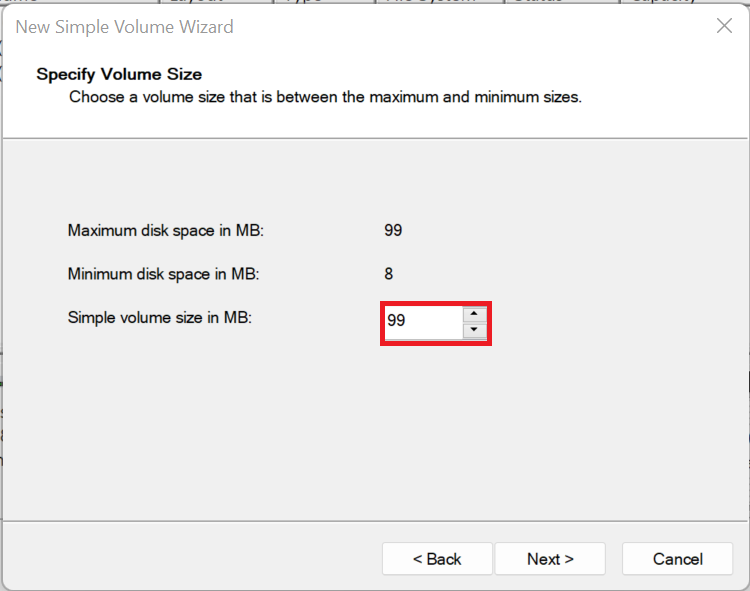
- In the Specify Volume Size window.
- If you want to create a smaller partition, enter the desired size in MB and click Next.
- To use all the free space, just click Next without changing anything.
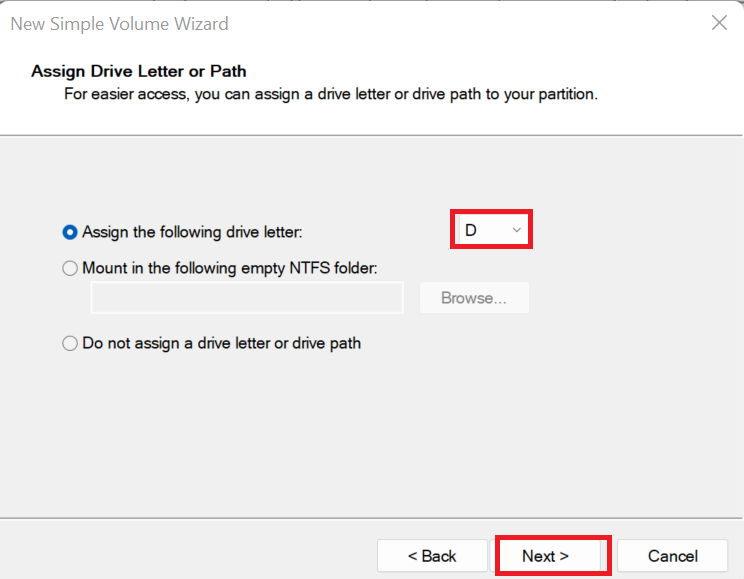
- In the Assign Drive Letter or Path window, choose a letter to identify your new partition. You cannot use C as this is usually reserved for your main drive. After choosing a letter, click Next.
- On the Format Partition screen, leave all settings as they are and click Next.
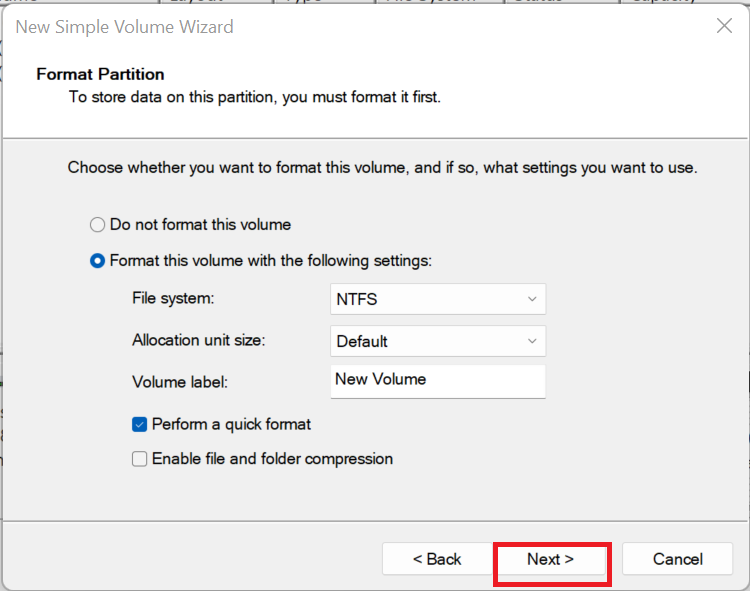
- Review the summary on the Completing the Simple Volume Wizard screen and click Finish.
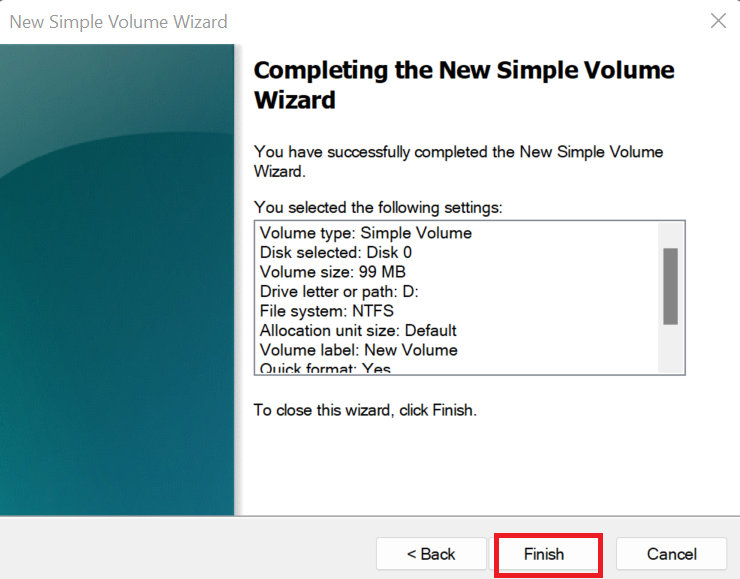
After a few moments, your new partition will appear in File Explorer. Click This PC, and you will see your newly created partition under Devices and drives.
How to Manage and Modify Partitions on a Hard Drive
Once you have created partitions on your hard drive, you can manage and modify them using the following steps:
- Open Disk Management by right-clicking the Start button and selecting Disk Management.
- In Disk Management, you will see a list of all the partitions on your hard drive. Take note of their sizes, file systems, and labels.
- If you need to adjust the size of a partition, right-click on it and select Resize or a similar option. Follow the prompts to increase or decrease the partition’s size as desired.
- If you have unallocated space on your hard drive, you can create new partitions. Right-click on the unallocated space and choose New Simple Volume. Specify the size, file system, and label for the new partition.
- To remove a partition, right-click on it and select Delete Volume. Be cautious, as this will erase all data on the partition. To merge partitions, you will need to use third-party partitioning software, as Disk Management doesn’t offer this feature.
- If you create a new partition or delete an existing one, you will likely need to format it to a specific file system (such as NTFS, exFAT, or FAT32) for it to be usable. Right-click on the partition and select Format or Erase to initiate the formatting process.
- After making any modifications, ensure that you apply the changes as instructed by the utility. This step may require a reboot of your system to finalize the modifications.
By effectively managing and modifying partitions, you can adapt your storage configuration to better suit your needs, optimize space allocation, and make the most efficient use of your hard drive’s capacity.
Why Partition a Hard Drive: Pros and Cons
Partitioning your HDD has several advantages. However, if you create partitions without a clear need, it can make managing your storage more difficult. For example, you might end up with some partitions running out of space while others remain mostly empty, or you may need to adjust partitions later, which can be time-consuming.
- Better organization—Keep system files, personal data, and applications separate for easier management
- Data protection—If the system crashes, files stored on another partition remain safe
- Dual boot setup—Install multiple operating systems, like Windows and Linux, on separate partitions
- Faster backup & restore—You can back up or restore a single partition instead of the whole drive
- Performance boost—System files on one partition and data on another can reduce fragmentation and improve speed
- Wasted space—Some partitions may run out of space while others have unused storage
- Harder to resize later—Adjusting partitions requires third-party tools and can be risky
- Unnecessary for small drives—Splitting limited storage can create clutter instead of helping
- Potential boot issues—Incorrect partitioning may cause OS boot failures or recovery problems
Take Caution When Partitioning Your Hard Drive
Partitioning your drive can be beneficial for organizing files, improving performance, and enhancing security, but doing it incorrectly can lead to serious issues. If you don’t follow the right steps, you might encounter problems such as:
- Data loss
- System instability
- Performance issues
- Compatibility problems
For example, if you shrink your system partition too much, Windows may struggle to update due to insufficient space. To prevent these issues, always back up your data, use reliable partitioning tools, and carefully follow partitioning guidelines.
We’d love to hear from you! Share your thoughts and tips in the comments below!