Do you know how to check how much RAM you have? Random-access memory (RAM) is crucial to your computer because it determines how well it will run. It also shows how effectively it can handle your various tasks and programs.
Furthermore, RAM provides faster access to data for computers. This data includes information about the operating system, programs, apps, etc. It also serves as temporary storage for data, which helps make the processor efficient and quick.
Typically, the bigger RAM your laptop or desktop has, the quicker your system can process information and the better it will run multiple applications simultaneously.
This guide shows you how to check RAM on Windows 10/11 and Mac, how to reduce memory usage, and other relevant information you need to know.
Let’s begin.
Types of RAM
There are two types of RAM. All the other types of RAM, such as SD RAM, RD RAM, etc., fall under these two categories. Let’s find out what they are:

The RAM most popular in computers is called dynamic random-access memory (DRAM), and it requires power to keep information stored. Every single DRAM cell stores charge in an electrical capacitor.
The capacitor refreshes every few milliseconds constantly to compensate for charge leaks. A transistor is a gate to regulate access to the capacitor’s value to read or write data.

The information stored in static random-access memory (SRAM) also needs a constant power source. But unlike DRAM, it doesn’t need to be refreshed frequently.
In SRAM, transistors serve as switches rather than capacitors, which are used to store charge. So one position represents a “1,” and the other, a “0.” SRAM uses many transistors to store data, while DRAM just needs a single transistor per bit.
How to Check RAM on Your Windows 10 or 11 PC
The various steps below can help you view your system’s memory. You can go through them and choose the one that best suits your preference.
We’ve grouped them from easy to not-so-easy to make it simple for you:
Method 1: Use the Settings app to check your RAM
If you want to check your total memory on Windows 11 or 10, follow these steps:
- Press the
Win + Ikeyboard shortcuts, select System, and click About. - In the right sidebar, under Device specifications, look for Installed RAM; you should see how much RAM is installed on your PC.
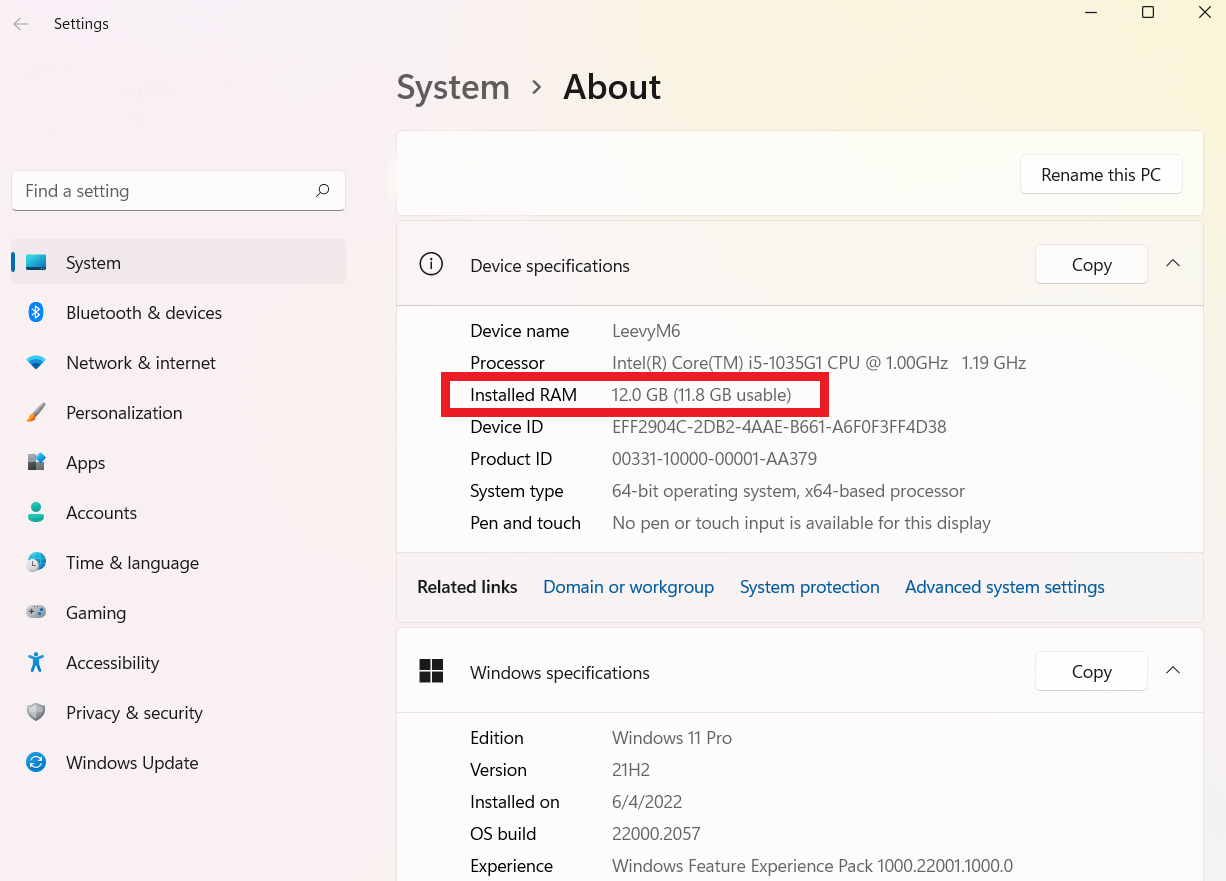
Alternatively, open your search box, type “view RAM info,” and press Enter
Method 2: Use third-party software
One of the reliable third-party tools you can use is Auslogics BoostSpeed. It has numerous features to help you optimize your PC. And one of those tools is System Information.
Here’s how to check how much RAM you have using this utility:
- Go to Auslogics official website and download the program if you haven’t already. It only takes a few minutes.
- Launch the program and click on All Tools on the header.
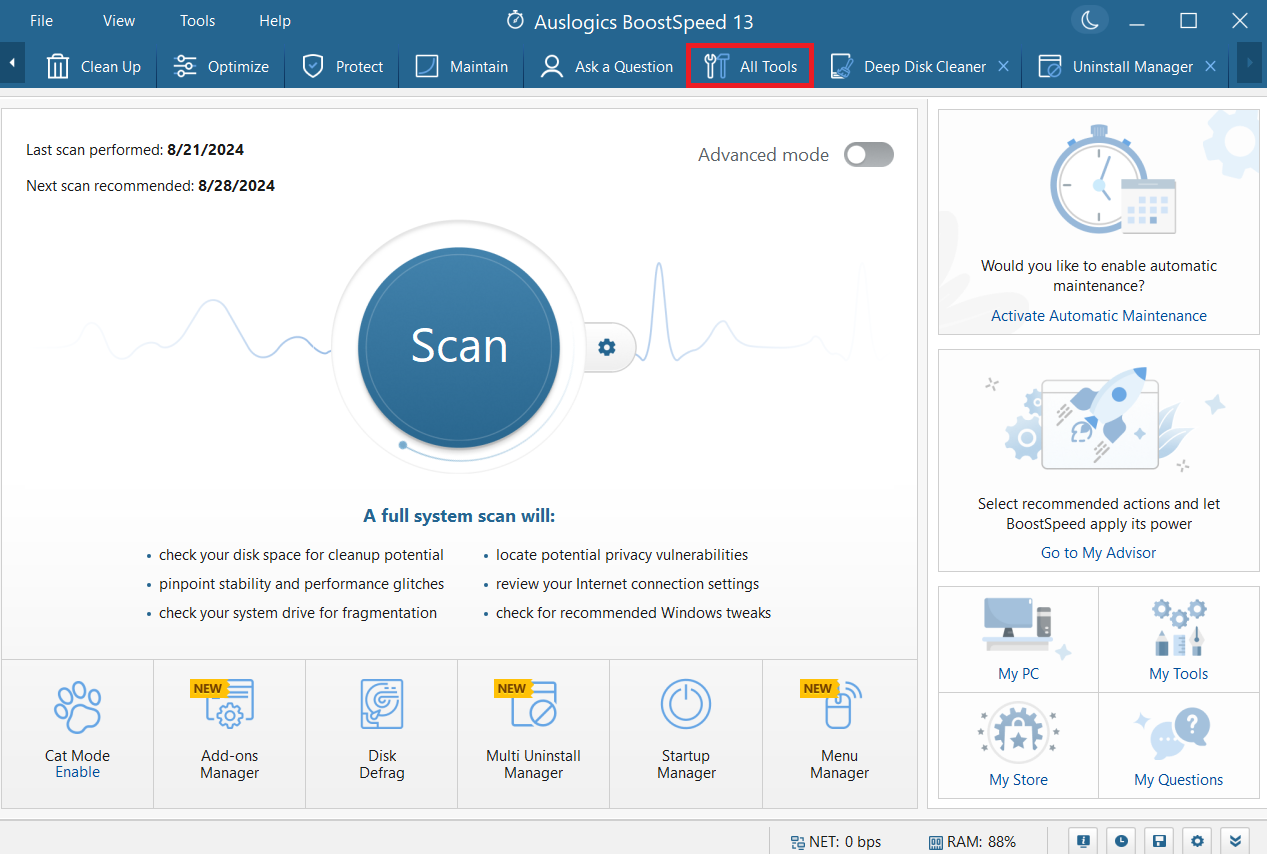
- Then, scroll down and click on System Information.
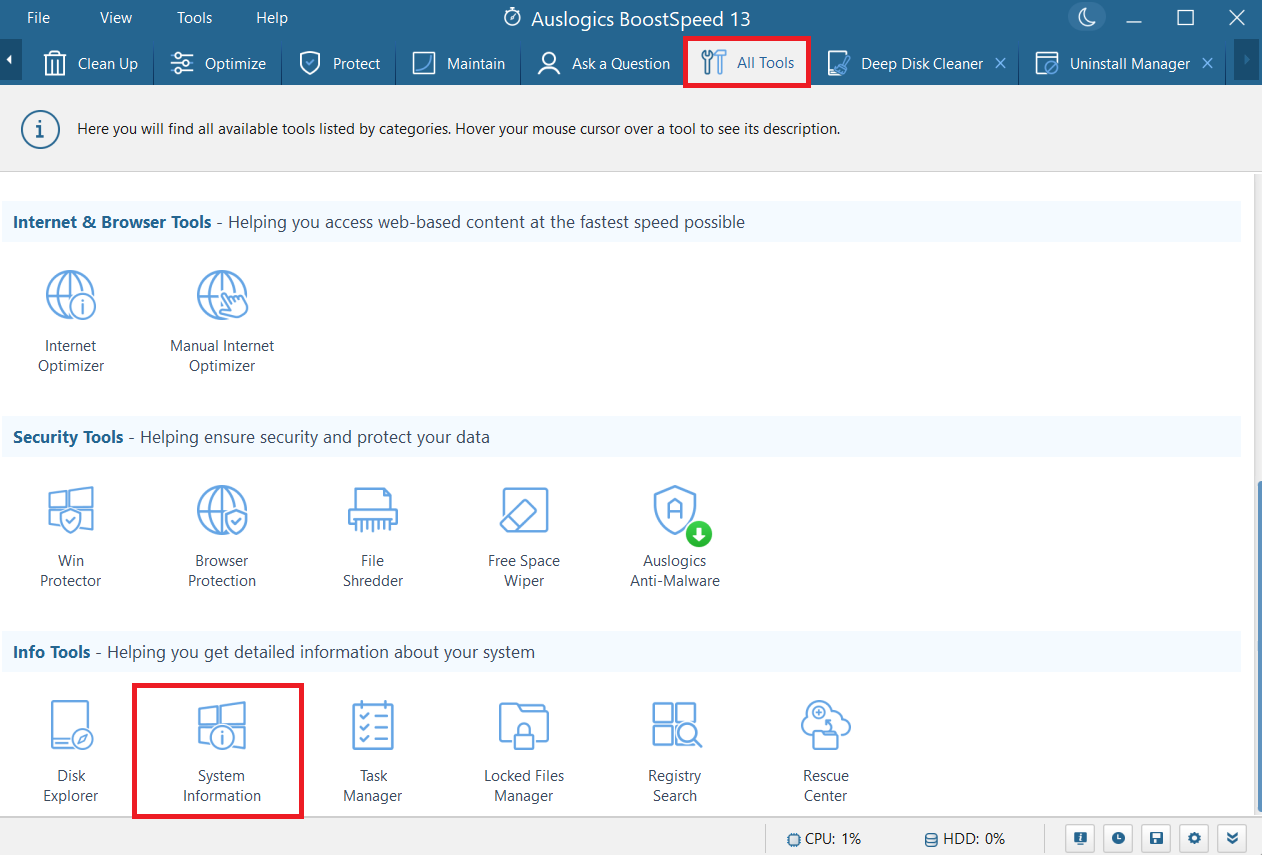
- That’s it. You should see everything you need to know about your PC, including your RAM.
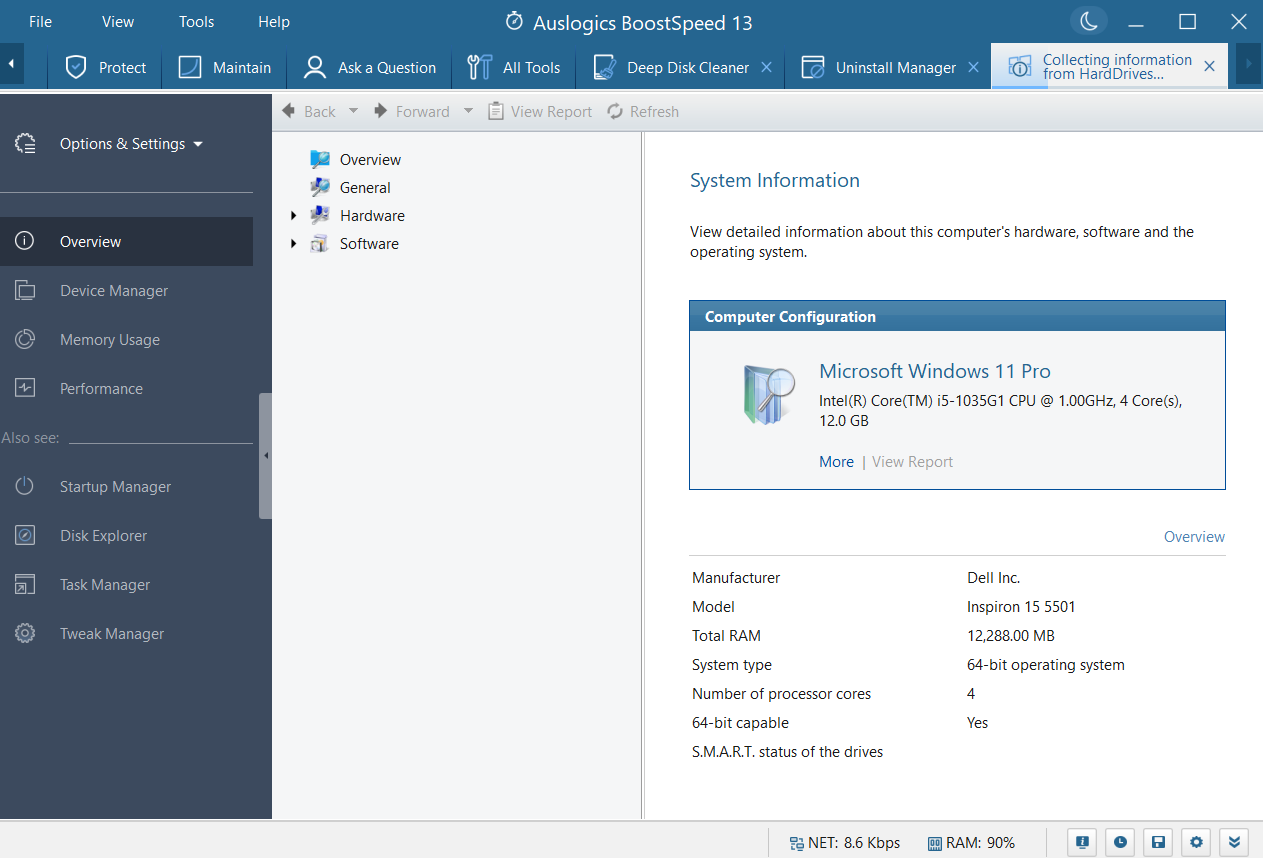
Besides monitoring your RAM usage, it helps you to understand where your memory is going and offers specific steps to reduce unnecessary utilization.
Method 3: Use System Information
Here’s how to find out how much RAM you have using System Information:
- Type
system informationinto your Windows search bar. Select it to open the app.
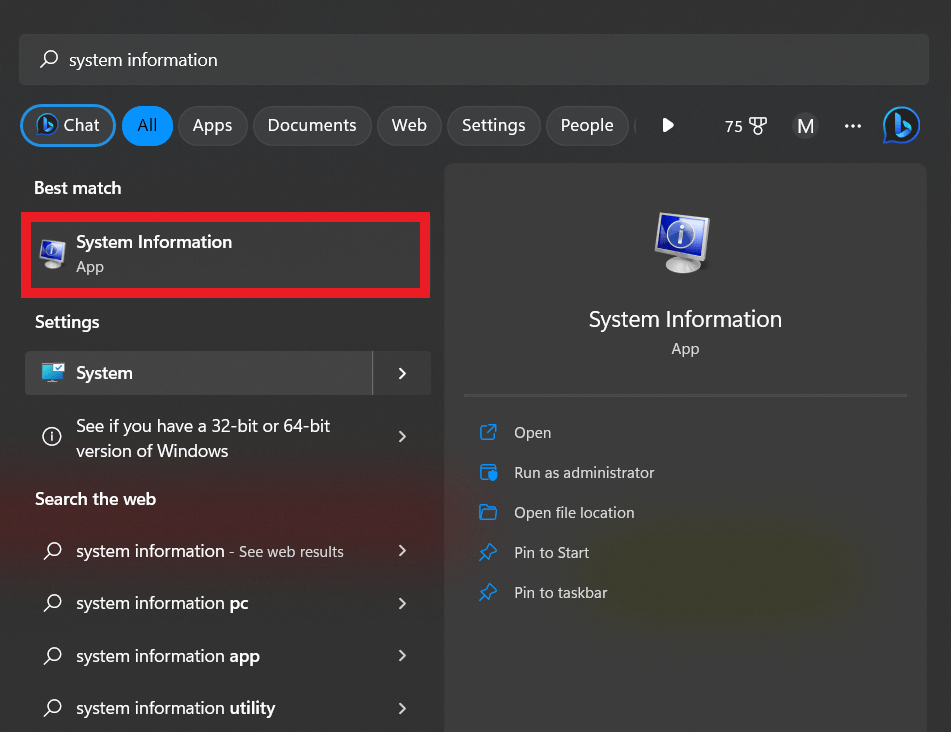
- You’ll instantly see all the memory details, including the total and available physical memory. You’ll even see how much virtual memory you have there.
Method 4: Use the Task Manager
Let’s go over how to check your RAM using the Task Manager:
- Press the
Ctrl + Shift + Esckeys at the same time to open the Task Manager. - Click Performance and select Memory on the window.
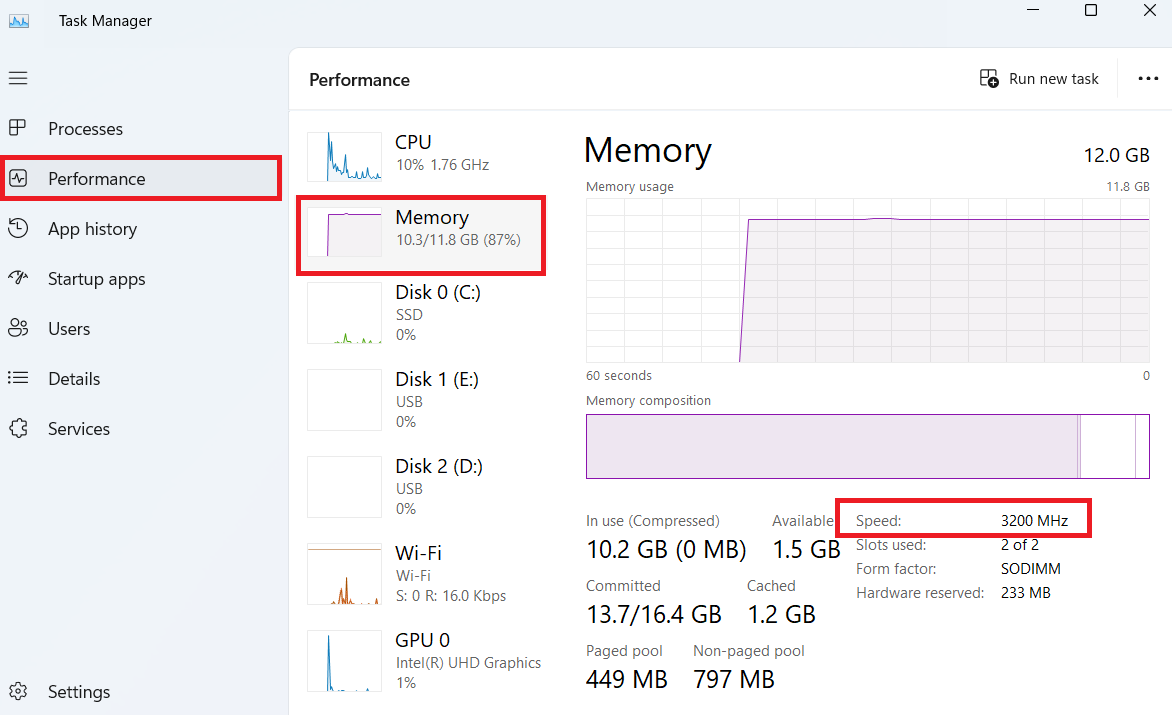
You’ll see details like the total amount of RAM on your computer, the form factor, and even the number of slots used. This can really be helpful when planning to upgrade your RAM.
Method 5: Use the Command Prompt
Follow the CMD prompts below if you want to know how to find out how much RAM you have:
- Press
Win + Rand typeCMDin the Run dialog box. Then, hitCtrl + Shift + Entersimultaneously to open the Command Prompt with admin rights. - Select Yes when you get a prompt by the UAC to proceed.
- Enter the following commands, depending on the information you want to see:
View the RAM manufacturer: wmic memorychip get devicelocator, manufacturer

Check the part number: wmic memorychip get devicelocator, partnumber

Verify the serial number: wmic memorychip get devicelocator, serialnumber

See the RAM capacity: wmic memorychip get devicelocator, capacity

Check total system memory capacity: systeminfo | findstr /C:“Total Physical Memory”
Determine the memory module speed: wmic memorychip get devicelocator, speed
Check the memory type: wmic memorychip get devicelocator, memorytype

Determine full memory details: wmic memorychip list full

These details are crucial when troubleshooting hardware and software-related issues and contacting technical support.
The System Information tool gives you more info on your memory modules if you want to change your memory or fix your slow PC, including other details like your motherboard and more.
How to Check RAM on macOS
Follow the steps below to check the RAM usage on Mac:
- Click Go in the Finder’s menu bar and select Utilities.
- Double-click on Activity Monitor.
- When the monitor opens, select the Memory tab.
- Here, you’ll see your computer’s memory. You can also see all the active processes and how much each program uses.
How to Check RAM: Explained
We’ve shown you how to find out how much RAM you have throughout this article. You can go through the methods and choose the one that works for you.
If there’s a step we didn’t cover, let us know in the comments below!
FAQ
Ctrl + Shift + Esc to open it, go to Performance, and click on Memory. You should see your RAM speed.


![[Complete Guide] How to Check How Much RAM You Have on Windows 10/11 and Mac](https://www.auslogics.com/en/articles/wp-content/uploads/2023/06/How-to-Check-How-Much-RAM-You-Have-on-Windows-1011-and-MAC-Complete-Guide.png)