Outlook stores data in cache temporarily for quicker access. But with time, this cache builds up, which can cause the software to slow down. It can also cause errors and synchronization problems.
The best way to fix the problem is to clear the Outlook cache. This guide will show you how to clear the cache in Outlook.
It’s a straightforward process which takes a few simple steps. Whether you want to improve Outlook’s performance or are experiencing issues, clearing the cache is a great place to start.
Let’s begin.
What Is Outlook Cache?
Outlook cache is a temporary storage space that the Outlook program uses to store information.
This includes data that Outlook retrieves from the mail server, such as email messages and attachments.
The cache’s primary function is to speed up access to frequently used data, which improves Outlook’s overall performance.
But, with time, the cache may fill up with a lot of data, leading to performance issues, synchronization problems, or errors.
Deleting these temporary files enables Outlook to rebuild the cache with current and relevant data.
Why Does Outlook Use Cache?
The main reason why Outlook uses cache is to give you instant access to your mailbox contents, regardless of whether you’re offline or have a slow internet connection.
The cache also helps users who travel frequently or work in places with poor internet connections to access their mailboxes.
Furthermore, the Outlook cache minimizes the number of requests delivered to the server, which can also help reduce network traffic.
With cache, Outlook only needs to synchronize changes made to the local copy of your mailbox with the server instead of downloading your whole mailbox every time you connect to the server.
Types of Data Stored in the Cache
Outlook’s cache holds different types of data to provide quicker access and better performance. Here are some of them:
1. Email messages
You can retrieve email messages and their attachments more quickly from the cache when you open your mailbox.
Also Read: How to Download All Emails from a Server in Outlook?
2. Calendar information
The cache also stores calendar events, appointments, and related information, giving you faster access to your schedule.
3. Contacts
Cached data contains names, email addresses, and other contact information you can quickly access when writing emails or setting up appointments.
4. Attachments
Emails with file attachments are cached to help you open and preview files faster.
5. Offline address book
Outlook keeps a cached copy of the offline address book to access contact details even when you’re not online.
6. Search index
Cached search indexes help make Outlook’s search functionality faster. This makes it easier to search for specific emails or items.
Signs it’s Time to Clear Outlook Cache
There are several signs that show it’s time to clear Outlook cache. Let’s go through them:
1. Slow Outlook performance
When you realize that Outlook is running slower than usual, it may be a sign that a large amount of data has been collected in the cache.
You can resolve the problem by learning how to clear Outlook cache to boost performance and increase response times.
Also Read: How to Fix “MS Outlook Not Responding” Issue
2. Error messages and glitches
Outlook error messages or unexpected malfunctions could be signs of problems with the cached data.
Clear the Outlook cache to resolve potential conflicts or corruption within the stored information.
3. High storage usage on devices
Your smartphone’s excessive storage consumption in Outlook may show that the cache has maxed out.
Clearing the Outlook cache can fix performance issues and free up storage space on your device.
Further Reading: How to Get More Storage on PC – Clean Up Your PC to Run Faster
How to Clear Cache in Outlook: Step-By-Step Guide
If you want to know how to clear Outlook cache, follow the steps below.
1. Backup important data
Before you clear Outlook cache, back up your data. This will prevent the loss of crucial information, such as important emails, contacts, or other relevant information.
Outlook has an export function that you can use to make a backup file. But they may be different depending on the version of Outlook you’re using.
Here’s how to back up your mailbox on the latest Outlook version released on January 2024:
- Open Outlook.
- Click the gear icon in the upper-right corner to open the Settings menu.

- Type “export mailbox” in the Settings window.
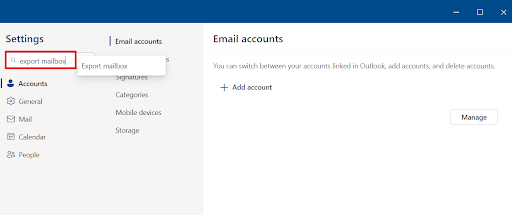
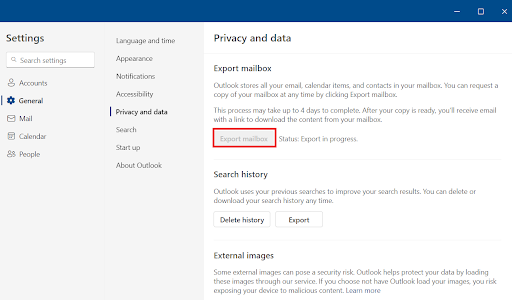
- Click “Export mailbox” to begin the process. Remember that the process can take up to four days to complete. You’ll receive a link to download it in your mailbox when it’s done.
Backing up from previous Outlook versions
Follow the steps to back up your files for previous versions:
- Open Outlook.
- Click the “File” button at the top left corner.
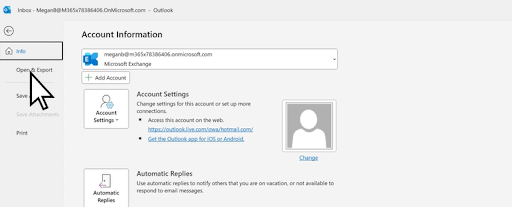
- Click “Open & Export.”
- Select “Import/Export.”
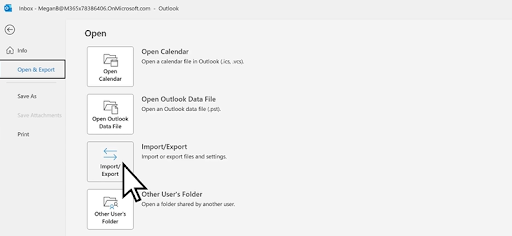
- Choose “Export to a file” and click “Next.”
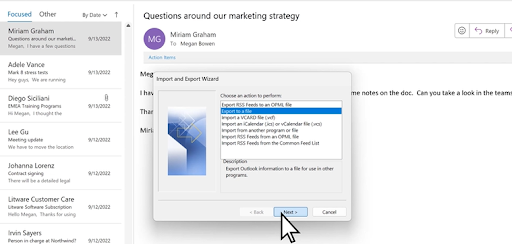
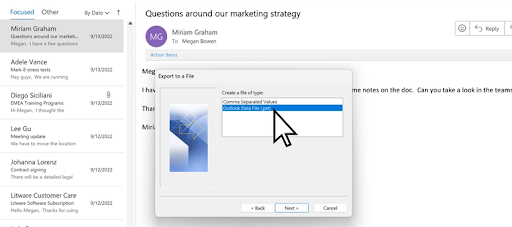
- Click “Outlook Data File (.pst)” and select “Next.”
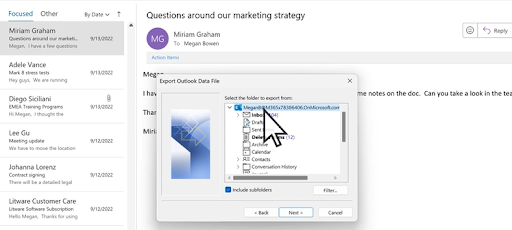
- Choose the folder you want to back up and select “Next.”
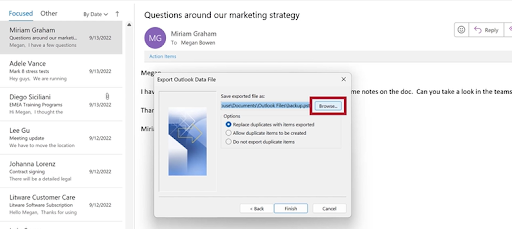
- Select the name and location to store the backup file and click “Finish.”
2. Locate and clear the cache files
The next step is to search for the cache, which is simple. Remember that this method is for Outlook’s current version.
- First, press “
Windows key + R” to open the Run dialog box. - Then, copy and paste “%localappdata%\Microsoft\Outlook” into the field and press “Enter.”
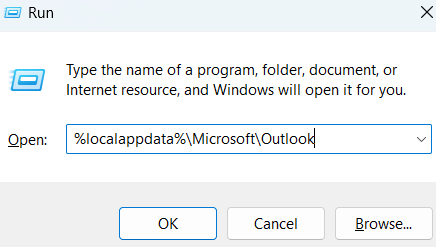
- Search for the “RoamCache” folder to view all the cache files.
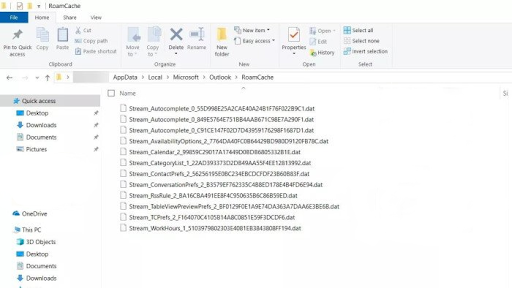
- Select all files, right-click, and select the “Delete” option.
How to clear Outlook cache on previous versions
Here’s how to clear cache in Outlook for previous versions:
- Open Outlook on your PC.
- Select “File” in the upper left corner of the Outlook window.
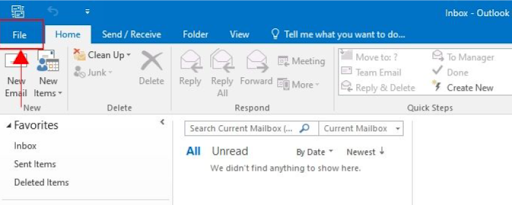
- Click “Options” on the left side of your screen.
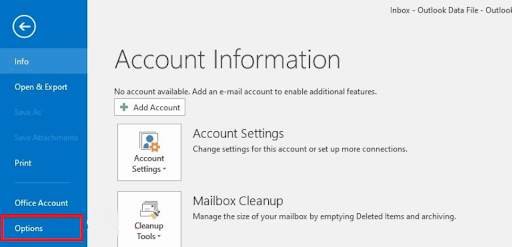
- Click on “Mail” on the left side of your screen.

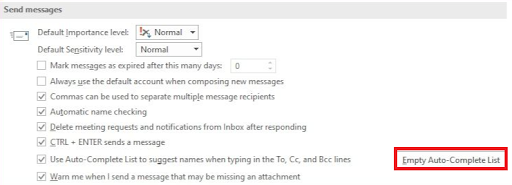
- Scroll to the “Send messages” section and select “Empty Auto-Complete List.”
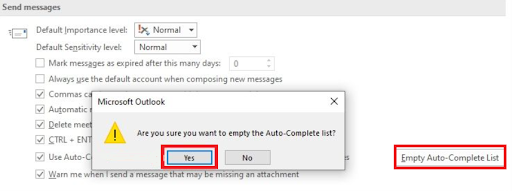
- A confirmation box will appear. Click “Yes” to clear the Outlook cache.
Conclusion
Throughout this guide, we’ve discussed how crucial it is to clear the Outlook cache. We’ve discussed why Outlook uses cache, the types of data it stores, and the step-by-step process to back up and clear the cache.
Did you face any challenges clearing your cache? What was your experience? Share your thoughts or questions in the comments below! And don’t forget to rate the article!
Further Reading: How to View and Clear DNS Cache on Windows 10/11?


