

You’re not alone if you’ve been experiencing a high Windows Shell Experience Host CPU usage, since many users have been complaining about the problem.
Issues with system files, graphics drivers, conflicting software, desktop backgrounds, etc., could be a reason for a high ShellExperienceHost.exe CPU usage.
Regardless of the cause, we’ll show you how to fix the problem.
Keep reading!
What Is Windows Shell Experience Host
The Windows Shell Experience Host, also known as ShellExperienceHost.exe, is the Windows component responsible for the window display feature of universal Windows applications.
It is the component of the Windows shell (basically, the graphical user interface on Windows) that specifically handles universal apps.
The Windows Shell Experience Host process handles universal app interface behavior concerning elements like the taskbar, Start menu transparency, calendar, clock, background behavior, etc.
The process debuted in the OS with the launch of Windows 10. Over the years, it has been tweaked and refined with each new build of Windows 10, but its core functions remain the same.
Issues with Windows Shell Experience Host
If the ShellExperienceHost.exe process has been using more CPU resources than it should, you may wonder why.
After all, it is one of the least power-hungry system processes around. There are several reasons why the CPU usage of ShellExperienceHost.exe has spiked (if it has).
If you monitor the Windows Shell Experience Host process in Task Manager, you may notice sudden memory and CPU usage jumps whenever a desktop element changes.
However, this shouldn’t be enough to make the process consistently use above the expected processor usage rate.
Potential malicious activity
There is another, often overlooked, potential reason for ShellExperienceHost.exe’s spike in CPU usage: it is not the real Shell Experience Host process.
It is possible to mistake a rogue executable for the real ShellExperienceHost.exe.
For example, cybercriminals have been known to use the trojan miners ShellExperienceHost.exe & MicrosoftShellHost.exe to mine for the Monero cryptocurrency using victims’ CPUs.
Search for the ShellExperienceHost.exe causing high CPU usage’s location to determine whether it is malware.
Here’s the location’s path:
C:\Windows\SystemApps\ShellExperienceHost_cw5n1h2txyewy
Right-click the process in Task Manager and select Open file location from the context menu. If Windows Explorer opens to the location above, you can rest easy, as the executable isn’t malicious.
3. Issues with system files
Another potential reason for the problem is damaged or corrupted system files.
4. Problems with the graphics driver
Issues with a Windows Shell Experience Host high CPU usage may also come from corrupted or outdated drivers. Whichever it is, it poses a risk to your computer, and this tutorial will outline the best course of action.
5. Updates for the operating system
Although generally helpful, there are occasions when an update could bring about a bug that causes the Windows Shell Experience Host to use a lot of CPU power.
6. Software in conflict
Software conflicts are usually caused by third-party tools that might not be compatible with your system or some programs on your computer.
How to Fix Windows Shell Experience Host High CPU Usage
If you are having a “Windows Shell Experience Host suspended” issue, use the methods discussed below to resolve the problem:
Method 1: Update your operating system
Being on the latest version of Windows can help solve many bugs and glitches in earlier versions.
So, make sure that you have installed all available OS updates. Some minor updates contain bug fixes and patches for system errors, like ShellExperienceHost.exe, which has a high CPU usage issue.
Here’s how to check for updates for your OS:
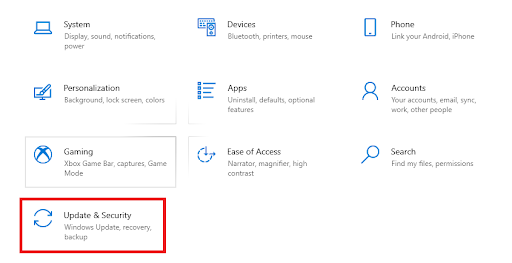
- Right-click the Start menu icon and select “Settings” to launch the Settings app.
- On the main Settings screen, select “Update & Security.”
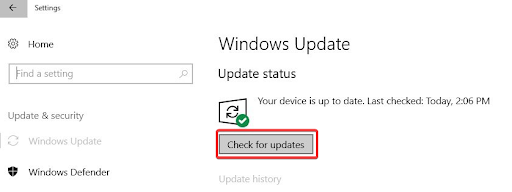
- Switch to the Windows Update tab on the Update & Security screen and click the “Check for updates” button.
- The OS will check the Windows Update servers and download any available updates.
When the updates have been downloaded, you can reboot your system to start installing them or schedule the reboot for later.
With the latest OS installed, ShellExperienceHost.exe and other system processes should no longer use more than the expected CPU percentage.
Related: How to Manually Check and Install Windows Updates
Method 2: Turn off automated accent colors
The Shell Experience Host process makes visual changes to your desktop and its background.
The more changes are made on the desktop, the more work the process has to do and the more CPU it uses.
This may be the cause of Shell Experience Host’s high CPU usage on PCs whose desktop background is a slideshow.
Since the background changes every few minutes, the Shell Experience Host is regularly called upon.
In addition, your PC picks a new accent color by default to match the new background image, which makes the process even more complicated.
Try turning off automatic accent colors to lessen the CPU consumption of ShellExperienceHost.exe.
Here’s how to do it:
- Press
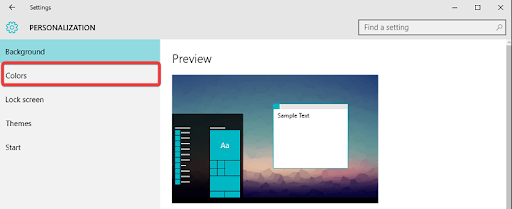
Windows + Ito open the Settings window. - On the main Settings screen, select “Personalization.”
- Then, switch to the “Colors” tab.
- Scroll down the Colors tab to the “Choose your accent color” section.
- Untick the “Automatically pick an accent color from my background” checkbox.

Exit the Settings app and check the CPU usage of ShellExperienceHost.exe in Task Manager after a few minutes.
Your issue has been fixed if the Shell Experience Host process now uses a moderate to low CPU percentage.
However, if the CPU usage by ShellExperienceHost.exe keeps jumping, try the next solution.
Also read: How to Create Custom Themes in Windows
Method 3: Disable slideshow background
If turning off automatic accent colors doesn’t help, changing your background style altogether may yield a better result.
You can switch the slideshow style to a solid color or choose a static picture instead. Since either alternative is fixed, the Windows Shell Experience Host will have less work to do, and this can stop the high CPU usage.
- Right-click the Start Menu icon and select Settings to launch the Settings app.
- On the main Settings screen, select “Personalization.”
- On the Personalization screen, stay on the Background tab.
- Click the downward arrow button under the Background section in the right pane,
- Select “Solid color” or “Picture.”
Like before, exit the Settings app and check the CPU usage of ShellExperienceHost.exe in Task Manager after a few minutes.
Your issue has been fixed if the Shell Experience Host process now uses a moderate to low CPU percentage.
Also read: Best Photo Slideshow Software with Music
Method 4: Run an SFC scan
If the methods above haven’t helped, you can run a System File Checker scan in a command-line window to resolve the issue of ShellExperienceHost.exe’s high CPU usage.
The SFC utility is built into Windows and can repair system files. Since the Shell Experience Host is a system component, the usage jumps could result from problems with related system files.
Hence, you can use the SFC tool to find and fix system file errors. Follow the steps below to do so.
- Right-click the Start menu and select Command Prompt (Admin) or PowerShell (Admin). Which option you see depends on your Windows 10 build.
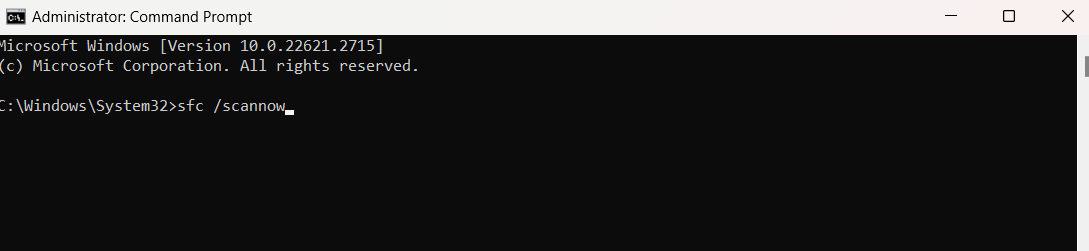
- In the command-line window, type
sfc /scannowand hit Enter to begin the scan.
When the scan is done, reboot the computer. The SFC tool is good at finding and fixing corrupt system files.
However, if this solution doesn’t stop ShellExperienceHost.exe from displaying a usage jump, you can still try a few possible fixes.
Method 5: Set CPU usage limit for ShellExperienceHost.exe
Task Manager is much more than a simple process overview table. You can use it to perform specialized tweaks, such as setting CPU usage limits for processes that consume much processor power.
So, if other methods have failed to stop the Windows Shell Experience Host from slowing down the system through abnormal CPU usage, this method is an option.
When you limit a process’s CPU usage, it cannot use more than the percentage of processor power you have stipulated. This will free up processor power for other programs that need it.
Here’s how to limit the CPU usage for ShellExperienceHost.exe:
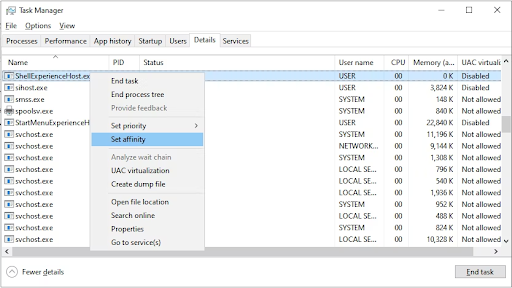
- Open Task Manager. Right-click the Start menu and select Task Manager.
- Click the “Details” tab.
- Scroll down the list to the ShellExperienceHost.exe process.
- Right-click the process and select “Set affinity.”
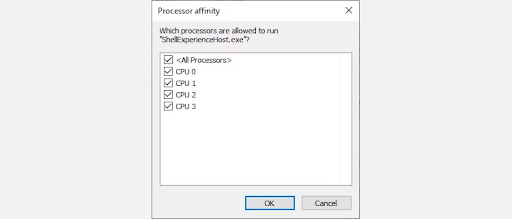
- Under “Which processors are allowed to run ShellExperienceHost.exe?” set your processor affinity to one or two processor cores.
Method 6: Use a PC optimizer
Windows is a collection of programs and processes that run in the background. It is no big surprise that some of these programs occasionally conflict.
Unfortunately, some processes are critical to Windows’s operation.
If a third-party program conflicts with a system component like the Windows Shell Experience Host, the PC can experience various issues.
The bad news is that you can’t always stop conflicts between native and installed third-party programs.
The good news is that a tool like Auslogics BoostSpeed can help you resolve conflicts between files and programs on your PC.
You can use it to resolve system issues, boost PC performance, tweak memory allocation, and make many other computer-enhancing changes.
Related: Speed Up Slow Computer: Auslogics BoostSpeed 13
Method 7: Boot Windows in a clean environment
To manually determine whether any programs conflict with the Shell Experience Host process, boot Windows in a clean environment and check whether the CPU usage of Shell Experience Host becomes stable.
A clean boot disables third-party drivers and startup items and boots Windows, mostly with Microsoft services and startups.
This helps you to safely troubleshoot your issues without the risk that a third-party app will interfere.
To clean boot Windows, follow these steps:
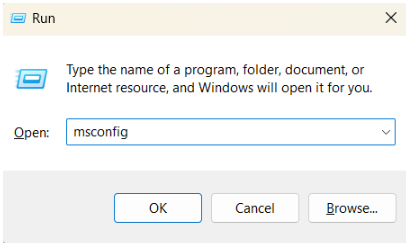
- Press
Win key + Rto open the Run box. - Type
msconfigand click “OK.”
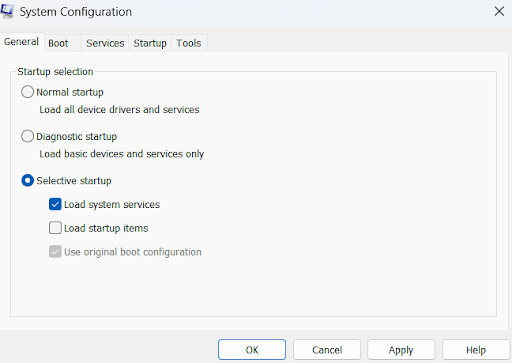
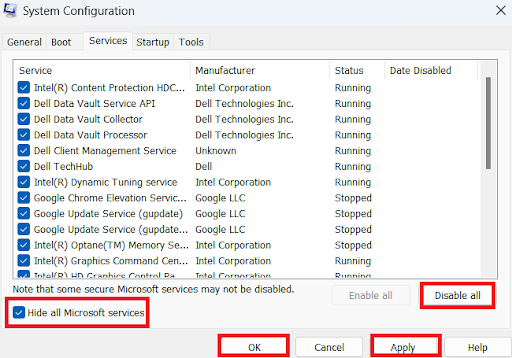
- In the System Configuration dialog, select the “General” tab.
- Under Startup selection, choose “Selective startup.”
- Make sure the boxes next to “Load system services” and “Use original boot configuration” are ticked.
- Untick the “Load startup items” checkbox.
- Switch to the Services tab and tick the “Hide all Microsoft services” checkbox.
- Click the “Disable all” button near the bottom right to disable all third-party services.
- Click the “Apply” button, then the “OK” button to save the changes.
Restart the computer. It will boot into a clean environment.
Check how the Windows Shell Experience Host behaves during a clean boot. If the CPU usage is minimal, one of the disabled services, drivers, or startup items might conflict with the Shell Experience Host process.
You can narrow down the conflicting third-party items by returning to System Configuration, enabling half of the disabled services, and rebooting the machine.
Keep doing this until you’ve found the driver, startup item, or service causing the spike in CPU usage by ShellExperienceHost.exe.
Windows Shell Experience Host: Explained
The Windows Shell Experience Host process is a critical component of Windows. Hence, you should never attempt to delete or disable it unless you’re okay with using your PC through a command-line window 100% of the time.
However, you can temporarily end ShellExperienceHost.exe to stop CPU usage spikes. Windows will restart the process in a few moments, so there’s no need to worry.
Open Task Manager and navigate to the ShellExperienceHost.exe process. Right-click the process and select End task.
Your PC’s desktop will likely go blank. Wait for a few moments, and the UI elements will reappear.
We hope this article has helped you fix the high CPU usage of the Windows Shell Experience Host. Tell us in the comments below about the solution that worked for you!