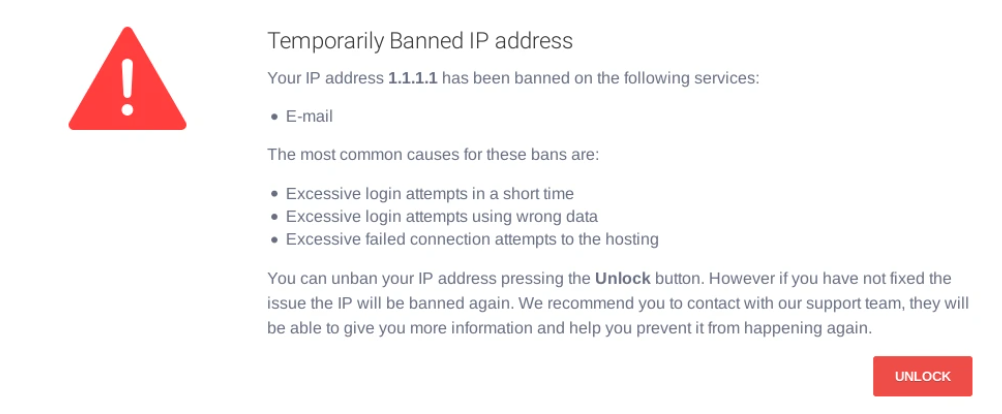
The message “Your IP has been temporarily blocked” means that the website or service you are trying to access has temporarily restricted your IP address. While the block protects websites from spam, attacks, or abuse, it can also unintentionally affect legitimate users. This guide will explain the most common reasons why websites or services block IP addresses and provide you with the fastest and most reliable methods to regain access. First, what does “IP banned” mean ?
If you violated the terms of the website or service, these methods may not work. Skip to the last point and contact the website to see if they can lift the ban.
What Does an IP Ban Mean?
IP blocking prevents devices (such as laptops and phones) and larger platforms (like servers) from accessing a network, website, or service. It is a security mechanism that blocks access to specific devices or geographic areas to stop threats, spam, and rule violations.
Websites have their own rules that users must follow to access them. If a website thinks your actions are unsafe or inappropriate, it can block your IP address and show a message like “Your IP has been temporarily blocked.”
For instance, some websites might block your IP address if you have multiple accounts registered under the same IP address. Also, entering the wrong login details too many times can result in your IP address being blocked.
What is an IP address?
An IP address is a special number made up of digits and dots (something like 123.456.7.89) that identifies devices (computers, smartphones) on the Internet. They are generated mathematically and distributed by the
Internet Assigned Numbers Authority (IANA). It works like a digital home address, making sure information reaches the right device. Devices use IP addresses to send and receive data online.
We will explain all the various ways you can get blocked later in the article.
How Does an IP Address Get Blocked?
An IP address gets blocked through a series of steps that involve detecting suspicious activity, evaluating the threat, and enforcing security measures.
IDS or WAF watch for incoming traffic
The process typically starts with security systems such as intrusion detection systems (IDS) or web application firewalls (WAF) monitoring incoming traffic. If an IP address triggers predefined security rules, like exceeding login limits or attempting unauthorized access, the system may automatically block the address.
How the IDS and WAF work
An IDS watches network traffic or computer activities to spot anything suspicious. It sends alerts if it finds a threat but does not stop it because its primary purpose is to provide visibility and alert administrators so they can investigate immediately. A WAF, on the other hand, protects websites by blocking harmful traffic. Unlike the IDS, it stops attacks like hacking attempts and harmful code from reaching the website.
Types of IP blocking
Once an IP address is flagged by any of these, the IP blocking can either be a temporary or permanent denial of access. Temporary blocksAutomated systems can impose time-based bans, where the block expires after a certain period. This may apply to minor threats like temporary spikes in traffic or accidental policy violations. Permanent blocksMore serious threats like repeated hacking attempts or distributed denial-of-service (DDoS) attacks may lead to permanent bans. In certain situations, network administrators do not rely solely on automated systems to block IP addresses. Instead, they personally check activity logs and reports that contain records of network traffic to verify whether an IP address is truly involved in suspicious or harmful behavior. Now that you know how it happens, let’s show you why this can happen.
Why Has My IP Address Been Temporarily Blocked?
An IP address can be temporarily blocked for several reasons, including conflicts with firewalls, too many failed login attempts, suspicious actions, restrictive locations, or violating rules. Here’s how:
This article specifically covers temporary IP address blocks. We do not address permanent blocks or bans. If your IP has been permanently blocked, you may need to contact the service provider or administrator for further assistance.
Owning a website is like having a property, you have all the right to protect your possession from security threats. So, if a website owner notices anything suspicious from your device, they can block you to prevent further damage to their website.
The list of things that count as suspicious will depend on the website and their terms of service. However, in most cases, the following activities are suspicious and will likely get your IP banned on most websites:
- Repeatedly trying to hack into a website
- Trying to access other users’ accounts without permission
- Engaging in scams, phishing , or other fraudulent activity
- Making fake purchases online
- Stealing someone’s identity
- Spreading harmful content online
Spamming means sending messages to people that do not want your messages. It also includes posting irrelevant or unsolicited content on social media for the purpose of advertising or phishing. So, if a computer on your network keeps sending hundreds of promotional emails to random people, email providers might ban your IP. They do this to stop the spam and ensure other users receive only relevant messages.
Your computer could have a virus or other
malicious software that is searching the website for weak spots, like open doors (called ports). These weak spots could allow attackers to get into the website or network. In such cases, the website might block your IP to protect itself.
Your
firewall settings can interfere with DNS settings or send frequent connection requests that trigger website security measures. They may alter DNS settings to block malicious websites or enforce content restrictions. On the other hand, frequent connection requests, like keep-alive signals, are often sent to maintain stable network connections. However, these actions can unintentionally appear suspicious to websites, leading to temporary IP blocks.
A DDoS attack happens when many computers or devices flood a website or server with too much traffic. This causes the website to crash or become unavailable. To protect the website or server, the system might block (ban) the IP addresses involved in the attack to stop the flood of requests and restore normal service.
Due to legal restrictions, some websites cannot share all of their content in all countries. To avoid lawsuits, they block the IP addresses of people in some places. For example, gambling is not legal in many countries. As such, websites that offer these services typically block people if they are located in countries where they are not licensed. Streaming platforms also use this method.
Getting error messages like “403 Forbidden” or
“503 Service Unavailable” can also get you an IP ban. The “403 Forbidden” error, for instance, indicates you are trying to access a page that you don’t have access to. The error 503 , on the other hand, shows that the server is temporarily unable to handle your request. Trying to get past these errors could be seen as a potential attack, so the website may block you.
Too many failed login attempts
Similarly, trying to log in with the wrong details can get your IP banned. Even though you legitimately forgot your details, trying to gain access repeatedly with wrong details would seem like a brute-force attack.
A brute-force attack is when hackers systematically try all possible combinations of passwords or encryption keys until the correct one is found. To prevent such unauthorized access, many websites block the IP address after multiple failed attempts.
Violating terms of service
Every website or online service has rules about how users should behave called the terms of service. If your IP address is used in ways that go against those rules, it can result in a ban.
For instance, if a video streaming service allows only personal use and someone used your IP to stream content to many people for profit, the service might block that IP for breaking their rules. Some other common activities that might break terms of service include:
- Owning multiple accounts
- Sharing or downloading copyrighted content without permission
- Using VPN
Most of these bans usually occur automatically because of the rules and restrictions. In many cases, they are temporary restrictions and should be lifted in a few hours or days. However, if you can’t wait that long or it doesn’t correct itself in a couple of hours or days, use the solutions discussed in the next section.
How to Unblock Your IP Address?
You can’t directly change the status of your IP block. However, you can try making specific changes to fix the problem. Let’s find out some alternatives to the IP unblock:
Method 1: Check for malware
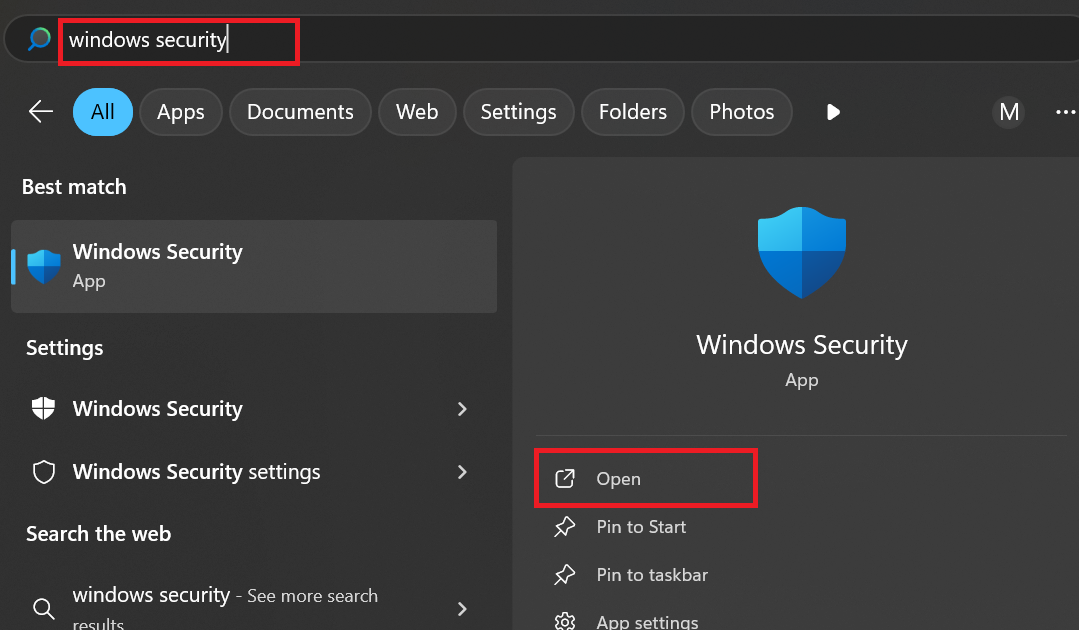
It’s crucial to regularly scan your computer for malware , especially if you are getting frequent temporary bans. Hackers may use your infected system to send spam or carry out denial-of-service attacks. So, check your system to be sure it’s not a malware problem. You can use Windows Security to scan for malware by following these steps: Step 1: Click the Start menu and type Windows Security , then select it from the results.
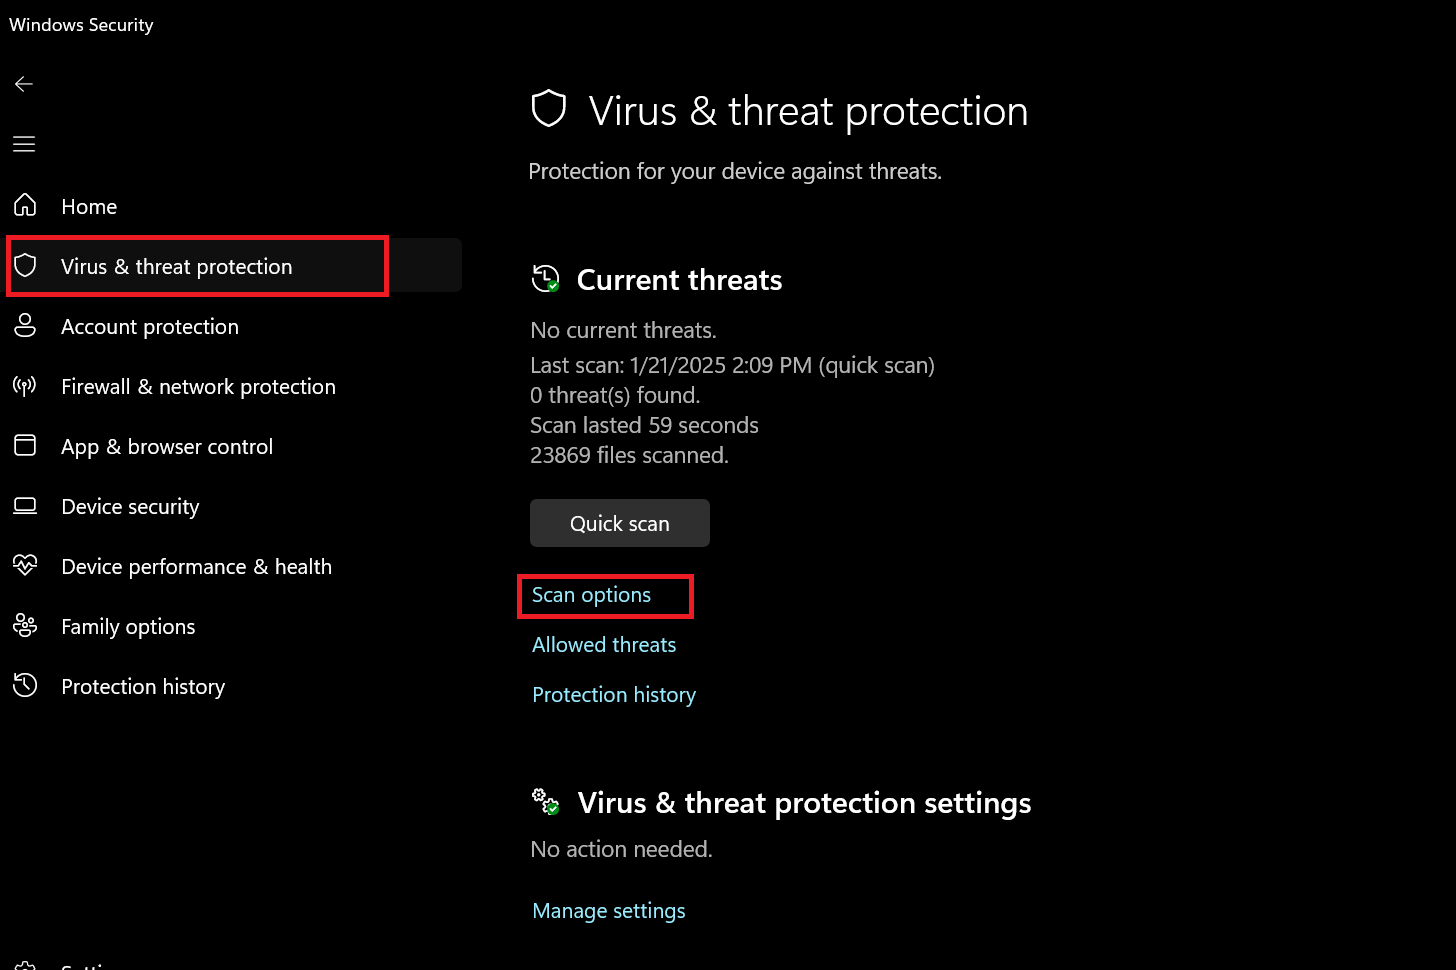
Step 2: In the Windows Security window, click on Virus & threat protection. Next, click Scan options under the Virus & threat protection section.
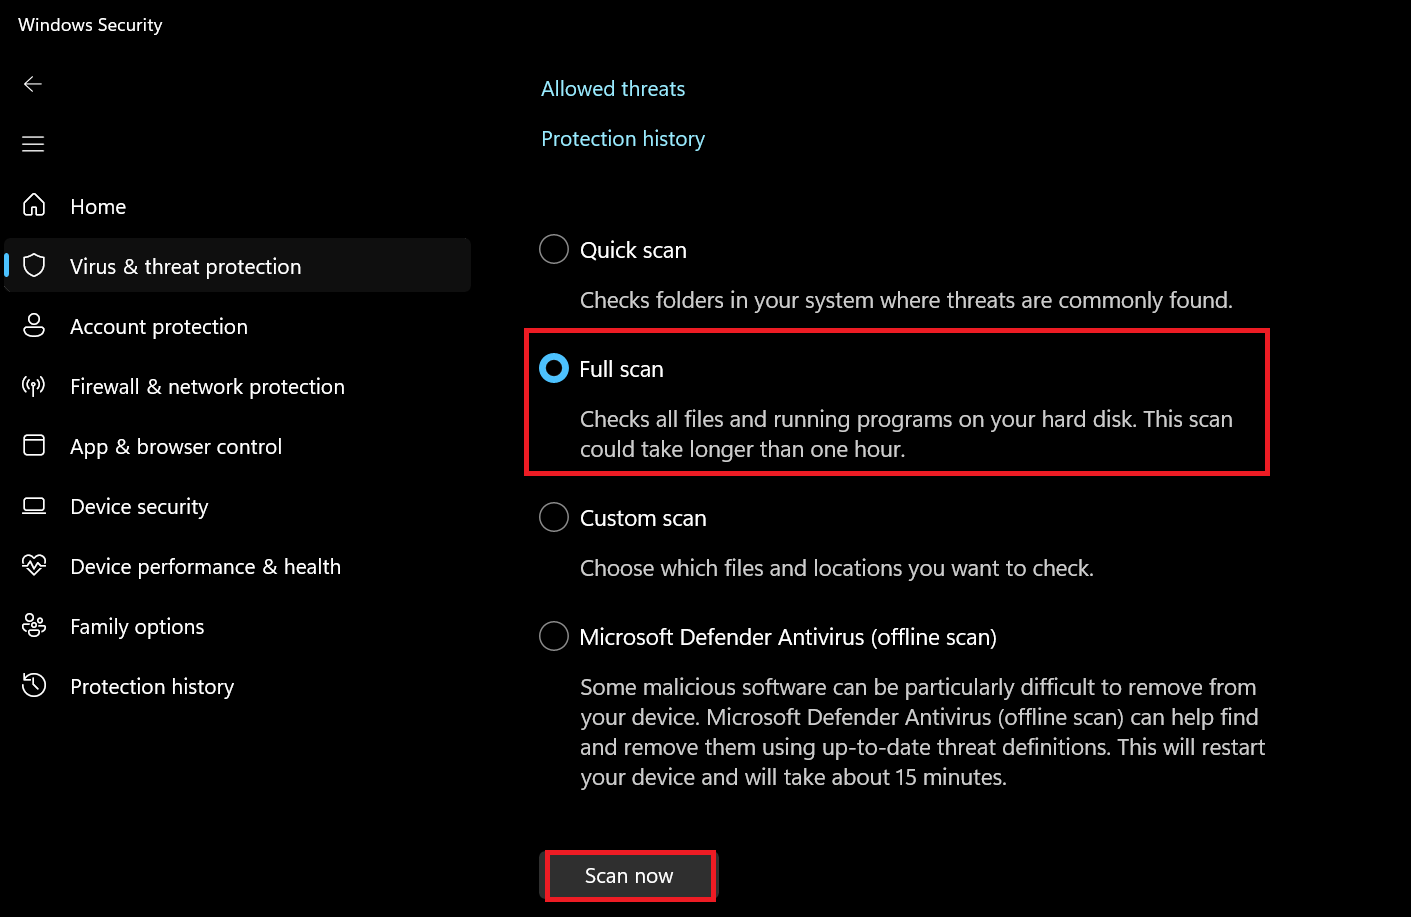
Step 3: Select Full scan and click Scan now .
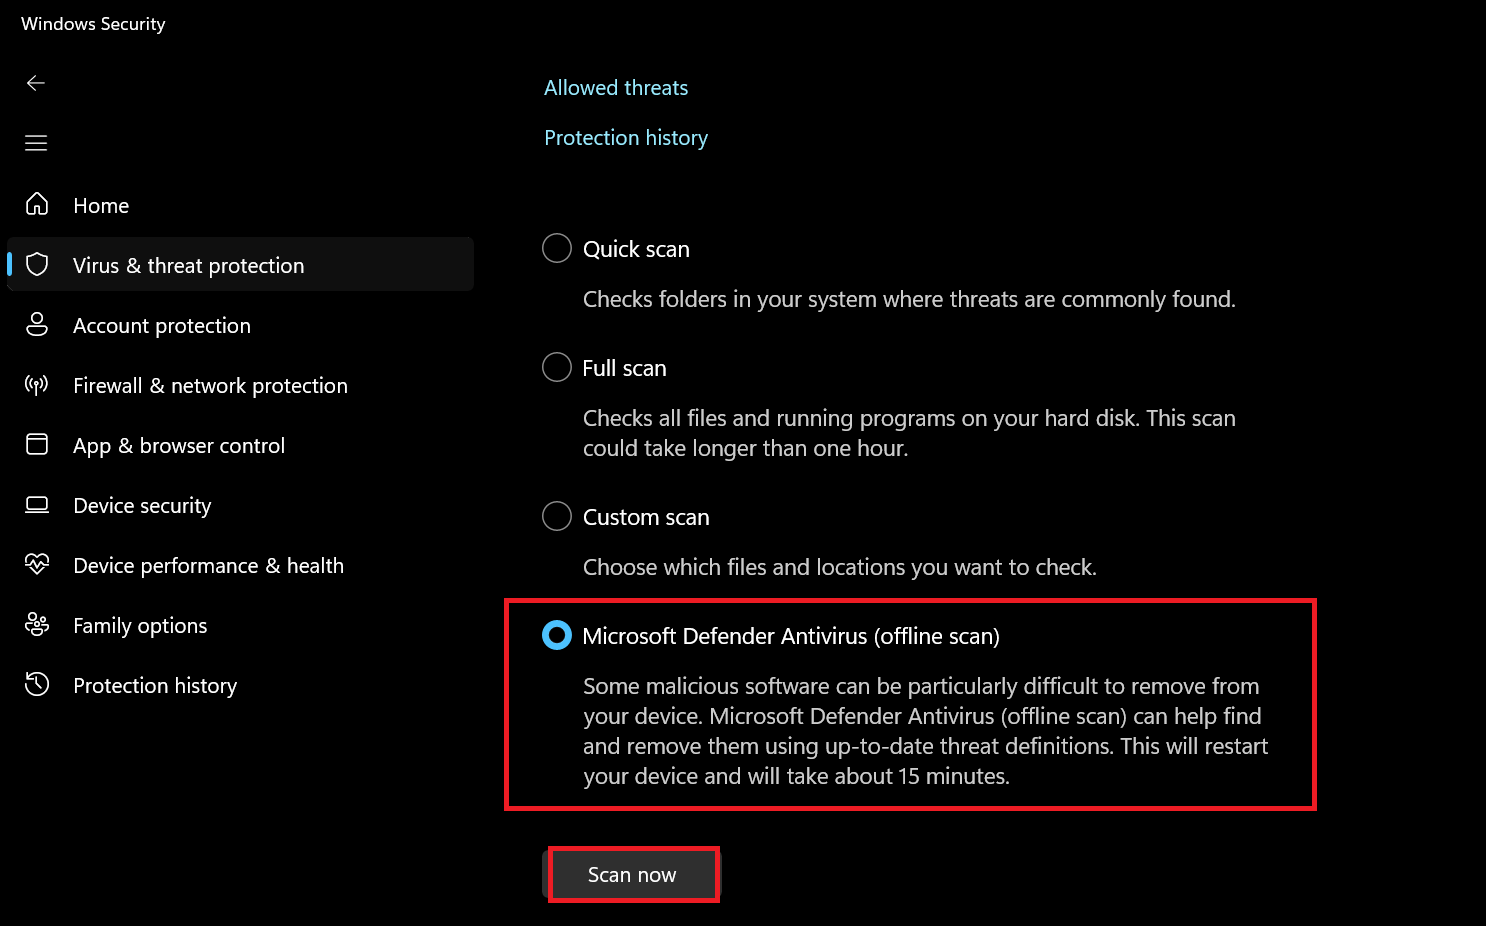
Step 4: (Optional) If the full scan does not find threats, you could take a step further and choose Microsoft Defender Antivirus (offline scan) . Your computer will restart and scan for hidden threats before Windows boots.
After the scan completes, Windows Security will display detected threats. If threats are found, follow the recommended actions such as Remove or Quarantine.
PRO TIP
Even with a Microsoft Defender Antivirus offline scan, your Windows PC may not find malware. Advanced threats, like rootkits and fileless malware, can hide deep within the system, disguising themselves as legitimate processes or residing in memory.
To deal with such threats, use trustworthy anti-malware programs like Auslogics Anti-Malware alongside your primary antivirus to detect and delete hard-to-reach malware, spyware, and viruses.
Method 2: Make sure your IP address is not blacklisted
Your IP address may be on a blacklist if you see an IP blocked error on a well-known website. Several websites block suspicious IP addresses to prevent spam.
Here’s what you do:
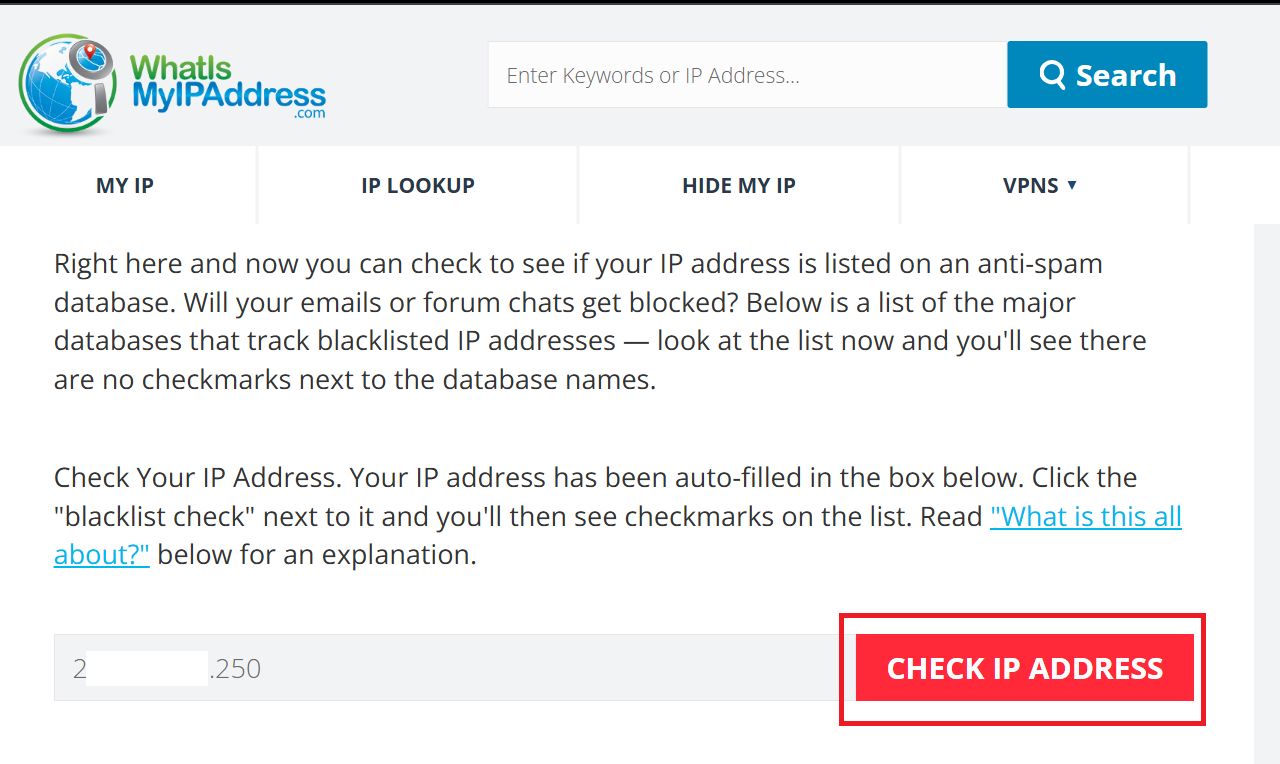
- Visit the website WhatIsMyIPAddress.com .
- The page automatically detects your IPv4 address. Copy it.
- Now, go to the Blacklist Check page, paste your IP address in the field below, and click Check IP Address.
If your ISP provides you with a static IP or your PC is connected directly to the internet (without a router or NAT), you can manually check via the Command Prompt. To do this, open the Start menu, type
cmd, and hit
Enter.
In the Command Prompt window, type ipconfig and hit Enter. Look for IPv4 Address under your active network connection to find your IP address.
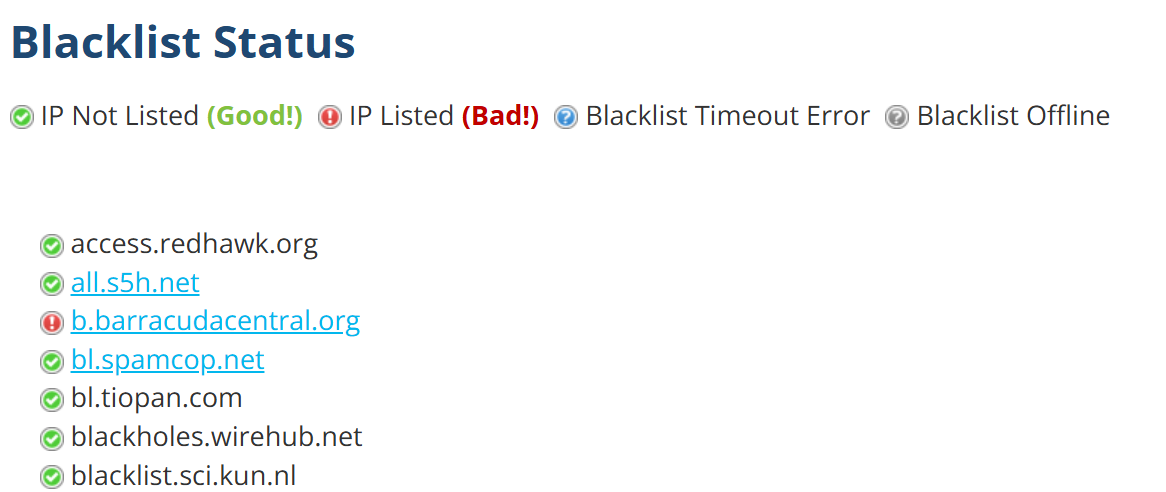
The website will then show you a list of 80 anti-spam databases and your IP status on each. A green checkmark indicates your IP is not blocked in a database, while a red exclamation sign (!) means your IP has been banned .
To remove your IP from a blacklist, click on it and then follow the process indicated by the website. You may need to send an email explaining the issue and requesting removal or take steps to resolve the problem, such as changing your passwords, to avoid further issues.
Method 3: Change your IP address by restarting your router
Whenever you connect to the internet, you get a different dynamic IP address unless your ISP assigns you a permanent public IP address. This is not a problem except if the IP you were assigned was previously used for suspicious activity by someone else. Such an IP might already be facing blocks or restrictions. Restarting your router or modem can get you a new, unbanned IP address, which might solve the problem. Here’s how to do it:
- Use the power button to turn off your router and modem. If there are no specific buttons, unplug them from the power source and leave them off for at least ten seconds.
- Turn your modem and router back on.
- Open a web browser on your computer and try to access the restricted site again.
Method 4: Turn your VPN on or off
If you’re using a VPN , the IP address that your VPN service provides may be restricted, which can block access to some websites. Some websites also do not allow users to use VPNs. They do this by detecting the IP addresses associated with VPN servers, which are often shared by many users. Some websites also use more advanced methods like deep packet inspection to identify VPN traffic. Here’s how to fix this: Switch off VPNBefore visiting the website, turn off any VPNs you may be using. If the VPN’s IP address is causing the block, this might help. Turn on VPNIf you don’t currently use a VPN but have access to one, switch it on before visiting the restricted website. You can use both premium and free VPN services. When you turn on your VPN, your computer will get a new IP address. This may help you access websites that have blocked your original IP address.
Method 5: Connect to another Wi-Fi network
Connecting to a different Wi-Fi network is another alternative. By changing your network, you’ll receive a new IP address. If there are no Wi-Fi networks around you, you can connect to your phone’s hotspot . Turn on cellular data on the phone and then turn on the hotspot. You might be able to access the website that blocked you again when you switch to a different network.
Method 6: Disable the firewall temporarily
If you are still getting the error, you could disable your firewall temporarily to determine if it’s causing the problem.
Follow these steps to disable it temporarily:
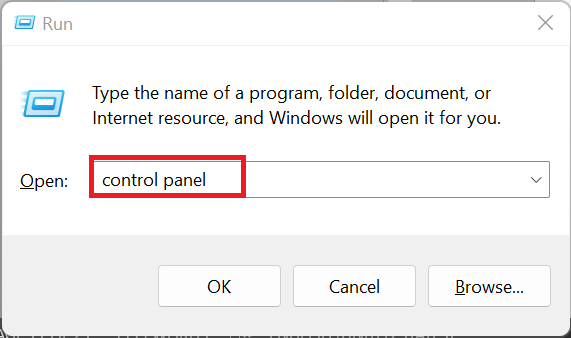
Step 1: Press Win + R , type control panel, and press Enter .
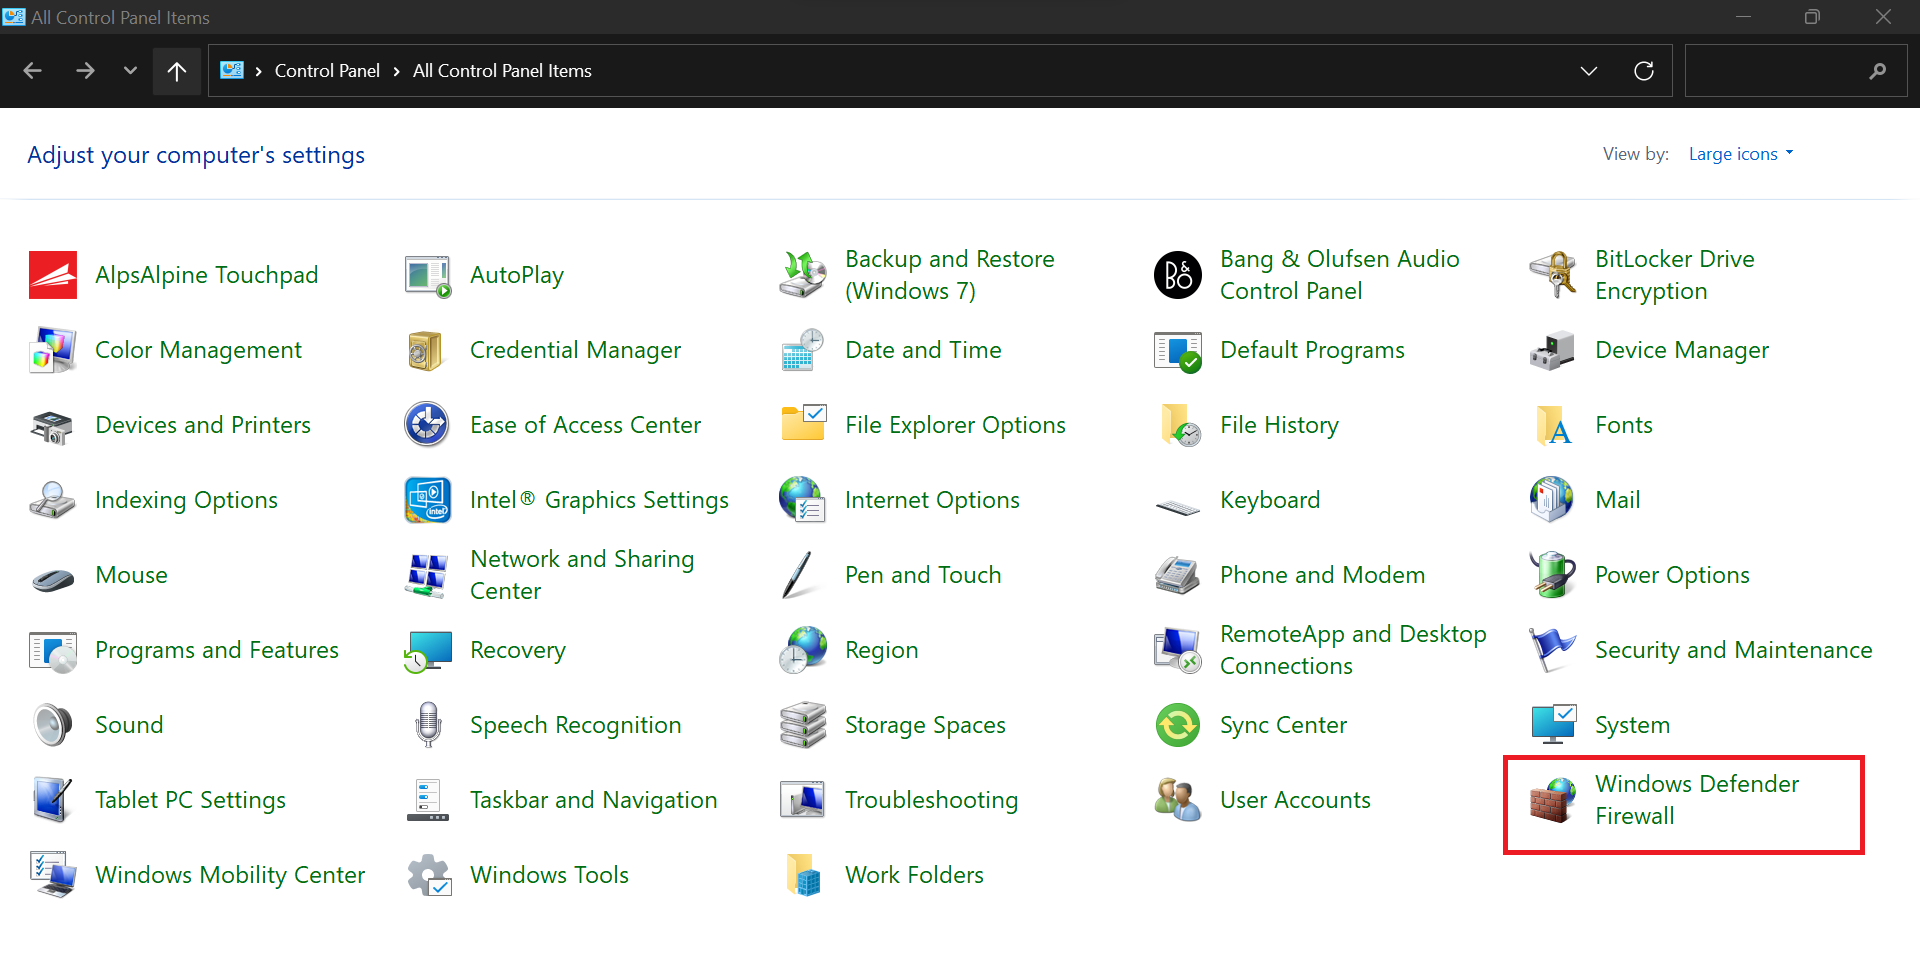
Step 2: Click on Windows Defender Firewall (if View by is set to Category, click System and Security > Windows Defender Firewall) .
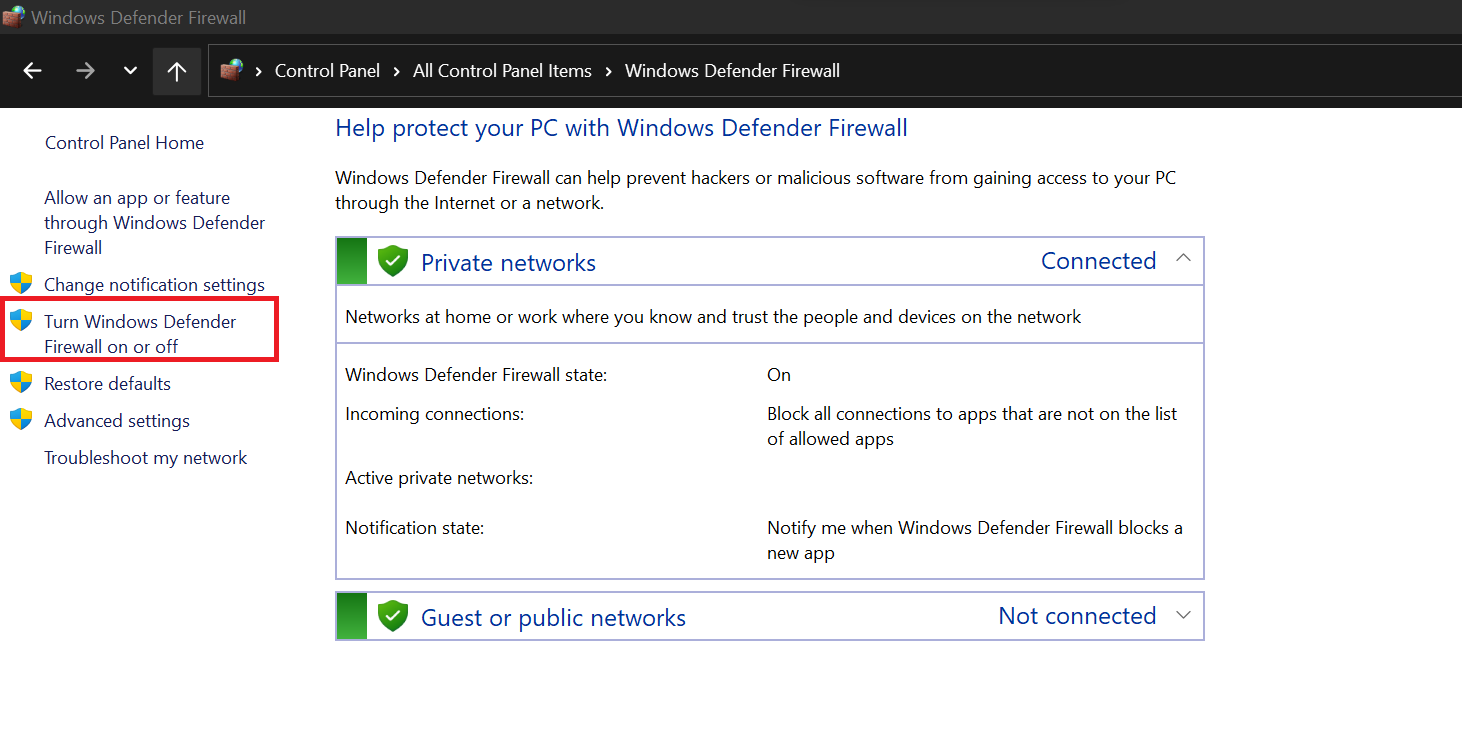
Step 3: In the left panel, click Turn Windows Defender Firewall on or off.
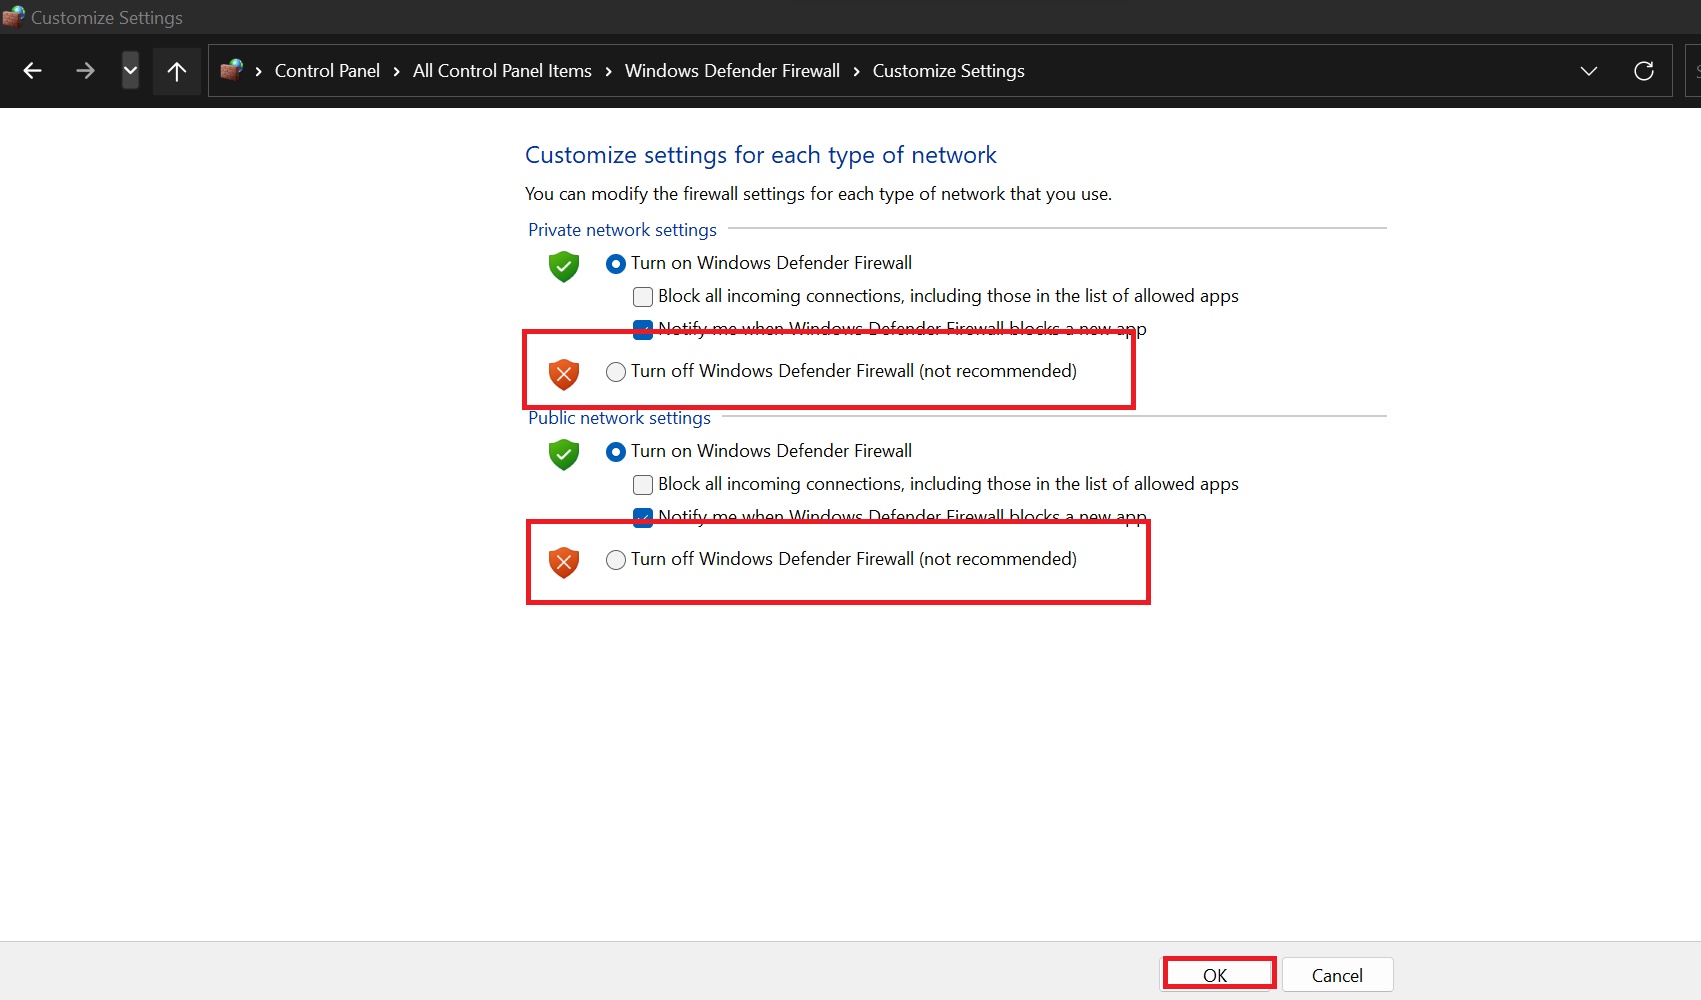
Step 4: Select Turn off Windows Defender Firewall (not recommended) for both private and public networks.
Step 5: Click OK , then try accessing the website again. If the website works with your firewall turned off, then the firewall is likely the problem.
What if the firewall is the cause?
You can choose to turn off your firewall every time you visit this website, which is not recommended for security reasons. Another option is to adjust your settings to allow access to the blocked website while keeping your system secure. Follow these steps:
- Open Control Panel > System and Security > Windows Defender Firewall.
- Click Allow an app or feature through Windows Defender Firewall.
- Select the browser you use to access the website on the list, check both Private and Public networks, and click OK .
Method 7: Use a proxy server
If you don’t use a VPN, you can use a proxy server as an alternative . In this case, your computer and the website you’re attempting to visit are connected through a proxy server, which hides your IP address, giving you more freedom and privacy. However, most websites and services recognize proxy servers and may restrict such IP addresses. When that happens, you’ll receive a message claiming that “the owner of this website has banned your IP address.”
Warning!
Unlike VPNs, many proxies do not encrypt your traffic (especially the free ones), making it easier for hackers or malicious users to intercept sensitive data. If you must use a proxy server, do not use it to share personal information like your credit card details.
To use a proxy server, first you need to find a proxy provider of your choice. You can search online for the best proxy servers, like MarsProxies , IPRoyal , or Storm Proxies . Once you have the proxy details from your provider, follow these steps:
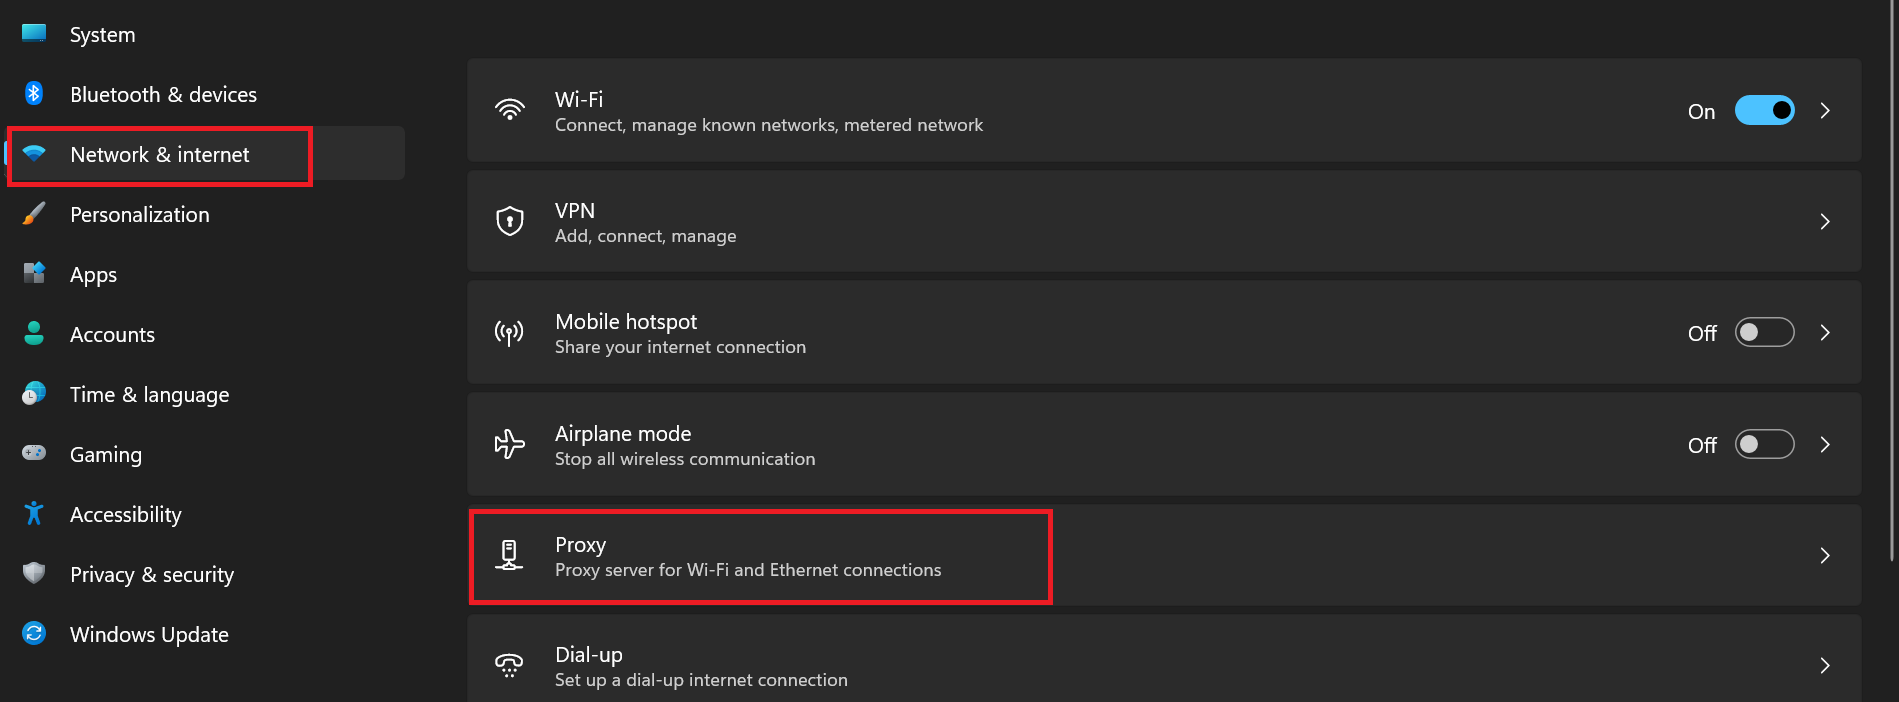
Step 1: Press Windows + I to open Settings.
Step 2: Go to Network & internet and click on Proxy.
Step 3: Under Manual proxy setup, click Set up next to Use a proxy server .
Step 4: Toggle the Use a proxy server button on and enter the IP address and port provided by your proxy provider.
Once you are done, click Save .
Method 8: Change the DNS server
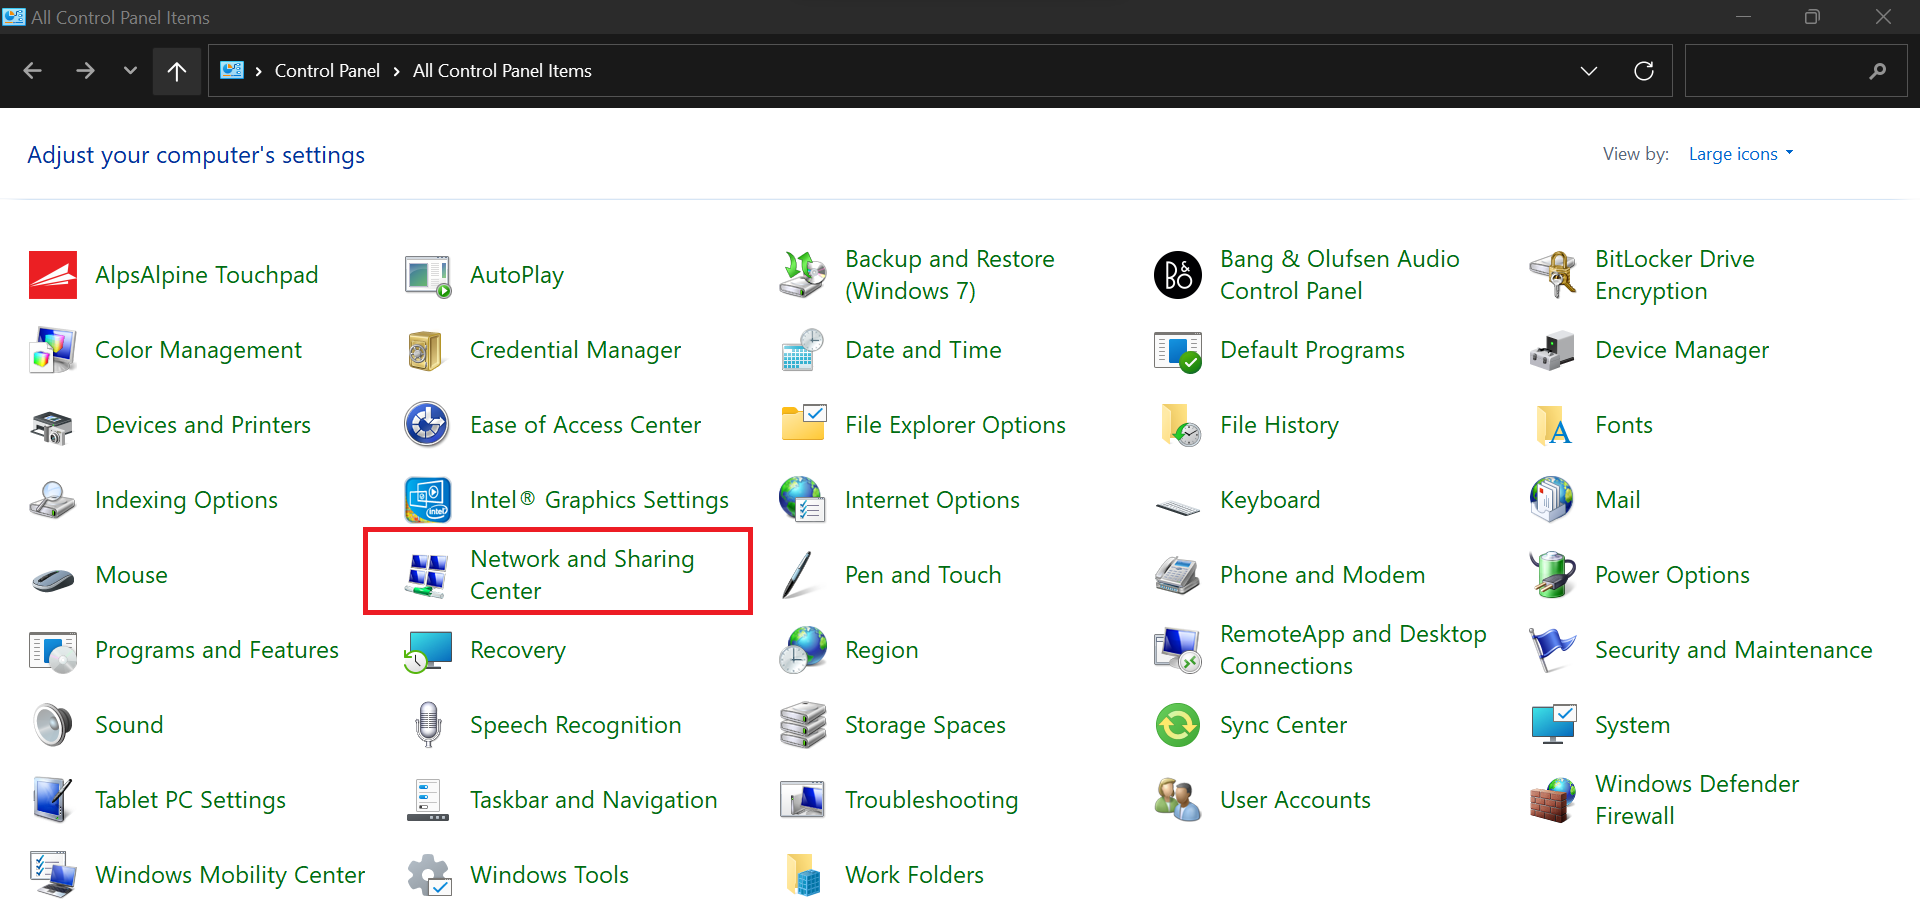
DNS servers translate web addresses into IP addresses. The error could be the result of DNS server problems. So you could fix this by changing your DNS server using the Control Panel. Here’s how to do it: Step 1: Open Control Panel. Step 2: In Control Panel, go to Network and Sharing Center .
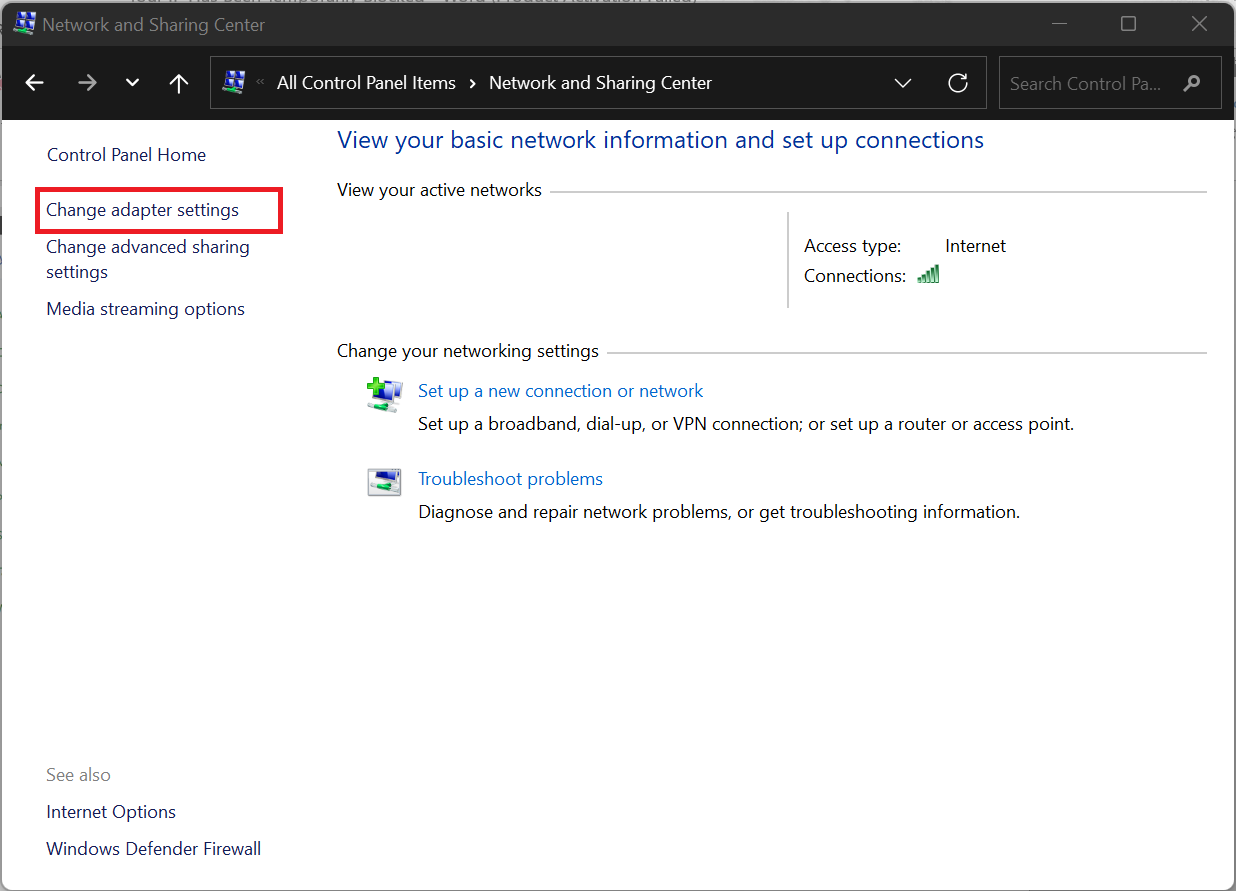
Step 3: Click on Change adapter settings.
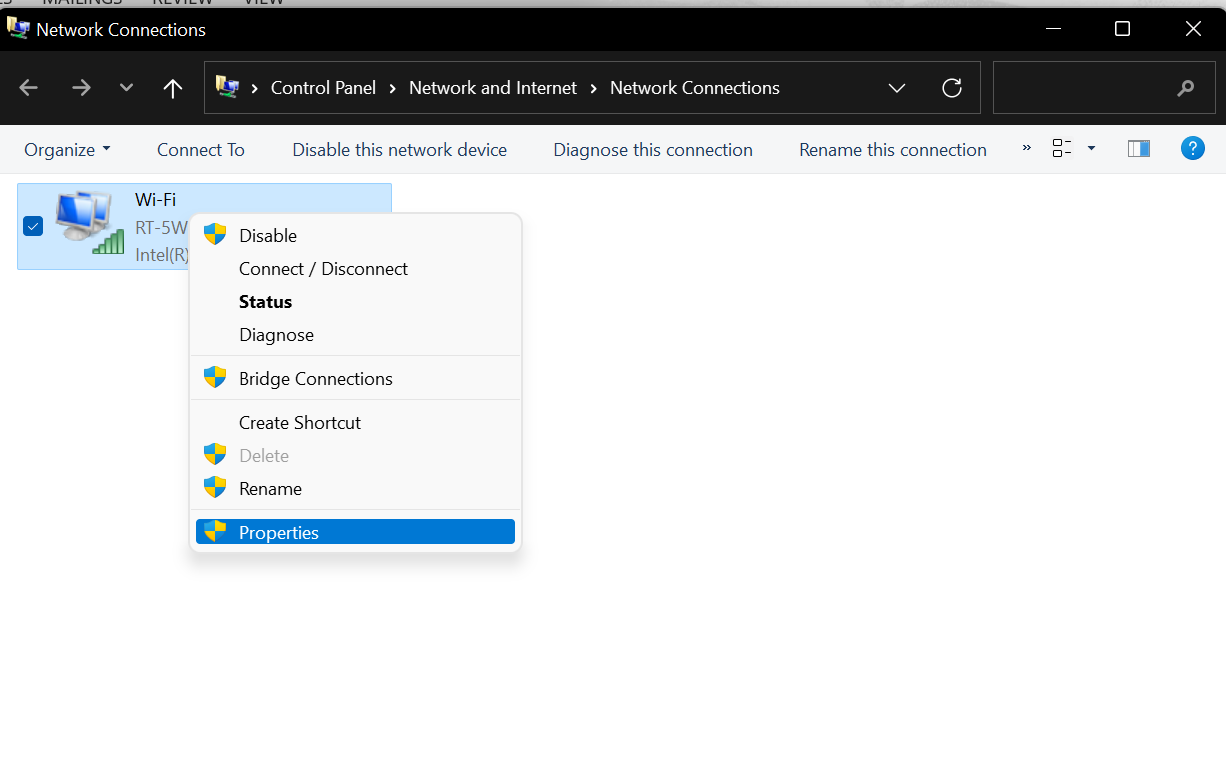
Step 4: Go to Properties by right-clicking your Wi-Fi connection.
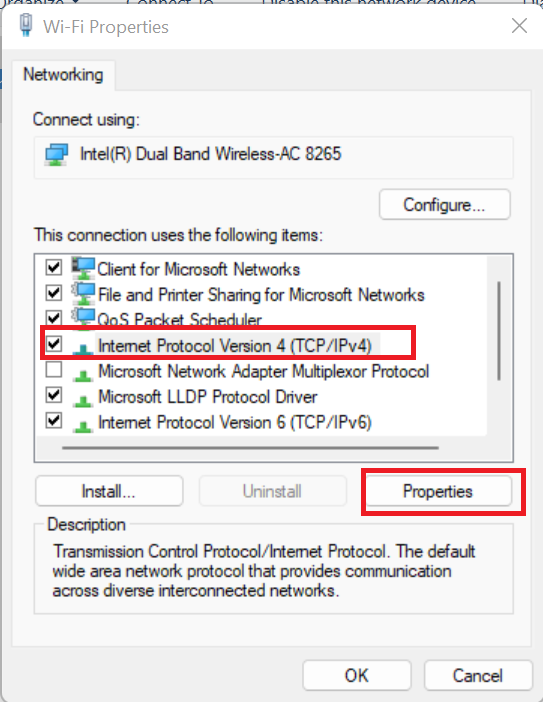
Step 5: Select Internet Protocol Version 4 (TCP/IPv4) and click Properties.
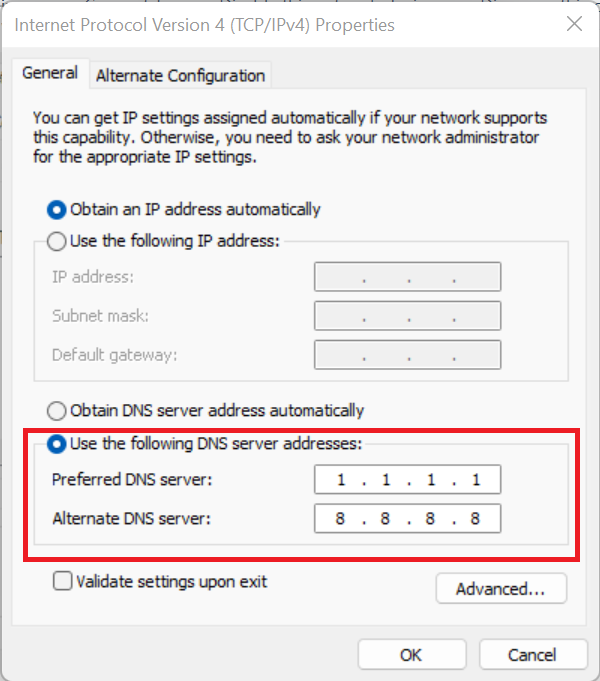
Step 6: Select the option that says Use the following DNS server addresses and enter the information below:
- Preferred DNS server: 1.1.1.1
- Alternate DNS server: 8.8.8.8
Step 7: Click OK to close.
Changing DNS servers may solve the issue by guaranteeing accurate address translation and potentially fixing the “Your IP has been temporarily blocked” error.
The “1.1.1.1” DNS server is provided by Cloudflare and is known for its speed and privacy-focused features. Likewise, Google’s “8.8.8.8” DNS server is widely used and known for its performance and reliability.
However, if you prefer other alternatives, check the table below:
| DNS server |
Preferred DNS |
Alternate DNS |
Pros/cons |
| Google Public DNS |
8.8.8.8 |
8.8.4.4 |
Pros:
- Fast resolution
- Highly reliable
- Protects against malicious actors
Cons:
- Privacy concerns due to tracking
- Lacks content filtering
|
| Quad9 |
9.9.9.9 |
149.112.112.112 |
Pros:
- Enhances web security
- Operates under strict Swiss privacy laws
Cons:
- Can be slower than some competitors
- Lacks manual filtering options
|
| OpenDNS Home |
208.67.222.222 |
208.67.220.220 |
Pros:
- Robust parental controls
- Faster internet browsing
- Highly reliable
Cons:
- Logs user activity
- Some advanced features require a paid version
|
| Comodo Secure DNS |
8.26.56.26 |
8.2.247.20 |
Pros:
- Protects against malware and phishing
- Includes content filtering and it’s free
Cons:
- Restricted features in the free edition
- May not be as fast
|
| CleanBrowsing |
185.228.168.9 |
185.228.169.9 |
Pros:
- Strong content filtering
- Protects against malicious domains
- Free filters for different needs
Cons:
- Limited customer support
- Custom content filtering requires a paid plan
|
Method 9: Change your IP address
You can also use the network connection settings to change your IP address. Here’s how to do it:
Step 1: Press Windows + R , type control panel , and hit Enter.
Step 2: Select Network and Sharing Center , then click Change adapter settings on the left.
Step 3: Right-click the network adapter for which you want to change the IP and select Properties .
Step 4: Select Internet Protocol Version 4 (TCP/IPv4) and click Properties .
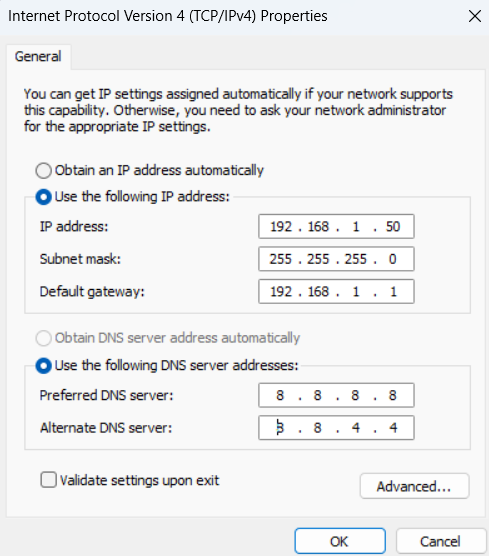
Step 5: Choose Use the following IP address , then enter your desired IP address, subnet mask, and default gateway. You will also need to enter details for DNS.
- Click OK to save the changes.
The screenshot above shows example values only. Make sure to use an IP address that’s appropriate for your network setup to avoid conflicts. You can check your router’s settings or documentation to find the range of IP addresses your network uses.
Generally, home networks use private IP ranges like 192.168.0.0 – 192.168.255.255. You can use an IP scanner to identify IP addresses already in use. Select an IP address within your network’s range, but make sure it does’nt conflict with your router or any other device.
You can do that by increasing the last number. For example, if your router’s IP is 192.168.1.1, you can choose something like 192.168.1.50 or 192.168.1.60.
Sometimes the IP lock could be as a result of network issues from your internet service provider (ISP). So, if nothing has worked to this point, reach out to them and describe the situation. They just might have a solution.
If your ISP cannot fix the issue, you can contact the website’s webmaster to clarify your situation, especially if you believe your IP address was mistakenly restricted. You can use Whois Lookup to find the website owner’s details. You can also try acceccing the website from a different device. Next, check the website’s Contact page for their email or contact form. Reach out to explain your problem. There’s a good chance you’ll get clarification on the reasons behind the IP ban . Here is a summary of all the methods to unblock your IP address:
| Method |
Solution |
Steps |
| Check for malware |
Scan your computer for malware that may be causing the ban |
- Open Windows Security > Virus & threat protection > Scan options > Full scan > Scan now
- Run Microsoft Defender Antivirus offline scan (optional)
|
| Ensure your IP is not blacklisted |
Verify if your IP is blacklisted and remove it from anti-spam databases |
- Visit WhatIsMyIPAddress.com to check your IP status on anti-spam databases
- Follow the process to request removal if blocked
|
| Restart your router |
Obtain a new dynamic IP by restarting your router |
- Power off your router for at least 10 seconds
- Power it back on and try accessing the website again
|
| Turn your VPN on or off |
Use or turn off your VPN to change the IP address |
- Turn off your VPN and try accessing the site
- Alternatively, turn on the VPN to get a new IP address
|
| Switch Wi-Fi networks |
Connect to a different Wi-Fi network to get a new IP address |
- Connect to a different Wi-Fi network or your mobile hotspot and try accessing the website
|
| Disable the firewall temporarily |
Check if the firewall is blocking access and disable it if necessary |
- Open Control Panel > Windows Defender Firewall
- Turn off Windows Defender Firewall for all networks
|
| Use a proxy server |
Use a proxy server to hide your IP address and bypass the block |
- Find a proxy provider
- Set up the proxy in Windows settings
|
| Change your DNS server |
Change your DNS servers to ensure correct address translation |
- Open Control Panel > Network and Sharing Center > Right-click your network adapter > Properties
- Change DNS server addresses to 1.1.1.1 (preferred) and 8.8.8.8 (alternate)
|
| Change your IP address |
Manually change your IP address through network settings |
- Open Control Panel > Network and Sharing Center > Right-click your network adapter > Properties
- Manually set your desired IP address
|
| Contact ISP |
Reach out to your ISP if the issue is on their end |
- Contact your ISP and explain the issue
- Follow their advice or solutions
|
| Contact website |
Reach out to the website’s administrator to resolve the issue |
- Find the website owner and contact them for support via email or contact form
|
How to Prevent the “Your IP Has Been Banned” Error in the Future
To prevent the hassle of having to unblock your IP in the future, you can take proactive steps:
- Avoid untrustworthy websites and downloads. Visiting unsafe websites or downloading files from unknown sources can expose your device to malware. Stick to reputable sites to ensure your device remains protected.
- Install reliable security software. Use a good antivirus program along with trusted anti-malware solution like Auslogics Anti-Malware to safeguard your personal information and devices. Additionally, using a firewall can help you monitor and control incoming and outgoing network traffic.
- Keep software up to date. Regularly update your operating system , web browser, and other applications. Doing this will close security vulnerabilities and protect your device from potential attacks.
- Use strong passwords for Wi-Fi. Protect your Wi-Fi network with strong, unique passwords to prevent unauthorized access. A compromised network can lead to malicious activity that might result in an IP block.
- Monitor network activity. Regularly check your router’s connected devices list to ensure no unauthorized users are using your network. If unknown devices appear, remove them and update your Wi-Fi security settings.
- Use a VPN wisely. There are many benefits of using a VPN , like hiding your real IP address, but using free or low-quality VPN services can lead to IP blocks if their servers are blacklisted. Choose a reputable VPN provider to stay secure.
- Limit public Wi-Fi use. Avoid using public Wi-Fi for sensitive activities. Some of these shared networks can expose your IP, leading to security risks and potential misuse by other users.
- Avoid excessive automated actions. Performing repeated actions, such as making too many requests to a website or engaging in automated tasks like web scraping, can trigger an IP ban. Be cautious about how often you interact with websites.
Build a Positive Reputation to Avoid an IP Ban
Now that you have fixed the issue, you need to prevent this IP blocking in the future. This typically involves building a good online reputation by ensuring your network is not involved in any harmful activities.
Regularly scan your devices for malware, avoid suspicious websites, and be mindful of your online behavior. If you share your network with others, set clear guidelines to prevent accidental misuse, such as excessive requests or unauthorized access attempts. Taking these proactive steps will help maintain a clean record and avoid disruptions while browsing online.
Finally, we’d love to hear from you! Do you have any tips or experiences related to avoiding IP bans? Share your thoughts in the comments below!
FAQ
The duration of a temporary IP ban can vary depending on the website or service. It may last anywhere from a few minutes to several hours or even days. Some services set a specific time limit, while others lift the ban once suspicious activity stops or after a review.
To bypass an IP block, you can try using a VPN, proxy server, or a different internet connection to obtain a new IP address. Restarting your router may also assign a new IP if your ISP uses dynamic IPs. However, it’s best to resolve the issue with the website to avoid further restrictions.
Google may block your IP address if it detects unusual activity, such as too many searches in a short time, automated queries, or suspected spam behavior. Malware on your device or network can also trigger a block. Using a VPN or shared network with flagged users may also cause Google to restrict access.
IP bans can be either temporary or permanent, depending on the severity of the violation. Temporary bans are usually lifted after a set period, while permanent bans are enforced if there is repeated or serious misuse, such as fraud, hacking attempts, or policy violations.