If you want to fix some issues with your PC or give it away, resetting it is usually a good idea. In this guide, we’ll show you how to factory reset a Dell laptop the right way and avoid any subsequent issues. Keep reading!
Want to know how to reset a Dell laptop? We can help! The factory reset process may seem complicated because it involves giving your PC a fresh start and removing your installed apps. However, it can be quite easy if you know the right steps to take.
This article will focus on how to factory reset a Dell laptop, explain why a factory reset may be necessary, and show you things to do before resetting your computer.
Let’s begin.
What Does a Factory Reset Do?
When you factory reset your Dell laptop, it restores the system to its original state by erasing all your settings, data, and apps.
Everything is wiped, leaving it just like when you bought it. That’s why the factory reset is usually the last option to consider.
Remember that a factory reset is different from resetting your Windows. A Windows reset (
Reset this PC ) reverts your system to a default state. You can, however, choose to keep your personal files or clear all of them.
That said, you’ll lose all your third-party applications, including software packages that came with the PC.
So, if you want to delete everything without any trace, especially if you’re planning to sell the PC, the factory reset is the best option.
Tips Before You Factory Reset Your Dell Laptop
You should ideally take certain measures before resetting your Dell computer, especially if you plan to use it again. These include backing up your data, inventorying your installed programs and license keys, syncing your passwords, and logging out of subscription services that allow limited devices.
Now, let’s find out how to factory reset a Dell laptop.
Also read: How to Factory Reset an HP Laptop
| Method |
When to use it |
What to consider |
Requirements |
Process |
| Using OEM tools |
You lost access to your computer and cannot repair Windows
You want to return to your PC’s factory settings with preinstalled drivers, software packages, and settings
|
If you have upgraded your operating system after purchasing the computer, a factory reset will likely revert to the old OS
Even if you reinstall your current OS, you could be far behind on Windows and driver updates
|
Requirements vary, depending on the tool
For example, creating a recovery drive requires a flash drive with at least 16GB of free storage space and an internet connection
You also need your computer’s service tag if creating with a different system
Using SupportAssist involves access to your recovery drive
|
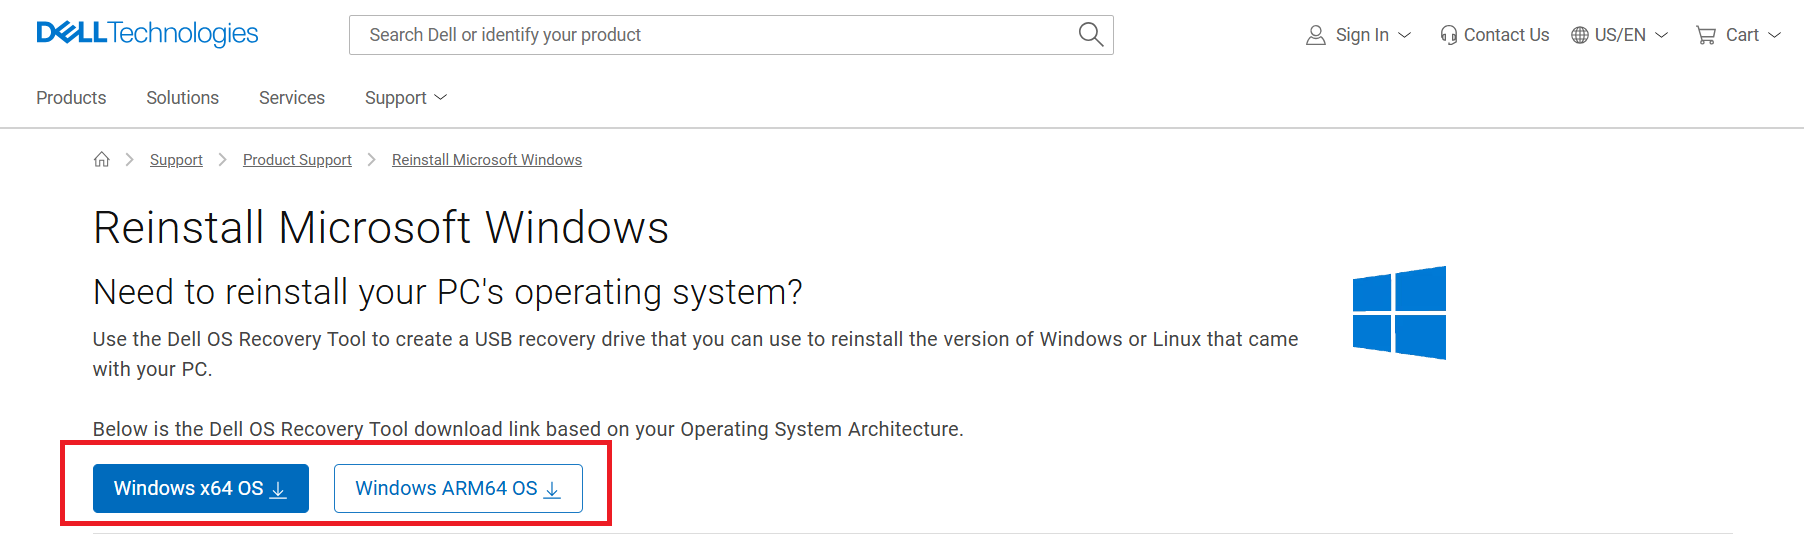
To use the OS Recovery Tool:
- Download the OS Recovery Tool from Dell’s website, select your computer, choose your USB drive, and click the Download button
- Turn off your computer, boot from the USB drive, and install Windows
To use SupportAssist:
- Turn off your computer
- Turn it back on and tap
F2
- Select the SupportAssist OS Recovery option
|
| Resetting without a password |
When you cannot log into Windows |
The process wipes your files or blocks access to preserved files
Using this process means some of your hardware may not work, and you may need to find the correct drivers
|
You have to access the WinRE interface, use recovery media, or rely on OEM recovery methods |
- Enter the Windows Recovery Environment, select Troubleshoot , and click Reset
- Boot from recovery media created with Microsoft’s media creation tool or third-party utilities like Rufus or Dell OS Recovery Tool and install Windows
|
| Factory reset from Settings |
When you can log into Windows |
You can choose to keep or wipe your files
The process reinstalls Windows and may leave out Dell’s factory-shipped software packages and settings
You may need to source and install drivers after the reset
|
Access to an account with administrator privileges |
- Open the Settings app and select System > Recovery if you’re on Windows 11. Click Update & Security > Recovery on Windows 10
- Choose the Reset PC option
- Select whether you want to keep your files or remove everything
|
You can use the original equipment manufacturer (OEM) tools to reset Dell laptops. And there are three ways to do that. We’ll go over the three steps in this section.
With the Dell OS Recovery Tool, you can create a recovery drive that you can use to install the operating system from scratch at any time.
While you can preserve files from your previous operating system, we recommend performing a clean installation if you’re giving your laptop away or don’t want anyone to recover your deleted files.
You will need the following for this process:
- Any working computer.
- Your computer’s service tag (if you’re creating the recovery drive on a different computer).
Note
You can find your service tag under your laptop.
Disabling your antivirus program while the process runs is recommended to prevent the security application from blocking the utility or your network.
How to create a recovery drive
Follow these steps to create the recovery drive:
- Once your browser downloads the package, head to the Downloads folder (or where you saved the file) and install the tool.
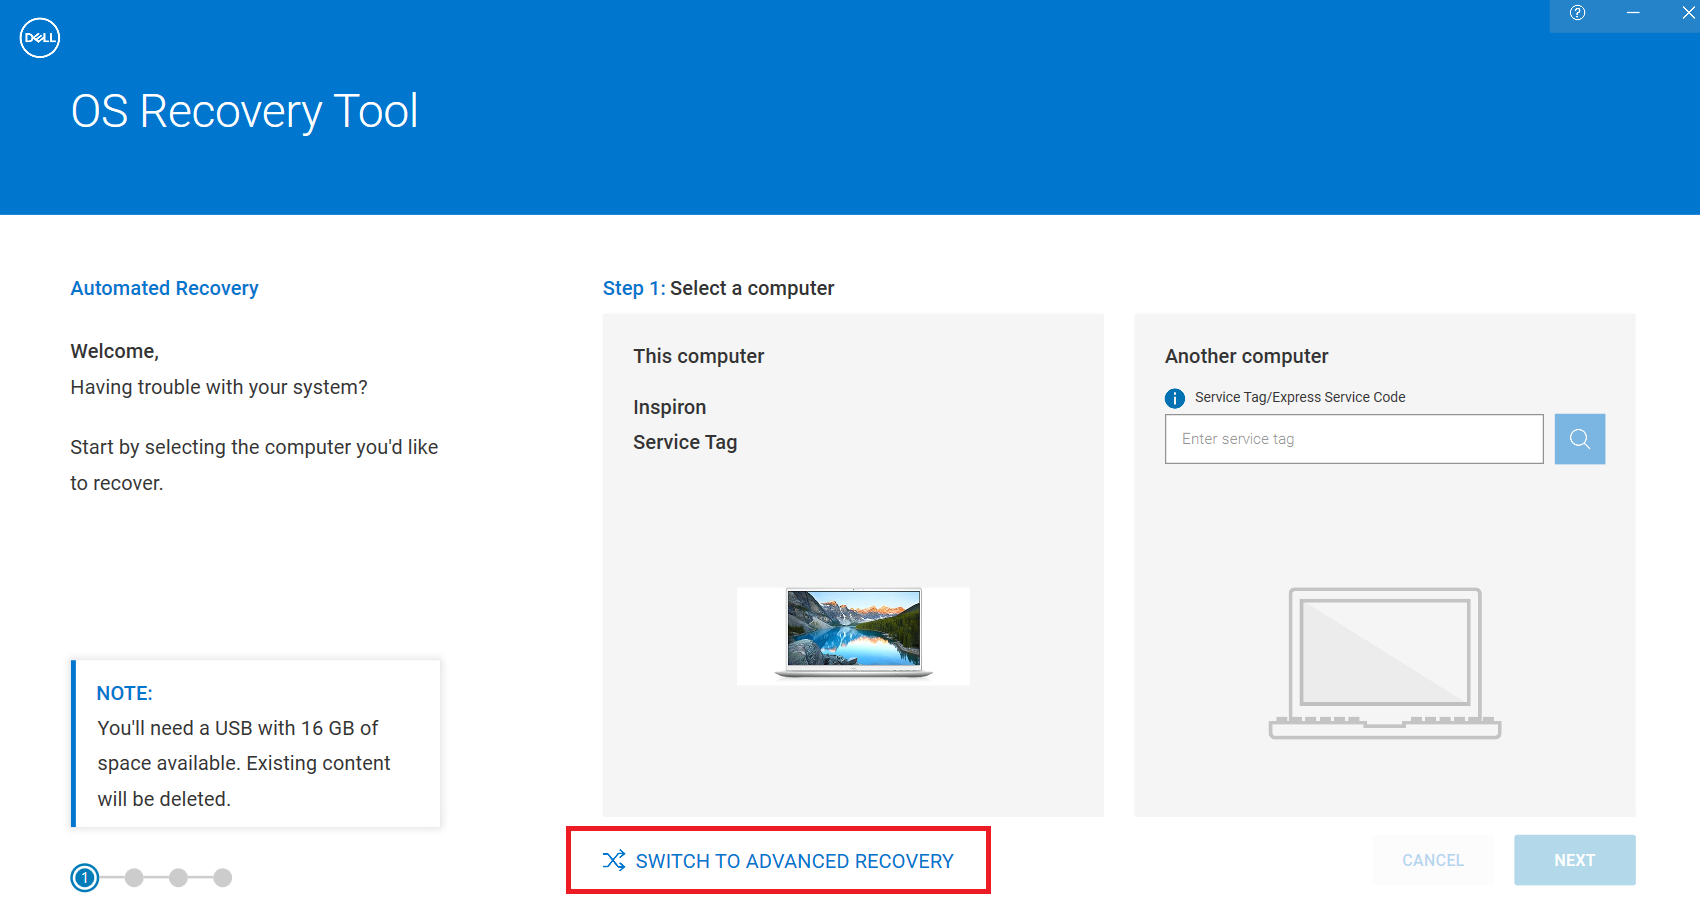
- Launch the Dell OS Recovery Tool after installation.
- Once the tool opens, click Switch to Advanced Recovery at the bottom of the page.
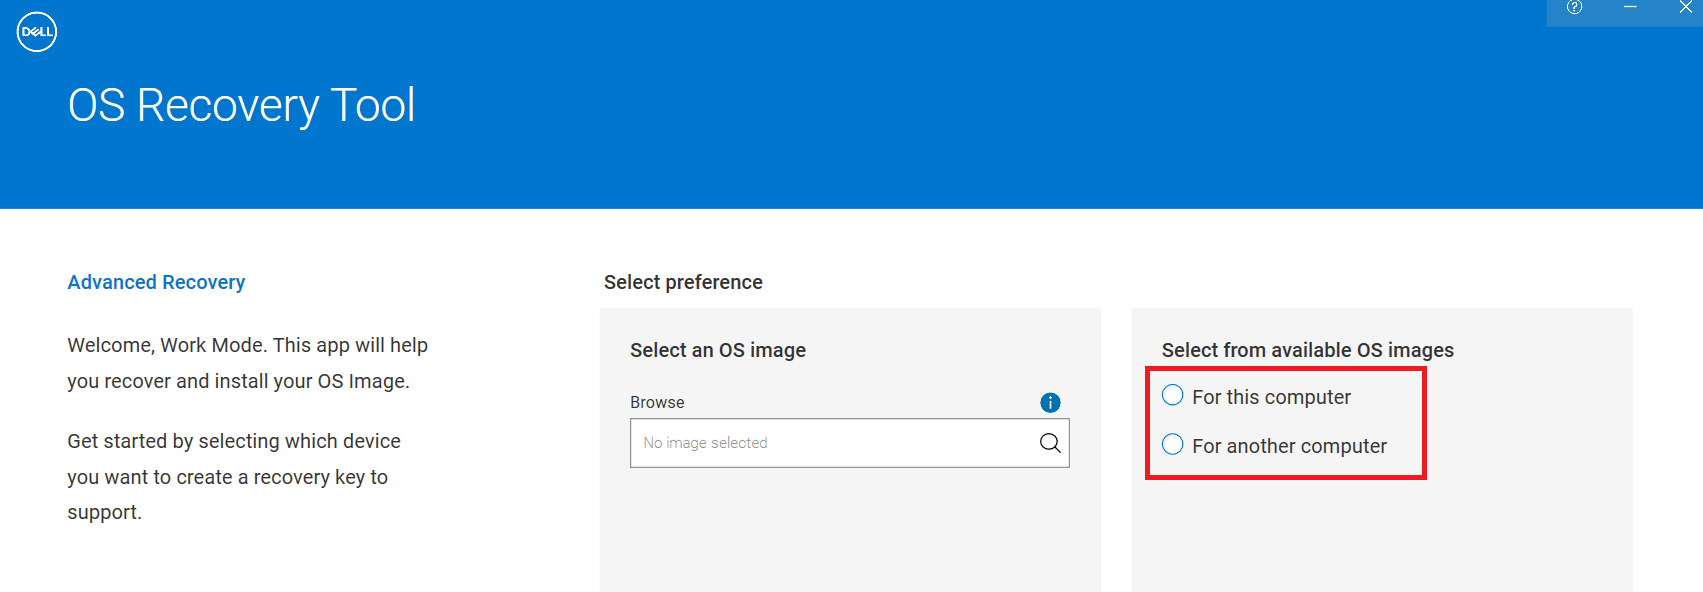
- Now, go to the Select from available OS images section on the right and do any of the following:
- Choose For this computer if you installed the program on the system you want to reset.
- Choose For another computer if you’re preparing the recovery drive for another system. If you choose this option, enter the service tag of the computer you want to reset.
- Click the Next button to display the recovery images available for the computer you chose.
- Click Download under the operating system that doesn’t have the Automated by SupportAssist label.
- Now, connect your USB drive with at least 16GB of free space.
The USB drive will be formatted during the recovery drive creation process. So, use a drive without important files on it.
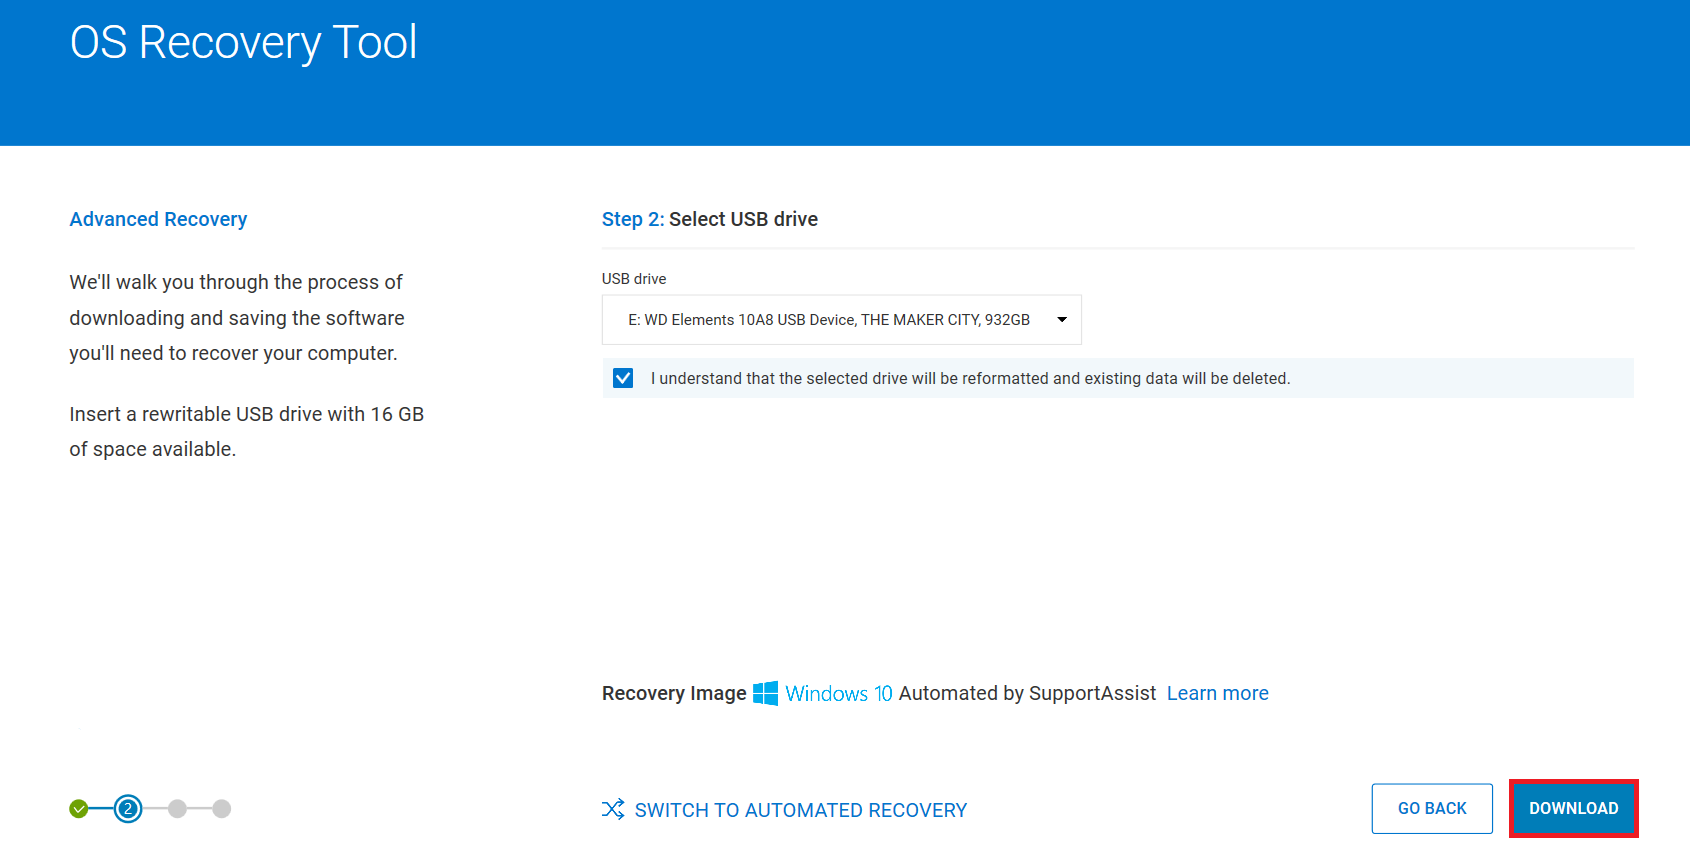
- Select the drive on the next page.
- Mark the checkbox for I understand that the selected drive will be reformatted and existing data will be deleted .
- Go to the bottom-right corner and click the Download button.
- The tool will now download, verify, and mount the recovery image you selected.
- You will see a summary screen once the process is complete. Click the Close button.
Have problems resetting your PC? Check out this article : [PRO FIX] There Was a Problem Resetting Your PC Error on Windows 10/11
How to factory reset a Dell computer using the recovery media
- Insert the USB drive and restart your Dell computer .
- Press the
F12 key once you see the Dell logo. You should see the Preparing one-time boot menu message in your screen’s top-right corner.
- Select the USB recovery drive using your keyboard arrow keys and hit the
Enter button.
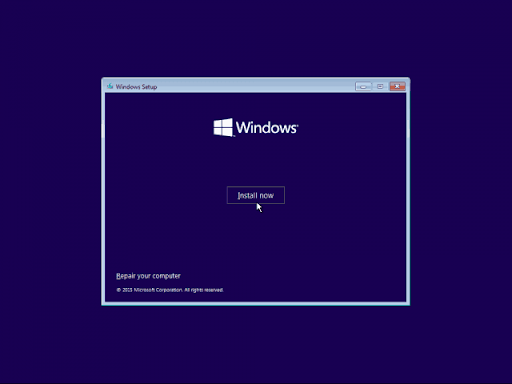
- Select your language and keyboard layout when the Windows Setup box shows up.
- Click Install now.
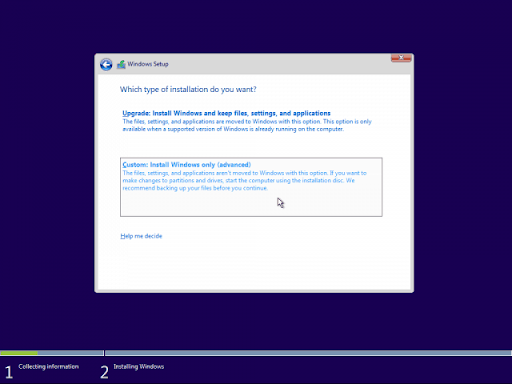
- Accept the license terms on the next page to proceed.
- Select Custom: Install Windows only (advanced) under Which type of installation do you want?
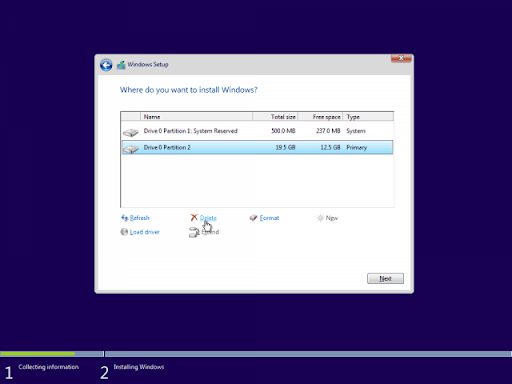
To perform a clean installation (you want to remove all your files), delete all your partitions under Where do you want to install Windows ? Click a partition and select the Delete option. Once your partitions are deleted, select the unallocated volume and click Next .
If you do not want to remove your files, select a partition with enough storage space for Windows and click Next .
Allow the Windows setup to complete the installation process, then follow the subsequent instructions to configure your PC for the first time.
Download Auslogics BoostSpeed
Your one-stop PC maintenance and optimization tool, this program will clean, speed up, repair, and tweak your system to ensure maximum speed and efficiency.
Method 2: Use SupportAssist OS Recovery
You can also reset a Dell laptop using the SupportAssist OS Recovery tool . It’s helpful for computers that cannot boot into Windows.
This tool allows you to diagnose hardware problems , back up personal files, repair operating system problems, and factory reset a Dell laptop from the boot.
You can use the tool to recover your operating system from your hard drive or reset your computer and update it using the cloud install option.
To run the program, ensure SupportAssist is enabled in your BIOS . To do that, restart your computer and press F2 after the Dell logo flashes. Expand the SupportAssist menu in the left navigation bar and enable the function. Apply your setting.
Now follow these steps:
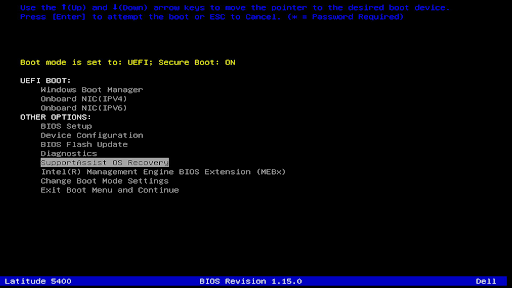
- Restart your computer and press
F12 to load the one-time boot menu.
- Go to Other Options and select SupportAssist OS Recovery.
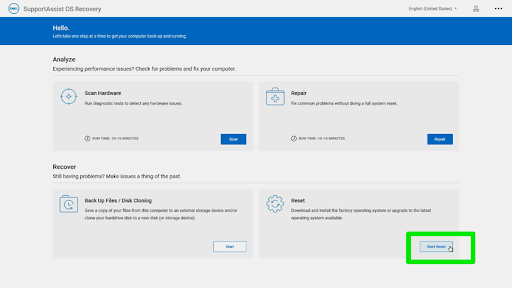
- Your computer will now open the SupportAssist OS Recovery interface.
- Click the Start Reset button in the Reset panel.
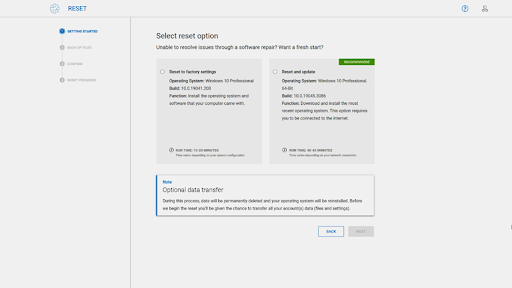
- You will now see two options:
Reset to factory settings: This option resets your computer to factory defaults using the recovery package stored on your hard drive.
Reset and update: This option downloads and installs the latest version of your operating system from the cloud. You must have created a recovery USB drive using the Dell OS Recovery Tool as explained above.
- Select an option and click the Next button.
- You will be given the option to back up your files.
- Select Yes, give access and transfer my settings data if you want to back up your files. Accept the Microsoft license, click Next , and then follow the instructions to complete the backup.
- Click No, do not transfer my settings and data and click the Next button if you do not want to back up your files.
- Click Yes, continue when you see the warning page.
- Allow the recovery process to run its course.
- You should see a message that indicates the process was successful after the tool resets your system.
- Click the Restart button in the Recovery process guide interface to set up Windows.
- Your computer will now reboot multiple times and transfer your data and settings.
- After that, the SupportAssist OS Recovery tool will help you set up Windows, allowing you to agree to the license agreement and retrieve your backed-up files.
What to do if the Dell recovery partition is deleted
If your computer’s recovery partition on your hard drive is somehow deleted or corrupt, you may have no way to recover it using the SupportAssist OS Recovery tool if Windows cannot boot. However, you can recover that partition if your computer supports the Dell BIOSConnect feature.
You can head to your BIOS and open the SupportAssist tab to turn on the feature (alongside SupportAssist) if it is available.
Choosing SupportAssist from the one-time boot menu as explained above will launch BIOSConnect if your recovery partition is corrupt or deleted.
How to Factory Reset Dell Laptop Without a Password
If you don’t remember your password, you can still factory reset your Dell laptop using different methods. Let’s cover those options.
If your hard drive
is encrypted using BitLocker or other tools, you may have to provide the password or recovery keys to access the files on the drive. If you can, disable BitLocker protection before performing the factory reset.
Option 1: Use a recovery/bootable drive
The recovery drive created using the Dell OS Recovery Tool allows you to factory reset your computer without demanding a password. So, follow the steps explained earlier to use this method. You can also use the Windows media creation tool or a third-party program like Rufus to create a USB recovery drive and use the drive to install a clean version of Windows.
Unless you created a boot password, you can also use the SupportAssist OS Recovery tool to factory reset your Dell laptop without providing your Windows password. Follow the steps as outlined in the earlier method.
Option 3: Go through the Dell DataSafe Restore and Emergency Backup environment
The Dell DataSafe Restore and Emergency Backup tool has been around for a while and works mainly on old laptops. You can use it to run the factory reset if your system supports it.
Here’s what you need to do:
- Switch your PC on.
- Press the
F8 key until you see Advanced Boot Options on the screen.
- Click Repair Your Computer .
- Choose your language and keyboard input method and click Next .
- Enter Administrator in the username field.
- Leave the password field empty, then click OK .
- Select Dell DataSafe Restore and Emergency Backup , then click Next .
- Opt for Restore My Computer , then click Next .
- When the process completes, click Finish to restart your PC.
Download Auslogics BoostSpeed
Your one-stop PC maintenance and optimization tool, this program will clean, speed up, repair and tweak your system to ensure maximum speed and efficiency.
Option 4: Use the Windows reset option
You can go through the Windows Recovery Environment to reset your computer. This process can retain your personal files, but your applications and settings that shipped with your laptop or programs you installed will be removed. Follow these steps:
- Turn on your computer and hold the power button once your manufacturer logo flashes and Windows starts to load.
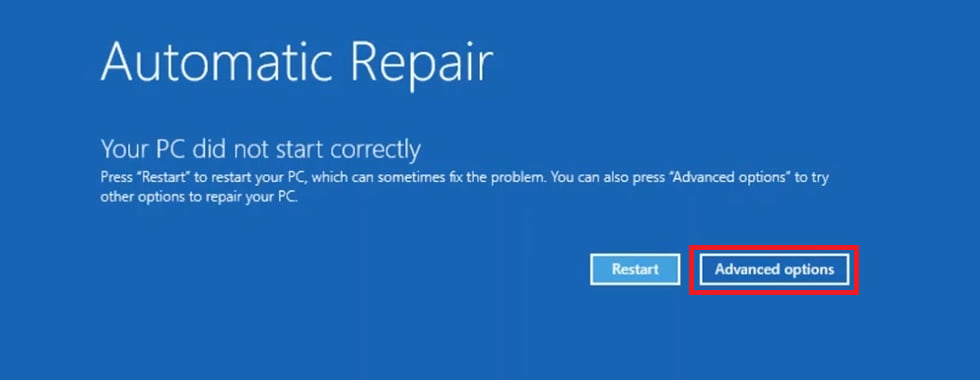
- Repeat the process three times until you see the Automatic Repair screen.
- Click Advanced options.
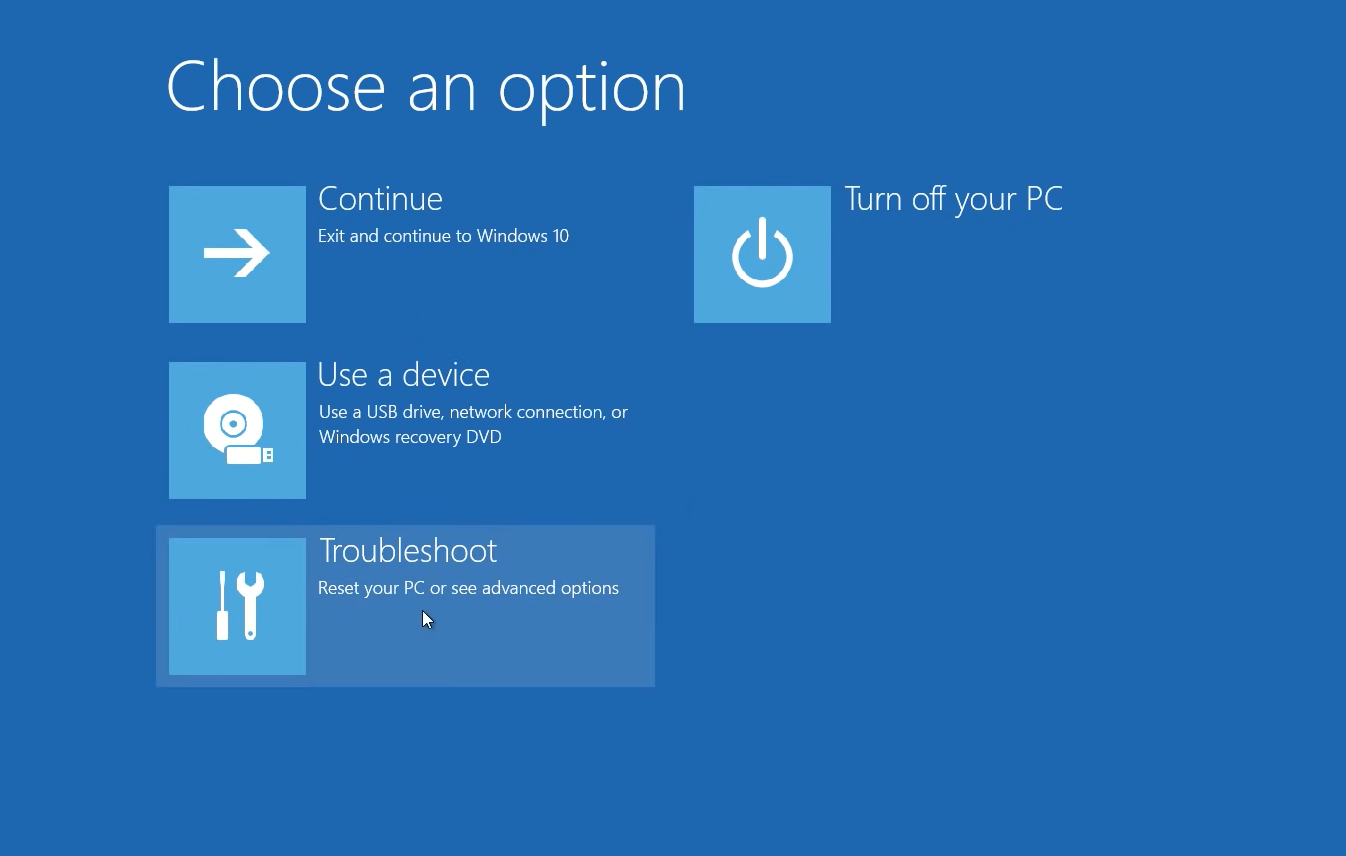
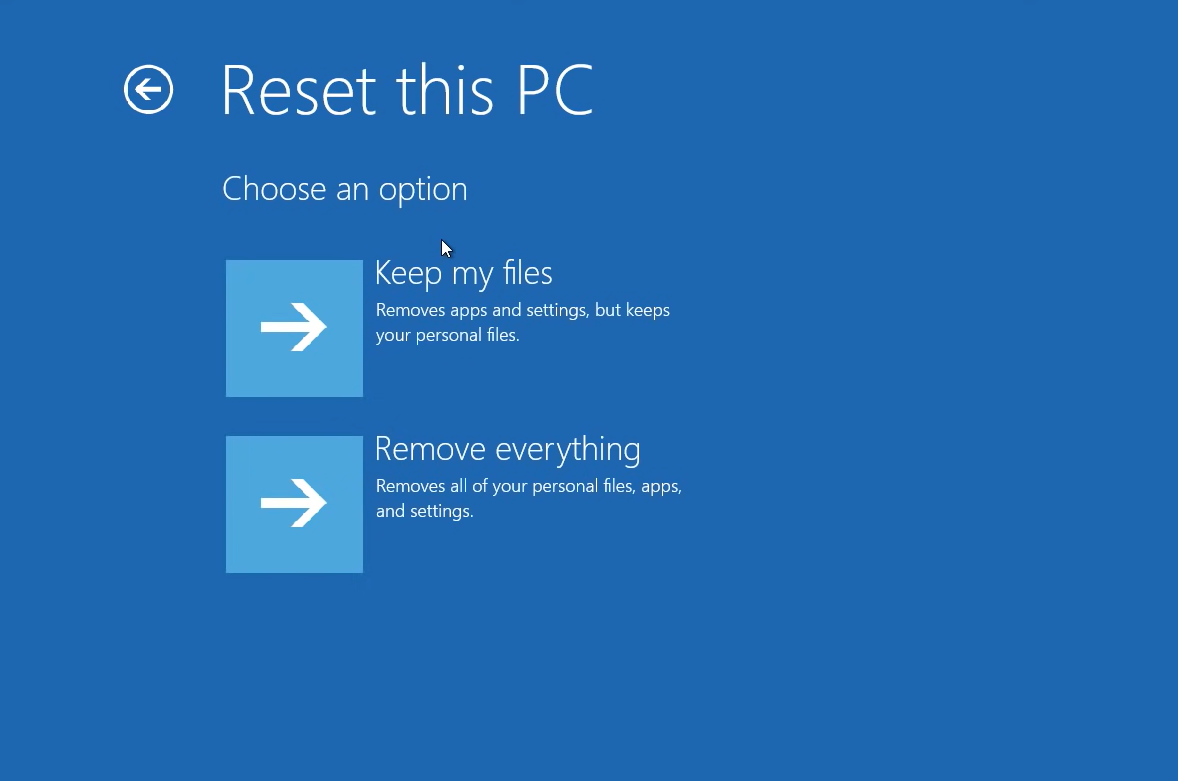
- When the Choose an option screen appears, select Troubleshoot > Reset this PC.
- Select between Keep my files and Remove everything .
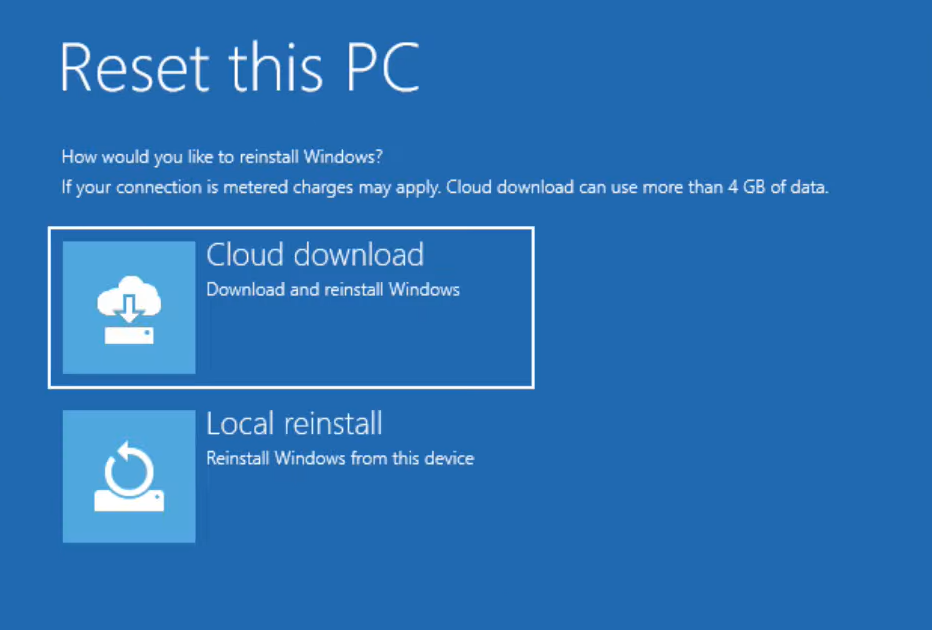
- Select Cloud download or Local reinstall. The first option requires an internet connection; it downloads the setup files from the Internet.
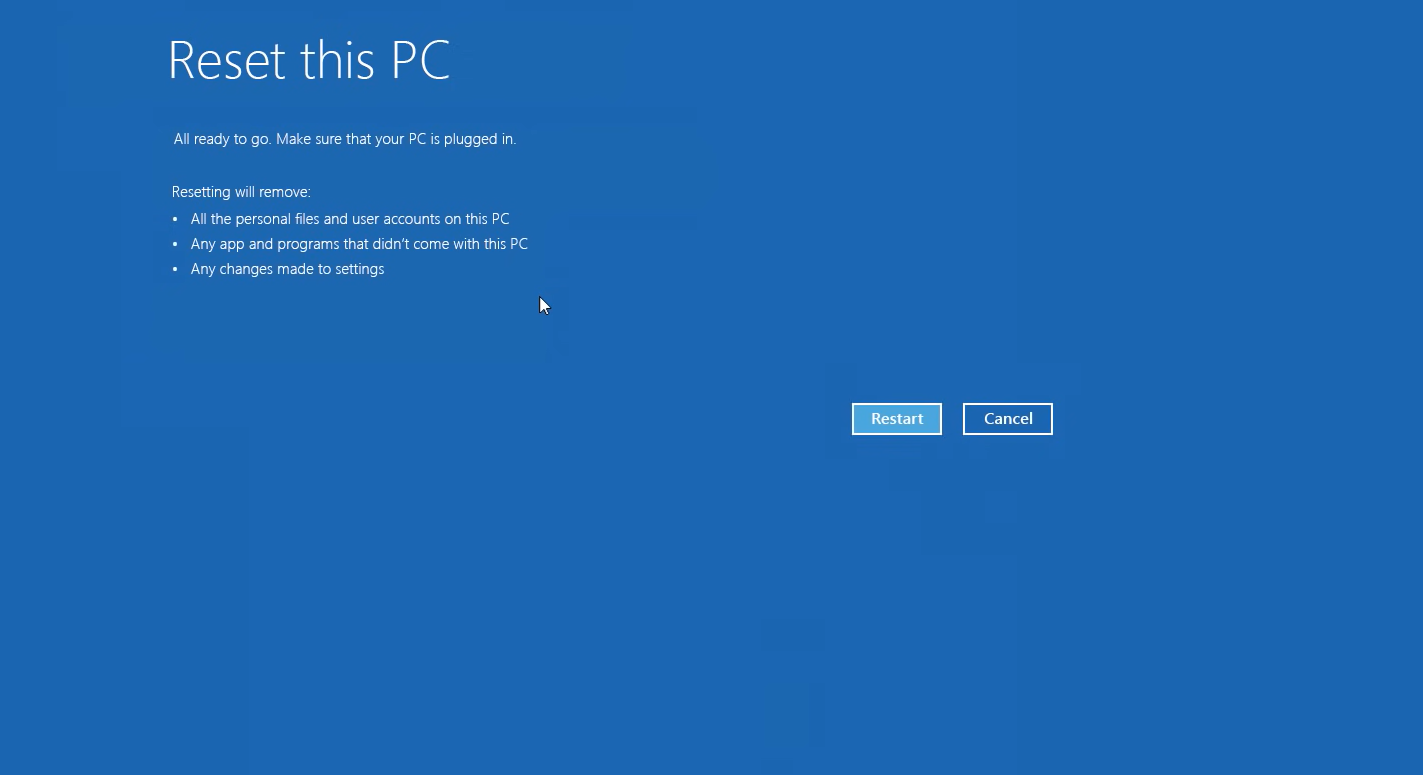
- Click the Restart button.
Also read: How to Factory Reset a Computer Running Windows 10/11
How to Factory Reset a Dell Laptop Using the Settings App
Microsoft includes a reset option in Windows 10 and 11’s Settings app. You first need to log into a user account with admin privileges to access this option. It works like the reset process in the Advanced Startup environment and also allows you to preserve or remove your files.
Here’s how to factory reset your Dell laptop through the Settings app:
- Open the Settings app on your computer.
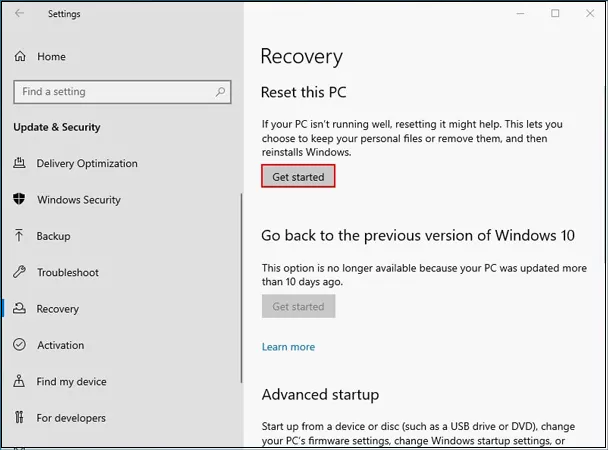
- Click Update & Security (Windows 10) or System (Windows 11) and select Recovery .
- After that, click Get started under Reset (Windows 10) or Reset PC next to Reset this PC (Windows 11).
- When the dialog window opens, you can choose to keep or remove your files or select Cloud download or Local reinstall according to your preferences.
- Follow our guide on resetting Windows computers to see the details about the complete process.
Download Auslogics BoostSpeed
Your one-stop PC maintenance and optimization tool, this program will clean, speed up, repair and tweak your system to ensure maximum speed and efficiency.
How to Factory Reset a Dell Laptop: Explained
Dell and Microsoft provide different options for resetting your Dell laptop. You can use Microsoft methods for a clean Windows installation without OEM software packages and settings. However, Dell’s tools are the best option if you wish to return your computer to how it was when it shipped from the factory.
Remember to back up important files and inventory your licenses, apps, accounts, and applications before performing the reset.
You can prevent unnecessary factory resets by keeping your drivers up to date , protecting your computer against malware, and engaging in regular system maintenance practices.
Please go to the comments section to let us know if the methods above helped you factory reset your Dell laptop.
FAQ
You need to first access the recovery options. Turn off your PC, turn it back on, and press F8 repeatedly until you see the Advanced Boot Options menu. Then, select Repair Your Computer and press Enter. When the System Recovery Options menu opens, choose Dell DataSafe Restore and Emergency Backup and follow the on-screen instructions to complete the process.
To start the Dell factory reset from the boot with F12, switch off your laptop and turn it on again, and continuously press F12 until the one-time boot menu appears. Go to Other Options and select SupportAssist OS Recovery. Follow the steps to factory reset your system.
Turn on your system while pressing F8 until you see the Advanced Boot Options screen. Choose Repair Your Computer and press Enter. You’ll be redirected to the System Recovery Options menu. Select Dell DataSafe Restore and Emergency Backup and follow the on-screen prompts to initiate the reset.
The time to factory reset Dell laptops varies based on the PC’s model, amount of data on the hard disk, and system’s speed. However, generally, the process takes from 30 minutes to a few hours.
![[Easy Guide] How to Factory Reset Dell Laptop on Windows 10/11](https://www.auslogics.com/en/articles/wp-content/uploads/2025/03/Easy-Guide-How-to-Factory-Reset-Dell-Laptop-on-Windows-1011-568x359.webp)