If you’ve ever faced the “Audio services not responding” error, you’re not alone. Many users have reported this issue on various forums, usually citing outdated drivers, failed updates, and Windows update issues as the main culprit. In one case , the user lost all sound on their laptop after performing a reset, with Device Manager unable to update the missing driver. Regardless of what you’re experiencing, I’ve put together a comprehensive guide to help you fix the audio services not responding. So, whether it’s a quick tweak or a deeper fix, this guide will help you get your sound back on track.
What Is the “Audio Services Not Responding” Error?
The “Audio services not responding” error occurs when the Windows Audio service, which is responsible for managing sound on your computer, is active but not functioning properly. This can lead to issues like no sound coming from speakers or headphones, audio playback problems, and disruptions during video calls or media playback.
- Issues with the audio drivers: For many users, the error is linked to problematic audio drivers. These drivers are crucial for enabling your computer to send sound to the speakers. If your audio drivers are corrupted, outdated, or incompatible, it can trigger this error. To prevent such issues, update your drivers .
- Issues with sound settings: Incorrect audio settings, such as the wrong playback device or disabled services, can prevent sound from working. Check and adjust your sound settings in the Control Panel > Sound or Settings > System > Sound .
- Incorrect service account permissions: The error may occur if the Windows Audio service is running under the wrong account ( Local System instead of Local Service ). This can prevent the service from starting properly. To fix this, modify the service to run under Local Service , ensuring the correct account is used with proper permissions.
- Damaged physical audio components: Faulty speakers or headphones can cause the system to fail in detecting audio output. To fix this, test the audio output on another device and inspect physical connections for damage.
- Malfunctioning audio-playing software: Conflicts with third-party applications that control or modify audio settings can be the reason your audio services are not responding . Try uninstalling or updating any recently installed audio software to see if this solves the problem.
In the following sections, we’ll walk you through detailed solutions, arranged in order from the first step to apply to the last resort. Follow them step by step to fix the error.
Download Auslogics Driver Updater
Prevent hardware errors and ensure problem-free device operation with this advanced tool that detects outdated drivers and safely gets them updated.
How to Fix Windows Audio Services Not Responding on Windows 10/11
| Method |
Solution |
What it does |
Key notes |
| Adjust the volume |
Click the speaker icon in the taskbar
and adjust the volume slider |
Fixes sound issues caused by muted or low volume settings |
Ensure the volume is not muted or too low before trying other solutions |
| Restart the system |
Restart your PC and check if the issue persists |
Resolves temporary glitches that might cause sound problems |
Simple but effective for many issues |
| Test with headphones or external speakers |
Plug in headphones or external speakers to
check if the issue is with built-in speakers |
Helps identify if the problem is hardware-related |
If external audio works, the internal speakers may be faulty |
| Run the Playing Audio troubleshooter |
Open Control Panel → Troubleshooting
→ View All → Playing Audio and follow
on-screen instructions |
Scans and fixes misconfigured settings or missing drivers |
On some versions of Windows 11, the troubleshooter has been
replaced with the Get Help app. Go to Settings → System →
Troubleshoot → Other troubleshooters → Audio → Run
or use Get Help for guided assistance |
| Update your audio drivers |
Open Device Manager → expand Audio inputs and outputs
→ right-click on Speakers → select Update driver
→ Choose Search automatically for updated drivers |
Ensures the system has the latest drivers to support sound |
Windows may not always find the latest drivers.
Consider using a dedicated driver updater, like Auslogics Driver Updater |
| Restart Windows Audio services manually |
Open Run (Win + R) → type services.msc → find
Windows Audio → right-click it and select Restart |
Refreshes the Windows Audio service to resolve sound issues |
Also set Startup type to Automatic in Properties to ensure it runs at startup |
| Modify the Log On settings of services |
Open Run (Win + R) → type services.msc → right-click
Windows Audio → select Properties → switch to the
Log On tab → select Local System account → click Apply |
Resolves permission-related issues preventing the Windows Audio service from running |
If it doesn’t work, use the This account: Local Service option with a password |
| Roll back recent Windows updates |
Open Run (Win + R) → type appwiz.cpl → click
View installed updates → find the most recent update →
right-click it and select Uninstall |
Removes problematic Windows updates that might have affected sound |
If rolling back fixes the issue, consider pausing Windows updates temporarily |
| Fix the local account configurations |
Open the Command Prompt as an administrator →
run these commands one after another:
- net localgroup Administrators /add networkservice
- net localgroup Administrators /add localservice
- SC config Audiosrv start= auto
- REG ADD “HKLM\SYSTEM\CurrentControlSet\Services\Audiosrv”
/V start /T REG_DWORD /D 2 /F secedit /configure
/cfg %windir%\inf\defltbase.inf /db defltbase.sdb /verbose |
Fixes permission-related issues and ensures the audio service runs properly |
Requires administrative privileges. If not run as an administrator,
you may encounter errors like “Access is denied” or “The requested
operation requires elevation” |
| Modify the registry settings |
Open Run (Win + R) → type regedit → navigate to
HKEY_Local_Machine\System \CurrentControlSet
\Services\AudioEndPointBuilder\Parameters → check if
ServiceDll is set to %SystemRoot%\System32\AudioEndPointBuilder.dll
→modify if incorrect |
Fixes misconfigured registry settings related to the audio service |
Be cautious when editing the registry; incorrect changes can cause
serious system issues |
| Perform a system restore |
Open Run (Win + R) → type rstrui →
select a restore point before the issue starts
→ follow the prompts |
Reverts the system to a previous state where the sound was working |
Only works if restore points were created before the issue occurred |
| Run the SFC and DISM commands |
Open the Command Prompt as an administrator
→ run sfc /scannow →
then DISM /Online /Cleanup-Image /RestoreHealth
→ restart the PC |
Repairs corrupted system files that may be causing audio issues |
Running both commands ensures a more thorough repair |
| Reset your PC |
Open Settings → System → Recovery → Reset PC , then choose
Keep my files or Remove everything and follow the instructions |
Reinstalls Windows while fixing deep-rooted audio and other issues |
Removes apps and settings but can resolve persistent problems |
Before diving into more complex solutions, let’s rule out some quick and easy fixes.
- Adjust the volume: Interestingly, a surprisingly simple solution to this error is adjusting the volume. To adjust your computer’s volume settings, click the s peaker icon in the taskbar and drag the volume slider to increase or decrease the volume.
- Restart the system: Try restarting your PC and checking if the audio service problem persists. Sometimes, the error might occur due to a temporary glitch or an incomplete system restart.
- Test with headphones or external speakers: Plug in a pair of headphones or an external speaker to determine if the issue is with your built-in speakers or sound card. If audio works through an external device, your internal speakers may be faulty.
If these quick fixes don’t work, proceed with the more advanced troubleshooting steps below.
Solution 1: Run the Playing Audio troubleshooter
Using the Windows built-in troubleshooting tool can be really helpful when facing common problems like the audio issues. This tool scans your system for misconfigured settings, missing drivers, or other audio-related problems and applies the necessary fixes to restore sound functionality.
To use the troubleshooter, simply follow these steps:
Windows 10
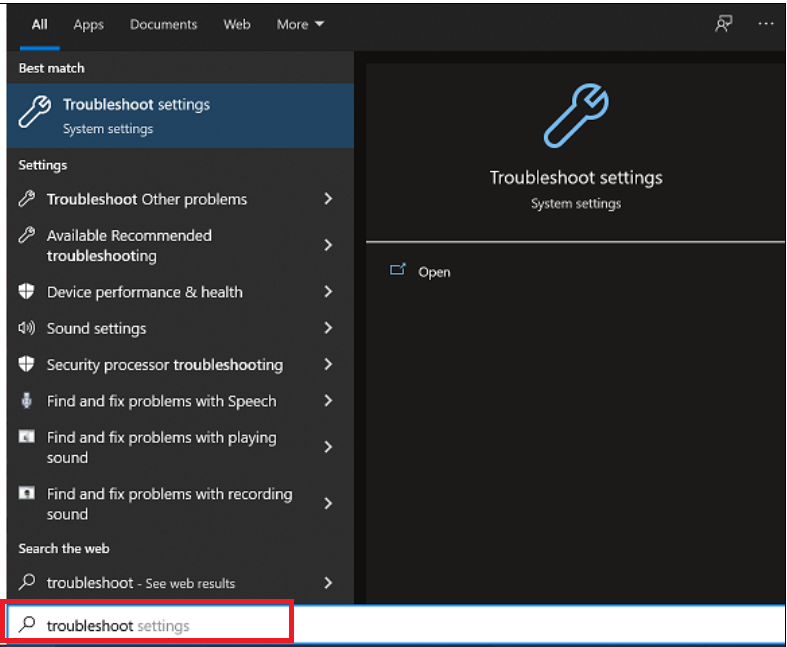
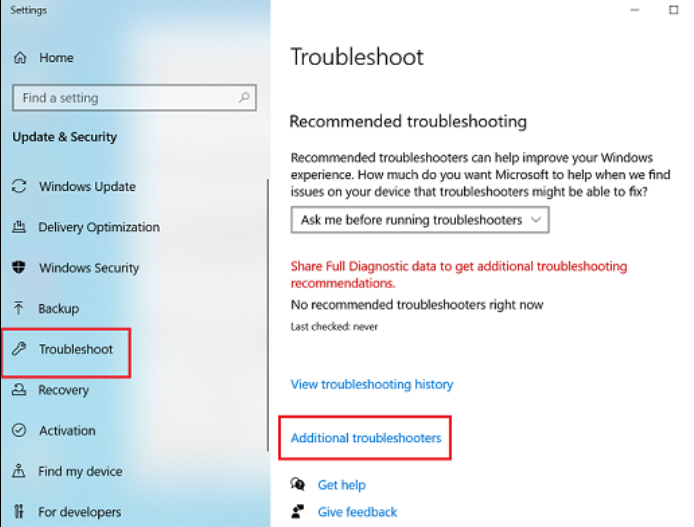
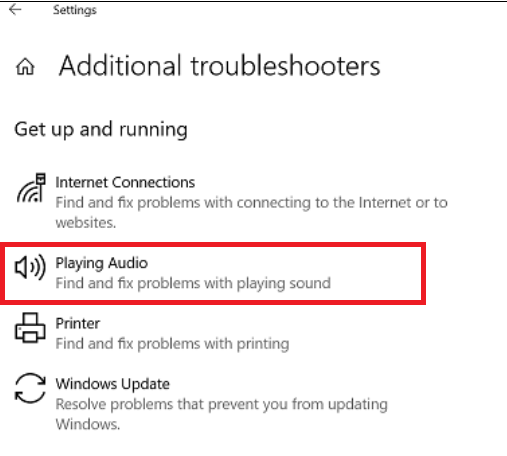
Step 1: Search for troubleshoot settings and open the first result.
Step 2: On the right side of the screen, click on Additional troubleshooters .
Step 3: From the list of troubleshooters, select Playing Audio.
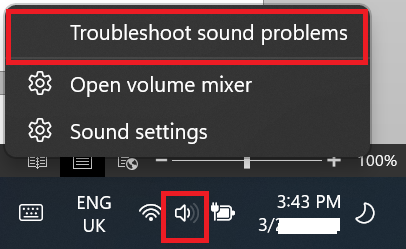
Windows 11
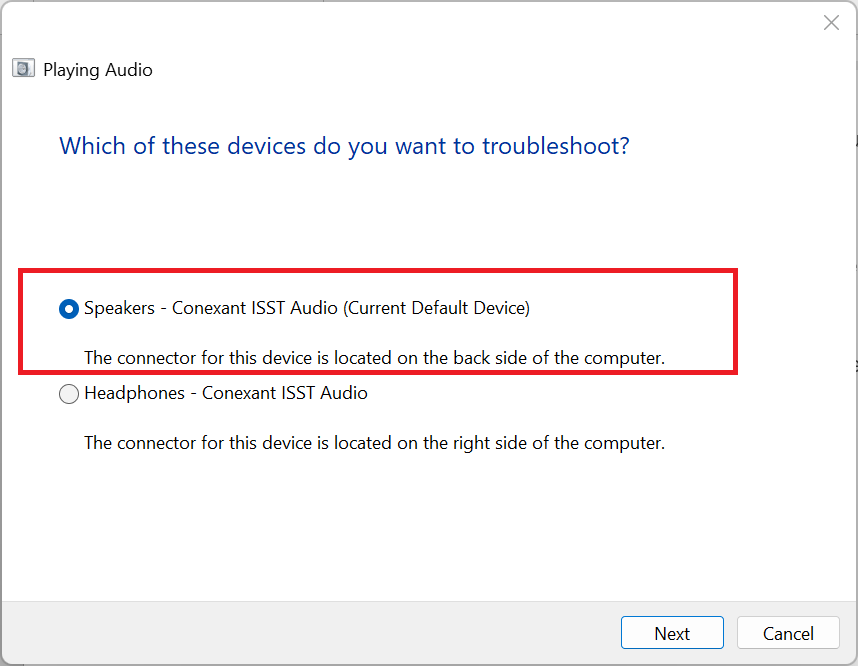
Step 1: Right-click the speaker icon in the taskbar and click Troubleshoot sound problems .
Step 2: Click on Speakers and click Next to continue.
The troubleshooter will begin detecting problems. Follow the on-screen instructions to resolve the issue.
For Windows 11 users, clicking the Troubleshoot sound problems may launch the Get Help app, depending on the Windows version, especially for those using 23H2 and 24H2 versions.
If that’s the case in your situation, you have to give consent by clicking Yes for Windows to diagnose the audio problem. The process might take time, so be patient. If it doesn’t work, proceed to the next solution.
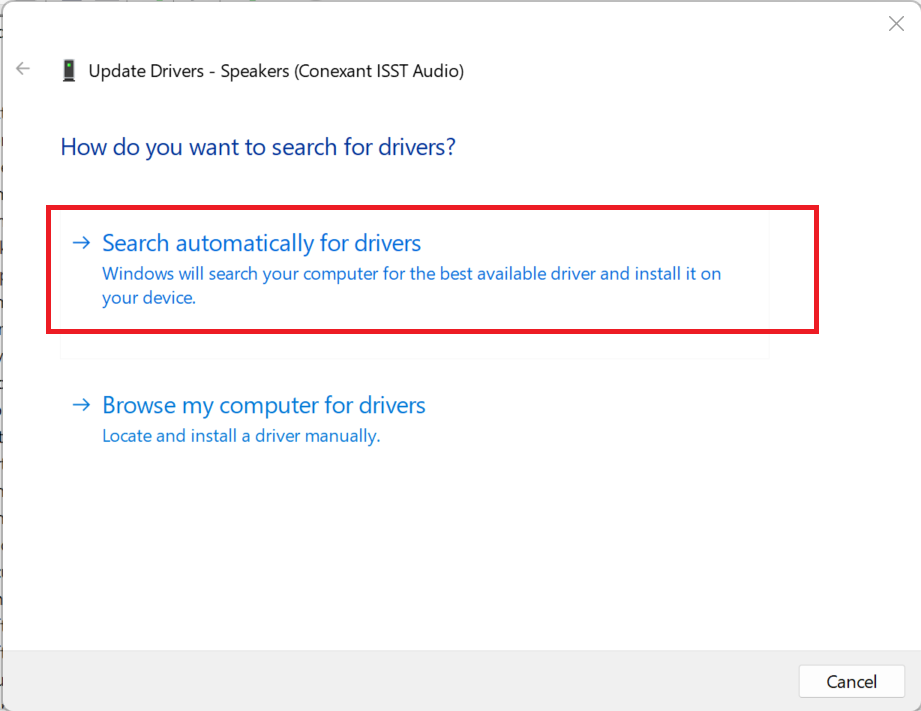
Solution 2: Update your audio drivers
Frequently, outdated drivers can be the culprit behind this problem. If the error is linked to drivers, try updating your audio drivers. To do that, follow these steps:
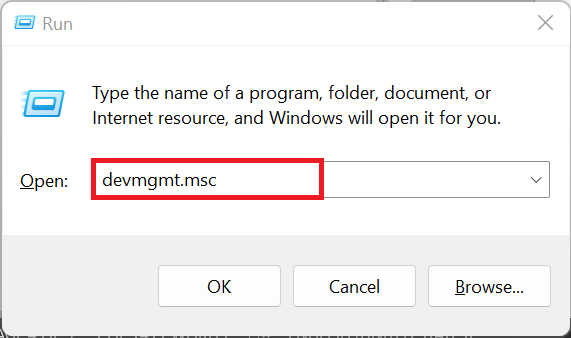
Step 1: Press the Windows key + R at the same time. In the Run dialogue box, type devmgmt.msc .
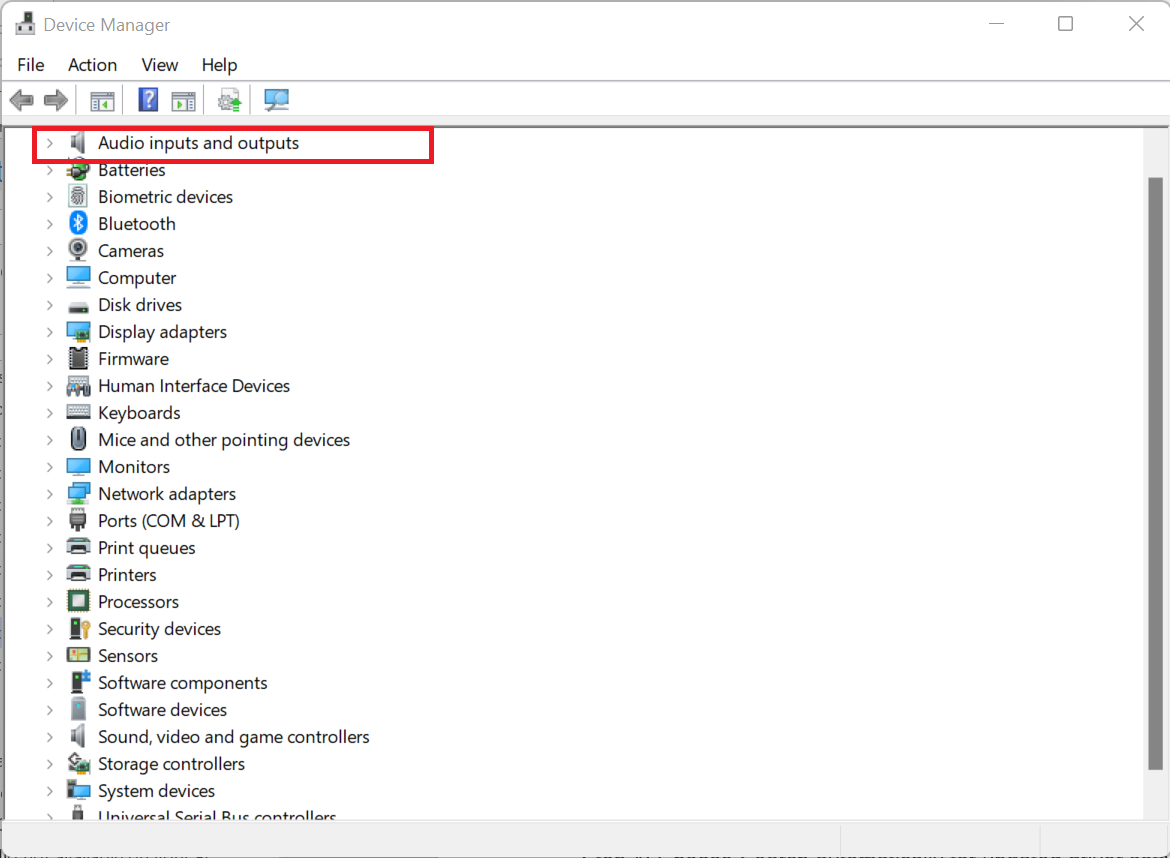
Step 2: Click on the Audio inputs and outputs group to expand the options.
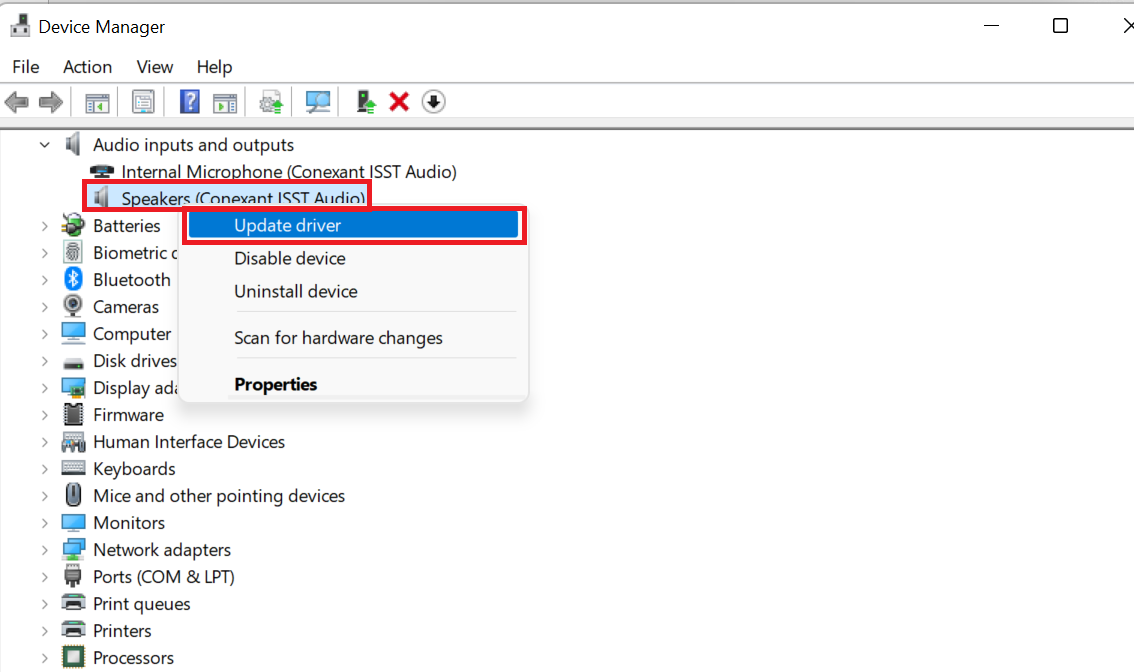
Step 3: Right-click on Speakers and select Update driver .
Step 4: Choose Search automatically for drivers and allow Windows to find and install the latest version of the driver.
You can also go to the Sound, video and game controllers category and follow steps 3 to 5 to update the drivers found there.
Step 5: Restart your computer and check if the issue is resolved.
PRO TIP
Windows might tell you your drivers are up to date, but that’s not always the case, as the system doesn’t always detect the latest versions. So, if you’re still experiencing the audio issue, a simpler and safer solution is to use
Auslogics Driver Updater . It automatically scans your system, identifies outdated or missing drivers, and updates them with the latest, manufacturer-approved versions.
This tool helps prevent driver-related issues, ensures compatibility, and even creates backups before updating, giving you peace of mind to roll back if needed.
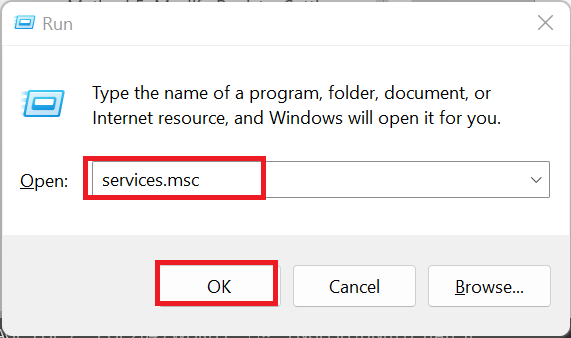
Solution 3: Restart Windows Audio services manually
Manually restarting the audio services can be a simple yet effective solution to fix the “ Windows audio services are not responding” error. This is because it directly refreshes the part of your computer responsible for sound, which can clear out potential glitches or errors that may have caused the issue in the first place. Follow the steps below: Step 1: Press the Windows + R keys at the same time to open the Run dialog box. Type services.msc and click OK to launch the Services tool.
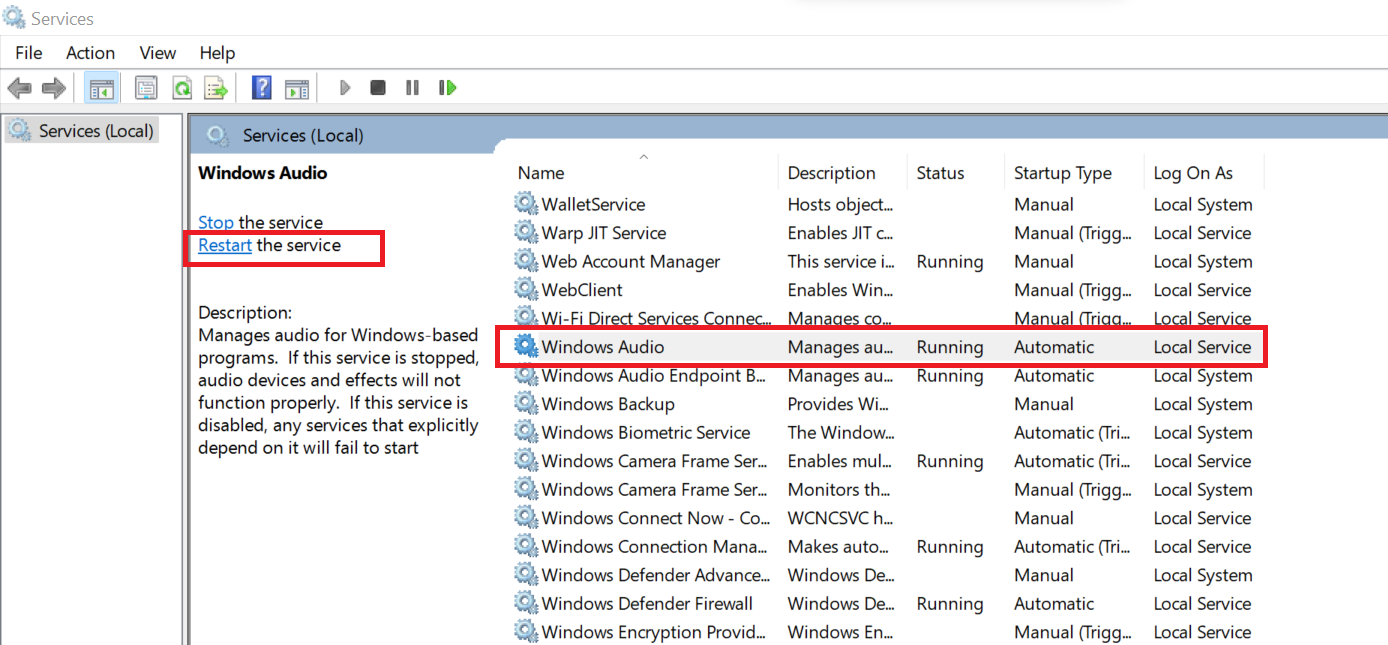
Step 2: Scroll down until you locate Windows Audio . Click on it and, in the left pane, click on Restart the service .
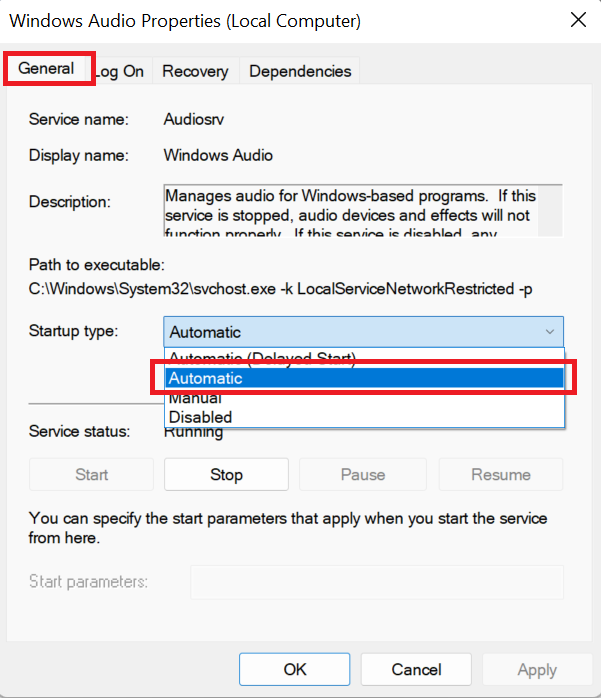
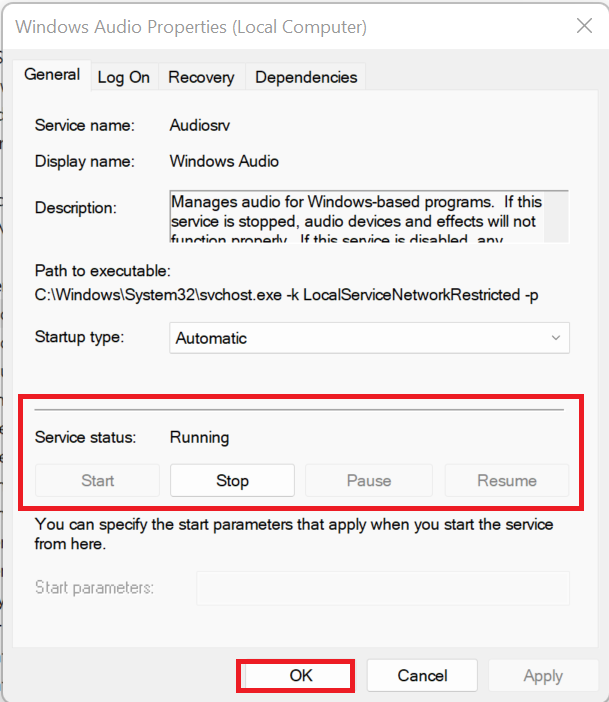
Step 3: Right-click on the Windows Audio service and select Properties .
Step 4: In the General tab, pick Automatic from the dropdown menu under Startup type .
Step 5: If Service status shows Stopped , click the Start button to change the status to Running.
Check if this solves the problem. If not, move on to the next solution.
Solution 4: Boot into Safe Mode
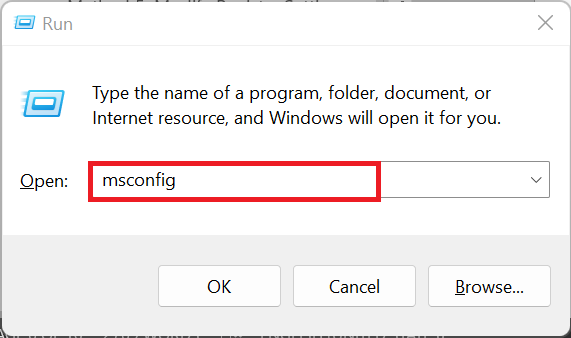
If you’’re having audio issues, booting your PC into Safe Mode is a smart step to identify the root cause. This method only loads essential system components, temporarily disabling third-party applications like sound enhancement software or virtual audio drivers that might be interfering with your settings. If your audio works fine in Safe Mode, it’s a clear sign that a third-party app is the culprit. Here’s how to test it: Step 1: Press Windows + R, type msconfig , and hit Enter.
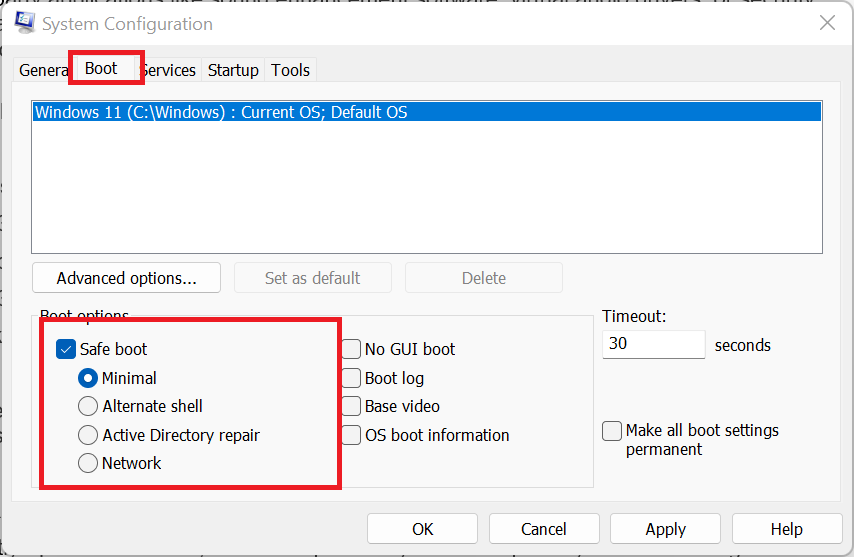
Step 2: Go to the Boot tab and check Safe boot under Boot options . Under it, select Minimal .
Step 3: Click OK , restart your PC, and check if the audio works.
Play any sound in Safe Mode. If the audio works, uninstall any recently installed apps in Safe Mode that may be causing conflicts:
You can uninstall these apps outside of Safe Mode if you prefer, but doing so in Safe Mode may be more effective. In Safe Mode, only essential system processes and services are running, which reduces the likelihood that the apps you’re trying to remove will interfere with the uninstallation.
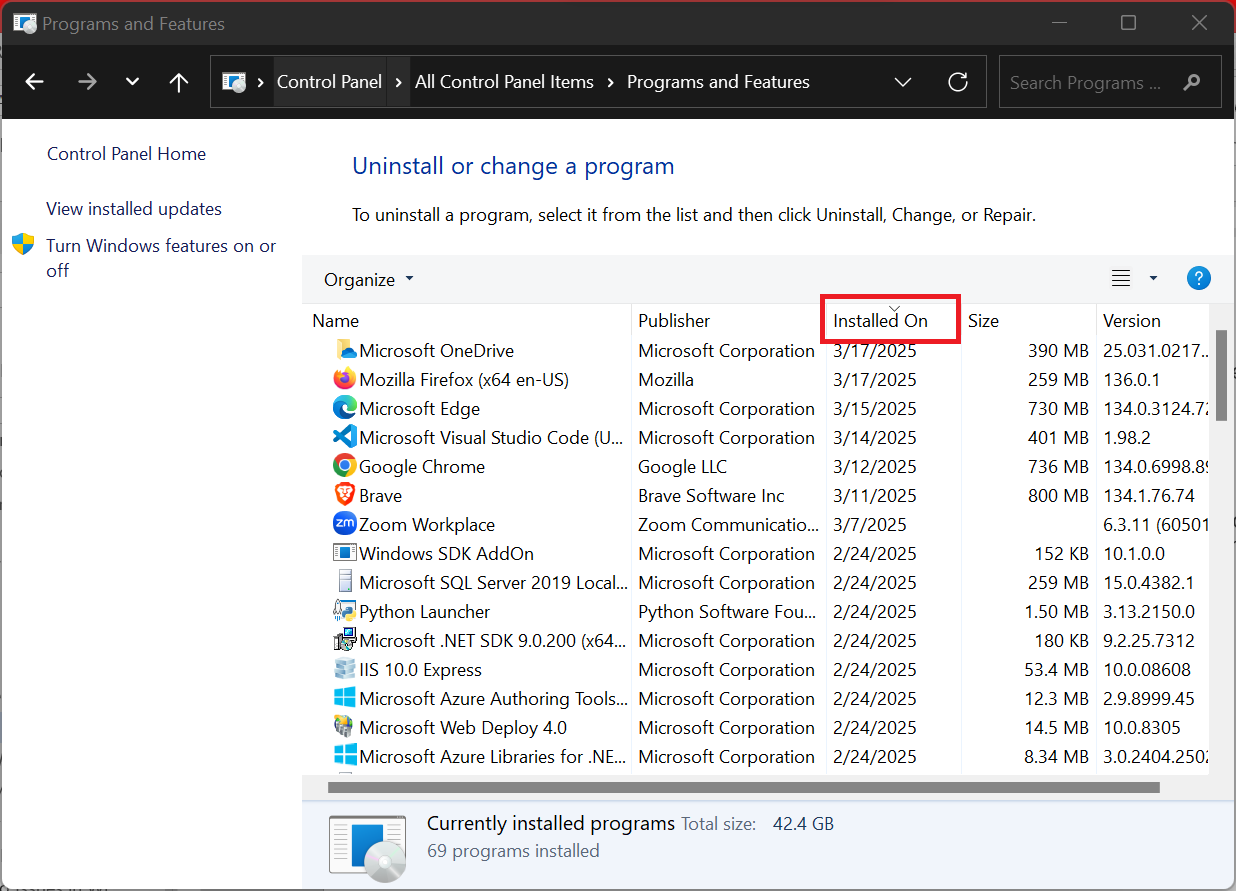
- Press
Win + R, type control , and hit Enter to open the Control Panel.
- Click Programs and Features .
- Sort by Installed On to see the latest installations.
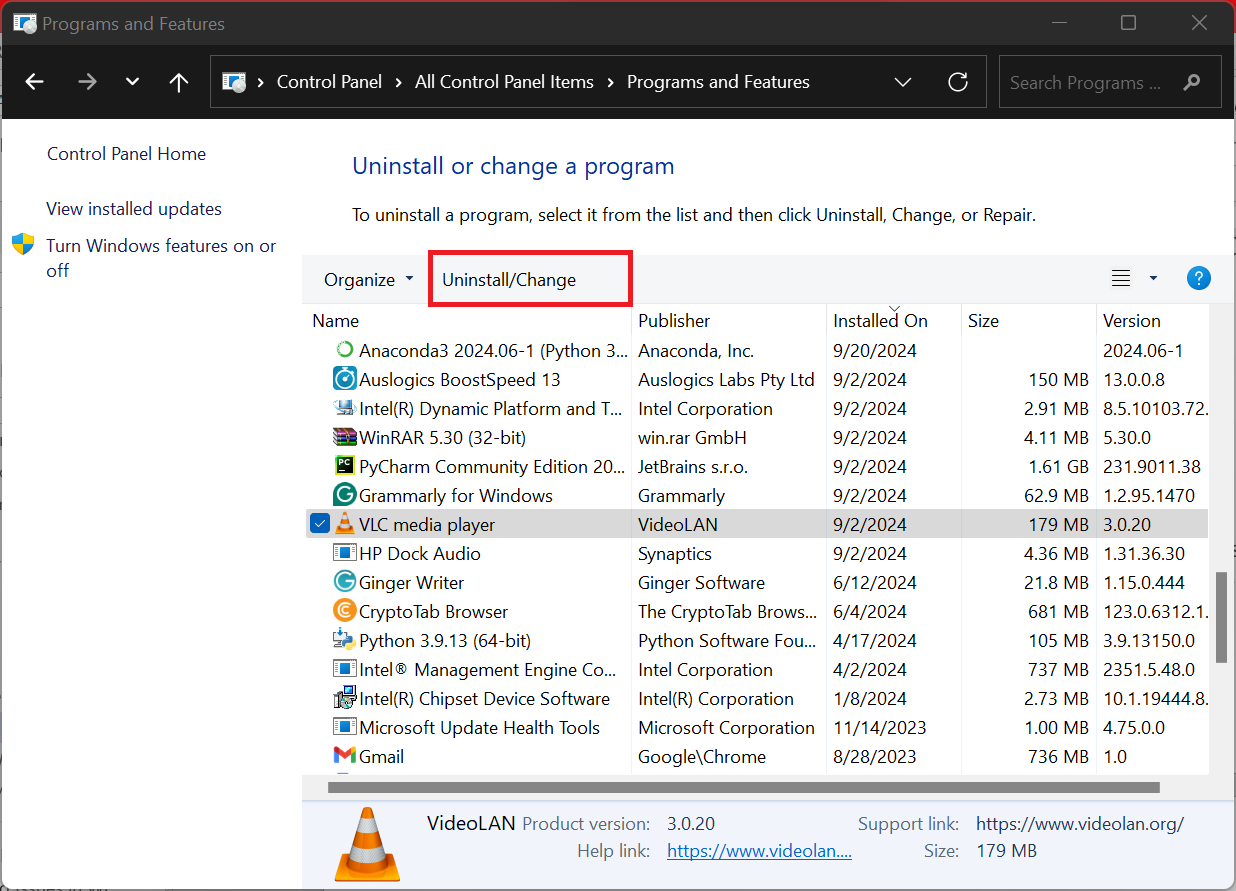
- Locate any third-party app that might be causing issues. Look for apps related to audio enhancements, or media players that might interfere with your system audio. Select such apps and click Uninstall/Change at the top.
Follow the prompts to complete the process. After uninstalling, go to the Bboot tab again, uncheck Safe boot , then switch to the General tab and select Normal startup. Apply the changesThen, restart your PC, and check if the issue is resolved.
If your audio doesn’t work in Safe Mode or the issue resurfaces after deleting the third-party apps, move to the next solution.
Solution 5: Modify the log on settings of services
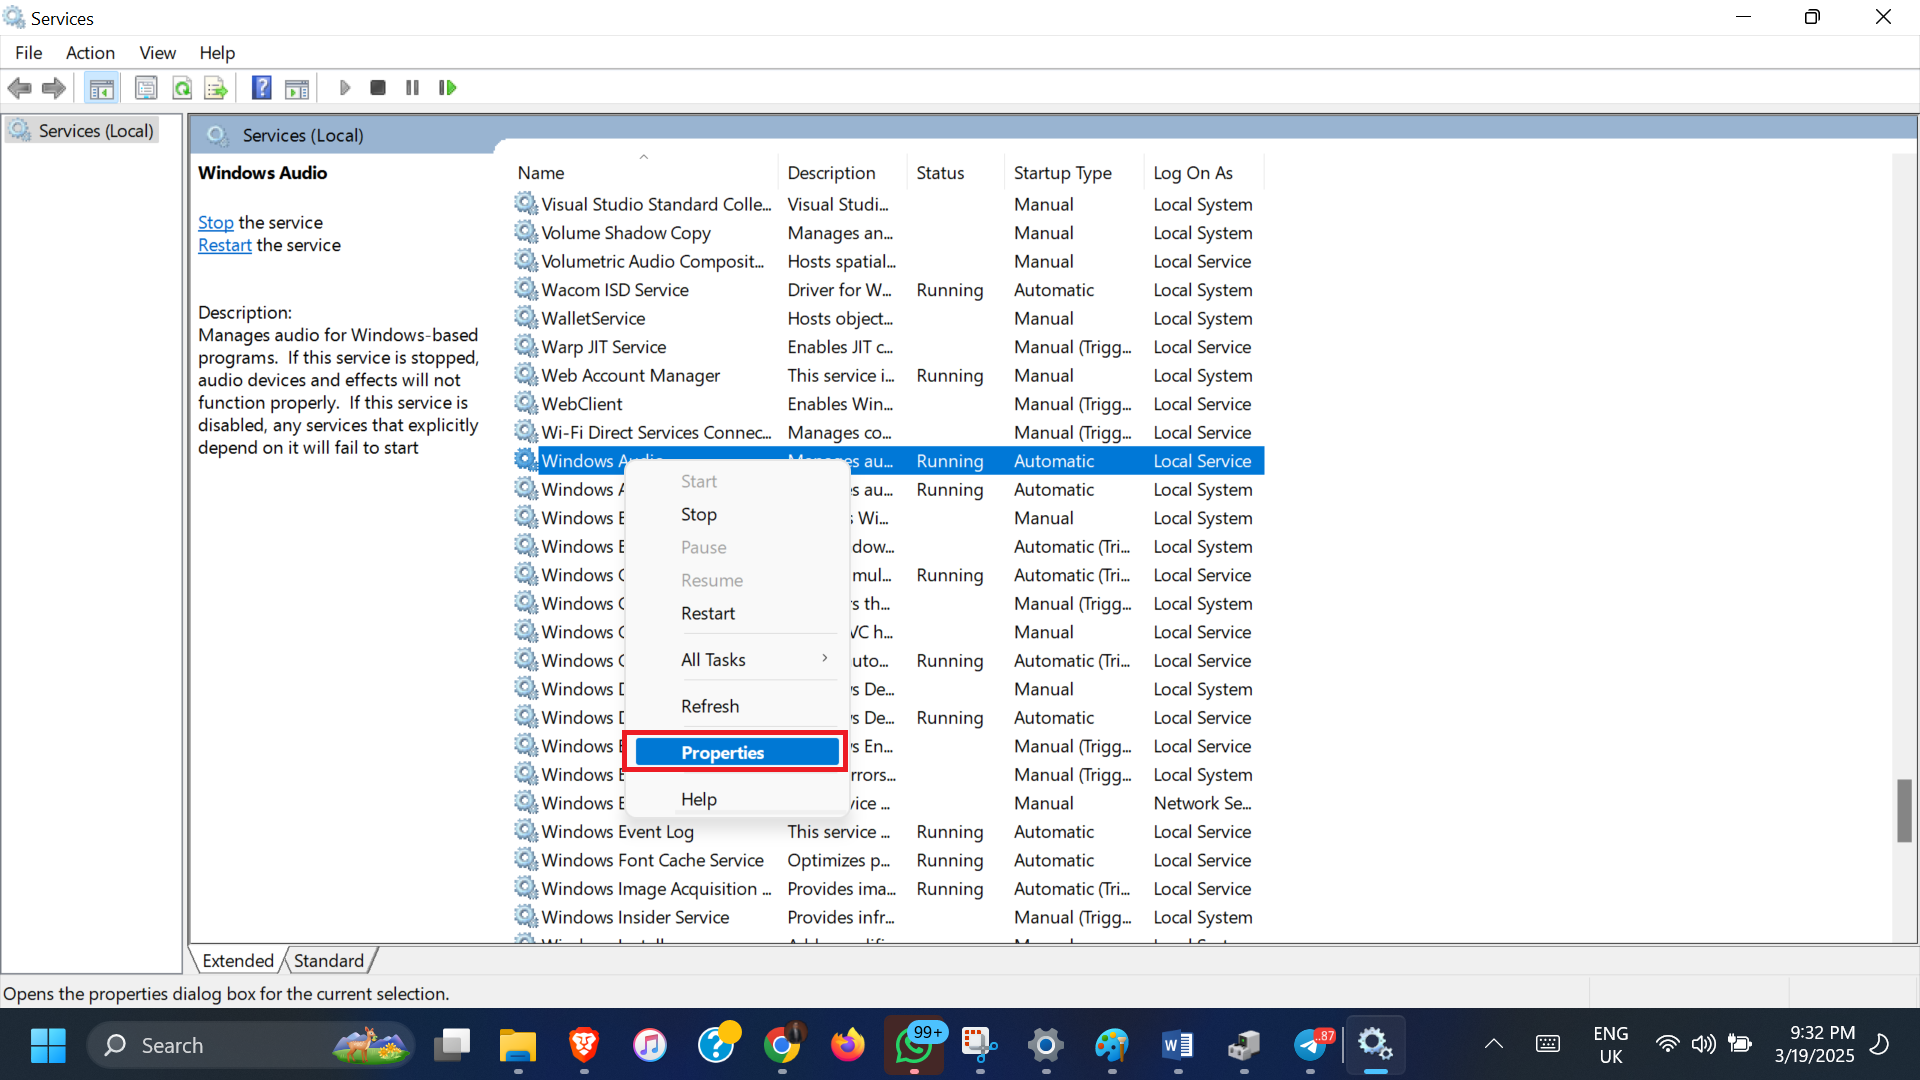
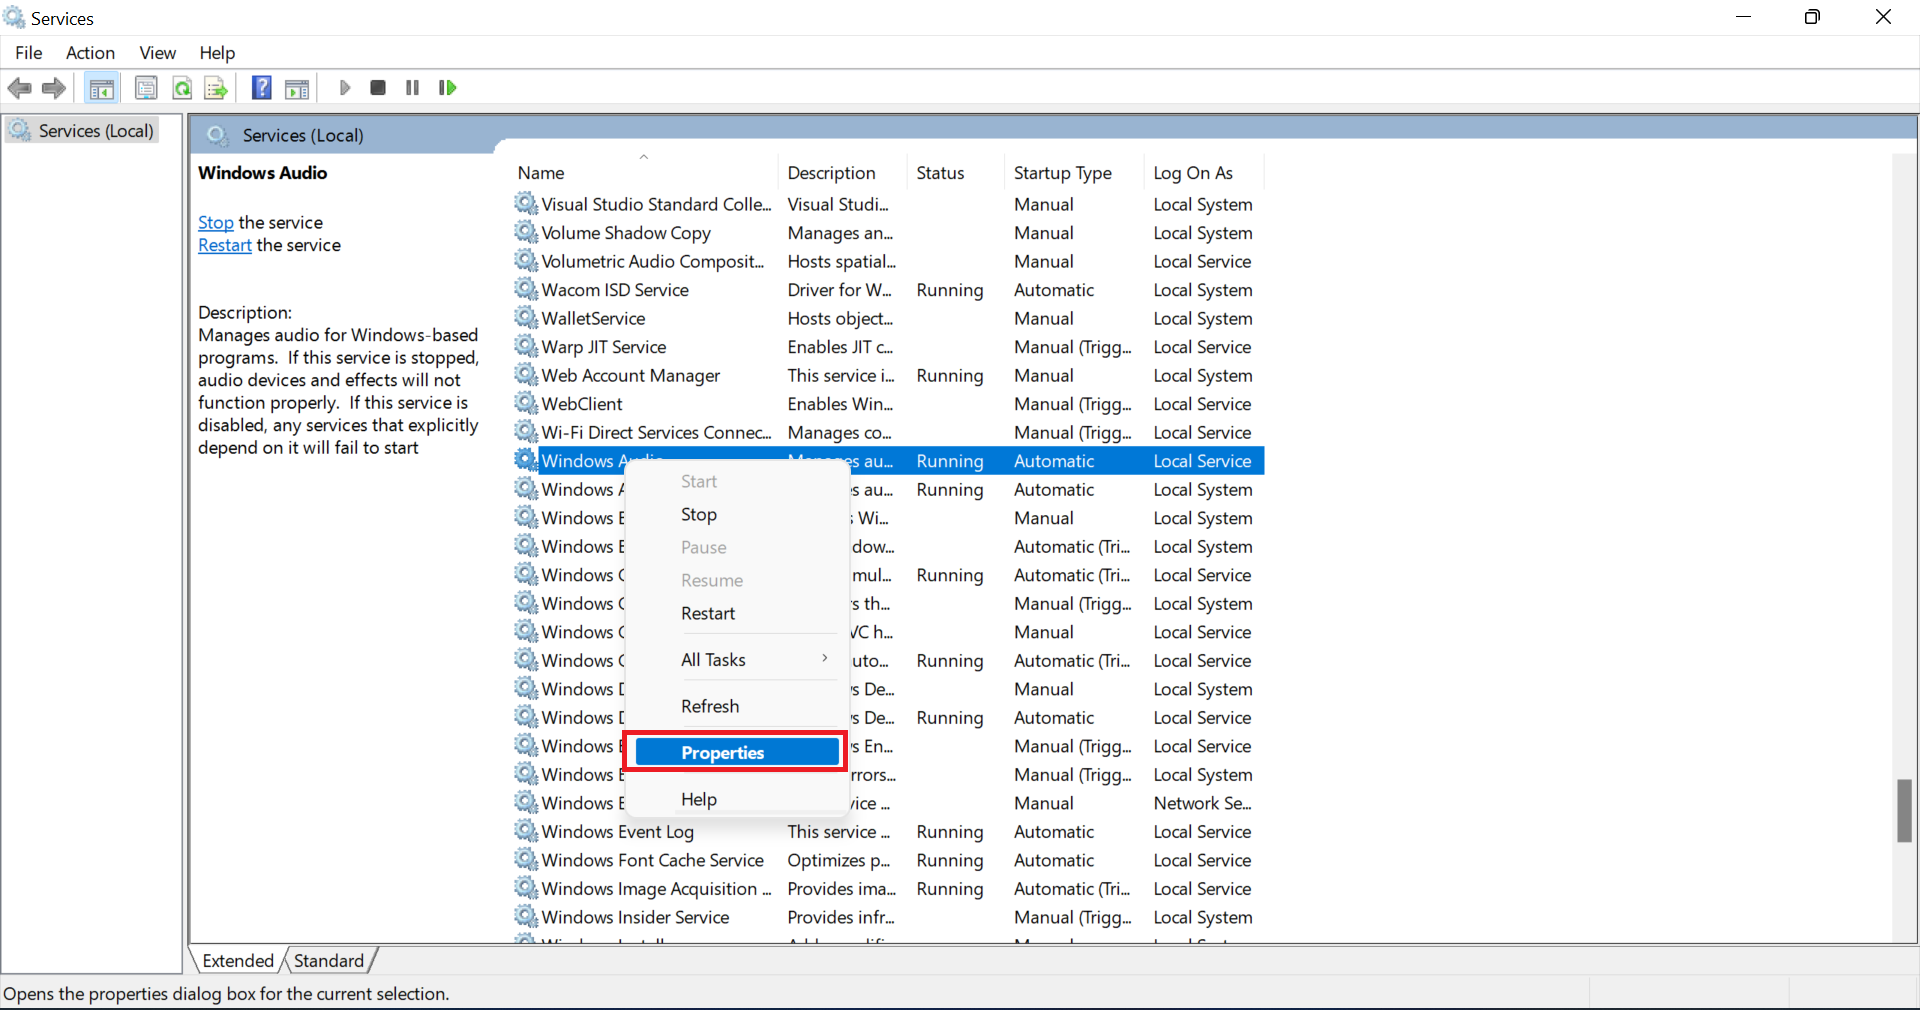
If your computer has multiple user accounts , each may have different access levels or settings, which can sometimes cause conflicts. This might lead to audio issues if the Windows Audio service is unable to log into a specific account due to restricted permissions or misconfigured settings. Here’s the solution to address this issue: Step 1: Open the Services application and locate Windows Audio like you did in Solution 3. Right-click the Windows Audio service and click Properties .
Step 2: Within this window, navigate to the Log On tab.
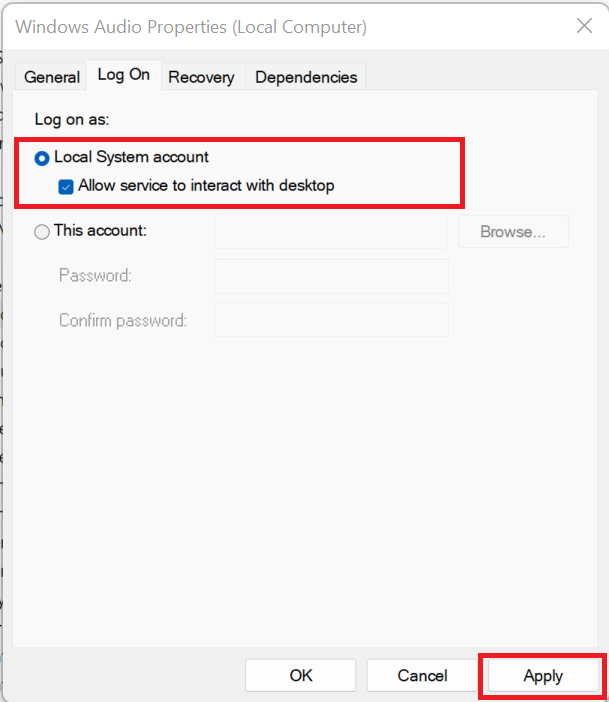
Step 3: Enable the Local System account option and click Apply .
Step 4: Check if your audio is working. If it’s not, proceed to the next step.
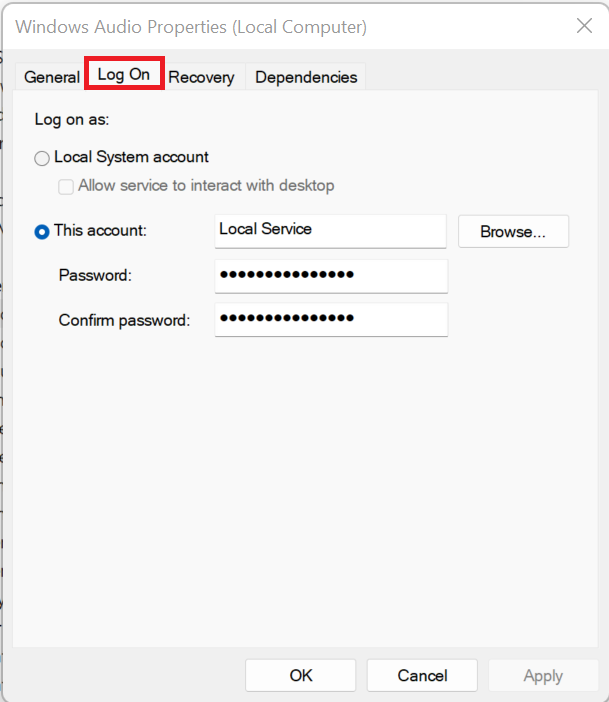
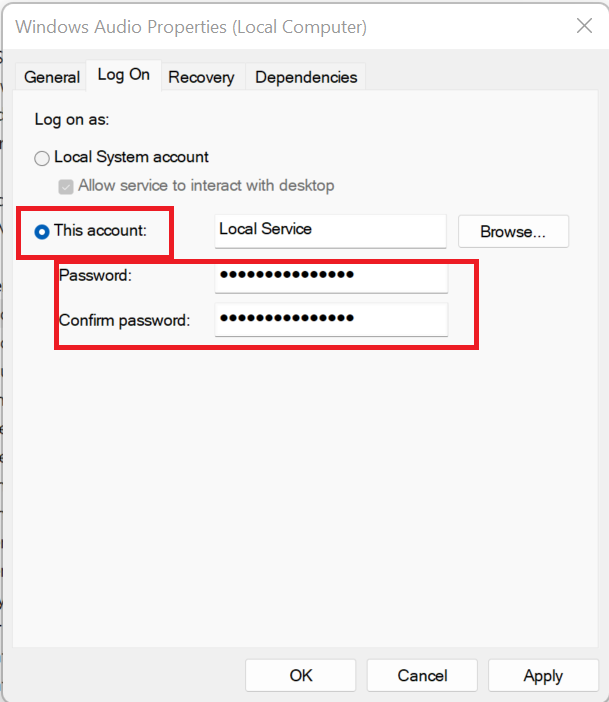
Step 5: On the Log On tab, select This account : and enter Local Service in the adjacent text box. Complete the Password and Confirm password fields and click Apply and then OK to confirm the changes.
The last step will manually configure the Windows Audio sService to run under a specific account ( Local Service ). If there’s a misconfiguration or conflict with the service’’s current account, assigning the ” Local Service ” account can help resolve the issue.
If it doesn’t work, go to the next solution.
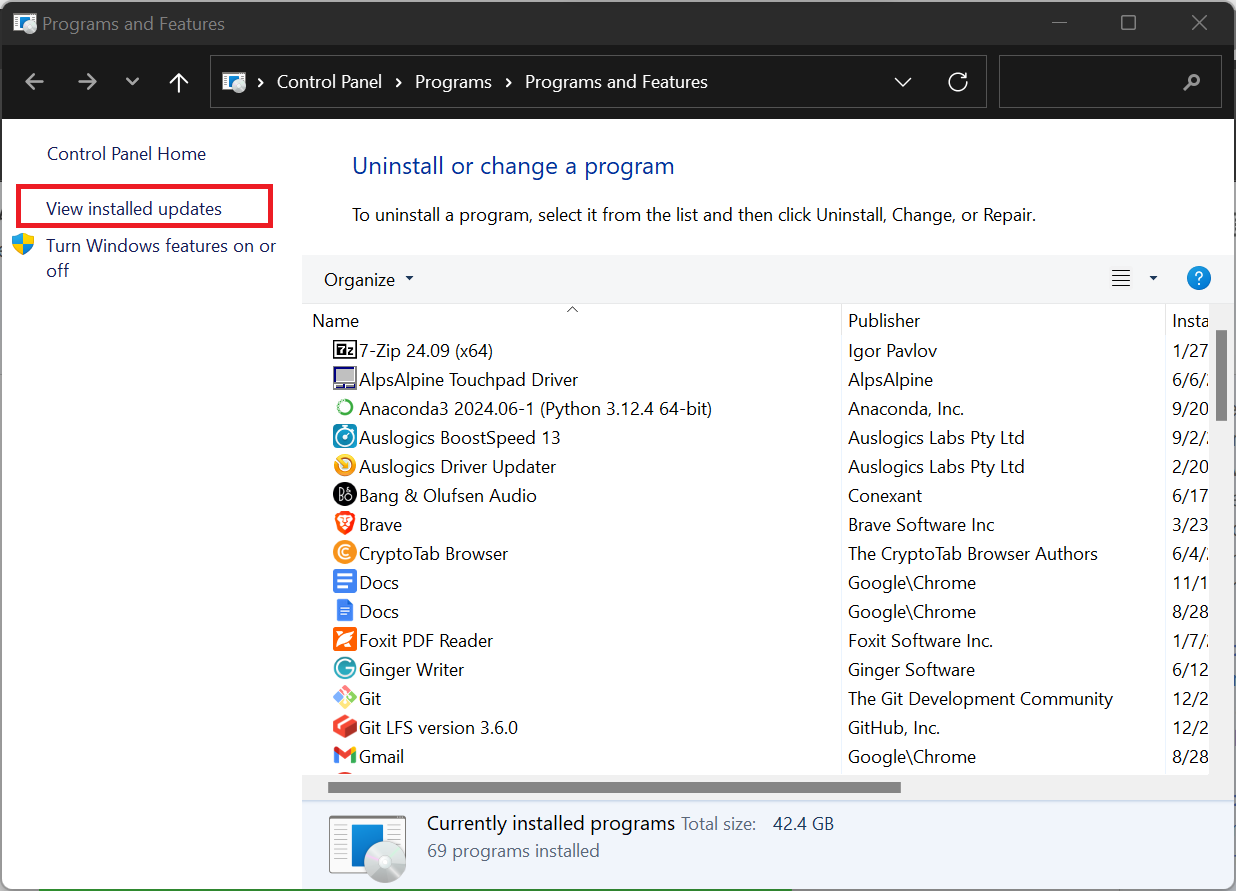
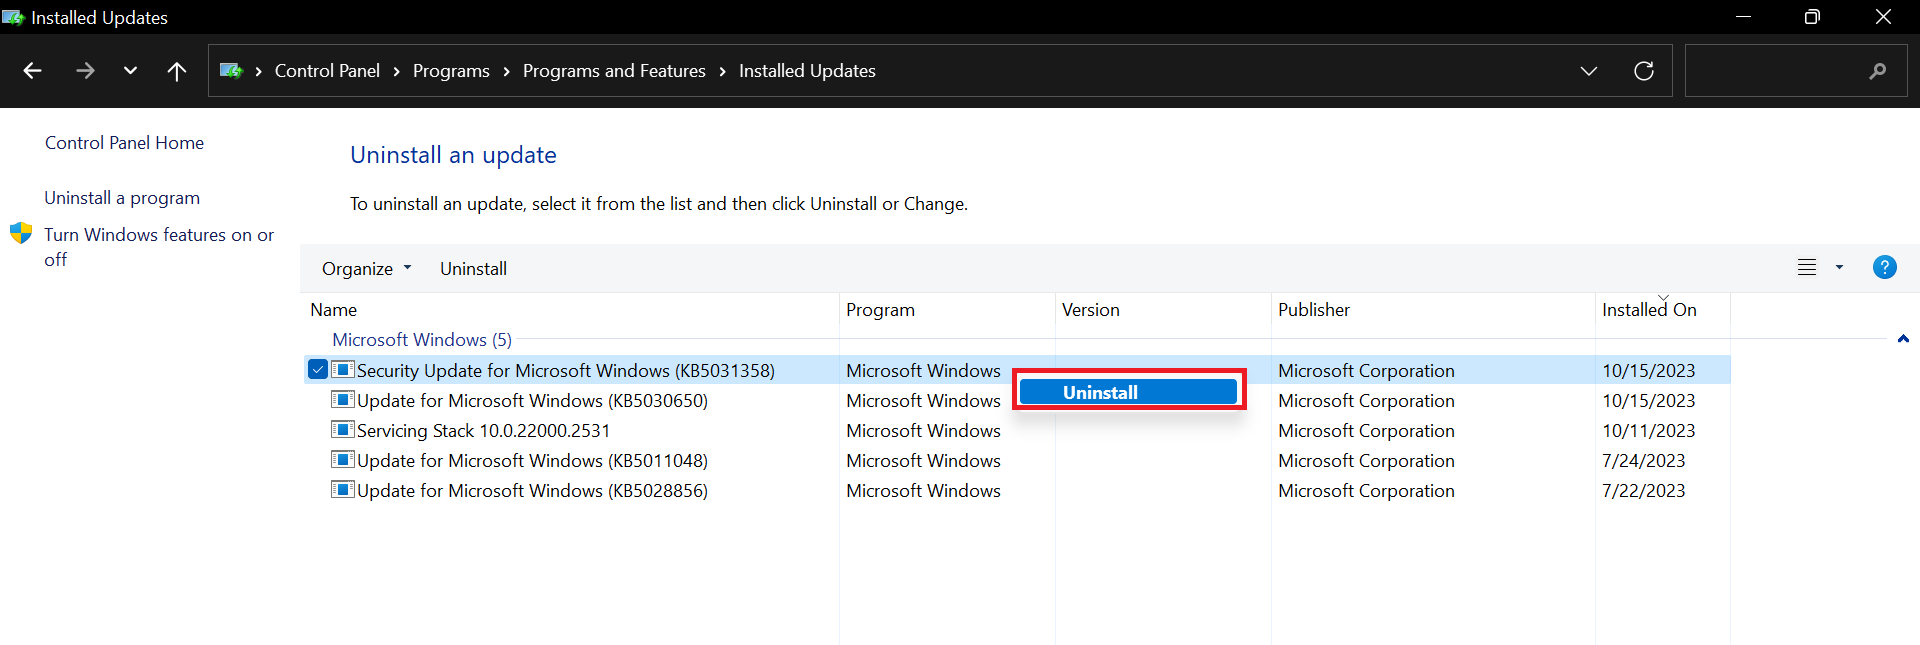
Solution 6: Roll back recent Windows updates
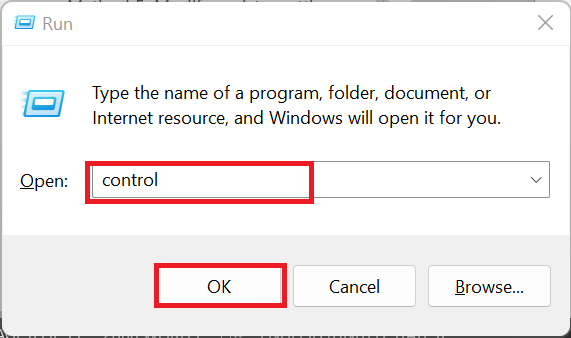
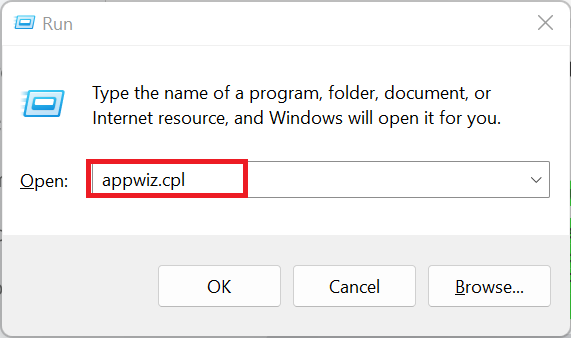
If you recently updated Windows , there is a possibility that the update you installed might have bugs or it’s not compatible with your audio driver. Microsoft typically releases patches for such problems, but in the meantime, you can roll back the update to restore audio functionality. Here’s how to do it: Step 1: Press the Windows key + R, type appwiz.cpl , and press Enter.
Step 2: In the left pane, click on View installed updates .
Step 3: Locate the most recent update under the Microsoft Windows section (check the installation date).
Step 4: Right-click the update and select Uninstall .
Step 5: Confirm the action and restart your computer to check if the issue is resolved.
If this fixes the problem, you may want to pause Windows updates temporarily to prevent the same issue from recurring.
You can pause updates in Windows 10 by going to Settings > Update & Security > Windows Update > Pause updates for 7 days and in Windows 11 by going to Settings > Windows Update > Pause updates and selecting the pause period . You can adjust the pause period for Windows 10 in Advanced options .
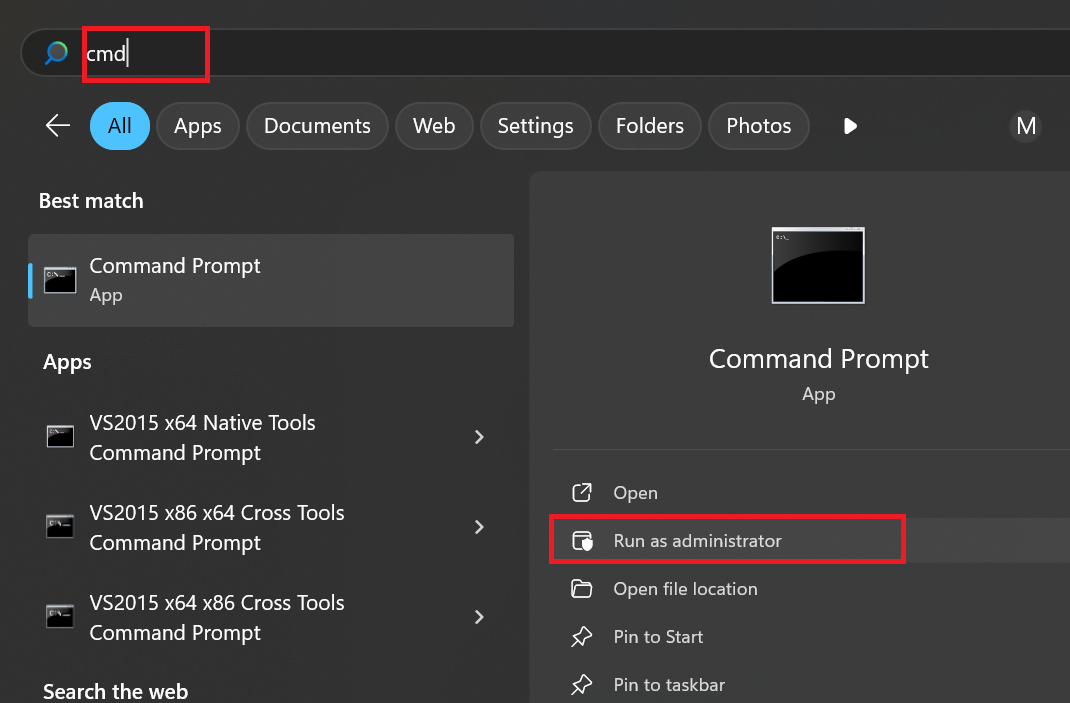
Solution 7: Fix the local account configurations
In addition to issues with the Windows Audio service, errors can also arise due to incorrect settings of the local account.
A local account is a user account that only works on one computer and doesn’t connect to the Internet or Microsoft services. It stores all files and settings on that computer.
You can resolve these issues by running a few specific commands using the Command Prompt :
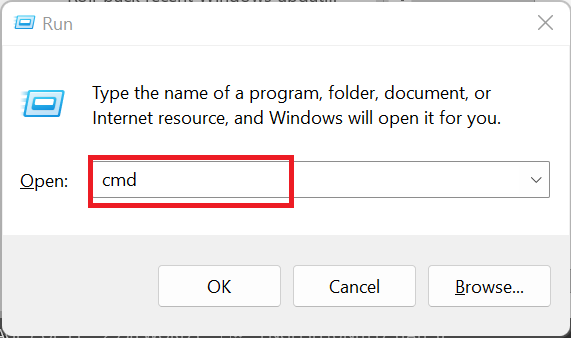
Step 1: Press the Windows key, type cmd , and select Run as administrator .
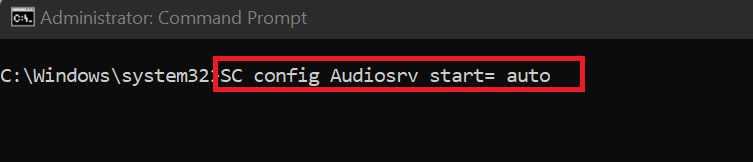
Step 2: Enter the following commands one by one and press Enter to check if this resolves the issue:
net localgroup Administrators /add networkservice
net localgroup Administrators /add localservice
net localgroup Administrators /add localservice
Note
These first two commands will ensure that the necessary service accounts are granted administrator-level privileges. This is important because these accounts are used to run critical system processes like audio services.
SC config Audiosrv start= auto
Note
This third command adjusts the settings so that the audio service starts automatically when your computer boots up to prevent future disruptions.
REG ADD "HKLM\SYSTEM\CurrentControlSet\Services\Audiosrv" /V start /T REG_DWORD /D 2 /F secedit /configure /cfg %windir%\inf\defltbase.inf /db defltbase.sdb /verbose
The final command restores the default permissions and settings for the audio service by resetting it to the system’s baseline configuration. This clears any misconfigurations or corrupt entries that may be causing the issue with the a udio services not responding on Windows 10 and 11.
Once these commands are executed, your audio system should be back on track. If the problem persists, it could indicate a deeper issue. The next solution should help resolve the problem.
Download Auslogics Driver Updater
Prevent hardware errors and ensure problem-free device operation with this advanced tool that detects outdated drivers and safely gets them updated.
Solution 8: Run the SFC and DISM commands
Corrupt system files
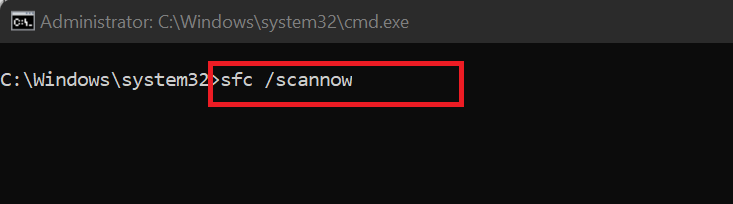
can disrupt the normal functioning of your computer, including its audio services. These files are essential for running various system processes, and if they become damaged or missing, it can lead to the “ Audio services not responding ” error. Running the SFC and DISM scans can help repair these files and restore normal functionality. Let’s go through the process: Step 1: Press Windows + R, type cmd , and press Ctrl + Shift + Enter to open the Command Prompt as an administrator.
Step 2: Type the following command and press Enter:
sfc /scannow
Wait for the process to complete and restart your PC. If the issue persists, proceed with DISM.
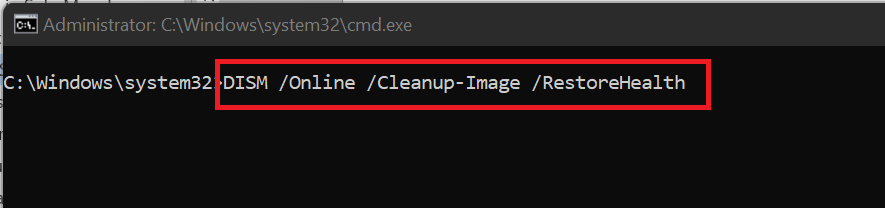
Step 3: Open the Command Prompt as an administrator again and run the following command:
DISM /Online /Cleanup-Image /RestoreHealth
Step 4: Restart your computer and check if the audio issue is resolved.
A system restore
allows you to roll back your computer to a previous state, undoing recent changes that may have caused the problem with your system sound. While this method is effective, it will only work if the problem started recently and a restore point exists from before the issue began.
If you do not have a restore point and you’re not comfortable with editing the registry, you might want to skip directly to Solution 11 and reset Windows.
Here are the steps to follow:
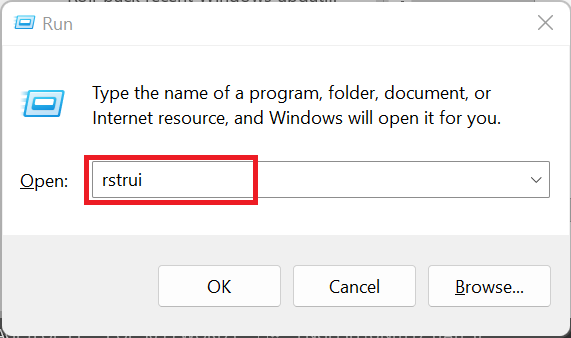
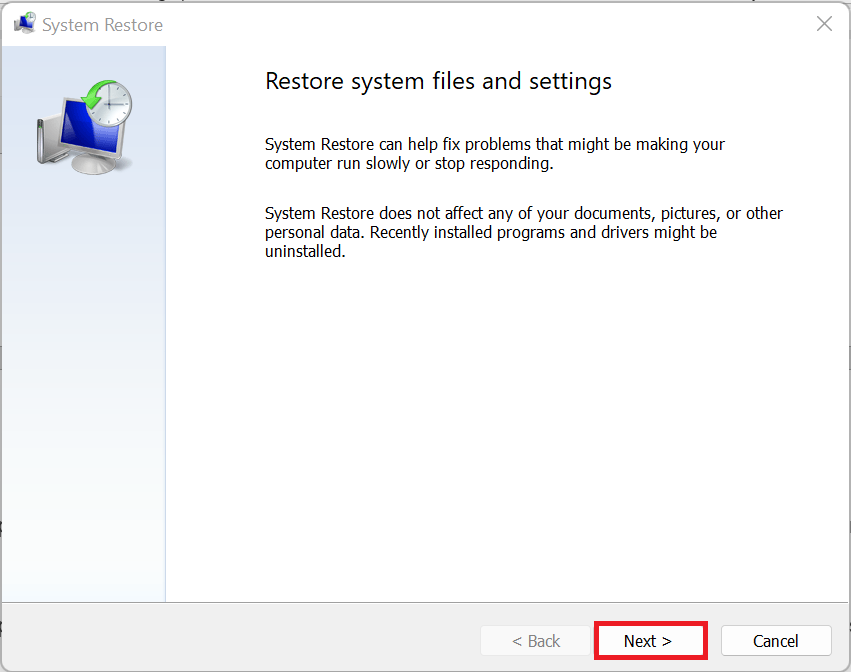
Step 1: Press Windows + R, type rstrui, and hit Enter.
Step 2: In the System Restore window, click Next .
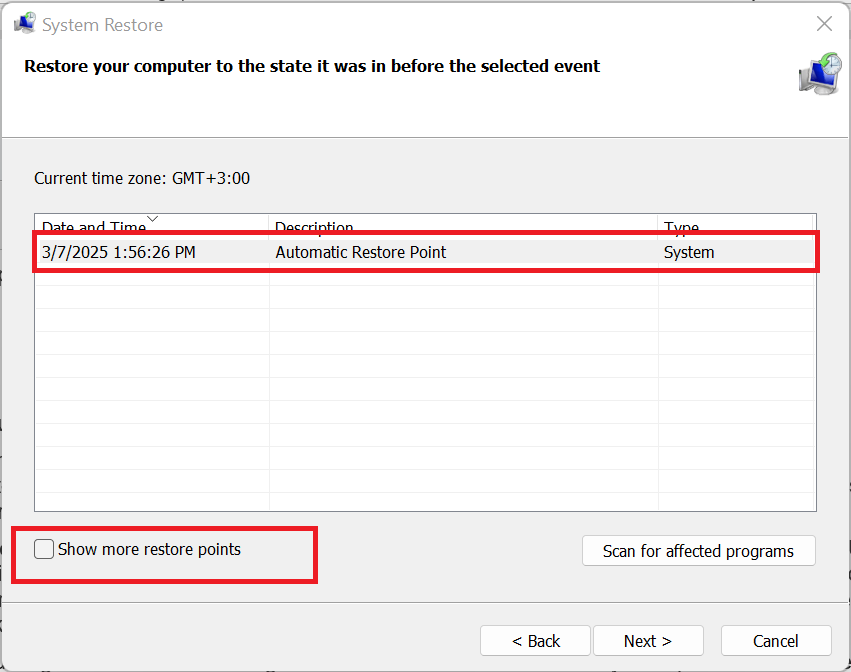
Step 3: Select a restore point from before the sound error started, then click Next .
If you do not see your desired restore point, check the box that says Show more restore points. You can also click Scan for affected programs to see if the audio drivers will be impacted by the restore.
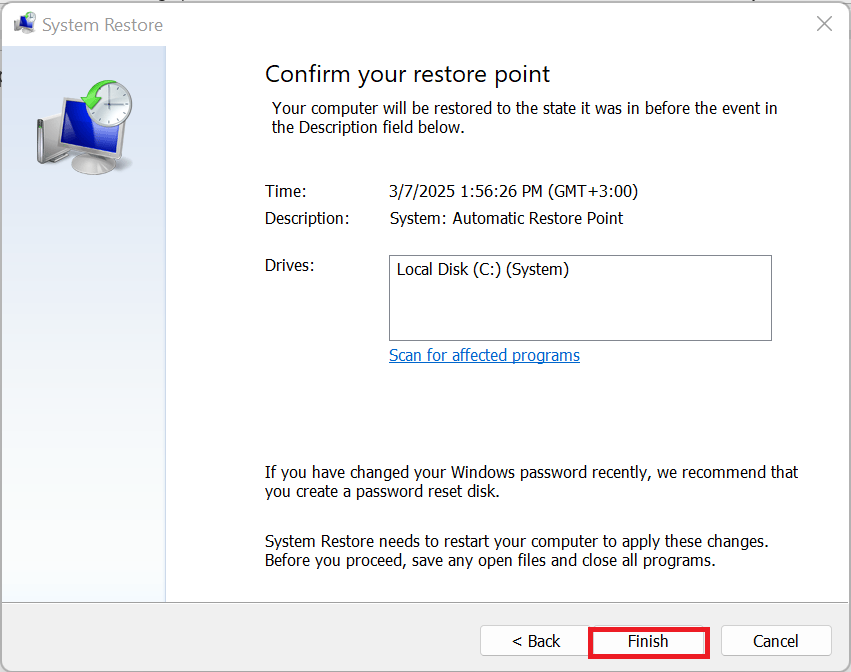
Step 4: Click Finish , then confirm by selecting Yes to begin the restoration.
Wait for the process to complete and restart your computer. The problem should be fixed.
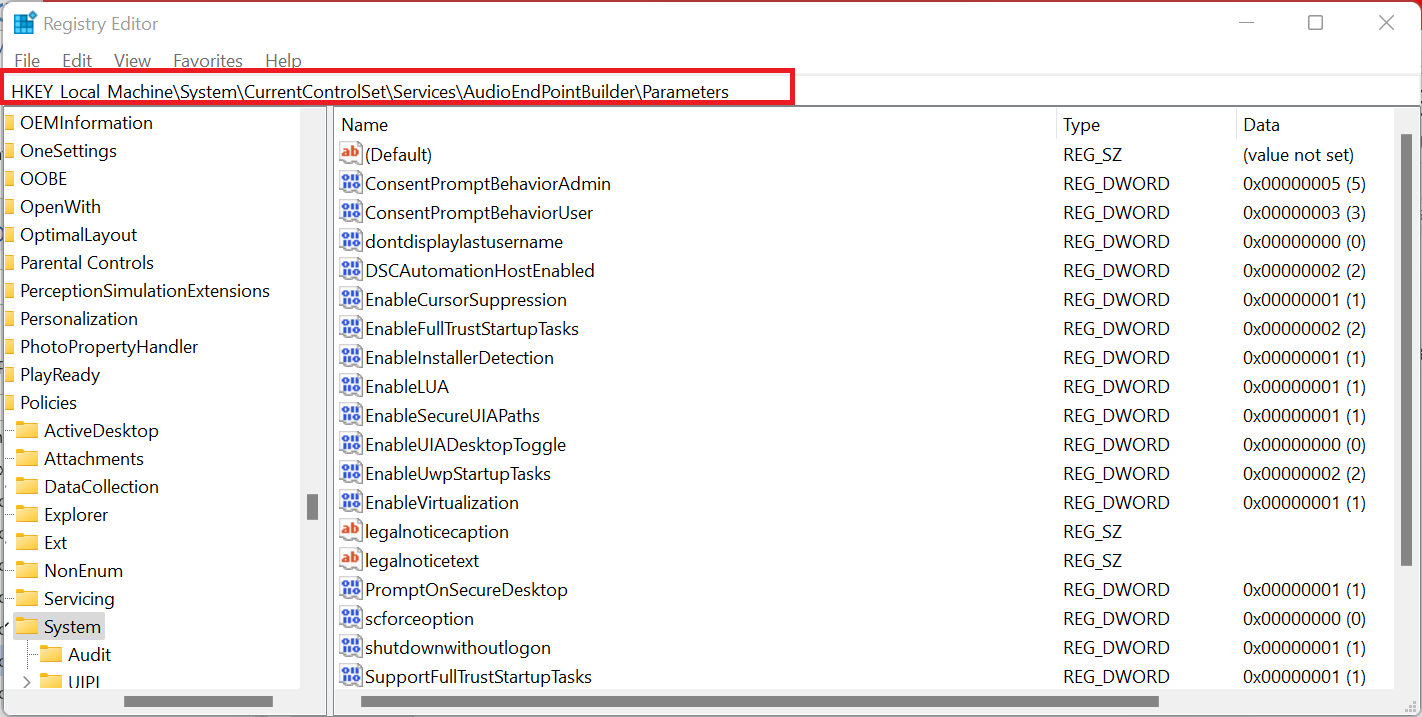
Solution 10: Modify the registry settings
The Windows registry is like the backbone of your computer’s operating system. It’s a database that stores essential settings for hardware, software, and system functions. If an entry related to your audio service is incorrectly configured, it can lead to issues like the “ Audio services not responding ” error. Here’s how to fix the problem using the registry:
Important!
Exercise caution while editing the registry, as any mistakes could lead to more problems. Make sure
to back up your WIndows registry before making any adjustments.
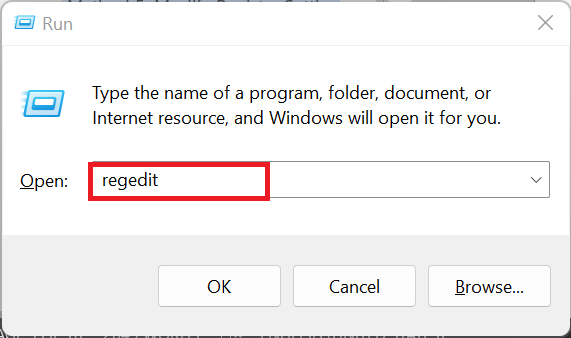
Step 1: Press the Windows key + R together to open the Run dialog box. Type regedit and press Enter to launch the Registry Editor application.
Step 2: In the navigation pane, paste the following path:
HKEY_Local_Machine\System\CurrentControlSet\Services\AudioEndPointBuilder\Parameters
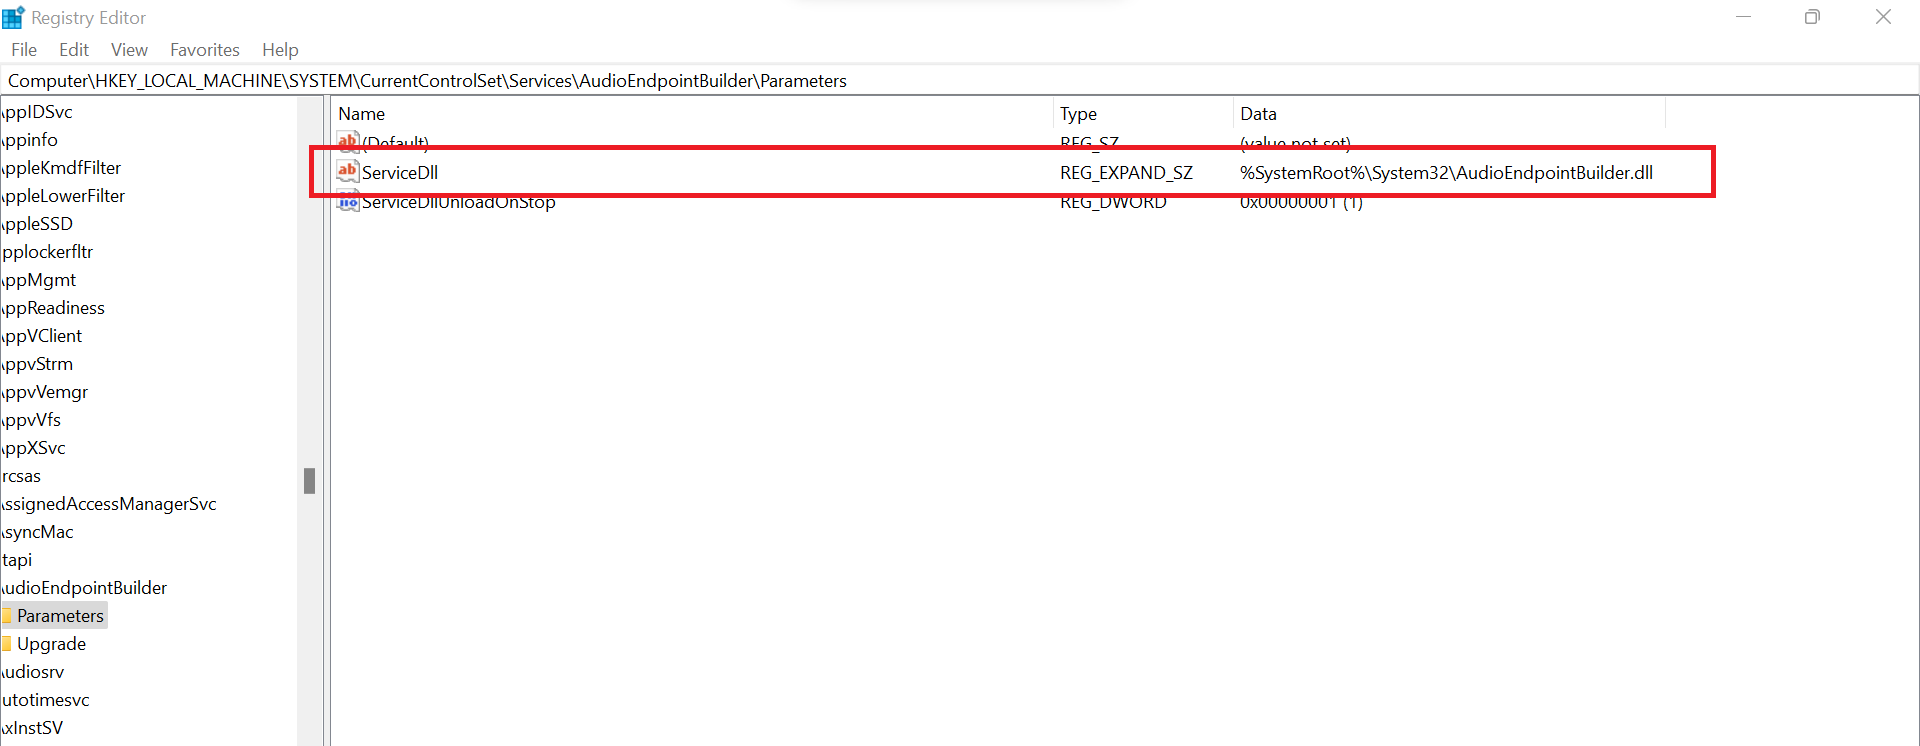
Step 3: On the right, look for ServiceDll and ensure that its Data column reads as follows:
%SystemRoot%\System32\AudioEndPointBuilder.dll
If what you see matches the above, the problem is not from here, so simply skip to the next method. On the other hand, if it doesn’t match, you’ll need to manually adjust the data value:
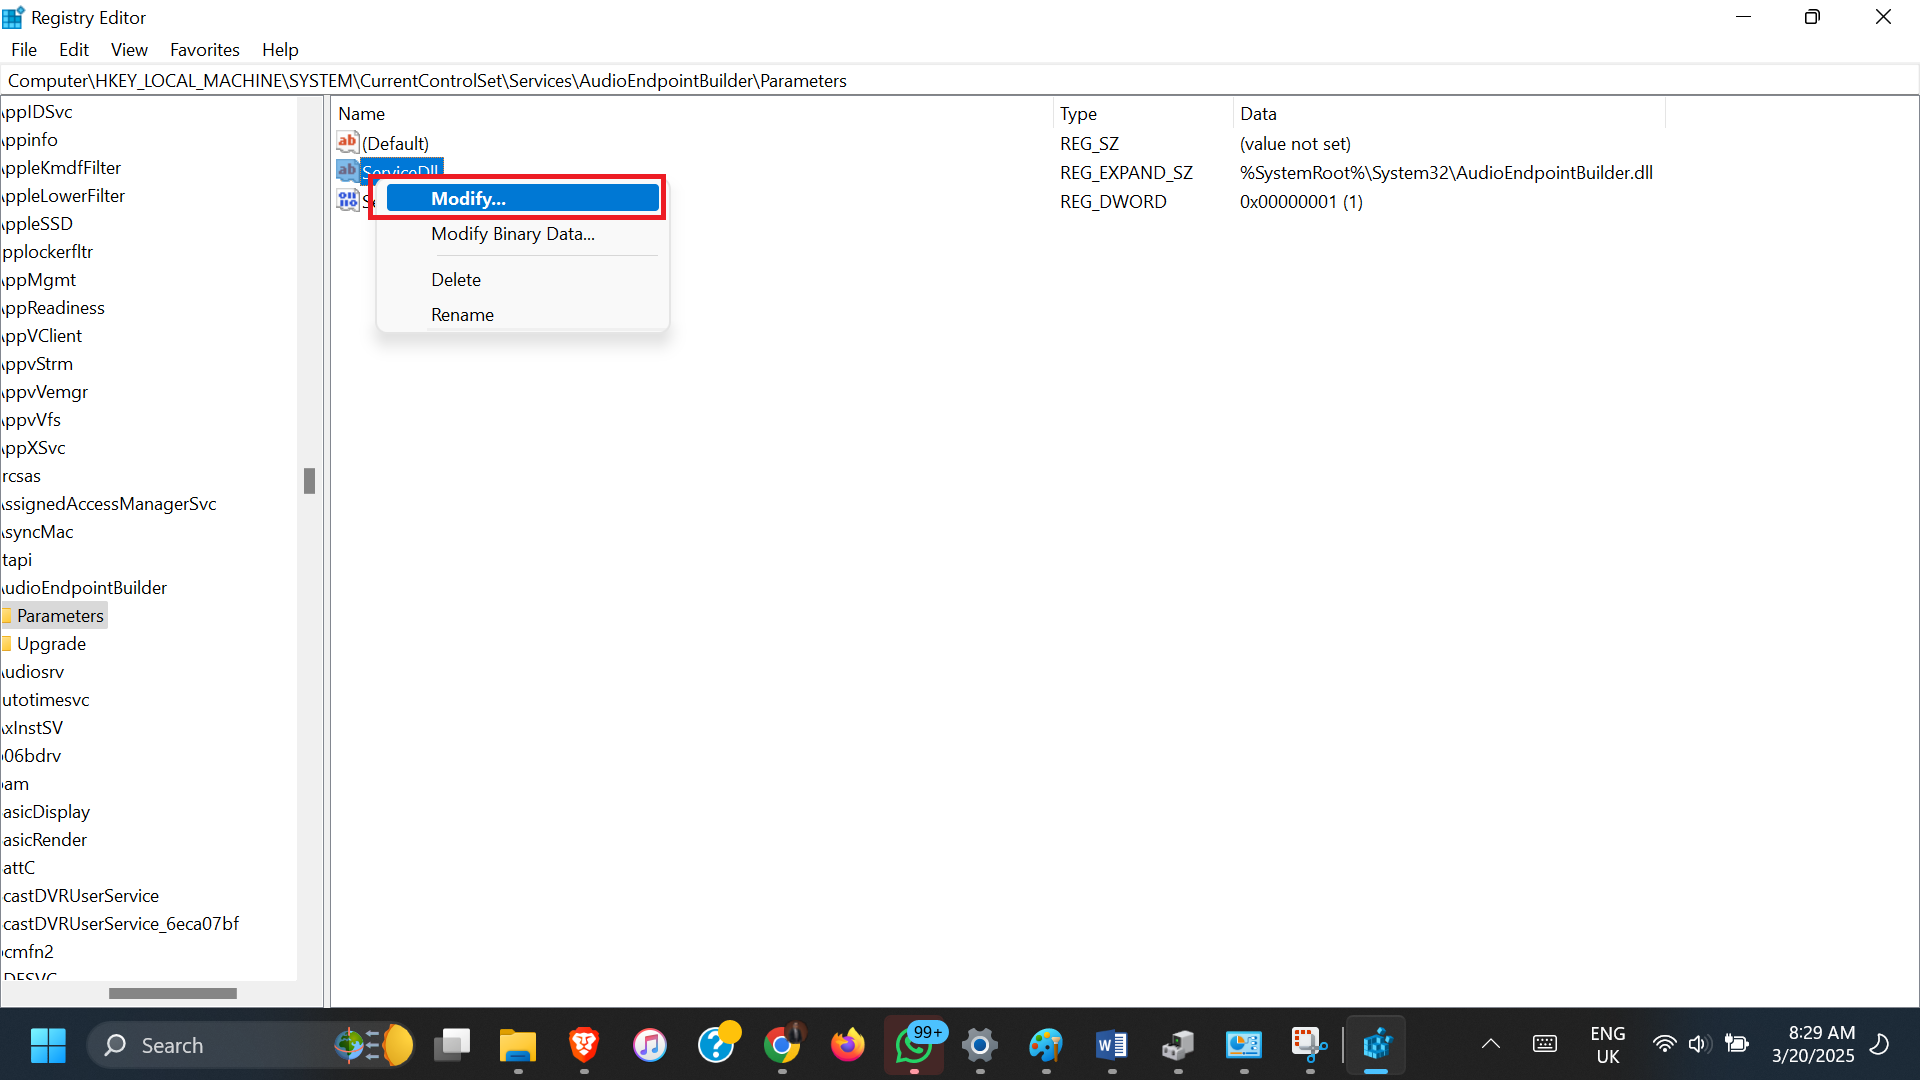
Step 4: Right-click on ServiceDll and select Modify .
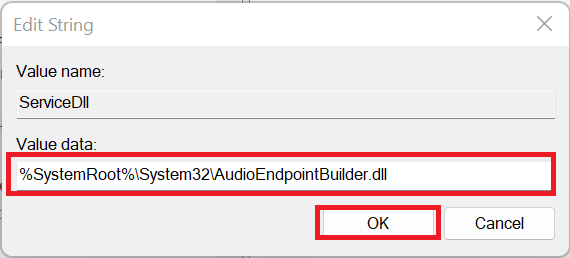
Step 5: Enter the following in the Value data field:
%SystemRoot%\System32\AudioEndPointBuilder.dll
Step 6: Click OK and restart your PC.
Solution 11: Reset your PC
Resetting your PC
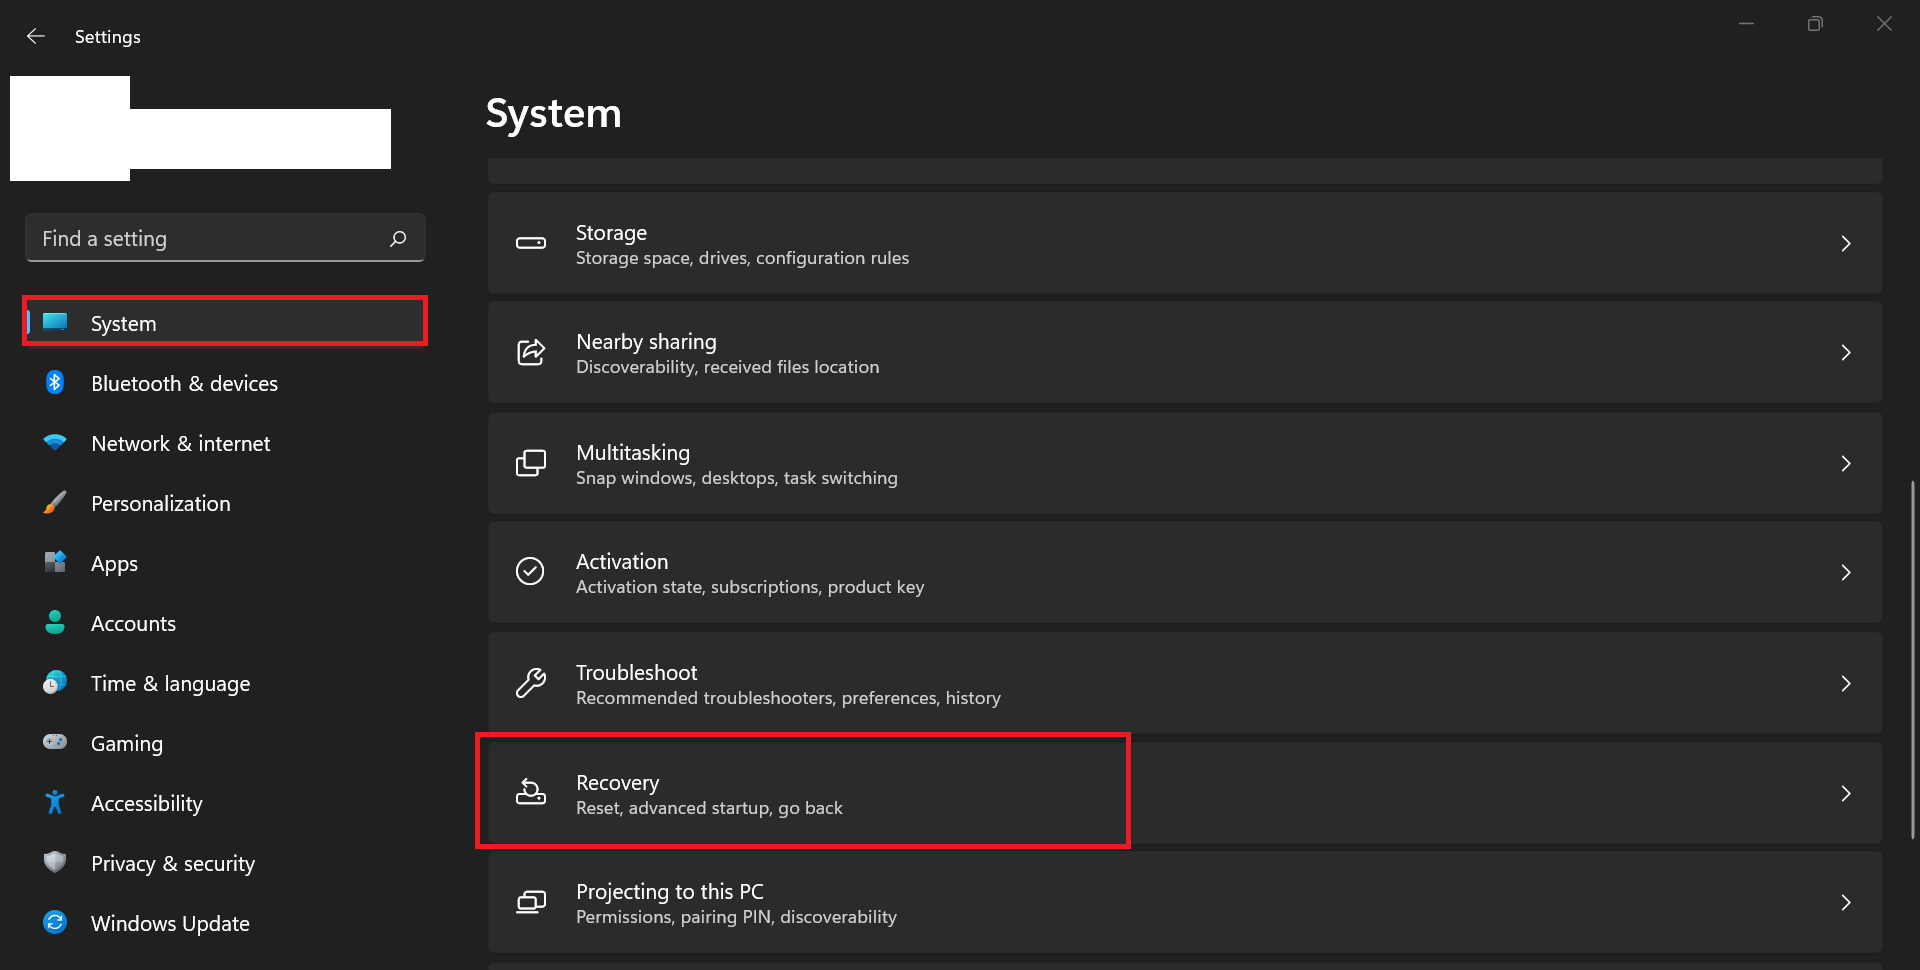
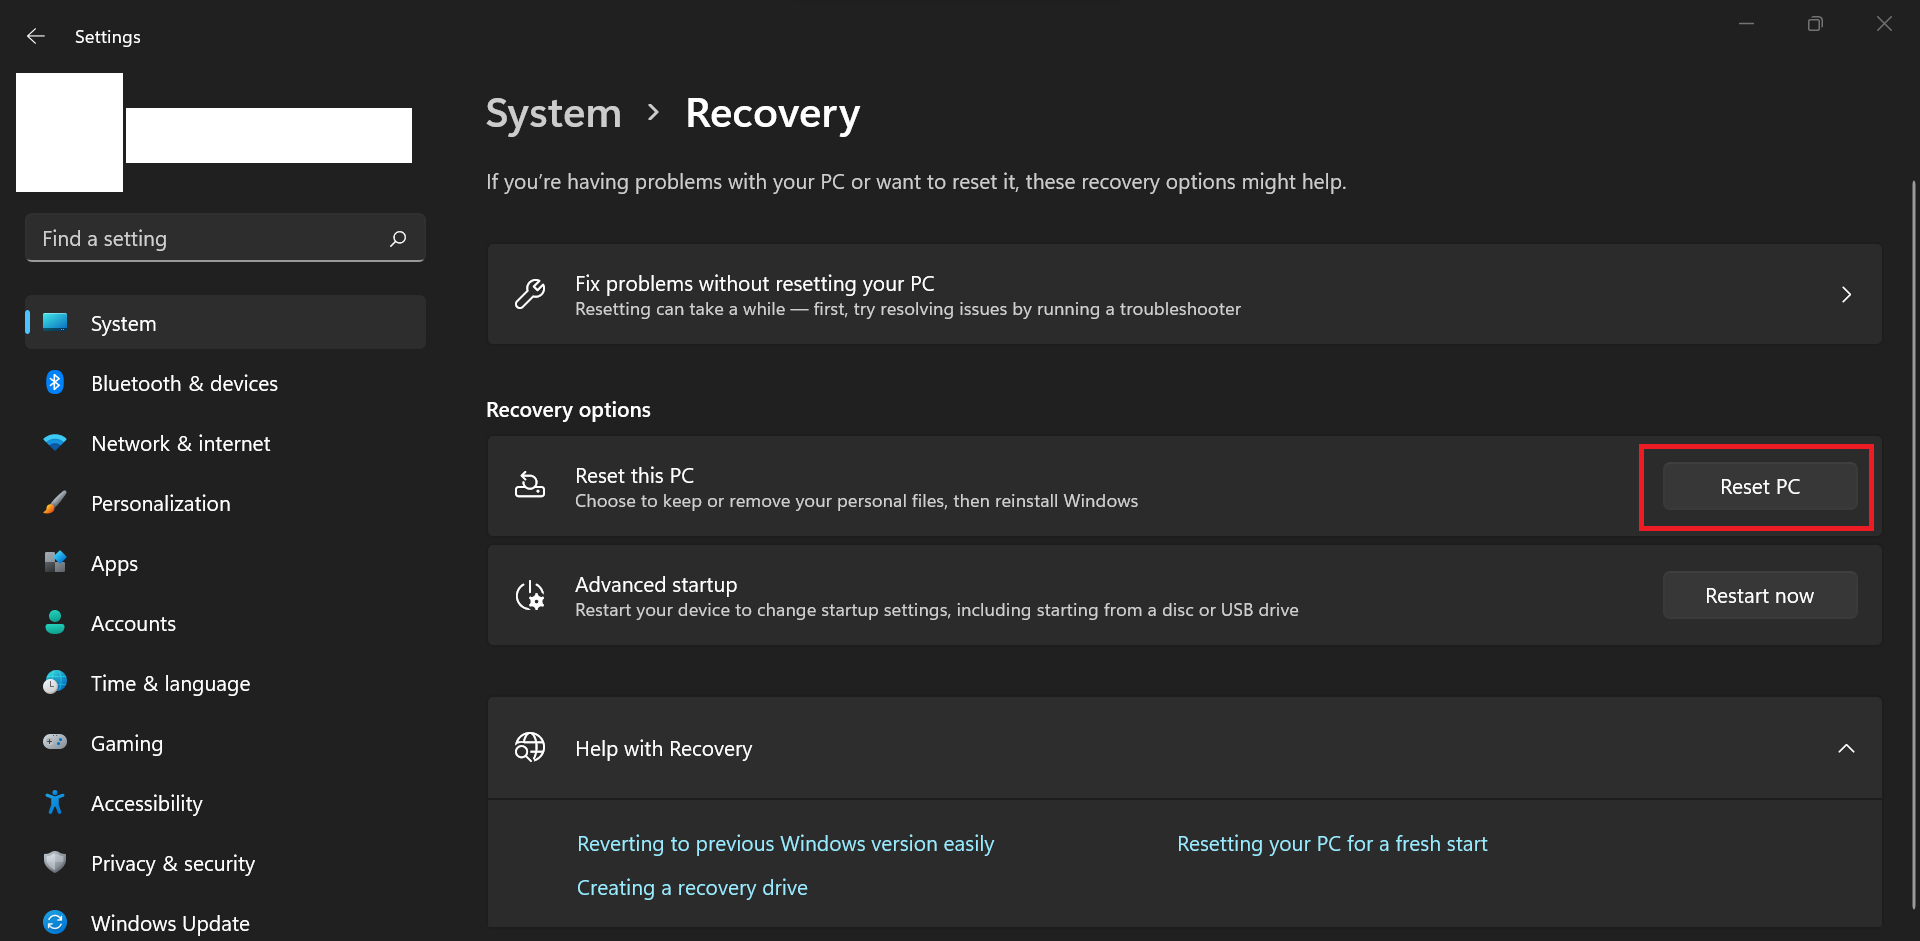
reinstalls Windows while allowing you to keep or remove your files, making it an effective solution for persistent system issues. This process can help resolve the issue with the Windows Audio services not responding by eliminating faulty settings, outdated drivers, or corrupted system files, giving your system a fresh start. However, while you can preserve personal files, installed apps and system settings will be erased. But then, this is good since it can remove potential third-party app conflicts that you may not have noticed. Here is how to reset your PC: Step 1: Press Windows + I to open Settings. Step 2: Go to System and on the right pane select Recovery ( Update & Security > Recovery in Windows 10).
Step 3: Under Reset this PC , click Reset PC ( Get started in Windows 10).
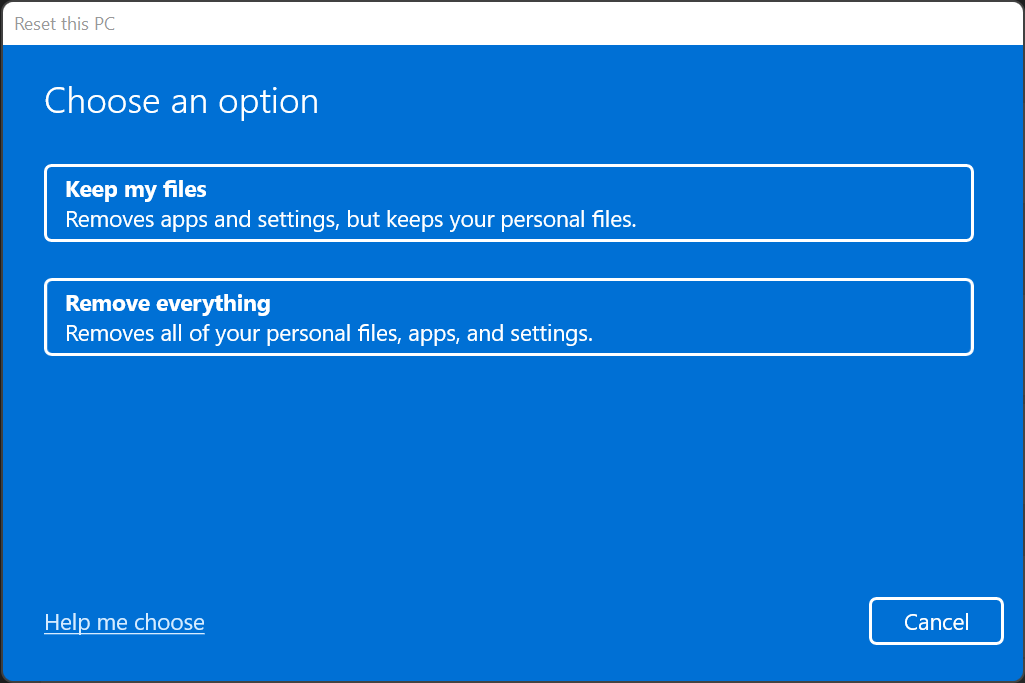
Step 4: Choose Keep my files (to keep your personal files) or Remove everything (for a fresh install).
Follow the on-screen instructions to complete the reset.
PRO TIP
The steps above can help you fix the “Audio services not responding” error. However, it’s crucial to emphasize how important it is to keep your drivers updated. After all, it’s one of the best ways to prevent similar issues in the future. That said, manually managing drivers can take time and effort, but that’s where
Auslogics Driver Updater makes things easy.
With this tool, you don’t have to worry about outdated or missing drivers. It automatically scans your system, updates everything to the latest versions, and ensures your computer runs at its best. Plus, it even creates backups, so you can roll back changes if needed.
Other Common Audio Issues in Windows and How to Fix Them
While the Windows “Audio services not responding” error is a specific problem tied to your system’s core audio functionality, there are also broader audio-related issues that might crop up. Below are some of the more common audio issues you may encounter and their corresponding fixes:
1. The “The Audio Service is not running” error
The “The Audio Service is not running” error means that the Windows Audio service has stopped or failed to start. This directly affects the ability of your PC to process sound.
The “The Audio Service is not running” error is different from the “A udio services not responding ” issue, where the service is running but becomes unresponsive and doesn’t process audio tasks properly.
Fix:
- Restart the Windows Audio service: Press
Windows + R, type services.msc , and hit Enter. Find Windows Audio , right-click it, and select Restart .
- Ensure dependencies are running: In the same Services window, check that related services like Windows Audio Endpoint Builder and Multimedia Class Scheduler are running. Restart them if necessary.
- Set the service to start automatically: Right-click Windows Audio, go to Properties, and set Startup type to Automatic. This ensures the service runs each time you start your PC.
2. “No audio device is installed”
If your computer shows “No audio device is installed,” it means your system can’t detect the hardware needed for sound output. This issue often comes from missing drivers, disconnected hardware, or disabled settings. First, check if your audio device is properly connected or powered on, then try the following: Fix:
- Use a third-party driver updater: Opt for reliable driver updater tools like Auslogics Driver Updater to automatically detect and install the correct drivers for your audio device. This helps save time and reduces errors.
- Scan for hardware changes: In Device Manager, right-click your PC’s name at the top and select Scan for hardware changes . This forces your system to detect and reinitialize the audio device.
- Check audio settings: Go to Settings > System > Sound, and ensure your device is selected as the output option.
3. A specific audio device isn’t working
If your speakers, an external sound device, or headphones aren’t working while other devices play sound, the issue could be with the hardware, drivers, or settings. Fix:
- Check the connection: If you are using a wired device, check the wires and ensure the jack is firmly connected. You can also try reconnecting or updating your Bluetooth if it’s a Bluetooth device.
- Check the device’s compatibility: Verify the device’s driver compatibility and update it if it’s not compatible.
4. Audio is not synced or playing with the video
Audio delay or desynchronization can happen for a variety of reasons, including system performance issues, outdated media players, incorrect sound settings, or outdated drivers. Hardware limitations may also play a role, especially with older devices struggling to handle high-resolution audio and video formats. Fix:
- Try playing the video in a different media player or browser.
- Restart your PC and check if the issue persists.
- Use specialized software to update drivers to ensure you have the latest audio and video drivers for smooth playback.
Sometimes your audio file won’t play because your computer doesn’t recognize the format or bitrate. This can happen if you’re missing the right software or codec to handle the file. Luckily, there are easy fixes for this.
Fix:
- If your current media player doesn’t support the file, download a codec pack like K-Lite to fill the gap.
- Try playing the file in a different media player like VLC Media Player.
- Convert the audio file to a supported format (e.g., MP3, WAV) using online converters.
Download Auslogics Driver Updater
Prevent hardware errors and ensure problem-free device operation with this advanced tool that detects outdated drivers and safely gets them updated.
Audio Services Not Responding in Windows? Fixed!
While the solutions covered in this guide can help fix the “Audio services not responding” error, sometimes, the problem goes deeper than software.
Hardware issues like a faulty sound card, damaged ports, or malfunctioning external audio devices can also cause your audio to stop working. However, these solutions usually require professional tools and expertise to fix.
If you’ve tried the steps in this guide and still can’t resolve the issue, it may be time to consult a professional technician. They can diagnose hardware-related problems and get your sound working again.
Feel free to share your experience or ask questions in the comments!
FAQ
This error occurs when the Windows Audio service fails to start or function properly. It could be due to a recent Windows update, outdated or corrupted audio drivers, or conflicts with third-party apps. Restarting the Windows Audio service, updating drivers, or running the Playing Audio troubleshooter can help resolve the issue.
Your Windows audio may stop working randomly due to driver conflicts,
background apps interfering with sound settings, or power-saving features disabling the audio service. Other possible causes include system updates, hardware issues, or incorrect sound settings. Restarting the Windows Audio service, checking default playback devices, or reinstalling your audio drivers can often fix the problem.
Yes, malware can potentially affect various aspects of your computer, including audio functions. Malicious software can disrupt drivers, modify settings, or even disable audio services. However, it’s not a common occurrence, meaning your audio-related problems are mostly due to something else. That said, running regular antivirus scans and keeping your system updated helps mitigate these risks.
![[SOLVED] “Audio Services Not Responding” Error Fixed in Windows 10/11](https://www.auslogics.com/en/articles/wp-content/uploads/2025/04/SOLVED-Audio-Services-Not-Responding-Error-Fixed-in-Windows-1011-568x359.webp)