Are you experiencing the error code 0x80072F8F – 0x20000 when trying to update Windows? You’ve come to the right place!
Since the introduction of Windows 11 , users have been making the move to the new OS in numbers.
There are many ways to do this, like upgrading through the Windows Update client, the Windows Update Assistant, or by using the Windows ISO file. However, one common way to upgrade Windows, especially from Windows 7 to 10, is to use the Media Creation Tool.
Sadly, users have been complaining about seeing the error code 0x80072F8F – 0x20000 when trying to use the tool. We’ll show you how to fix the error in this guide.
Let’s begin.
What Is the Windows Error Code 0x80072F8F – 0x20000?
The 0x80072F8F error code is a common issue that occurs when trying to upgrade your Windows operating system using the Media Creation Tool.
Here’s what really happens. When you try to use the Media Creation Tool, it needs to connect to Microsoft’s servers to download the necessary files.
However, if your computer doesn’t support the required security protocol—TLS (Transport Layer Security) 1.2—the tool can’t establish a secure connection, and that gives you the error. This normally occurs on Windows 7 because it doesn’t have TLS 1.2 enabled by default.
However, the error can also occur on Windows 10 and 11 due to outdated security protocols, corrupted cache, and other reasons, which we’ll cover later. For now, let’s find out how to fix the error.
The error code 0x80072F8F – 0x20000 can also be found in the
Microsoft Store when trying to download or update apps and during
system reset or
Windows recovery . However, the underlying reasons for these causes are similar to the Media Creation Tool. The solutions in the next sections cover all these areas.
The most common cause of the error code 0x80072F8F – 0x20000 , especially on Windows 7, is the lack of support for TLS 1.1 and TLS 1.2 security protocols, which are required for secure server connections. However, this error can also occur on Windows 10 and Windows 11 due to several other factors, such as:
- Corrupted SoftwareDistribution folder
- Application conflicts
- Incompatible system requirements
Incorrect date and time settings
Incorrect date and time settings or secure connection issues can trigger this error during Windows activation. To fix this:
- Ensure your system’s date and time are correctly set.
- Sync with an internet time server.
Network problems may prevent the Media Creation Tool from downloading essential files. This issue can also affect Windows updates and app downloads from the Microsoft Store. To resolve this:
- Check your internet connection while disabling any firewalls or proxies.
- Enable TLS 1.1 and TLS 1.2.
- Reset the Microsoft Store cache by opening the Run dialog (
Windows + R), typing wsreset , and pressing Enter.
📌 Also read: How to Reinstall Microsoft Store on Windows 10/11?
Corrupted Windows Update components
Corrupted components can disrupt Windows updates and prevent the Media Creation Tool from working properly. You can fix this by:
- Running the Windows Update troubleshooter
- Resetting Windows Update components
- Clearing the SoftwareDistribution folder
- Restarting Windows Update services
Issues with bootable media
Errors can occur when using the Media Creation Tool to create bootable USBs or DVDs due to a corrupted installation of the Media Creation Too or network disruptions during the download or creation process.
To fix this, reinstall the Media Creation Tool and ensure your internet connection is stable to avoid interruptions. Reinstall the Media Creation Tool to ensure it’s not corrupted and make sure your internet connection is stable to avoid interruptions during the download or creation process.
Downloading feature updates
You might encounter the error 0x80072F8F while downloading feature updates if system files are corrupted or update services are blocked. To fix it:
- Run sfc /scannow or DISM commands in the Command Prompt to repair system files.
- Ensure that no update services are being blocked by your firewall or antivirus.
The error might appear during system recovery or reset if critical update files are missing or if the internet connection is unstable. To prevent it:
- Ensure your internet connection is stable.
- Run sfc /scannow in the Command Prompt to repair missing or corrupted system files before attempting recovery or reset.
Download Auslogics BoostSpeed
Your one-stop PC maintenance and optimization tool, this program will clean, speed up, repair and tweak your system to ensure maximum speed and efficiency.
How to Fix the Error Code 0x80072F8F – 0x20000: Basic Solutions
Before you go through the basic methods below, restart your computer. Performing a restart will clear any temporary data that might have caused the issue. Restarting refreshes system processes, which can help fix those minor glitches or conflicts that may be causing the error.
If it doesn’t work, go through the solutions below:
If you’re not running the Media Creation Tool as an administrator, it won’t have the permissions it needs to perform necessary operations, such as creating installation media or upgrading Windows.
So if you get the error, you can close the tool and start all over. This time, right-click on the Media Creation Tool and select Run as administrator. Running the tool as an administrator ensures it has full access to your system, allowing it to perform tasks without restrictions.
Method 2: Check your internet connection
During updates or upgrades, your computer needs to have a good connection to communicate with Microsoft servers. Unstable internet connection usually prevents Windows from loading important data correctly, which can interrupt the update process. To solve the issue:
- Restart your router or modem.
- Try connecting to a different network or use an Ethernet cable.
- Run the Windows Network troubleshooter.
Here’s how to run the Windows Network troubleshooter:
For Windows 10:
Note
The steps are the same for Windows 10 and Windows 7, but the interface might be a little different.
- Click the Start button and then select Control Panel .
- In the Control Panel window, click on Troubleshooting.
- Under Network and Internet, click Connect to the Internet.
- Windows will automatically detect and try to resolve any issues related to your internet connection. Follow any on-screen instructions provided to complete the troubleshooting.
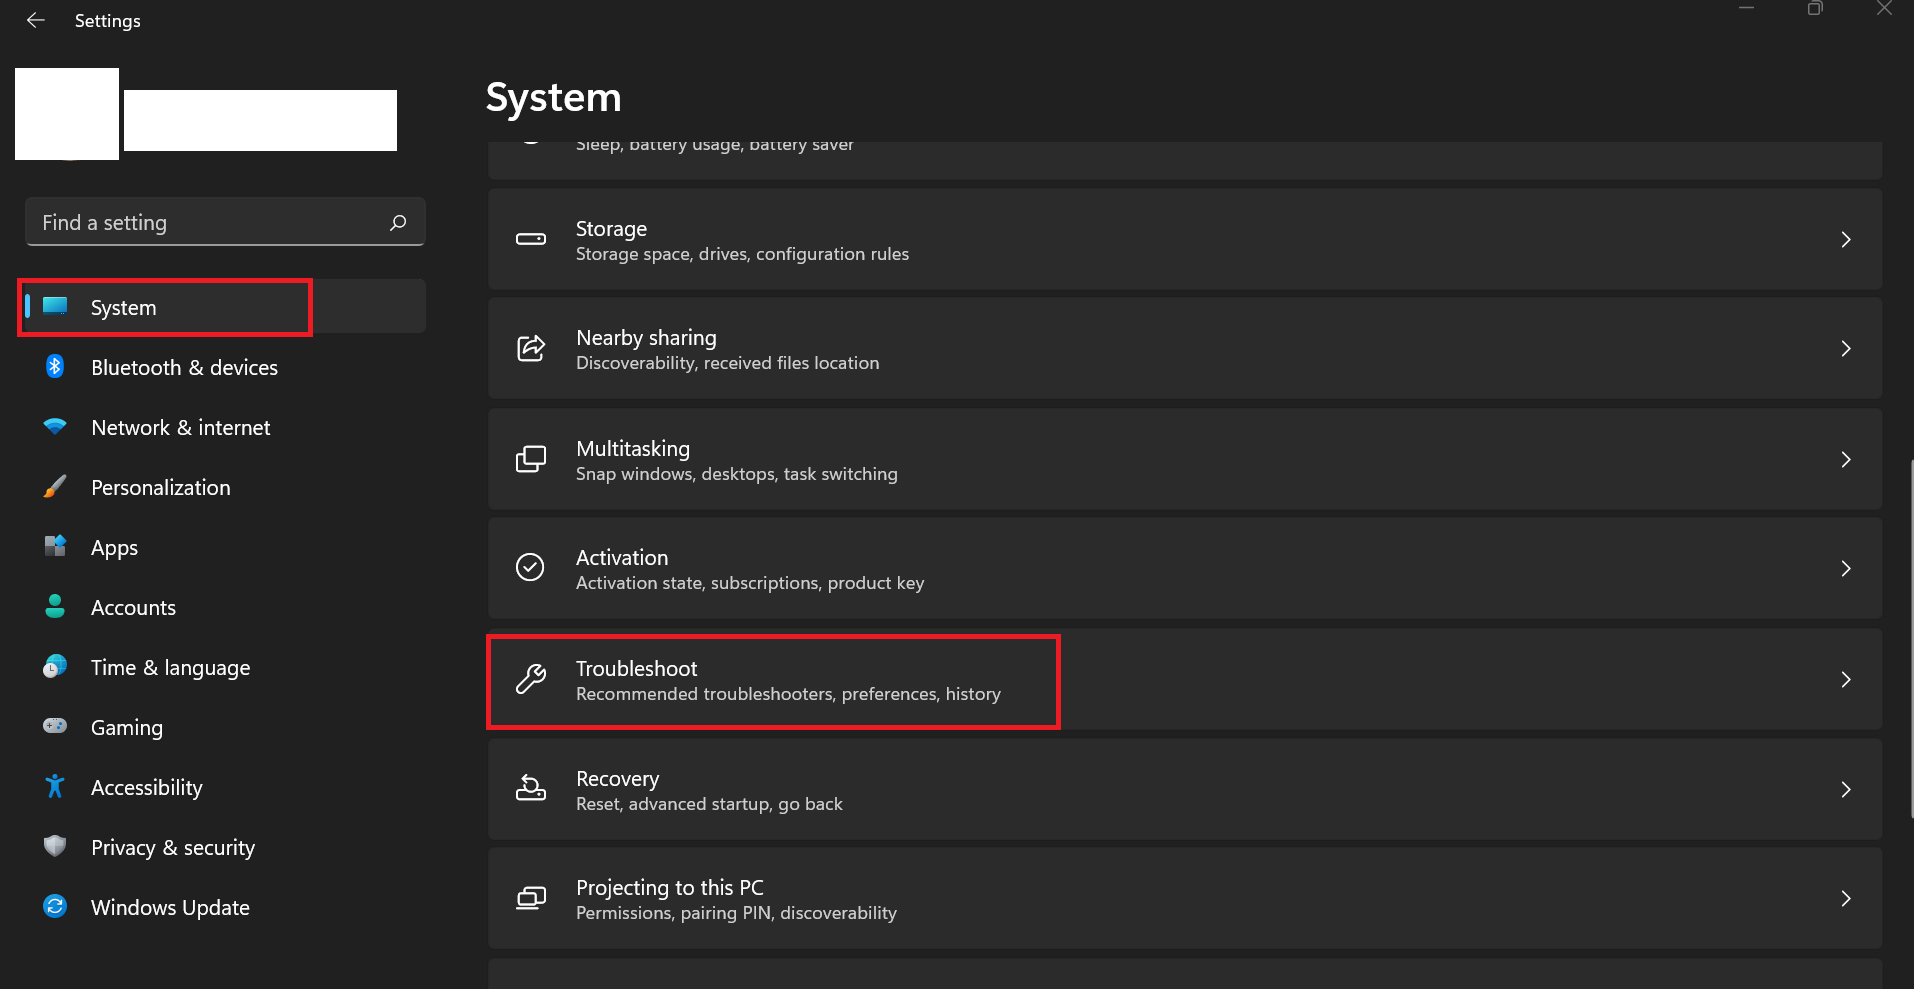
For Windows 11:
- Open Settings by pressing
Windows + I.
- In the Settings menu, select System from the left-hand side. On the right, scroll down and click on Troubleshoot.
- Next, click on Other troubleshooters to view a list of troubleshooters.
- Look for Internet Connections in the list and click the Run button next to it.
- Windows will start diagnosing any network issues. Follow the on-screen instructions to allow Windows to fix any detected problems with your internet connection.
Method 3: Check date, time, and region settings
Sometimes, the Windows error code 0x80072F8F – 0x20000 might be because the date, time, or region settings on your computer are wrong.
Windows uses secure connections (like SSL/TLS) to communicate with Microsoft servers when downloading updates or using tools like the Media Creation Tool. If your computer’s clock or region is incorrect, it can’t properly check Microsoft’s security certificates, causing the connection to fail.
If you have an old computer (like a PC from 2010 running Windows 7), the incorrect time might be because the CMOS batteries are failing, causing the system clock to reset.
Fixing the date, time, and region settings allows your computer to correctly verify these certificates, which is necessary for secure connections and smooth updates.
If your time is incorrect on Windows 10/11, it might be a sign of a deeper problem like
system file corruption , malware infection, or issues with the Windows Time service failing to sync with internet time servers. In some cases, a faulty CMOS battery or misconfigured group policies can also prevent proper time synchronization
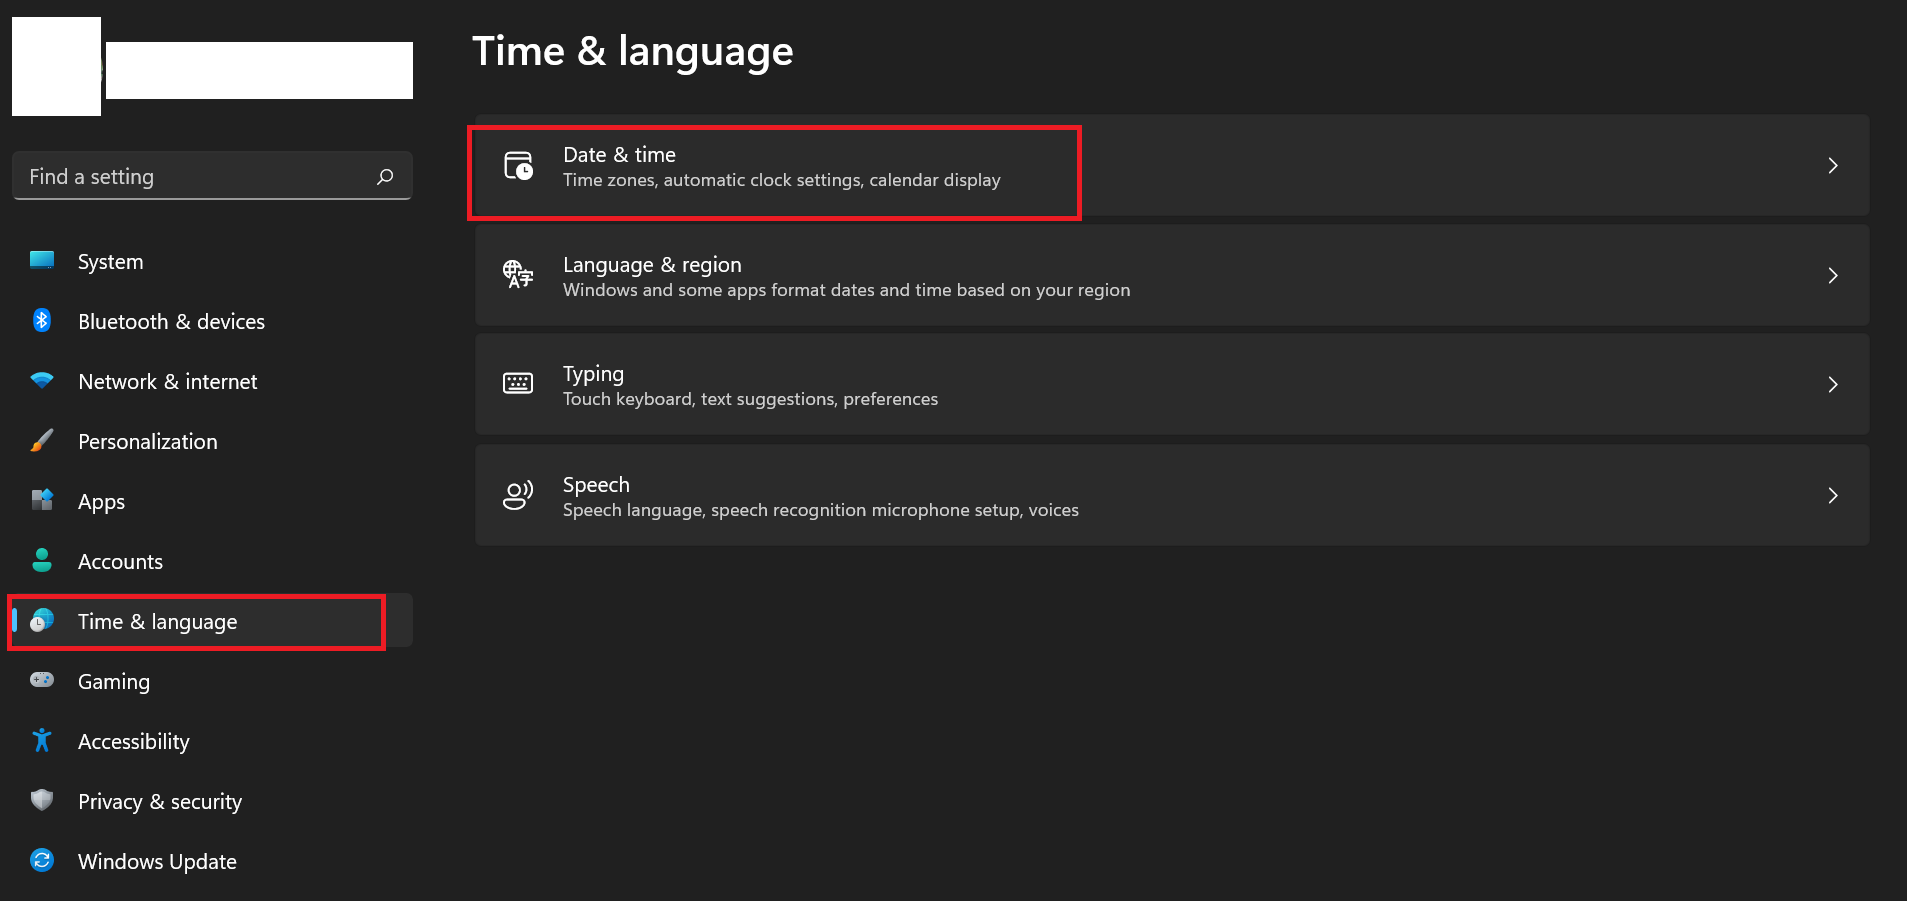
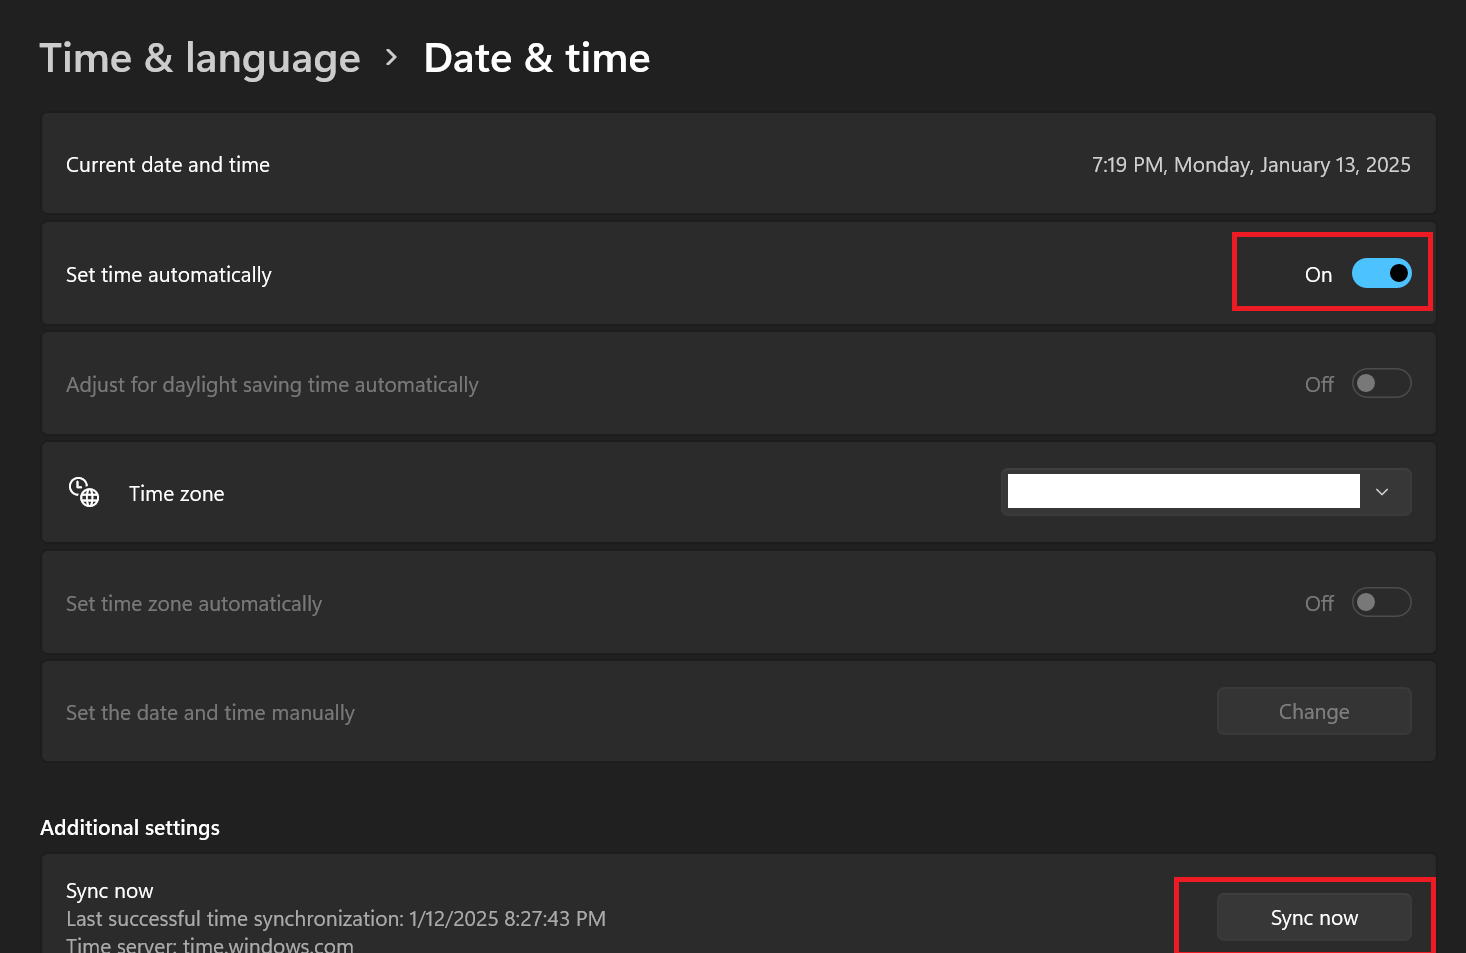
Here’s how to adjust date, time, and region settings on Windows 11. The steps are similar on Windows 10:
- Press
Win + I to open Settings .
- In Settings, click on Time & language and then, on the right, click Date & time.
- Enable Set time automatically , then scroll down and click Sync now.
- Check the Time zone setting and ensure it’s correct. If not, select the correct one and check if that fixes the problem.
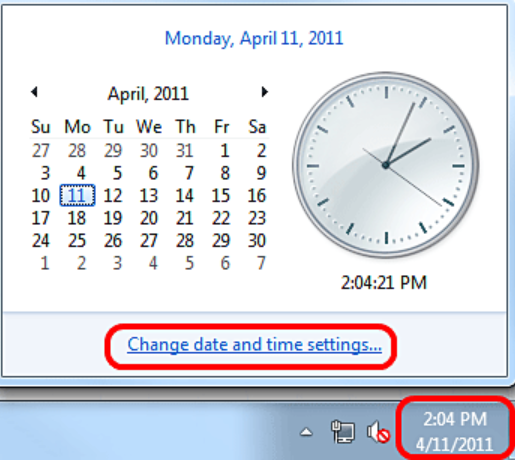
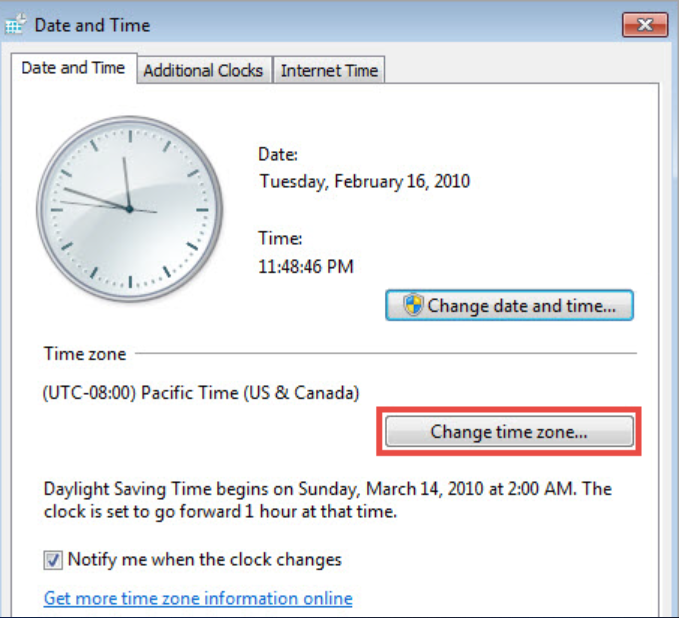
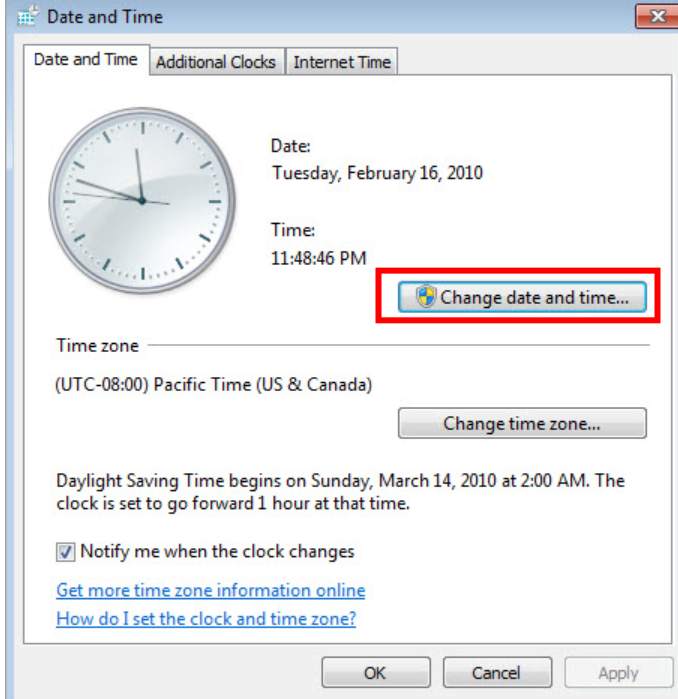
For Windows 7:
- Click the date and time area in the bottom-right corner of your screen and select Change date and time settings .
- Make sure the t ime zone is correct; if not, click Change time zone to adjust it.
- To update the date or time, click Change date and time , grant permission if asked, set the correct date and time, and click OK to save the changes.
Method 4: Temporarily disable your antivirus or firewall
While trying to protect you from threats, your Windows built-in antivirus can sometimes get in the way of legitimate processes like an OS update or upgrade. This does not mean the upgrade process is faulty; it simply means your antivirus or firewall is doing too much.
If this is the problem, simply disabling your antivirus or firewall while you run the Windows update or upgrade might be a solution.
However, remember to re-enable your security software after fixing the 0x80072F8F – 0x20000 error to maintain protection for your system once you are done.
To do this:
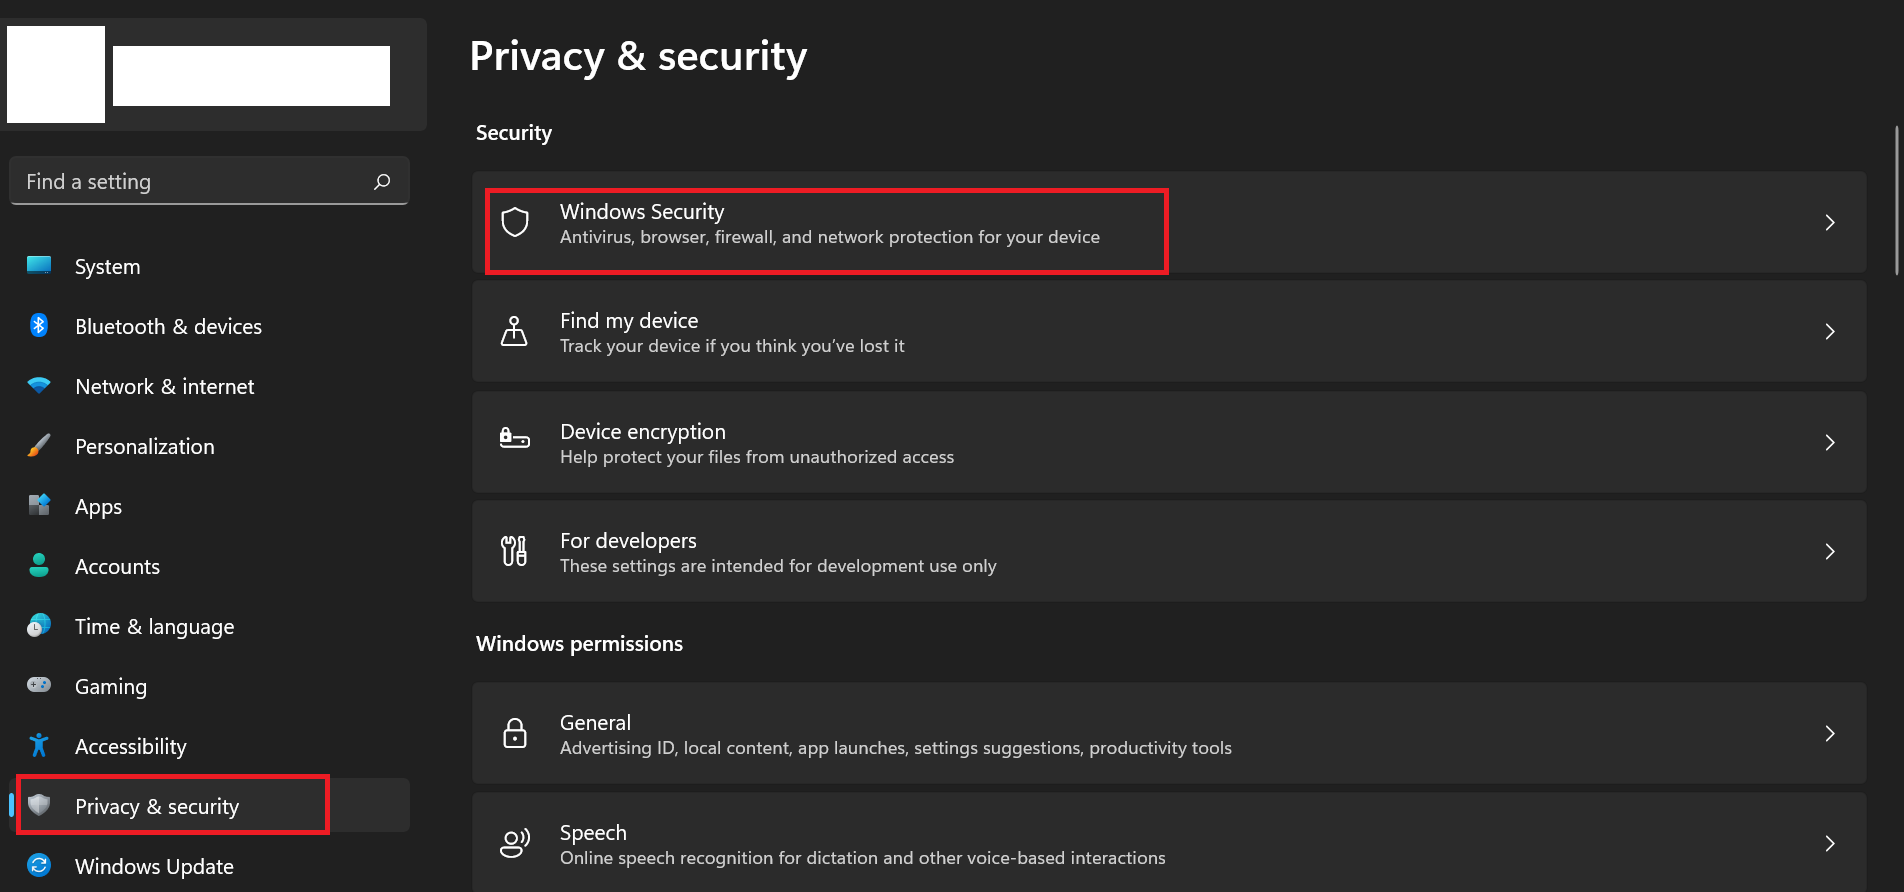
Step 1: Open your antivirus program and disable real-time protection temporarily. Depending on the program you are using, the process might differ. However, if you are using Windows Security, do the following:
- Press
Windows + I to open Settings.
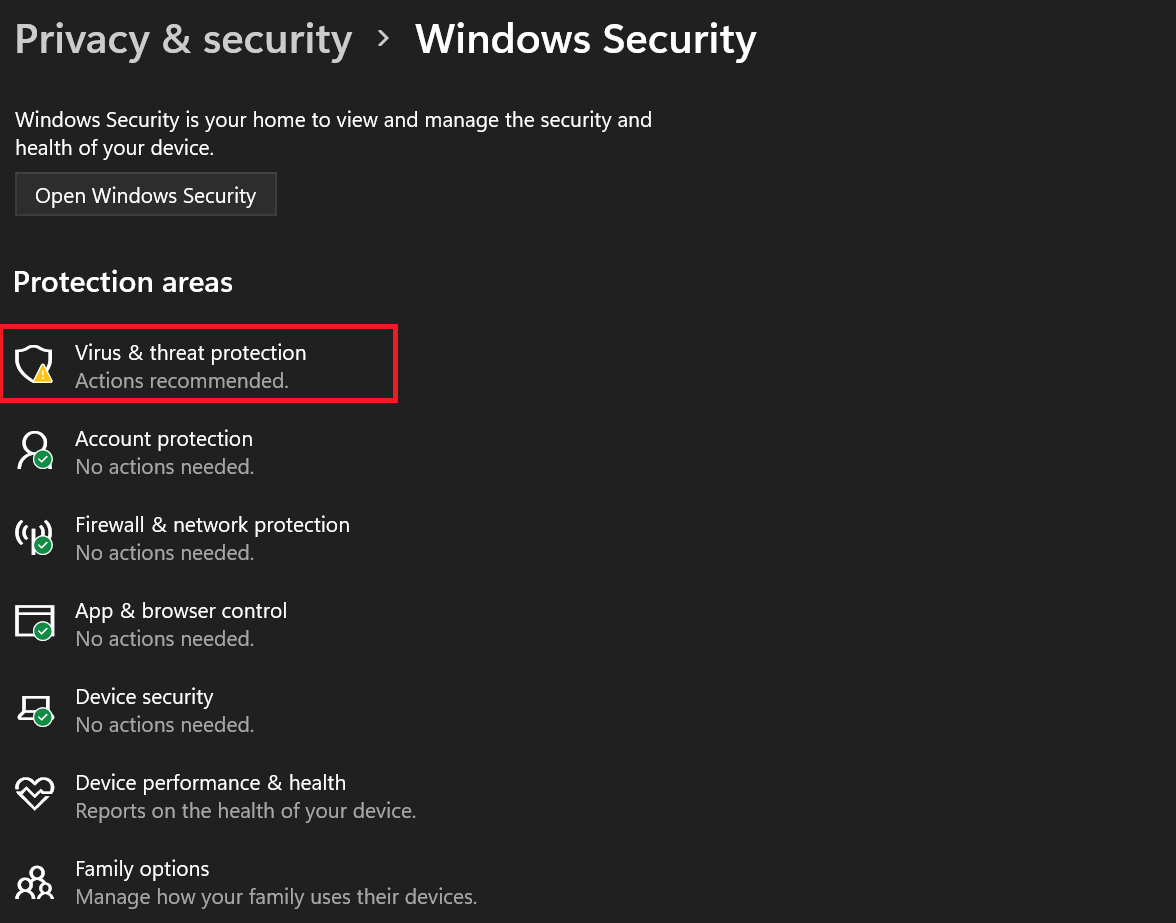
- Click on Privacy & security (or Update & Security on Windows 10). Then, select Windows Security from the sidebar.
- Click Virus & threat protection.
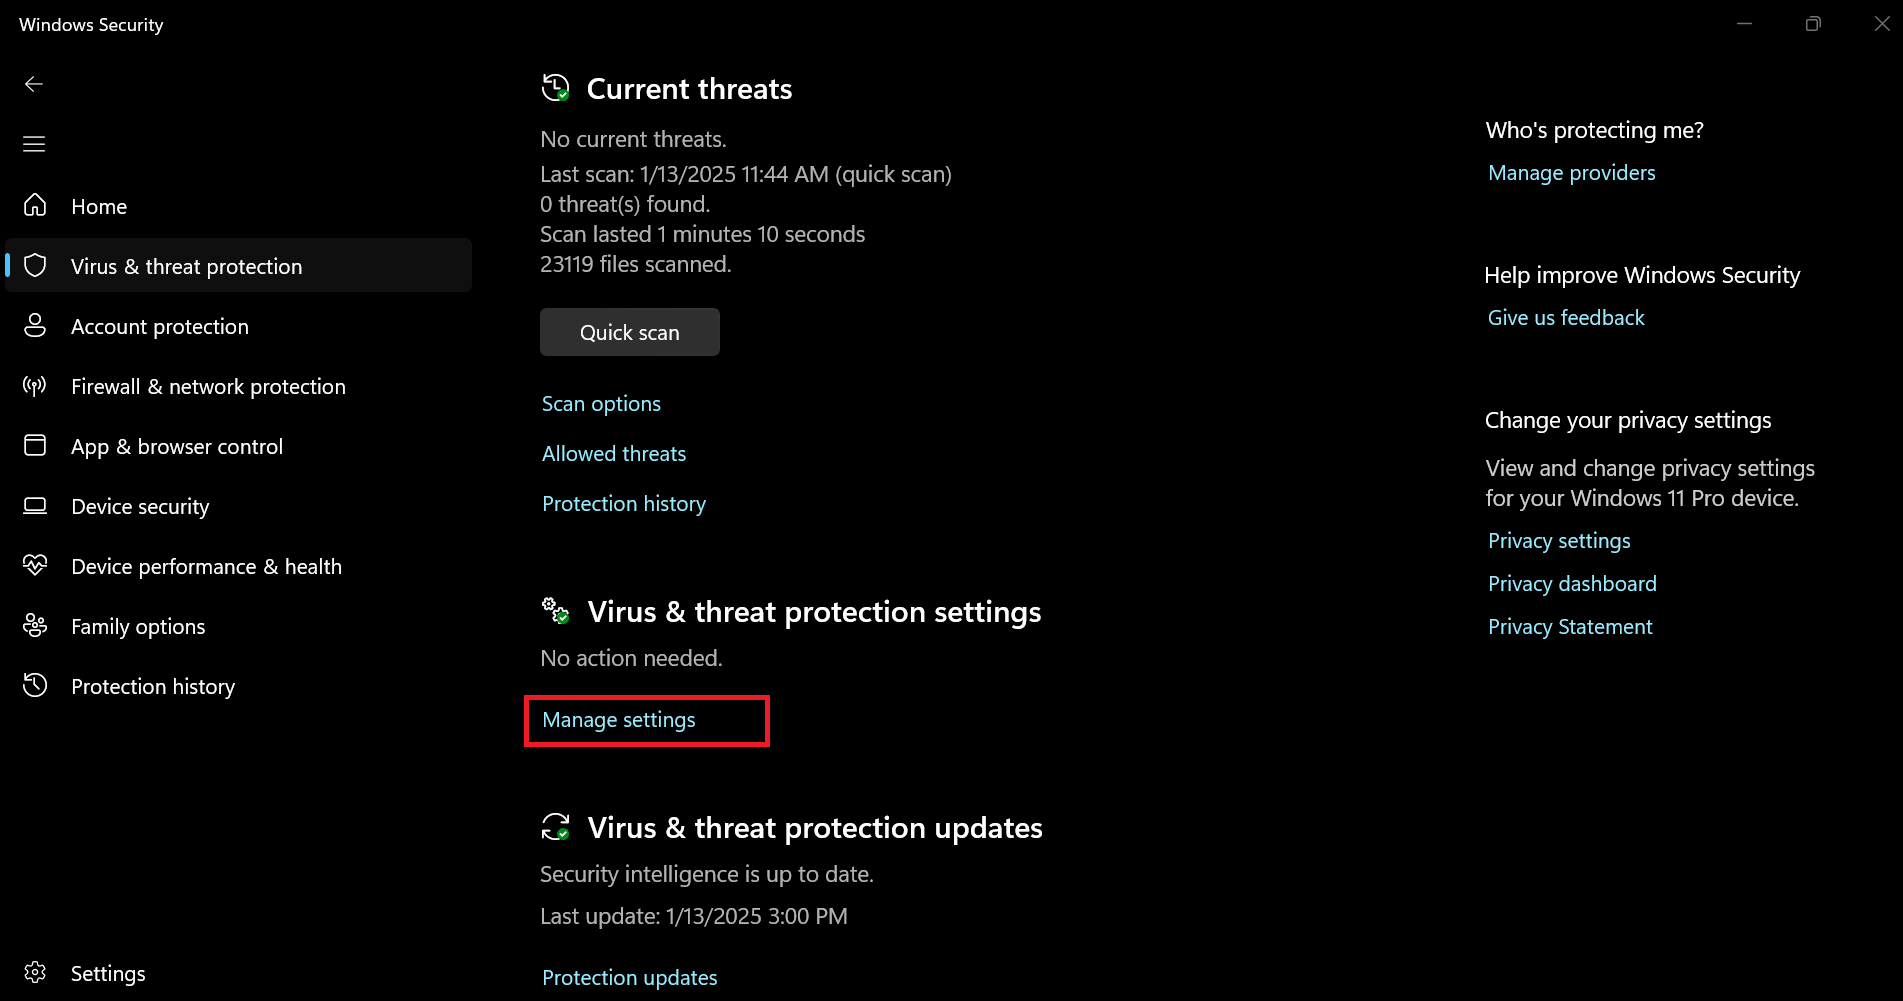
- Under Virus & threat protection settings, click Manage settings.
- Toggle off Real-time protection .
- If prompted by User Account Control (UAC), click Yes to confirm.
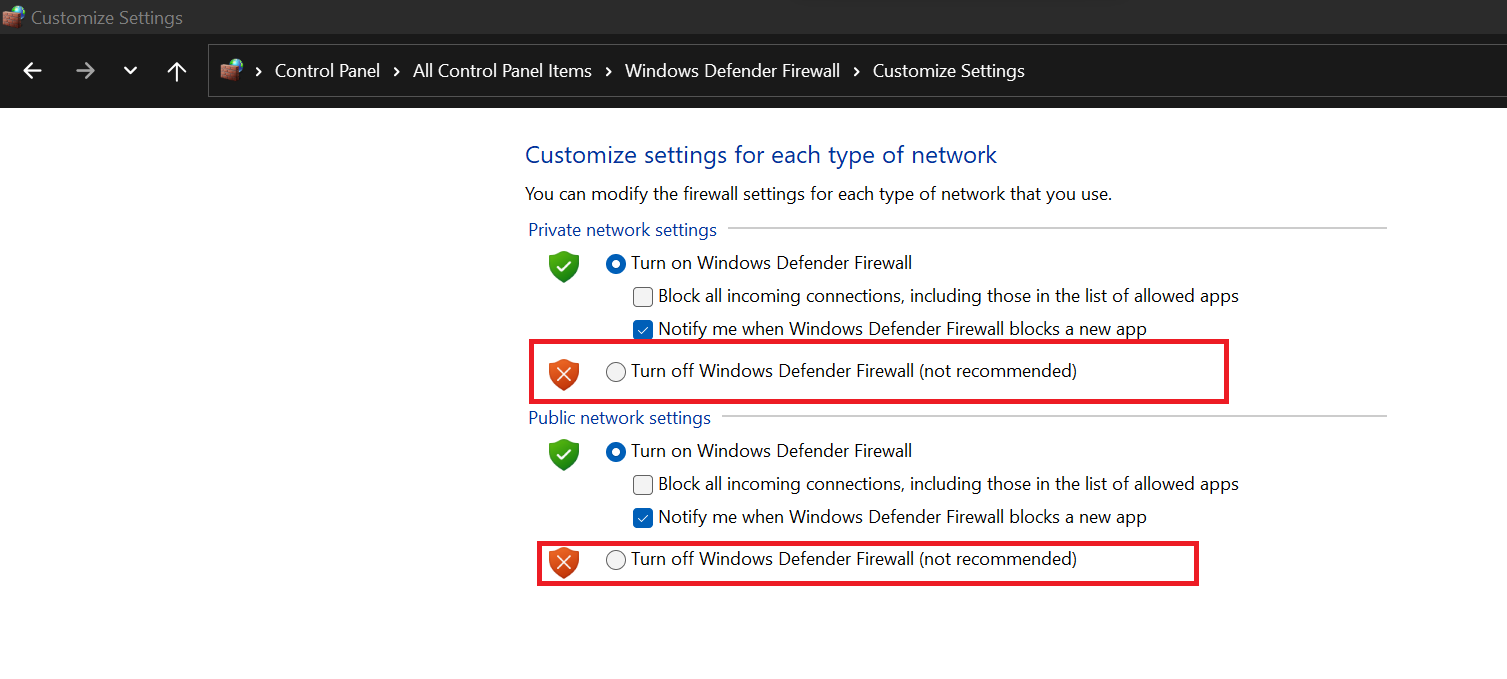
Step 2: Disable Windows Defender Firewall
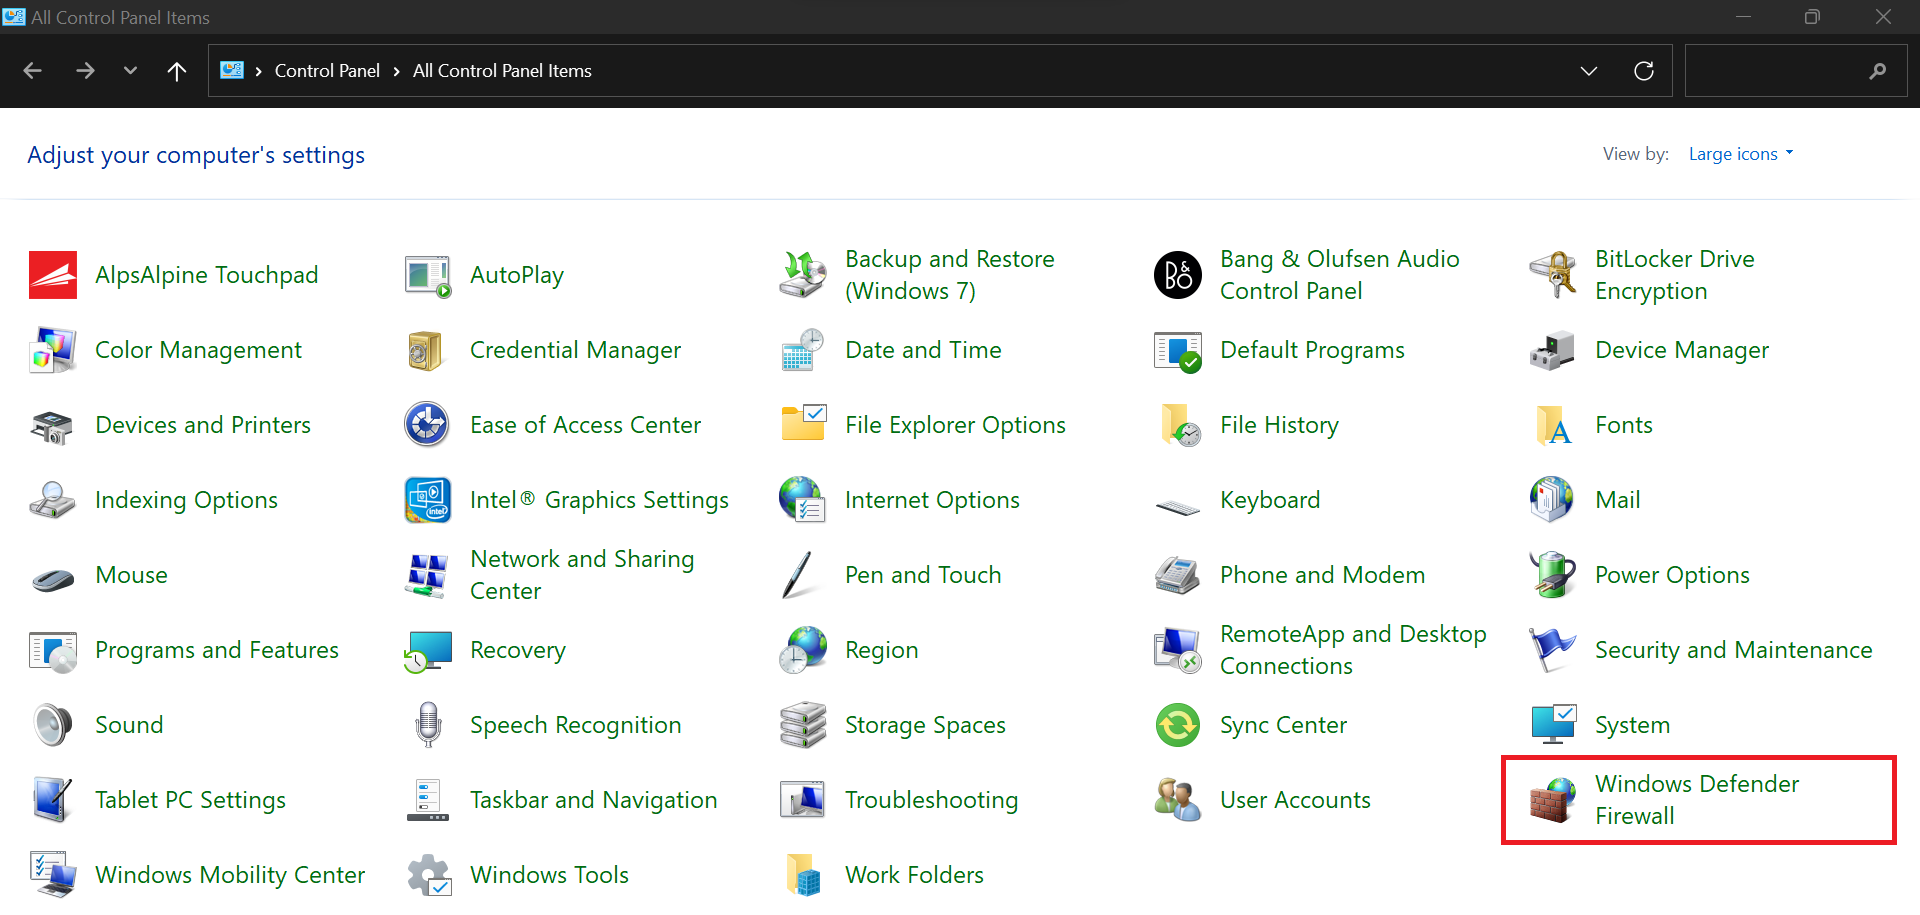
You can disable the firewall using the Control Panel on Windows 7, 10, or 11. Let’s go through the steps:
- Go to the Control Panel and click on Windows Defender Firewall.
.
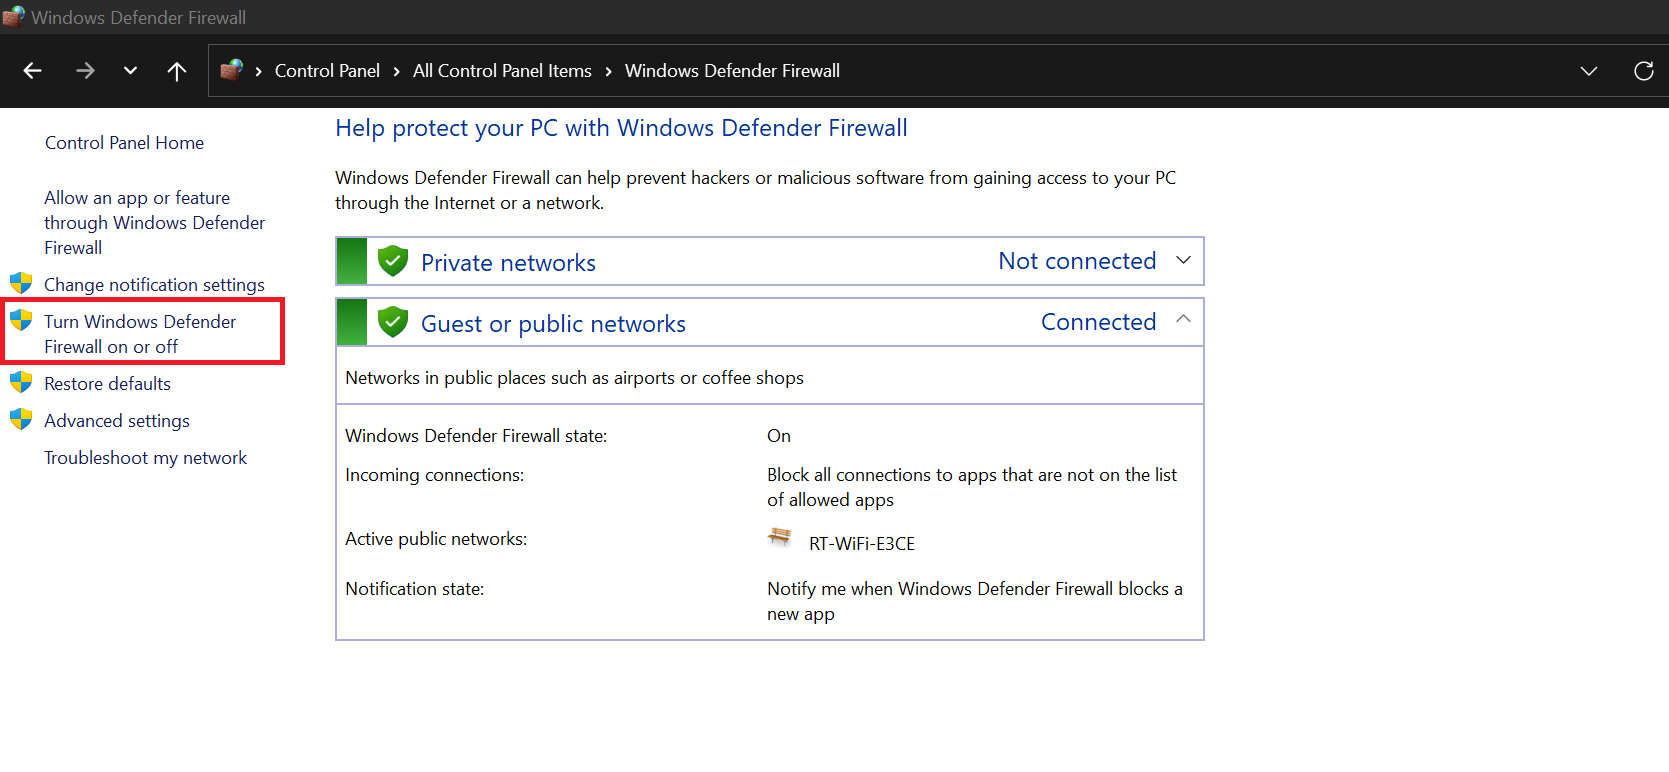
- On your left, click Turn Windows Defender Firewall on or off.
- Choose Turn off Windows Defender Firewall for each type of network you use and see if this resolves the problem.
How to Fix the Error Code 0x80072F8F – 0x20000: Advanced Solutions
If the basic solution doesn’t fix the error code, go through these advanced methods:
Method 1: Enable TLS 1.1 and TLS 1.2
This is a common solution that has helped many users get rid of the Windows error code 0x80072F8F – 0x20000.
The Media Creation Tool communicates with servers that use TLS 1.1 and TLS 1.2. That’s because the tool has to download the setup files required for the upgrade from Microsoft’s servers.
But as it turns out, these security protocols might be disabled by default on your current Windows version. This might happen because the system uses older security settings. In some cases, updates or wrong settings can also turn them off.
Either way, the error code 0x80072F8F could pop up because your PC can’t properly communicate with Microsoft’s servers.
Thankfully, you can enable TLS 1.1 and TLS 1.2 by making changes to the system registry.
Important!
The steps below are quite simple, but since they have to do with the Windows registry, a sensitive part of your operating system, it’s always advisable to take precautions. So, make sure you back up the registry before proceeding.
These steps work for Windows 7, 10, and 11.
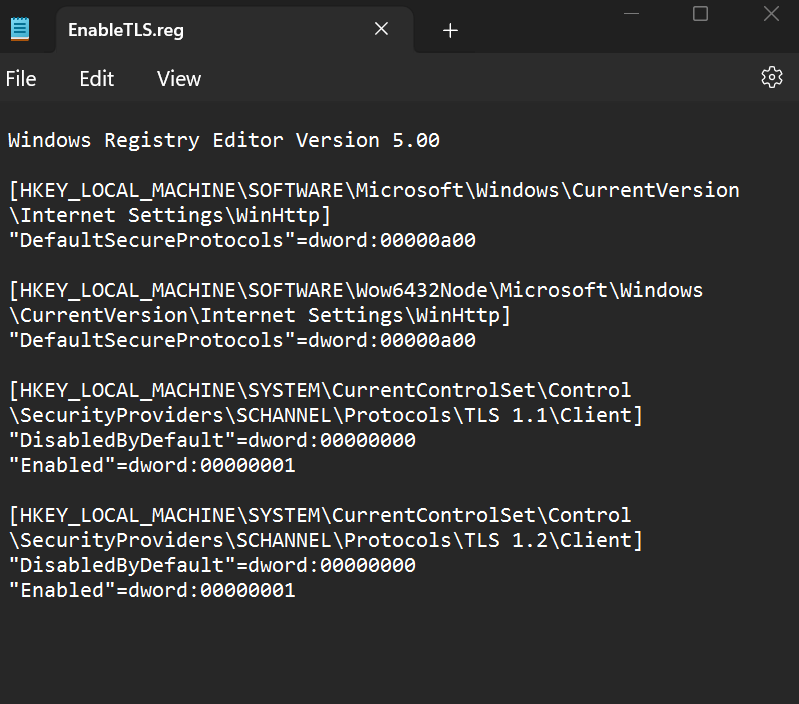
Step 1: Enable TLS 1.1 and TLS 1.2
- Copy the code below into your notepad:
Windows Registry Editor Version 5.00
[HKEY_LOCAL_MACHINE\SOFTWARE\Microsoft\Windows\CurrentVersion\Internet Settings\WinHttp]
"DefaultSecureProtocols"=dword:00000a00
[HKEY_LOCAL_MACHINE\SOFTWARE\Wow6432Node\Microsoft\Windows\CurrentVersion\Internet Settings\WinHttp]
"DefaultSecureProtocols"=dword:00000a00
[HKEY_LOCAL_MACHINE\SYSTEM\CurrentControlSet\Control\SecurityProviders\SCHANNEL\Protocols\TLS 1.1\Client]
"DisabledByDefault"=dword:00000000
"Enabled"=dword:00000001
[HKEY_LOCAL_MACHINE\SYSTEM\CurrentControlSet\Control\SecurityProviders\SCHANNEL\Protocols\TLS 1.2\Client]
"DisabledByDefault"=dword:00000000
"Enabled"=dword:00000001
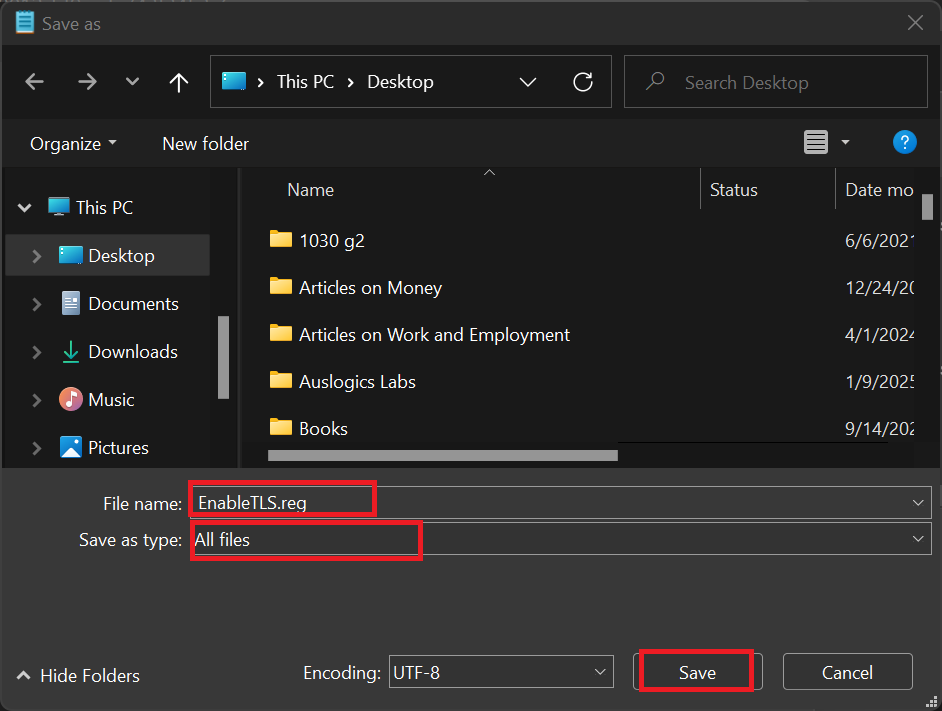
- Save the file with a .reg extension (for example, EnableTLS.reg ).
- Locate the file where you saved it (it should look like the image below). Double-click it to merge it into your computer’s registry.
- Restart your computer and check if the issue is resolved.
Method 2: Delete the SoftwareDistribution folder
The SoftwareDistribution folder is used by the Windows Update client to temporarily store files required for Windows updates. These files are stored when an update is pending installation or download.
Sometimes, the file in the folder causes conflicts and prevents the client from completing an update.
Since the Media Creation Tool must download the setup files required for upgrading Windows, the issue might be related to the SoftwareDistribution folder.
That’s because Windows may want to install pending updates before moving forward with the upgrade. So, deleting the folder may fix the problem.
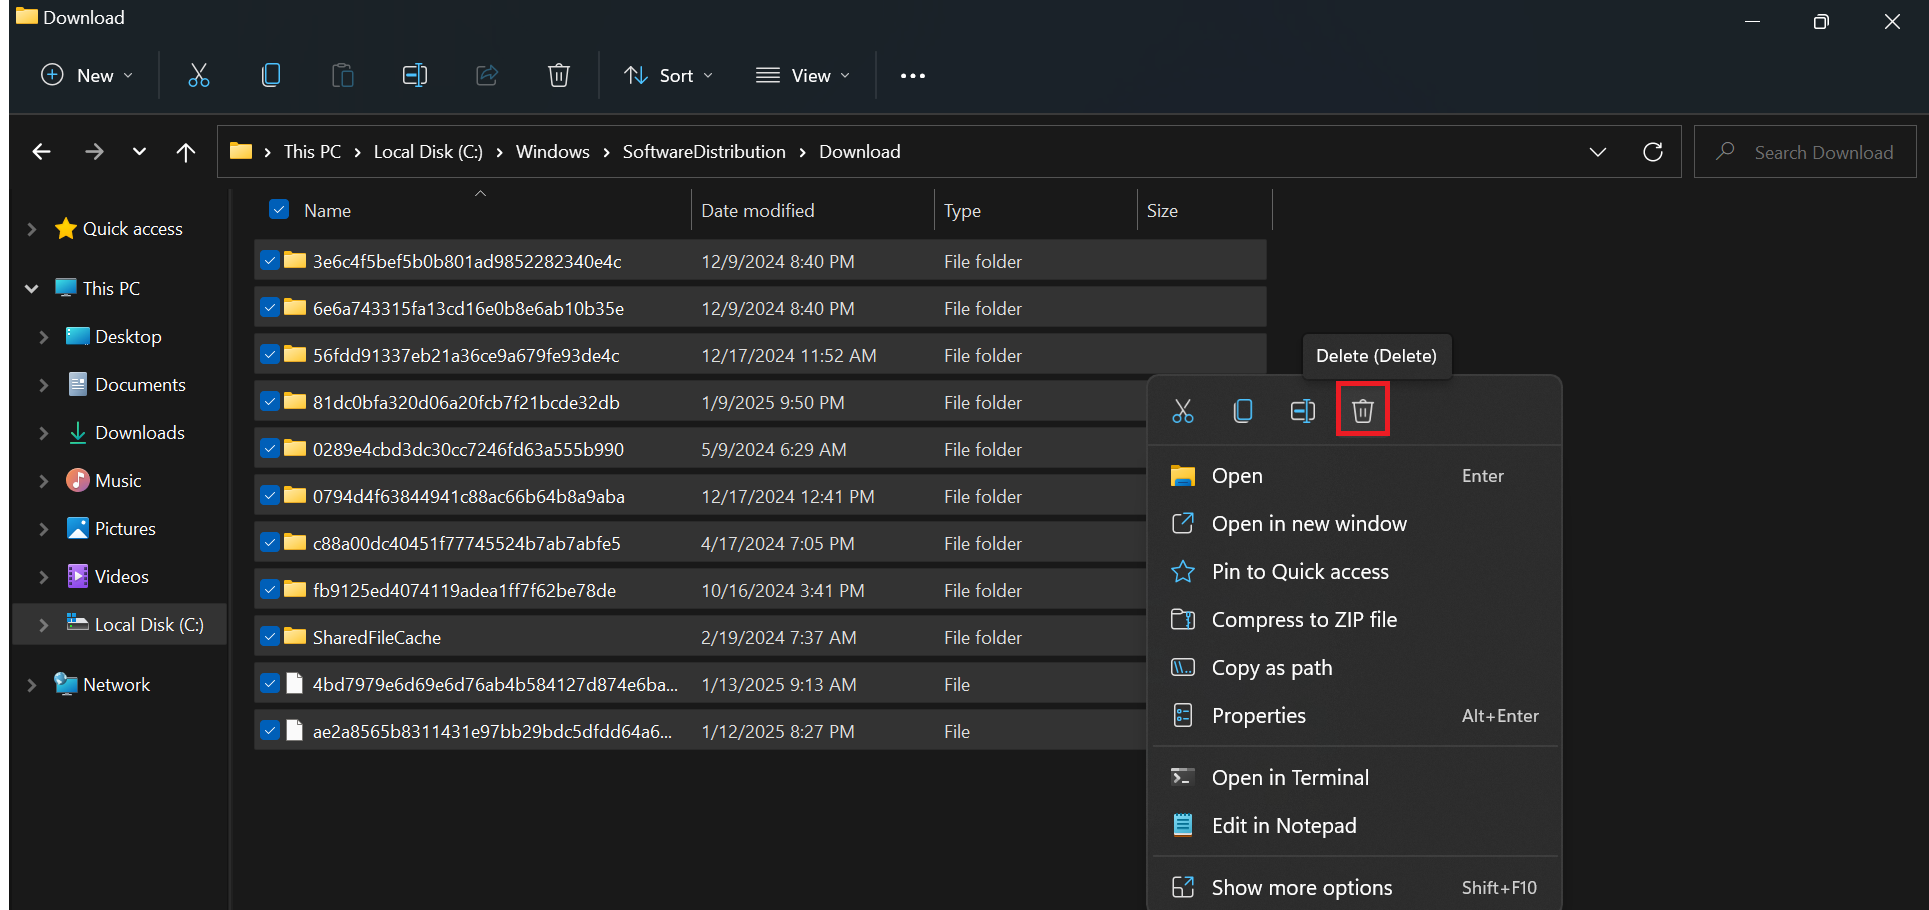
Follow these steps (they work similarly in Windows 11, 10, and 7):
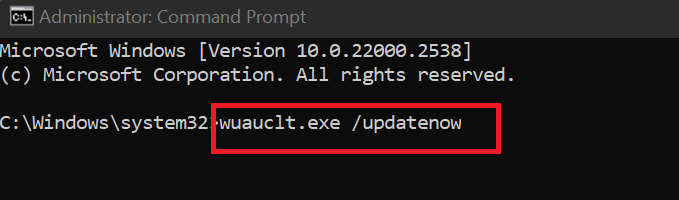
- Open File Explorer and go to C:\Windows\SoftwareDistribution\Download.
- Select every file and subfolder in the folder and delete them.
- Next, launch the Command Prompt as an administrator ( type cmd into the Windows search bar and select Run as administrator) and enter the following command:
wuauclt.exe /updatenow
When you hit the Enter key, Windows will attempt an update. Wait to see if the error persists.
The Windows error code 0x80072F8F – 0x20000 may also be appearing due to application conflicts.
Some programs and services that launch during startup may be responsible for triggering the error when you run the Media Creation Tool.
You can resolve the problem by disabling those applications and running only minimal programs at Windows startup. This process is called a clean boot .
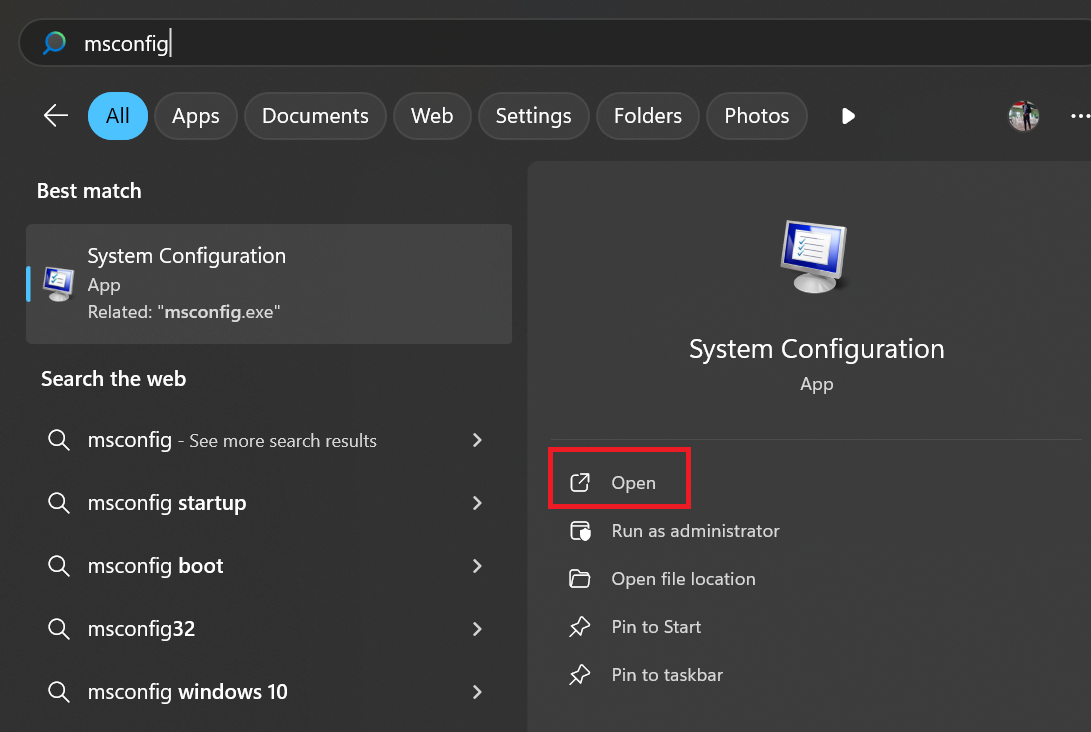
To perform a clean boot, follow these steps:
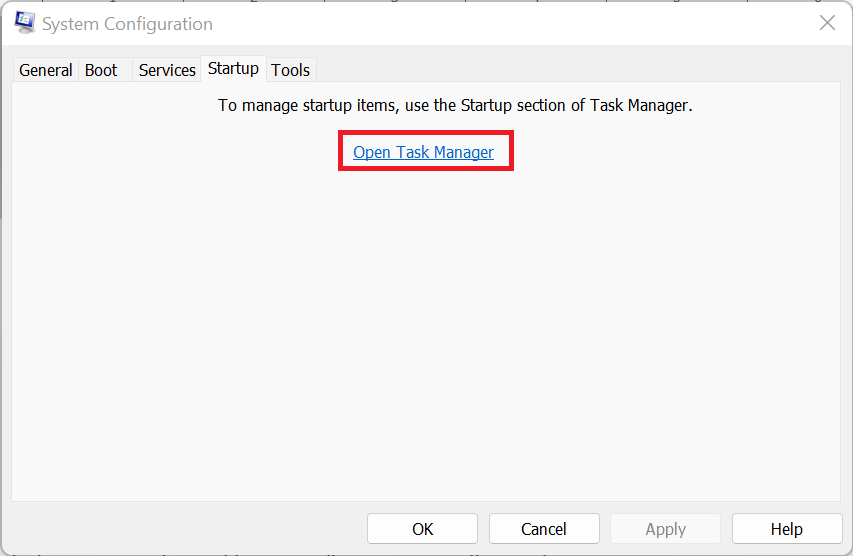
- Open the Start menu and search for msconfig . Click System Configuration in the search results.
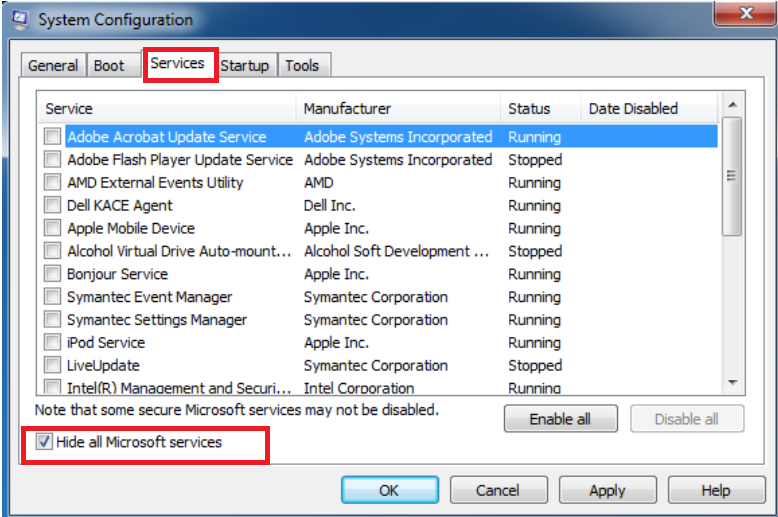
- Once the System Configuration dialog window appears, head to the Services tab.
- Check the Hide all Microsoft services box and click on the Disable all button.
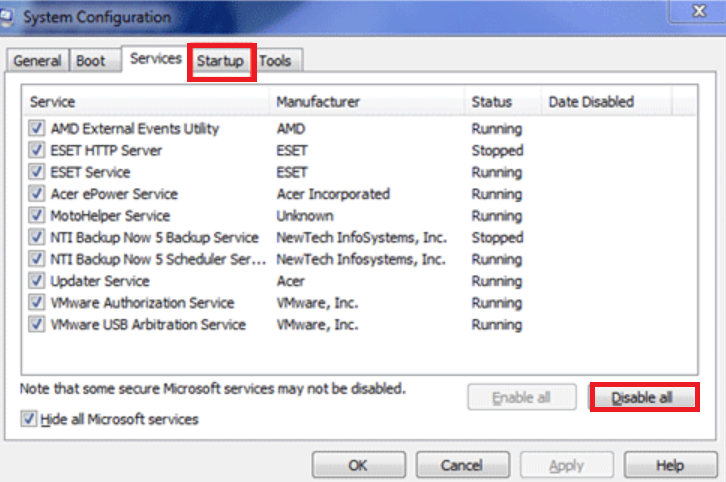
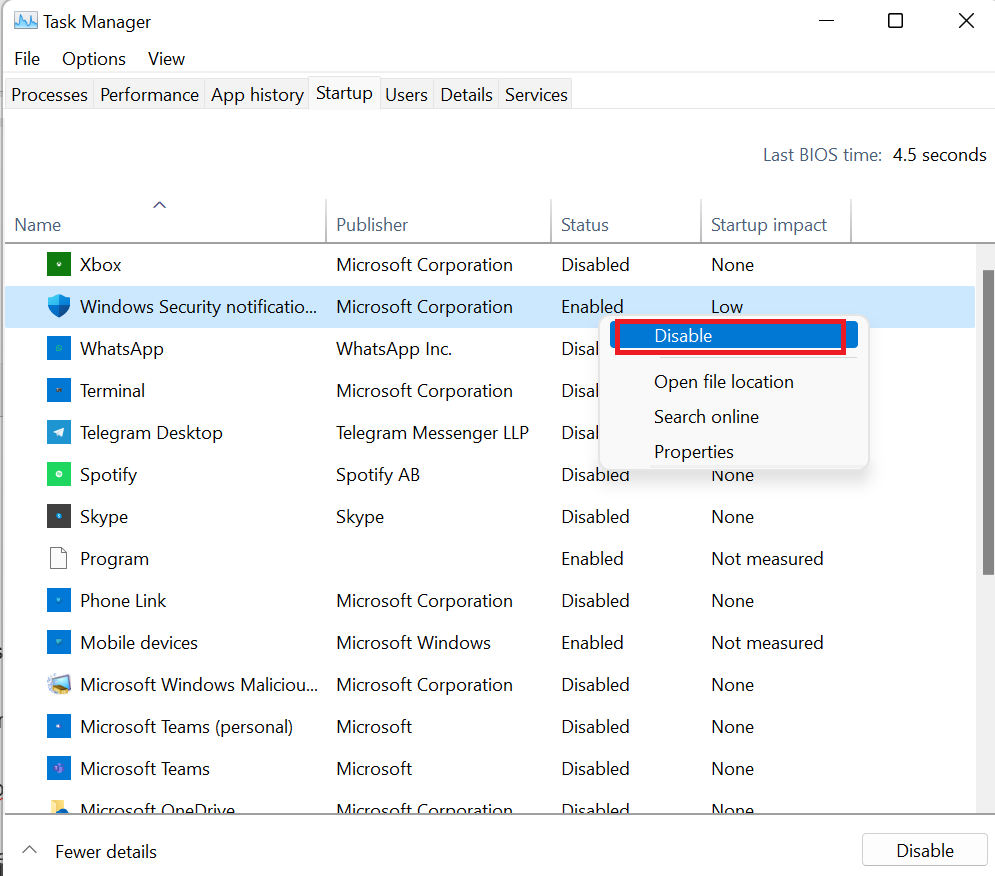
- Next, switch to the Startup tab and select Open Task Manager .
- Once the Startup tab of the Task Manager opens, select each enabled program and click on Disable.
- Return to the System Configuration dialog and click on the OK button.
- Restart your computer and try upgrading your operating system.
Note
The same steps apply to Windows 10.
For Windows 7:
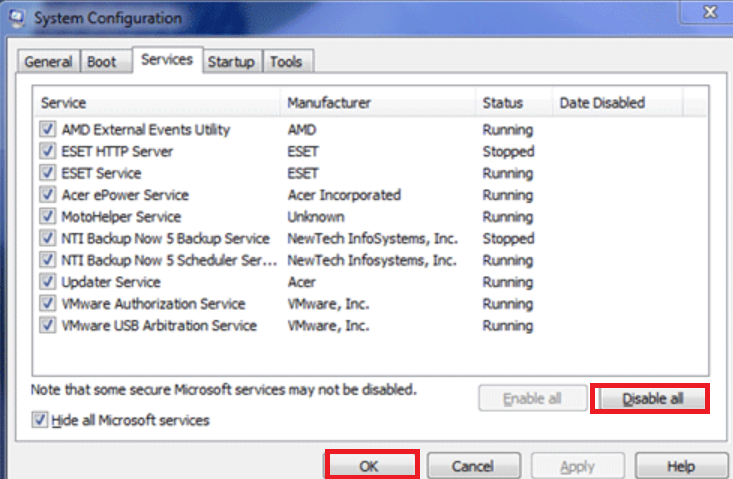
- Open the Start menu and type msconfig into the search bar. Select msconfig.exe from the search results.
- Navigate to the Services tab. Check the box labeled Hide all Microsoft services. This will help avoid disabling essential system processes.
- Click Disable all to turn off non-Microsoft services.
- Switch to the Startup tab. Click Disable all to prevent startup programs from launching.
- Press OK to save the changes.
- When prompted, click Restart Now to reboot your computer.
Download Auslogics BoostSpeed
Your one-stop PC maintenance and optimization tool, this program will clean, speed up, repair and tweak your system to ensure maximum speed and efficiency.
Method 4: Use the Windows ISO file
As we mentioned earlier, the Media Creation Tool has to download the setup file to upgrade your PC. But for some reason, it may keep showing the error code 0x80072F8F – 0x20000.
If none of the methods above helped you fix the problem, another alternative is to download the Windows setup file yourself and run the upgrade.
You should also consider downloading the ISO (Windows setup) file to your mobile device and transferring it to your computer.
This way, the error won’t botch the process.
So, follow these steps:
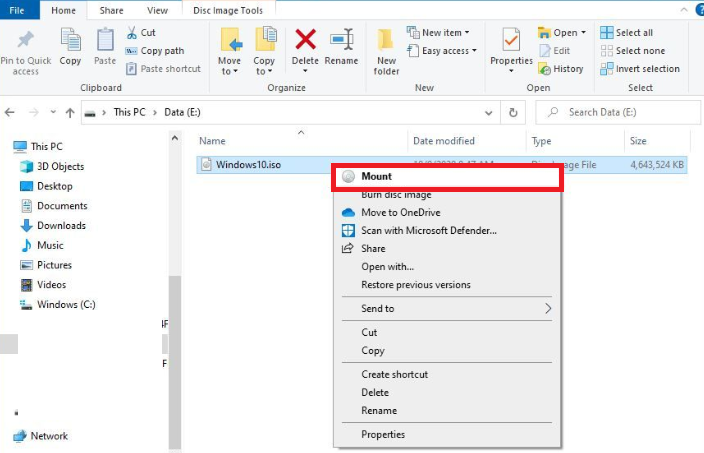
Step 1: Go to the Microsoft official page to download the ISO file for Windows 10 or Windows 11 .
The ISO file is a full copy of the Windows setup files that you can use to install or reinstall Windows on a computer. It can be used to make a bootable USB drive or DVD for installation.
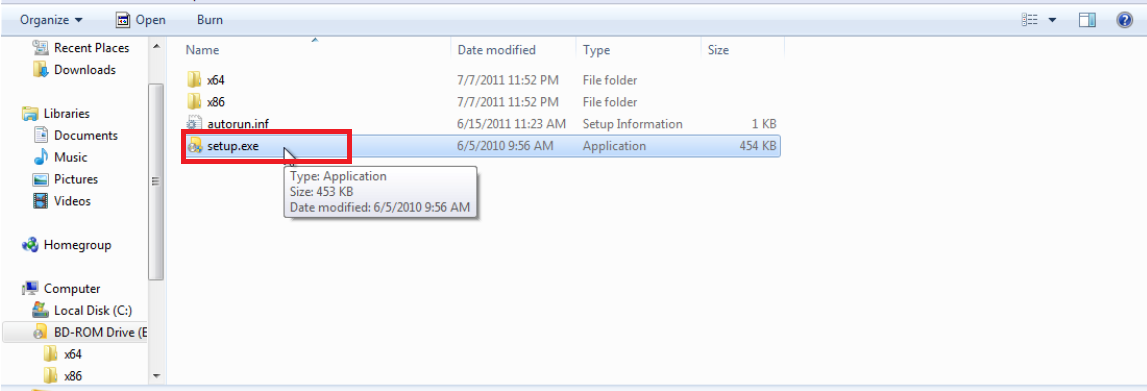
Step 2: Plug the drive where you saved the ISO file into your computer. Open the drive, right-click the ISO file, and select Mount .
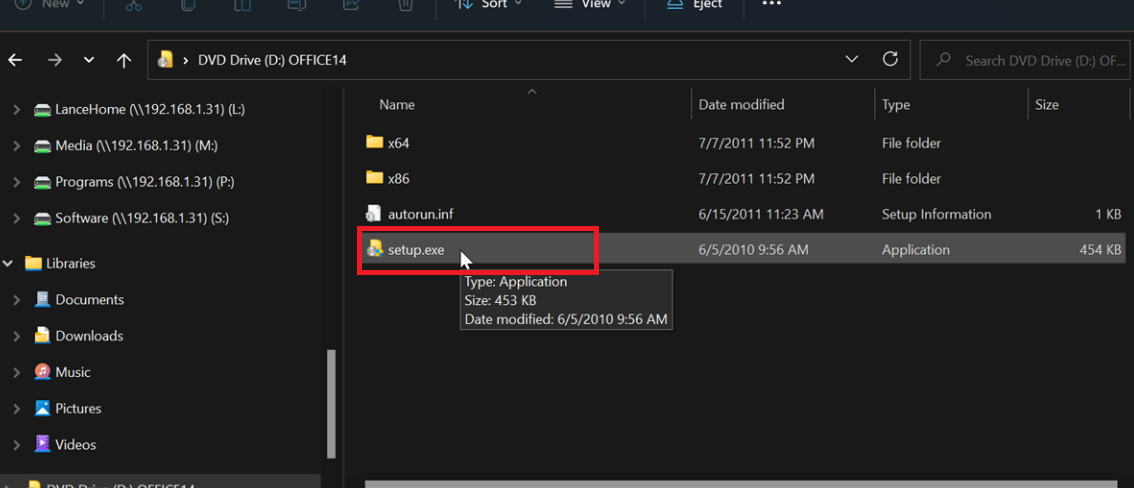
Step 3: Open the mounted drive and double-click setup.exe .
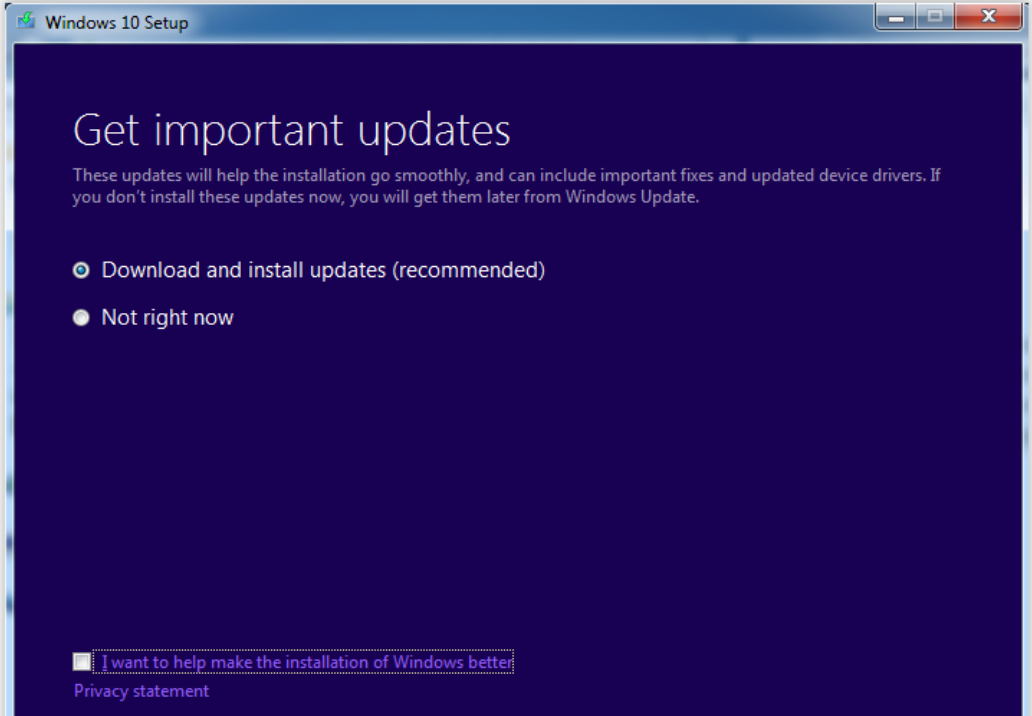
Step 4: Next, choose Download updates (recommended) and click Next .
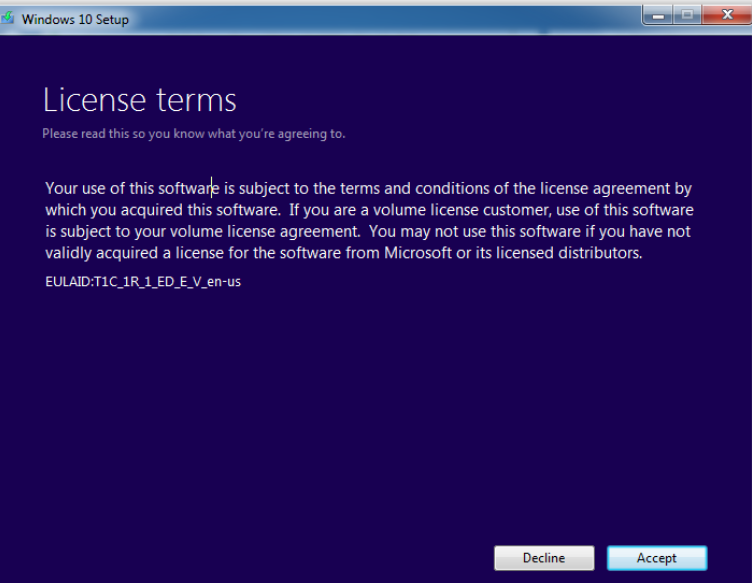
Step 5: Accept the license terms.
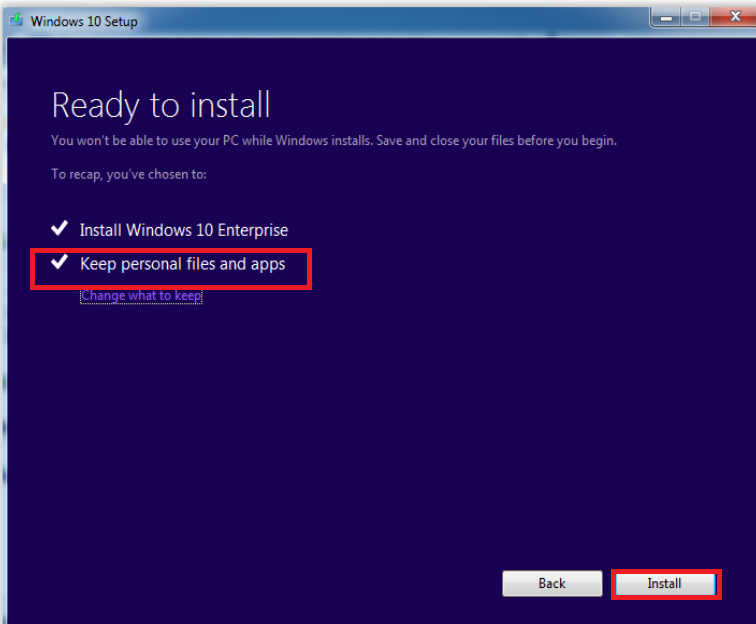
Step 6: Select Keep personal files and apps or choose another option, then click Next . This ensures that you keep your files after the installation. Click Install to start the Windows installation.
For Windows 7:
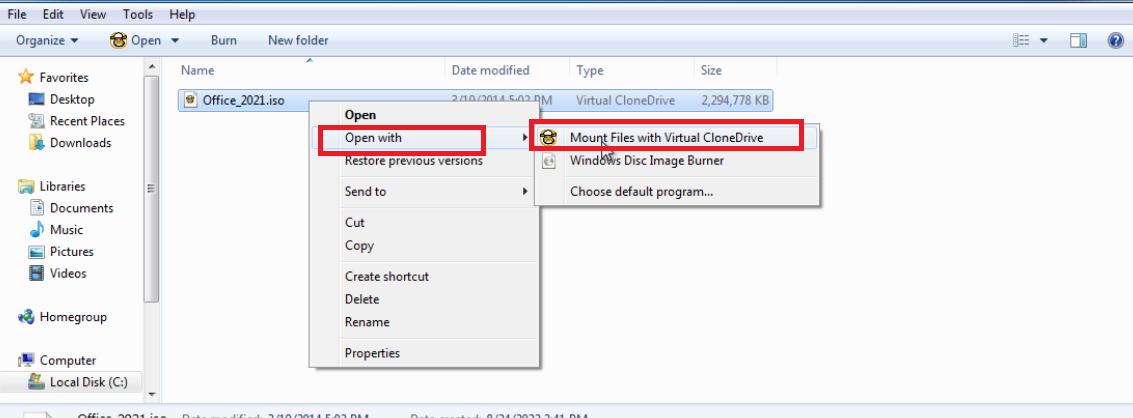
While most of the steps are the same across Windows 7, 10, and 11, the process of mounting is slightly different on Windows 7:
- Install virtual drive software like Virtual CloneDrive .
- Right-click the ISO file and click Open with, then select Mount Files with Virtual CloneDrive.
- Double-click setup.exe and accept the User Account Control prompt.
- At this point, you can continue from Step 4 above.
Method 5: Run the Windows Update troubleshooter
Issues like update errors or system glitches are difficult to detect, and some of these might be behind the error code 0x80072F8F. To fix issues like this, you can use the Windows Update troubleshooter .
It is a built-in tool that automatically scans for issues related to Windows updates and other system functions and fixes them.
Here’s how to run the troubleshooter:
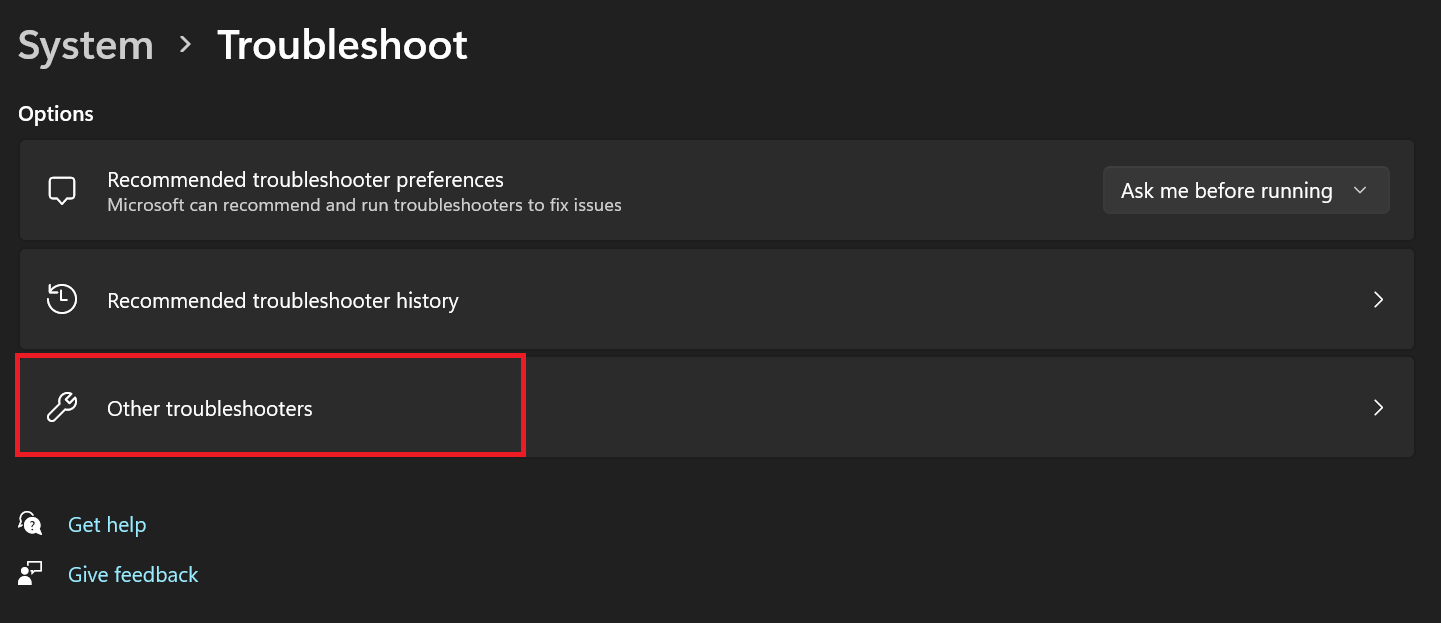
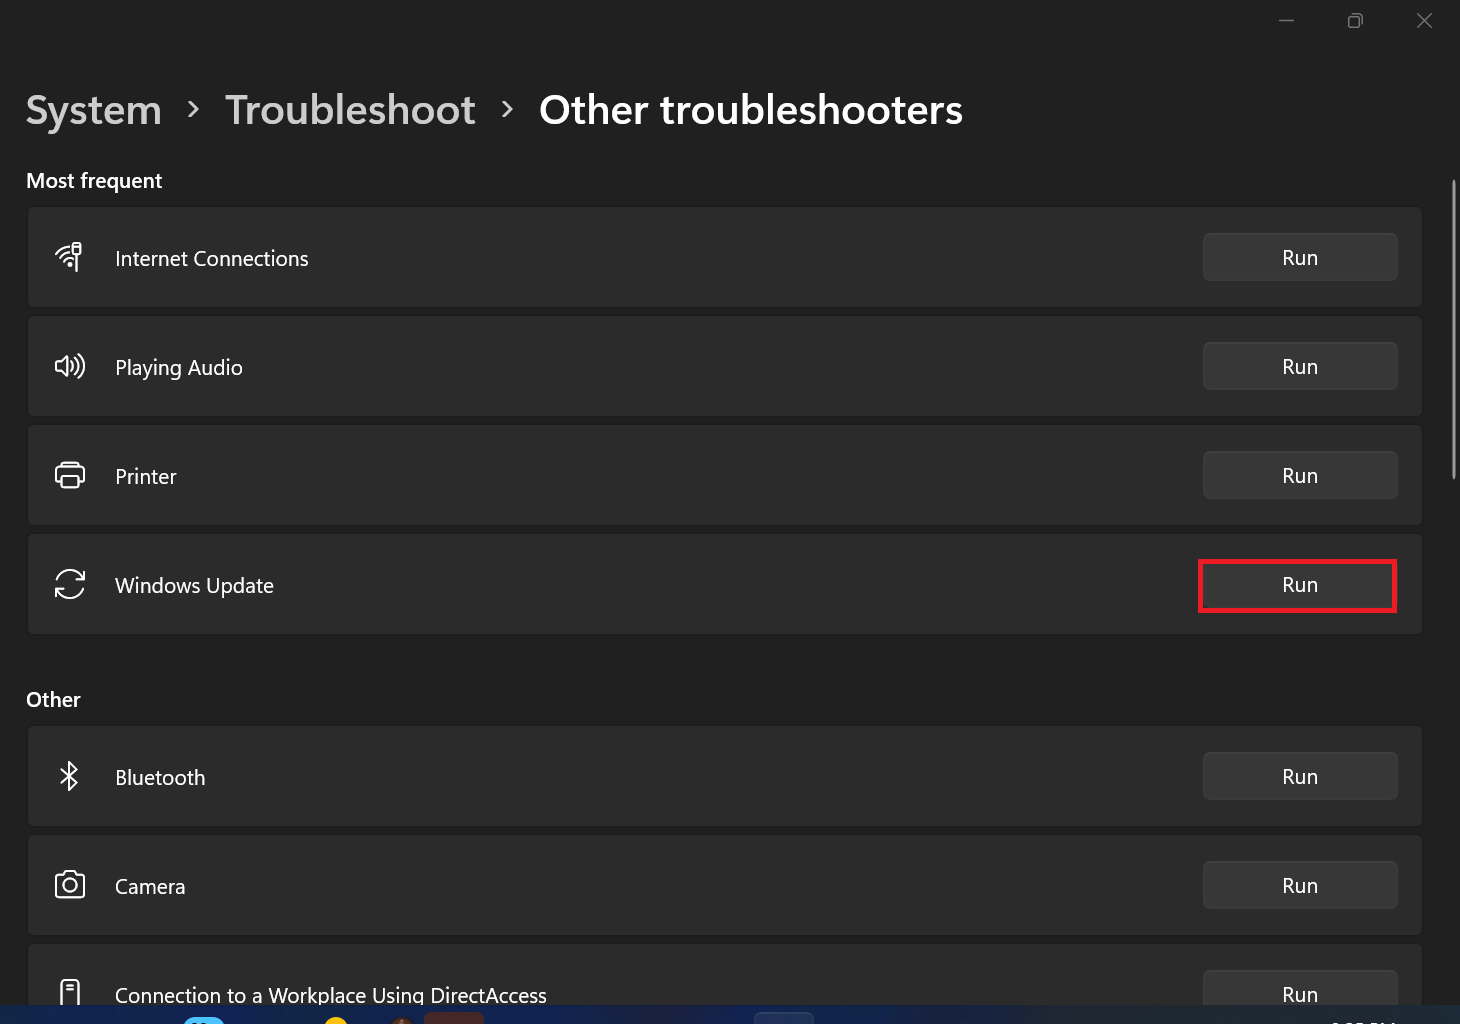
- Open Settings (
Windows +I).
- Go to System and click Troubleshoot on the right. For Windows 10, go to Update & Security > Troubleshoot.
- Select Other troubleshooters.
- Under Most frequent , select Windows Update and select Run.
- Allow the troubleshooter to run. When it is done, it will give you recommendations on what to do. Follow the on-screen prompts to complete the process.
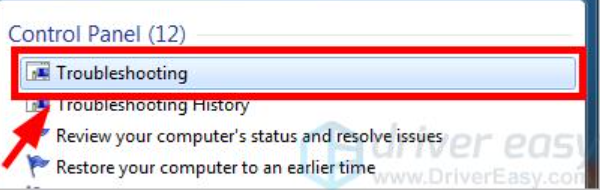
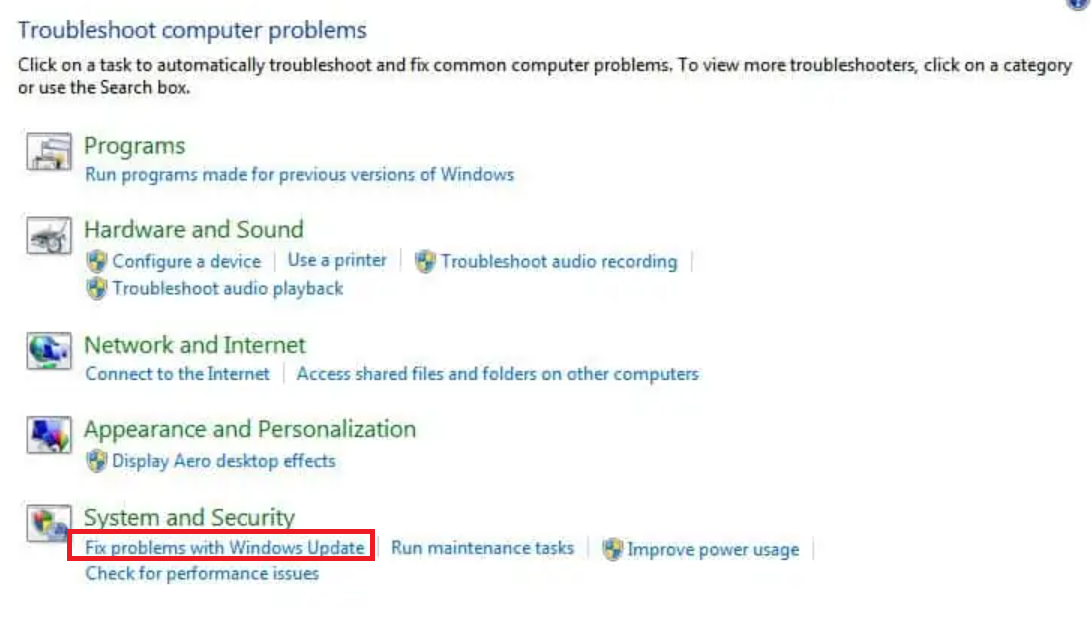
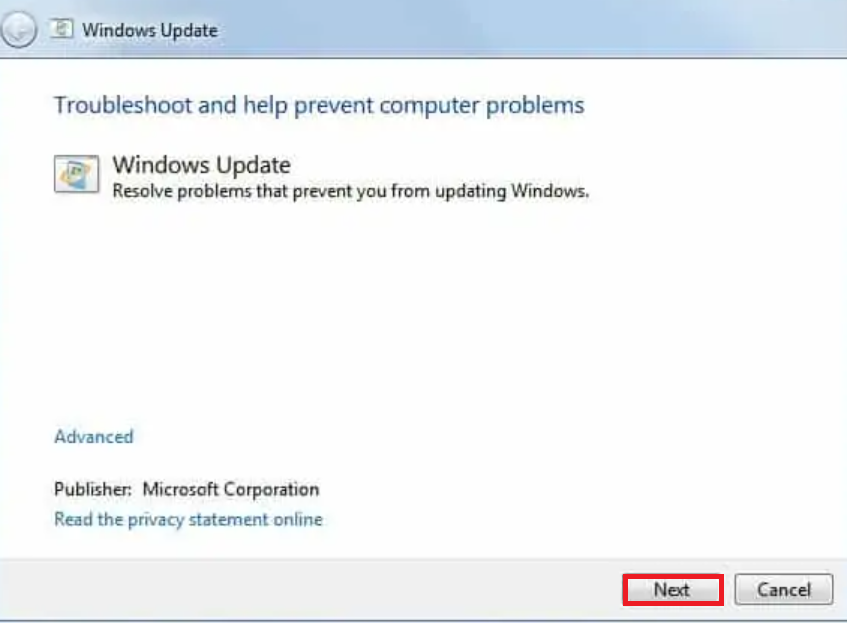
For Windows 7:
- Click the Start button at the bottom-left corner of your screen and type troubleshoot in the search bar. Select Troubleshooting from the search results.
- Click on Fix problems with Windows Update .
- Wait for the scan to finish. If any issues are found, follow the on-screen steps to fix them.
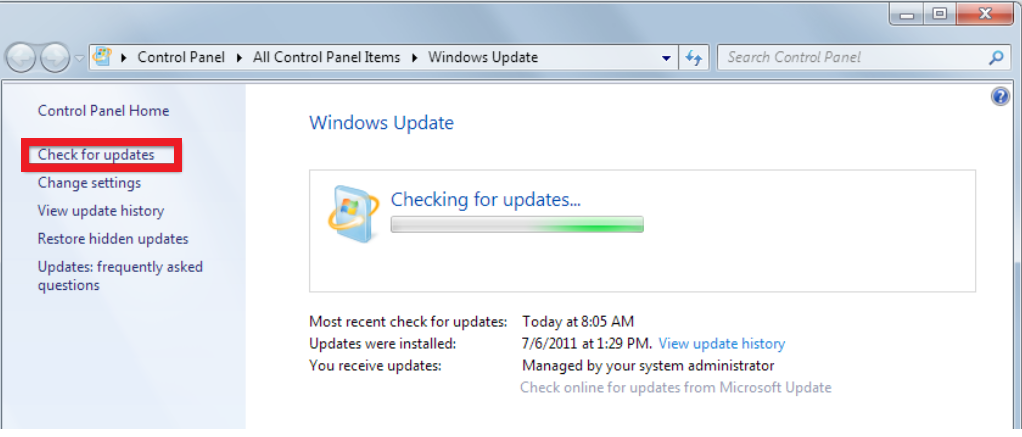
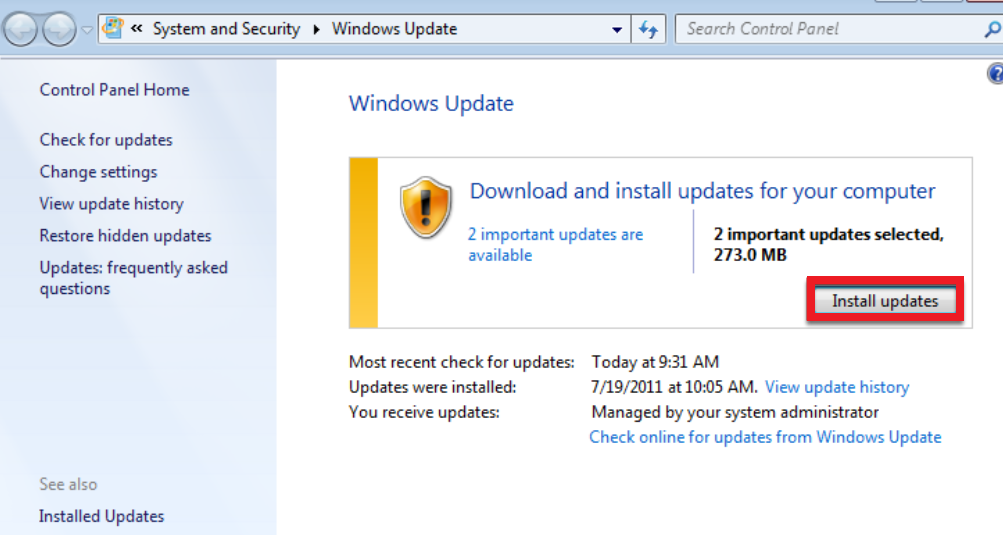
Method 6: Update Windows
If your version of Windows is outdated, your operating system may lack critical patches. This might be causing compatibility issues, which explains why you are seeing the error 0x80072F8F.
Most times, Microsoft releases updates that might include bug fixes and enhancements that might help resolve the problem.
Here’s how to check and see if new updates are available:
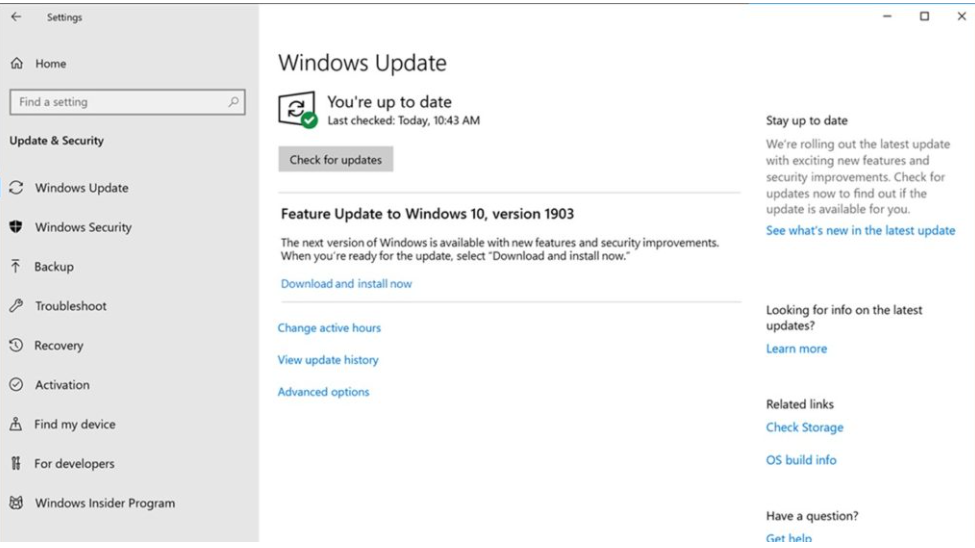
- Go to the Settings app.
- On Windows 10, scroll down to Update & Security and select Windows Update. Click Check for updates and install any available updates.
- On Windows 11, select Windows Update . On the right, click Check for updates and install any available updates.
- Restart your computer and see if this solves the problem.
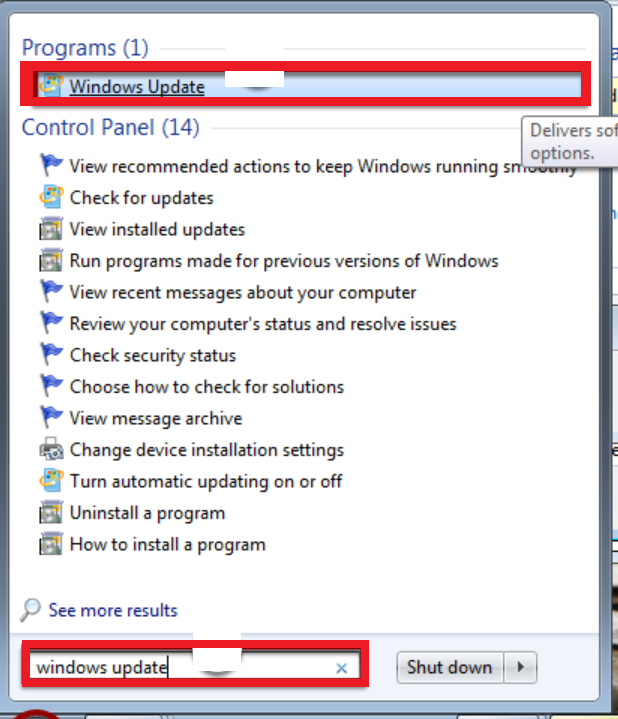
For Windows 7:
- In the Start menu, search for Windows Update .
- On the left side of the screen, click on Check for updates.
- If there are updates available, click Install updates to install them.
📌 Related: How to Manually Check and Install Windows Updates
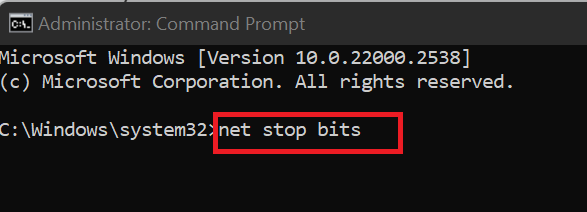
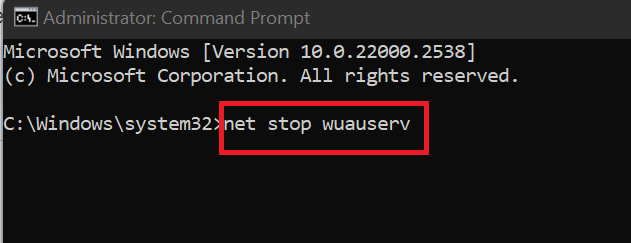
Method 7: Reset Windows Update components
Corrupted Windows Update components can prevent Windows from downloading or installing updates properly, causing errors like 0x80072F8F – 0x20000. These components include files and settings related to Windows Update, such as the SoftwareDistribution folder and update services, which may become damaged or outdated over time.
Resetting these components can fix the issue by clearing out corrupted files and settings, effectively giving Windows a fresh start for downloading and installing updates.
Here’s how to do it:
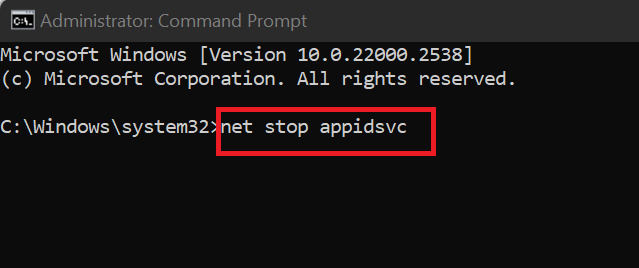
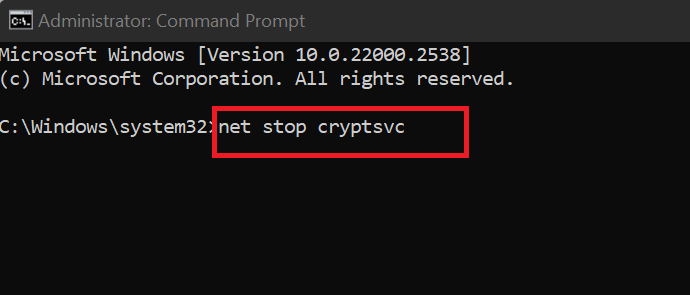
- Search for Command Prompt in Windows Search. Click on Run as administrator .
- In the Command Prompt, enter the following commands one by one and hit
Enter.
net stop bits
net stop wuauserv
net stop appidsvc
net stop cryptsvc
If the Media Creation Tool itself is corrupted, it could give you the error code 0x80072F8F – 0x20000 during the Windows installation or upgrade process. This corruption can result from incomplete downloads, interrupted installations, or malware interference.
Reinstalling the tool ensures you have a fresh, uncorrupted version, eliminating any issues caused by damaged files.
The Media Creation Tool doesn’t install like regular software; it runs as a standalone .exe file. To uninstall it, you need to follow these steps:
Step 1: Find and delete the old tool:
- Go to the folder where you saved the old Media Creation Tool (for most people, it’s usually the Downloads folder).
- Right-click the MediaCreationTool.exe file and select Delete .
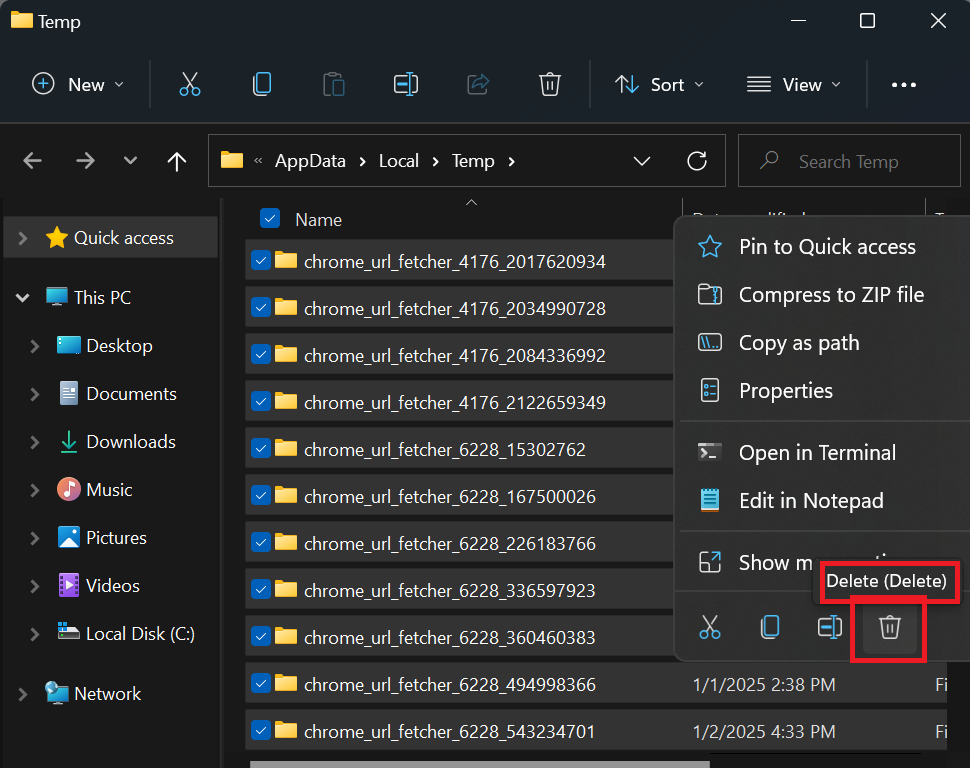
Step 2: Clear temporary files:
- Press
Windows + R, type %temp% , and press Enter.
- Press
Ctrl + A to select all the files and delete them. Some files may be in use by the system and cannot be deleted. If prompted that a file is in use, simply skip those files.
Clearing temporary files removes leftover data that could conflict with the new Media Creation Tool installation. This ensures a smoother setup process and reduces the risk of repeated errors.
PRO TIP
Using third-party tools like
Auslogics BoostSpeed s a better way to delete temporary files.
It safely removes temporary and junk files without risking important system data. Its advanced algorithms carefully identify unnecessary files like outdated cache, logs, and leftover update files, ensuring that only nonessential data is deleted.
This targeted cleanup prevents system errors and frees up valuable disk space, helping to resolve issues like the error code 0x80072F8F - 0x20000 without causing any harm to critical system functions.
Step 3: Download the latest version:
Related: How to Get and Use Windows 10 Media Creation Tool
That said, here is a summary of methods to fix the error code 0x80072F8F – 0x20000 on Windows:
| Method |
What it is |
How to do it |
| Run the Media Creation Tool as an administrator |
Gives necessary permissions for the Media Creation Tool to operate |
Right-click the Media Creation Tool file and select Run as administrator |
| Check internet connection |
Ensures stable connection to Microsoft servers for updates |
Restart your router, try a different network, or run the Windows Network troubleshooter |
| Check date, time, and region settings |
Correct settings for secure communication with Microsoft servers |
Adjust time and region settings via Settings > Time & language > Date & time |
| Temporarily disable antivirus or firewall |
Prevents interference from security software during updates |
Disable real-time protection and firewall temporarily, then re-enable after updates |
| Enable TLS 1.1 and TLS 1.2 |
Ensures secure communication with Microsoft servers during upgrades |
Edit system registry to enable TLS 1.1 and 1.2, then restart your computer |
| Delete the SoftwareDistribution folder |
Removes corrupted files preventing Windows Update |
Navigate to C:\Windows\SoftwareDistribution\Download , delete files, and run the update again |
| Perform a clean boot |
Resolves conflicts from startup programs and services |
Disable non-Microsoft services and startup programs through System Configuration and Task Manager |
| Use the Windows ISO file |
A manual upgrade method using the Windows installation file |
Download the ISO, mount it, and run setup.exe for installation |
| Run the Windows Update troubleshooter |
Automatically detects and fixes system update issues |
Go to Settings > Troubleshoot > Windows Update and run the troubleshooter |
| Update Windows |
Installs patches and fixes that may resolve compatibility issues |
Go to Settings > Update & Security > Windows Update and install any available updates |
| Reset Windows Update components |
Clears corrupted update-related files and settings |
Open the Command Prompt as an administrator and run the following commands:
net stop wuauserv
net stop bits
net start wuauserv
net start bits
|
| Redownload the Windows Media Creation Tool |
Fixes issues caused by corrupted installation files |
Delete the old version, clear temporary files, download the latest version from Microsoft, and install it |
Download Auslogics BoostSpeed
Your one-stop PC maintenance and optimization tool, this program will clean, speed up, repair and tweak your system to ensure maximum speed and efficiency.
The Error Code 0x80072F8F – 0x20000: Fixed
The error code 0x80072F8F can be frustrating, especially when it prevents critical system upgrades or installations. Hopefully, the solutions provided above, like enabling TLS 1.1 and TLS 1.2, resolving internet connectivity issues, and addressing corrupted update components, helped you fix the issue.
If you are still unable to get rid of the error, you might want to consider resetting Windows as a last resort. If you choose this route, remember to back up your data to avoid any potential loss.
Finally, we would love to hear from you! If you’ve tried these steps or have additional tips, feel free to share your experience in the comments section.
FAQ
This error can occur during Windows updates, as well as when using the Microsoft Store, activating Windows, or downloading other updates. It usually happens due to internet connectivity issues or system settings.
Enabling TLS 1.1 and TLS 1.2 in the registry may resolve this issue. Additionally, resetting Windows Update settings in the registry can help. However, editing the registry should be done carefully to avoid system problems.
![[SOLVED] How to Easily Fix Error Code 0x80072F8F 0x20000 on Windows 10/11 (And Windows 7)](https://www.auslogics.com/en/articles/wp-content/uploads/2025/02/SOLVED-How-to-Easily-Fix-Error-Code-0x80072F8F-0x20000-on-Windows-1011-And-Windows-7-568x359.webp)