Cleaning the registry might sound intimidating, but it’s an essential task to ensure your computer runs smoothly. Since it’s a vital database that powers your operating system and applications, the Windows registry can become messy over time. And that can cause various errors. However, if you know h ow to clean the registr y the right way, you can prevent these issues. In this article, I’ll show you the safest methods to clean your registry based on my 20+ years of using Windows, tips from reliable forums we’ve gathered, and insights from our experiece as a company that developed the Registry Cleaner software . Let’s begin.
So What Does It Actually Mean to “Clean the Registry”?
When we say “clean the registry,” we simply mean removing entries that are corrupted or unnecessary from the Windows registry with the aim of improving the computer’s performance and stability.
But let’s go a bit further. The Windows registry, as I said at the beginning, is a data bank that stores important settings and options for the operating system and apps you’ve installed. Think of it as a digital storage room where Windows keeps track of everything it needs to know about your computer and its software.
Over time, this storage room can get “dirty” with old, invalid, or not-important entries, which may come from:
When this happens, it can cause errors or crashes and even slow down your computer . So, cleaning the registry involves at least three steps:
Step 1: Get rid of unneeded entries
You can clean up your registry by removing entries you don’t need, either by using Windows’ built-in tools, like the Registry Editor, or reputable third-party registry cleaning tools, like CCleaner or Auslogics Registry Cleaner. Whatever method you use, the end goal is to leave only the essential entries.
Step 2: Fixing errors with the registry
During the cleaning process, registry cleaners can detect and repair corrupted entries that might be causing problems. The solutions or methods we’ve recommended in this guide can also detect and repair such entries.
Step 3: Organize the registry
Windows doesn’t have a built-in tool specifically for organizing and compressing the registry. So, your best bet is third-party applications. Some registry cleaning tools can reorganize and compress the registry to make it faster to find what it needs, which can speed up your computer.
Download Auslogics Registry Cleaner
The program will clean corrupt or outdated entries from the Windows registry to resolve causes of various errors and malfunctions.
Important Precautions to Take Before Cleaning the Registry
Before you clean the computer registry, you need to take steps to protect your system. Since the registry is a critical database that controls many aspects of how your computer works, any mistakes could lead to system instability or various hard drive errors . Follow the steps below:
Tip 1: Don’t delete entries if you don’t know what they do
The registry contains thousands of entries, and many of these are vital for Windows and applications to function correctly. So if you modify or delete them, it may lead to serious issues. Here are some guidelines we recommend before editing the registry:
- Research the entries before deleting. Use trusted online sources or forums like Ask a Question to find info or post any question and deeply understand what an entry does.
- Stick to known problematic keys. If you’re not an expert, only clean entries that reputable tools or sources have flagged. Don’t try to guess; if you don’t know anything about an entry or are not sure, leave it alone. It’s better to be safe than sorry!
- Use registry cleaners with caution. For example, some tools like CCleaner or Auslogics Registry Cleaner may flag a specific registry key linked to an app you recently uninstalled because it can cause errors if left behind. However, always use them with a full backup in place . Plus, choose registry cleaners with a solid reputation and that have built-in safety checkers.
Double-check everything and, if possible, keep a log of any changes you make for troubleshooting purposes.
Tip 2: Create a system restore point
A system restore point acts as a safety net. It not only backs up the registry but also other critical system files and settings. If anything goes wrong that affects the entire system, you can roll back to its previous state. Here’s how to do it:
Note
These steps work on both Windows 10 and 11.
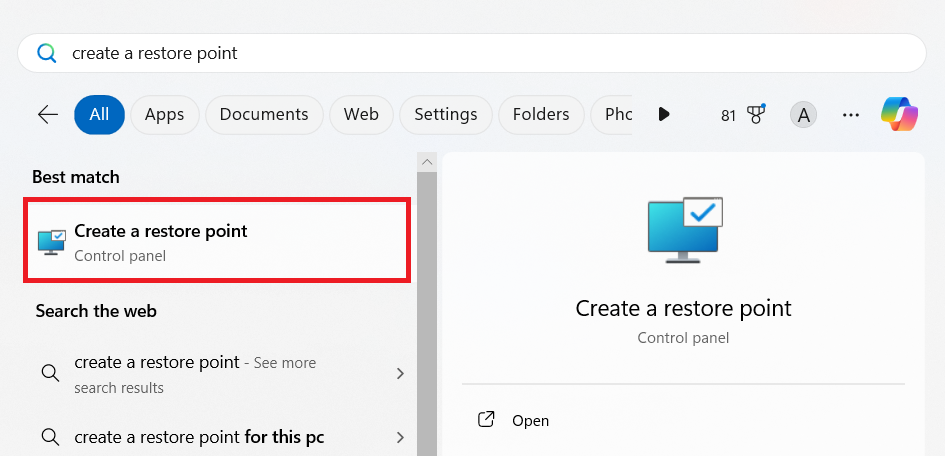
- Search for create a restore point in the Start menu and hit
Enter.
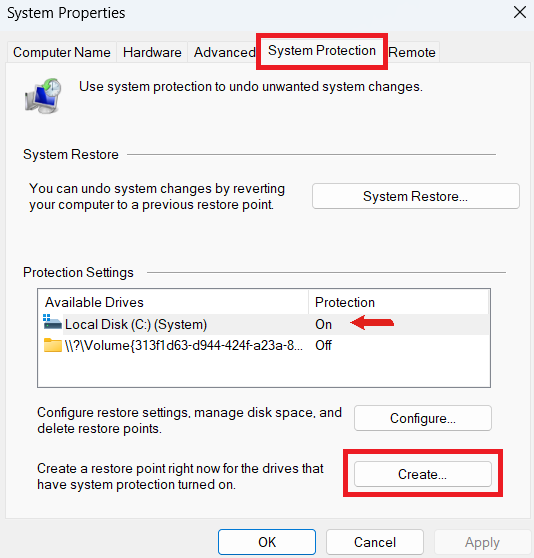
- Go to the System Protection tab and select your system drive (it’s usually labeled C: ) and make sure the protection is enabled. Then, click on Create .
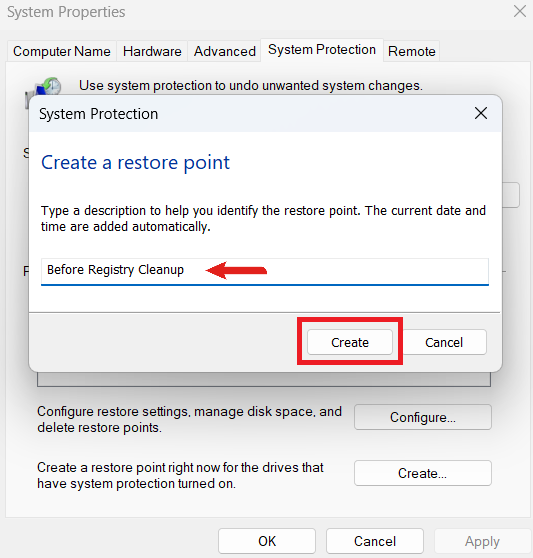
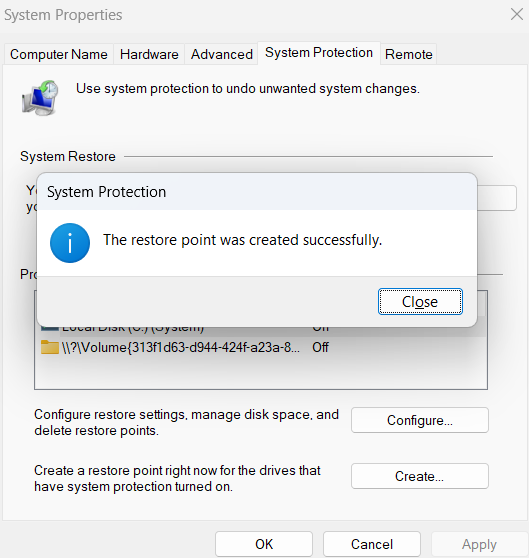
- Type a description or name to help you identify that specific restore point, like Before Registry Cleanup . Finally, click Create again to begin the process.
- Windows will alert you when the restore point is created.
Sometimes, the System Restore tool may not function properly due to various reasons like issues with your hard drive, system files being corrupted, or registry problems. Go through this guide to resolve the problem:
[FIXED] System Restore Not Working in Windows 10/11
Tip 3: Create a registry backup
Unlike a system restore point, this backup specifically targets the registry, which makes it a more focused safety measure. Here’s how it’s done:
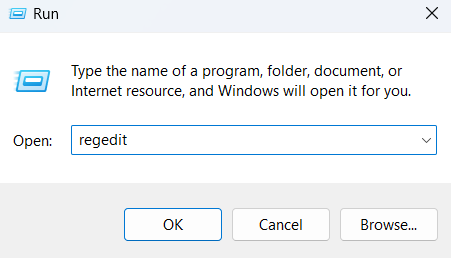
- Press
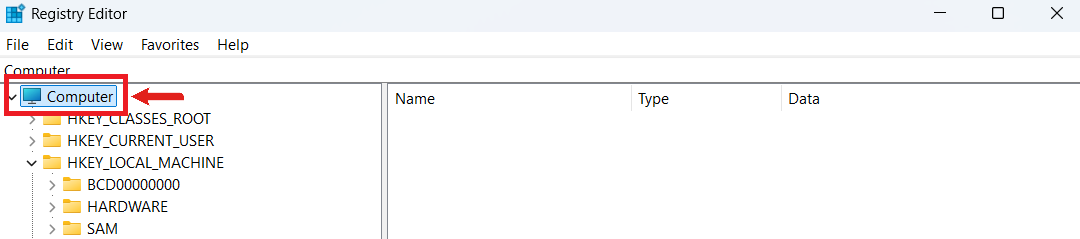
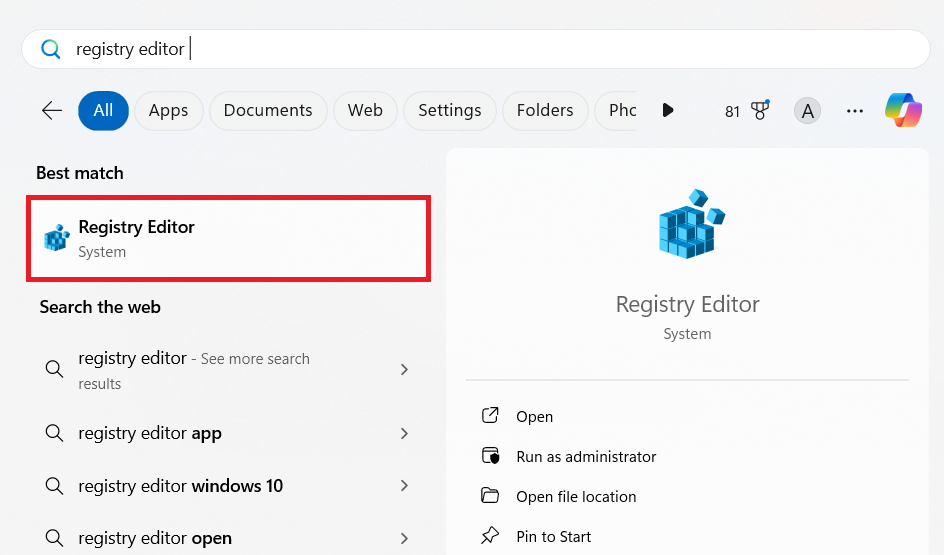
Windows + R to open the Run dialog box and type regedit . Then, press Enter.
- Next, select the hives, keys, or subkeys you want to backup. However, since we’re cleaning the entire Windows registry, select Computer .
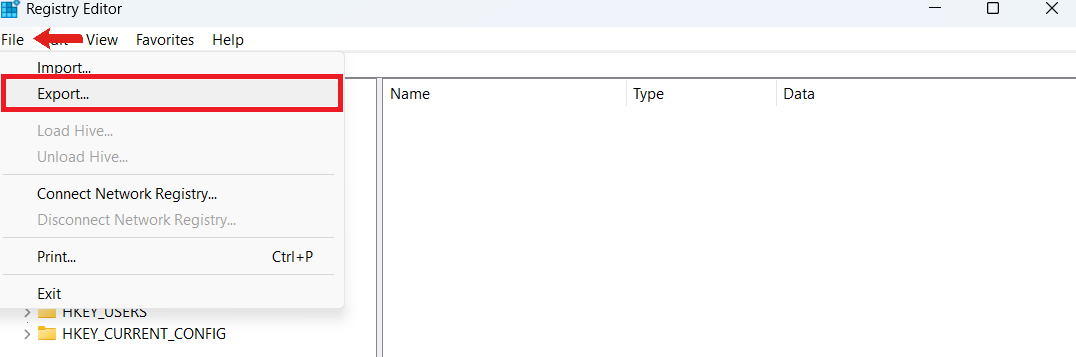
- Then, click on File and select Export .
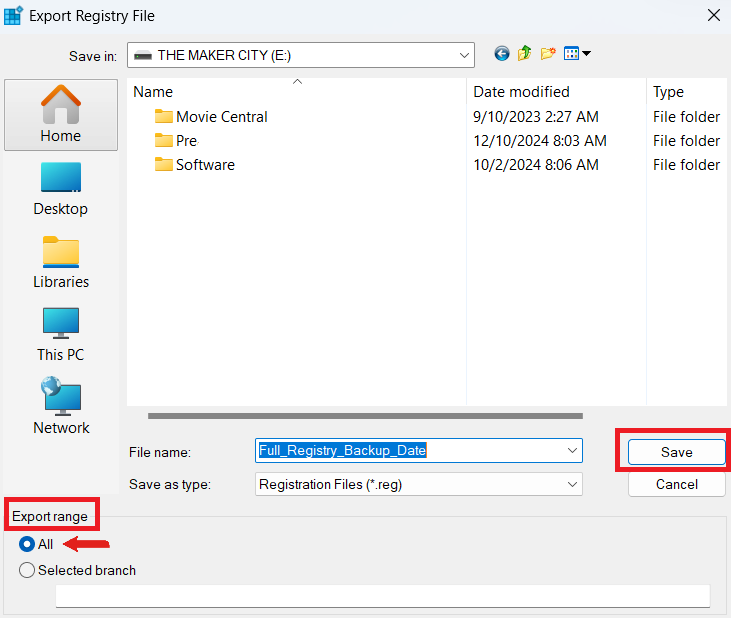
- Use a descriptive name you can remember, such as Full_Registry_Backup_Date. Save the file to a safe location, like your external drive or cloud storage.
- Make sure Export range is set to All to ensure a complete backup of everything. Click Save to complete the process.
If something goes wrong, just double-click on the .reg file to restore the backup. You can also open the Registry Editor, click File , and select Import .
You don’t have to both back up your registry and create a system restore point. You can choose one of them. However, if you want an extra layer of protection, we highly recommend going for both for the three reasons below:
- Redundancy: If the registry backup fails for some reason, the system restore point is there to save the day.
- Scope of protection: Registry backup focuses solely on the registry, while system restore points cover a wider range of system components. Together, they can work to significantly limit any potential issues.
- Ease of recovery: Regardless of the scope of the problem that can happen during the registry cleaning process, you have multiple options for recovery.
However, if you don’t want to proceed with two backups, you can choose one of the two methods that works for you.
How to Clean the Registry: Comparison of Listed Methods:
| Methods |
Description |
Pros/Cons |
Difficulty level |
| Using reliable third-party tools |
Use trusted tools like Auslogics Registry Cleaner or CCleaner for safe, automated, and effective registry cleaning. |
- Provides a user-friendly method to view and remove junk registry items
- Reduces risks and saves time by identifying safe-to-delete entries
- Third-party tools often offer additional options, such as automatic registry backups and system restore point management
- Installing unreliable registry cleaners could lead to significant problems
- Some cleaners don’t offer restore point capabilities
|
Easy |
| Using Windows Disk Cleanup |
Although not dedicated to registry cleaning, Disk Cleanup removes unnecessary files like temp files that indirectly help reduce registry clutter. |
- Helps improve drive health
- Removes temp files that may affect registry entries
- Does not directly clean the registry
- Offers negligible indirect registry optimization gains
|
Easy |
| Using the DISM tool |
The DISM tool repairs system files, which indirectly resolves registry issues caused by corrupted or missing files. |
- Repairs and replaces broken and missing system files that may be causing registry errors
- It can remove problematic Windows features and packages that cause registry conflicts
- Does not offer ways to directly find and remove registry items
- Often requires other utilities like the System File Checker to repair system files
|
Moderate |
| Cleaning up deleted apps or software entries |
Manually remove leftover registry entries from uninstalled programs. |
- Users can pinpoint and delete entries related to uninstalled software applications
- Offers custom backup options, as users can back up specific registry keys and subkeys
- Easier to track changes
- High-risk operation that can potentially cause catastrophic problems
- Complex and time-consuming undertaking, even for experts
- Easy to miss entries under other registry hives and keys
|
Advanced |
| Deleting invalid shared DLLs |
Remove leftover or invalid shared DLLs that cause errors or performance issues. |
- DLL paths can be verified before they are deleted
- The method offers users more control
- Backups can be more precise
- The operation is risky, as certain DLLs may be tied to other programs and system functions
- Tracking down and deleting individual DLLs is tricky and time-consuming
- Users may not find every DLL attached to uninstalled programs
|
Advanced |
| Removing startup items in the registry |
Clean invalid startup entries that can slow down system boot times or cause errors. |
- Users can determine which startup items to remove
- Verifying which program to disable avoids unintentionally removing important startup applications and services
- Highly risky
- Can be complex and labor-intensive
|
Advanced |
How to Clean the Registry in Windows 10/11: Basic Solutions
There are many ways to clean your registry—some are less technical and more user-friendly, like using third-party tools, and some are risky, like deleting entries manually. In this section, I’ll cover the easy-to-use methods that are suitable for beginners.
Method 1: Use reliable third-party registry cleaners
If you’re not an expert or don’t know much about cleaning the registry, the best route is to use third-party tools because it’s safer and less time-consuming. Of course, it’s only safe if you choose the right registry cleaner.
Here’s a table comparison between popular registry cleaners, including their pros and cons.
| Tool |
Main features |
Pros/Cons |
Ease of use |
Safety |
| Auslogics Registry Cleaner |
- Free registry cleanup
- Automatic backups
- User-friendly interface
- Customizable scans
|
- Trusted
- Free
- Detailed insights
- Safe backups
- Portable version available
- Real-time support
- Free version has limited advanced features
- Pro version required for unlimited access
|
Very easy |
High |
| CCleaner |
- Multi-functional tool with a registry cleaner feature
- Startup manager
- Junk file removal
|
- Beginner-friendly
- Versatile
- Ads in free version
- Potential bloatware
|
Easy |
High |
| Wise Registry Cleaner |
- Batch repair
- Scheduled scans
- Multi-user registry cleanup
|
- Scheduled cleaning
- Portable version available
- User interface seems outdated
|
Moderate |
High |
| Glary Registry Repair |
- Advanced error detection
- Real-time monitoring
- Supports system optimization tools
|
- Lacks detailed user customization
|
Easy |
High |
| IObit Advanced SystemCare |
- All-in-one optimization suite with registry cleaning, tuneups, and malware removal
|
- Versatile
- Lots of features
- Free version has fewer options
|
Easy |
Moderate |
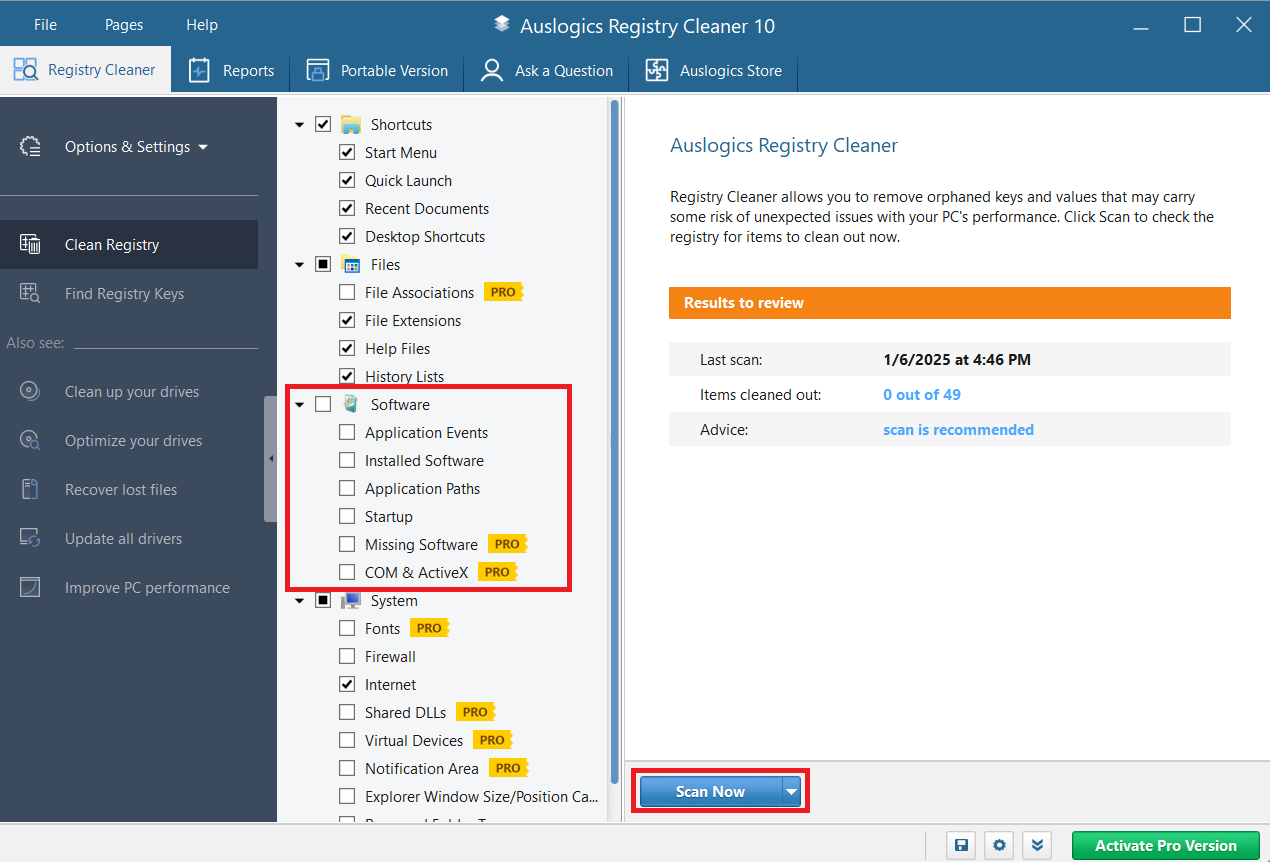
Let’s find out h ow to clean the regist ry using one of these registry cleaners, Auslogics Registry Cleaner:
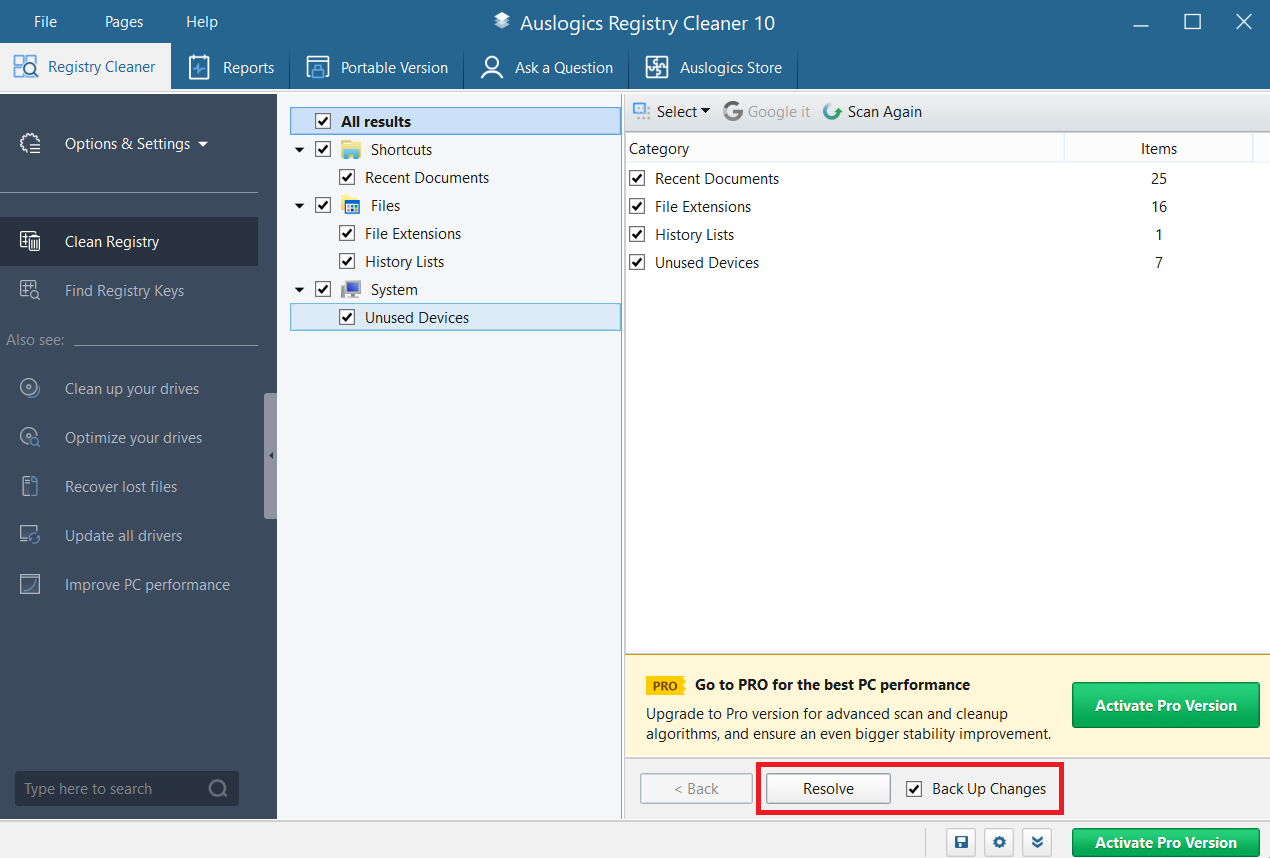
- After the scan, click on Resolve . Make sure the box next to Back Up Changes is ticked to ensure everything is backed up.
PRO TIP
You don’t have to worry about technical jargon when it comes to
Auslogics Registry Cleaner . Its user-friendly interface also helps you find which entries are safe to delete and choose specific registry areas to scan.
Method 2: Use Windows Disk Cleanup to clean the registry
Windows Disk Cleanup
isn’t a dedicated registry cleaner, but it’s one of the safest methods if you’re not familiar with the Registry Editor. It can remove unnecessary files that indirectly contribute to a bloated registry. It’s a good practice to pair it with other methods we’ve discussed.
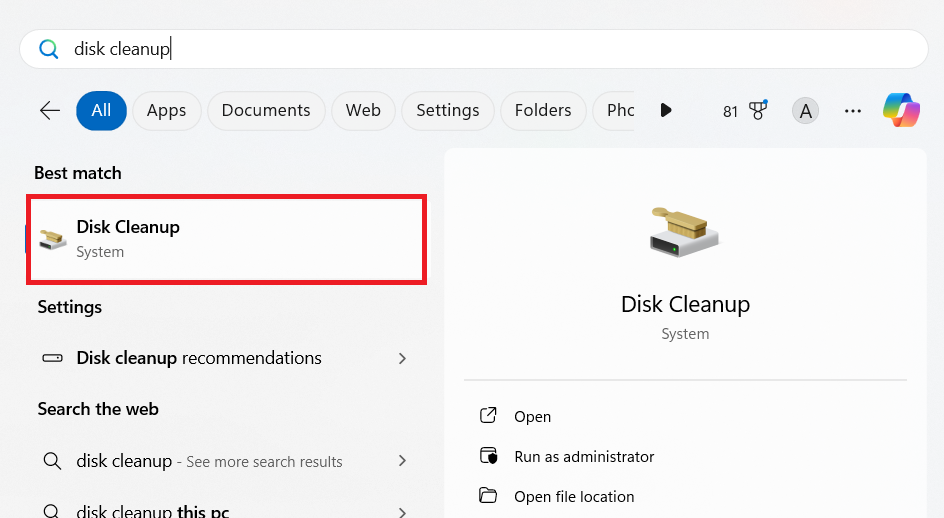
- Go to the Windows search field, type Disk Cleanup , and hit
Enter .
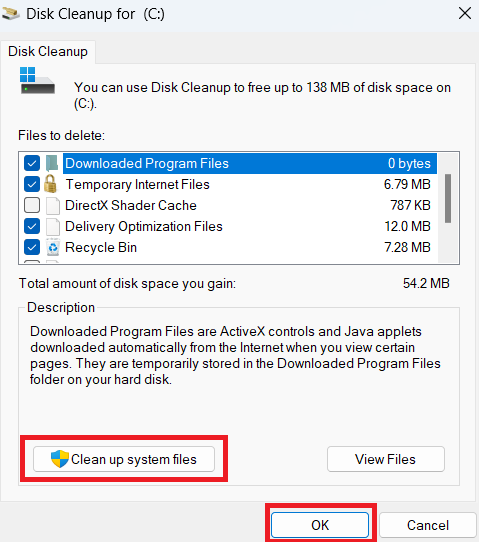
- Choose your system drive (usually C: ) if you have multiple drives connected to your PC and click OK .
- Select the files you want to delete, like Temporary Internet Files and Recycle Bin . Select Clean up system files for a deeper cleanup and click OK .
Besides cleaning your computer registry, you can use
Disk Cleanup to get more space on your system. You can learn different ways to increase your drive space and even automate the entire process.
The DISM tool is another easy and safe method if you don’t want to use the Registry Editor. This tool can help repair system files and improve the overall health of your computer, which can indirectly clean the computer registry.
For example, when the DISM tool fixes corrupted or missing system files , it can help resolve registry-related issues since the registry also relies on these files. Here’s how to use the DISM tool:
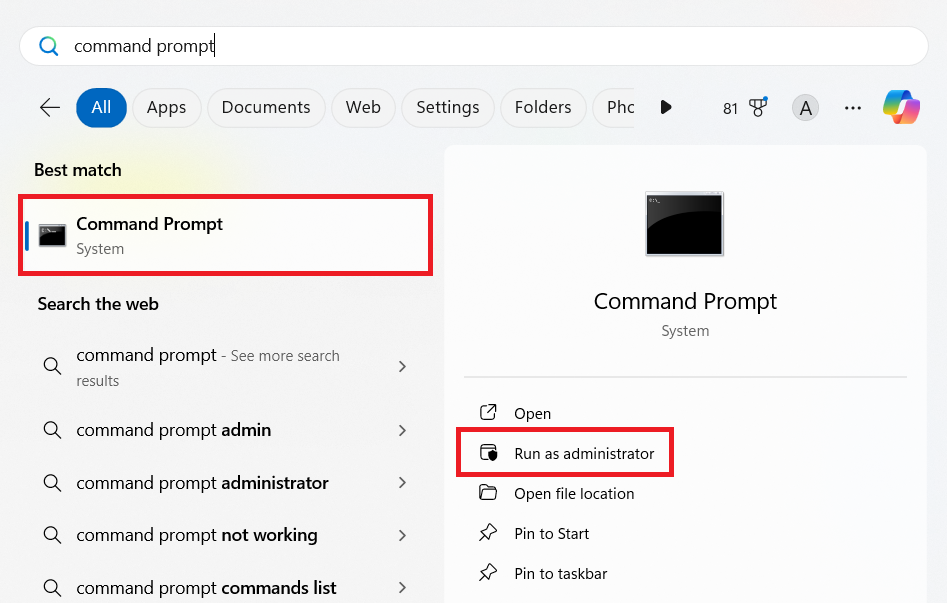
- Run the Command Prompt with administrative privileges.
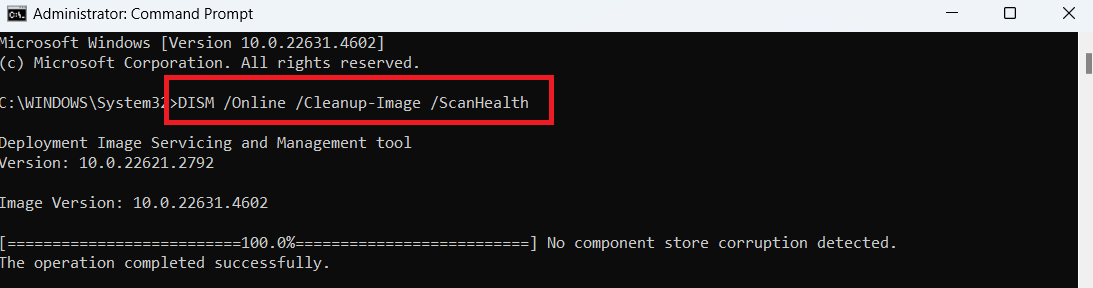
- Type the following commands one at a time and press
Enter after each one is complete:
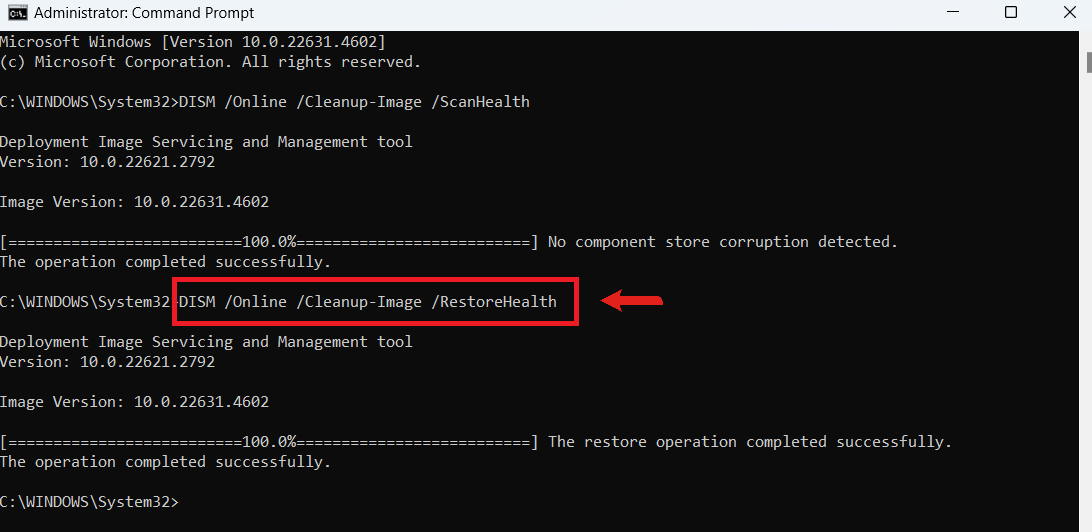
DISM /Online /Cleanup-Image /ScanHealth
DISM /Online /Cleanup-Image /RestoreHealth
- Allow the process to complete its scan and repair process.
Besides using the DISM tool to indirectly clean the registry on Windows 10 and 11, you can also use the System File Checker (SFC) tool to further check and repair system files.
To run the SFC scan, open the Command Prompt with administrative privileges, enter the command sfc /scannow , and press Enter. These two built-in tools can help keep your PC in good health, which indirectly helps maintain the registry health.
How to Clean the Registry in Windows 10/11: Advanced Solutions for Expert Users
If you’re comfortable with tweaking the Registry Editor, you can implement the steps we’ve covered in this section. Keep in mind that this method can be dangerous if you’re not familiar with what you’re doing. In fact, you still need to be careful even if you know your way around. Proceed with caution.
The Registry Editor lets you manually remove or modify registry keys, giving you full control of your system. However, there are certain things you need to know. We’ve written a detailed guide on
how to use the Registry Editor . Take your time, go through it, and understand before proceeding.
Step 1: Clean up deleted apps or software entries
When you uninstall an app or a program, sometimes bits and pieces of it are left behind in the registry. Cleaning up these leftover entries helps keep your system organized and running smoothly.
Here’s how to do it:
- Press
Windows + R, type regedit , and hit Enter.
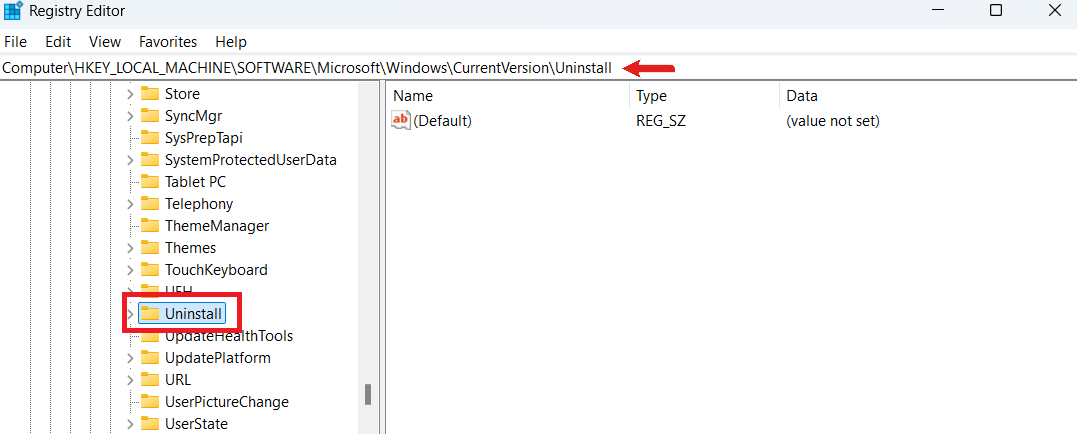
- Let’s say you want to delete outdated entries or software you’ve uninstalled. In that case, navigate to this path:HKEY_LOCAL_MACHINE\SOFTWARE\Microsoft\Windows\CurrentVersion\Uninstall
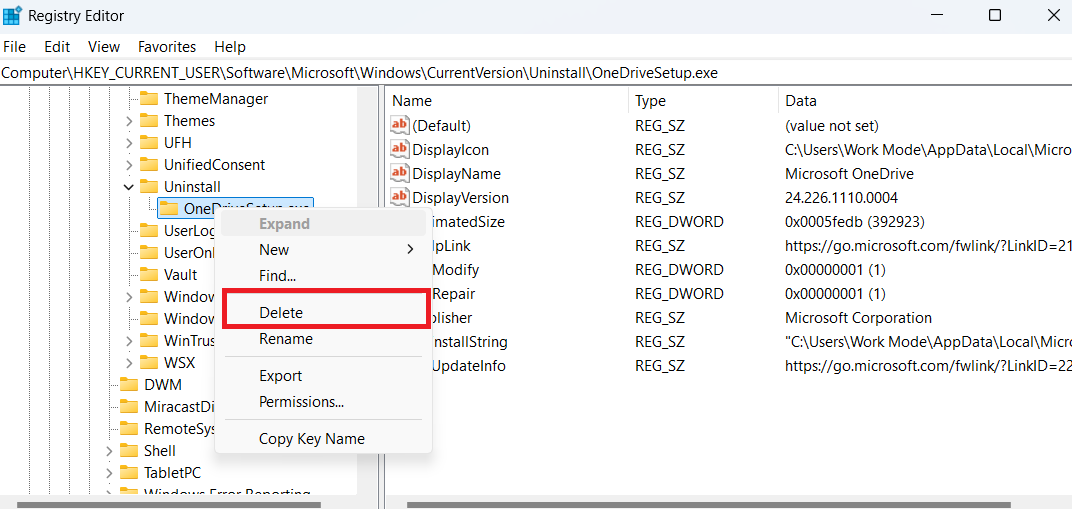
- Search for the subkeys that correspond to the app you uninstalled and delete it.
Note
Remember that the subkey might be named after the app or the publisher. So verify before deleting.
- Sometimes, you may have to repeat the process for other hives:HKEY_CURRENT_USER\Software\Microsoft\Windows\CurrentVersion\Uninstall
- Search these areas to ensure all entries for the deleted app are removed.
Interesting!
If you check the two immediate screenshots above, you will see that
HKEY_LOCAL_MACHINE\SOFTWARE\Microsoft\Windows\CurrentVersion\Uninstall has no leftovers from uninstalled apps, while
HKEY_CURRENT_USER\Software\Microsoft\Windows\CurrentVersion\Uninstall contains entries of a deleted app—OneDrive. This is because the first path contains all uninstall information for apps installed for all users on the PC (if there are
multiple user accounts ). And the second path has uninstall info for apps installed only for the current user.
Step 2: Delete invalid shared DLLs
Shared dynamic-link libraries (DLLs) are files that contain data, code, and resources that multiple programs can use at the same time. It helps these programs to run smoothly.
For example, a DLL file like User32.dll contains instructions on how to display windows and buttons on your screen. So instead of each program having its own separate copy of these instructions, they all share the same DLL file to save space and improve efficiency.
However, sometimes invalid or leftover DLLs can cause issues, like app crashes. Here’s how to clean invalid DLL files using the Registry Editor:
- Open the Registry Editor.
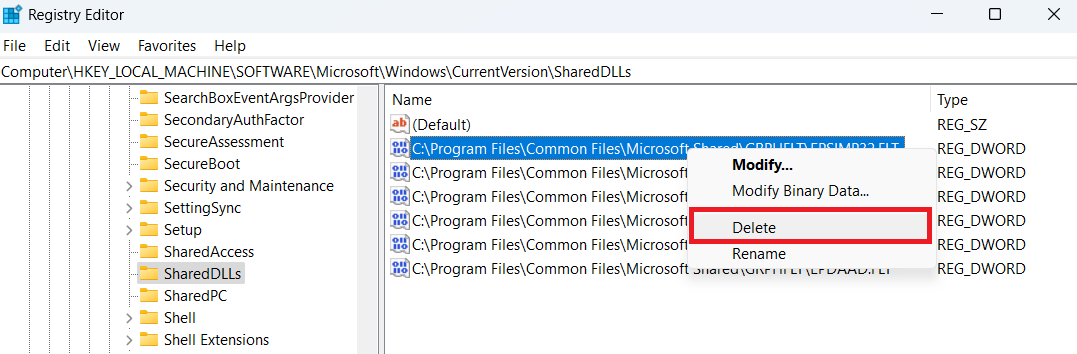
- Expand the HKEY_LOCAL_MACHINE hive and go to the location:
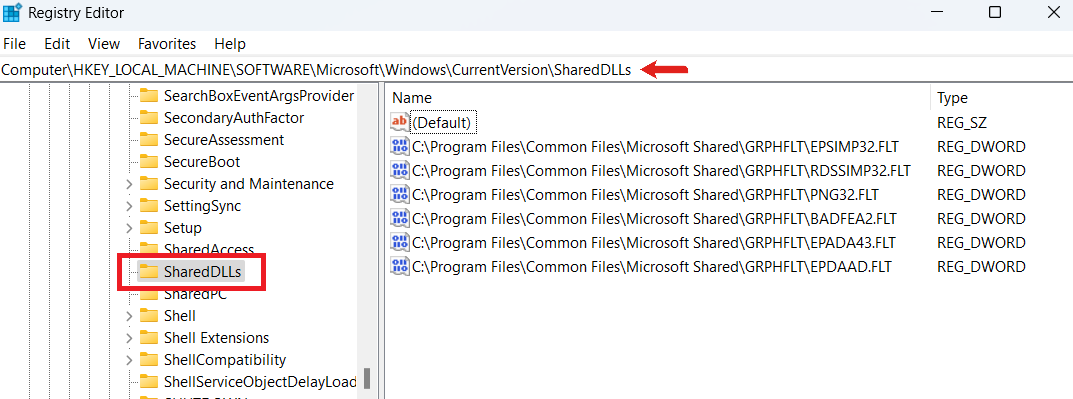
HKEY_LOCAL_MACHINE\SOFTWARE\Microsoft\Windows\CurrentVersion\SharedDLLs
- You’ll find numerous entries with paths and corresponding DWORD values. Check each entry to see the file path it points to. The name of each entry is the path of the DLL file.
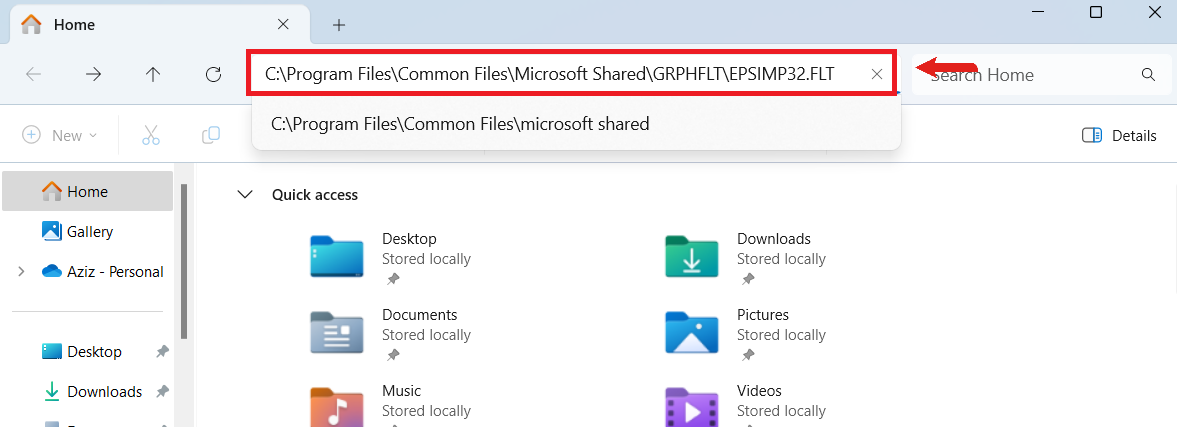
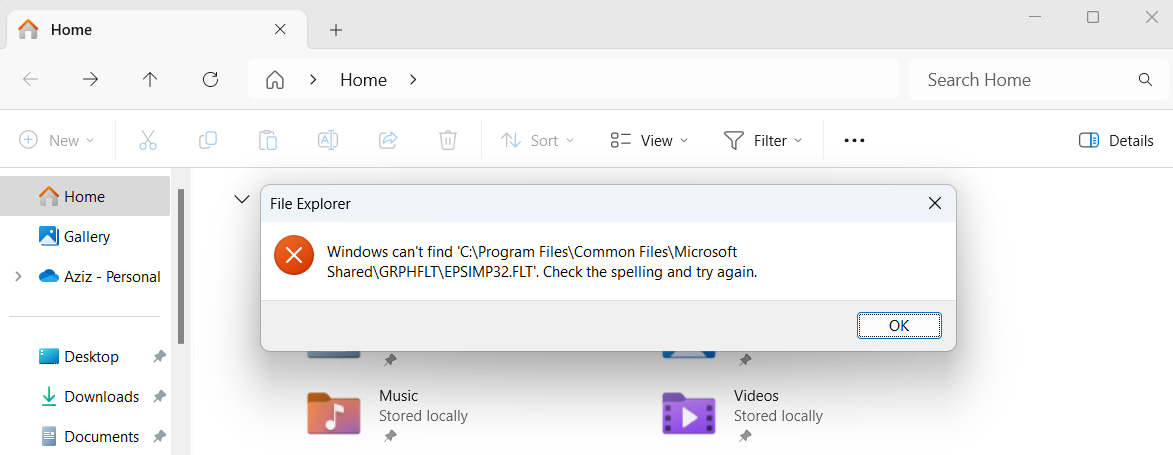
- To verify if it’s valid or not, copy the path of the entry, open File Explorer, and paste it into the address bar and see if it leads to an existing file.
- If it doesn’t, it’s invalid.
- You can correct the path of these entries only if you know how to do it. If you don’t, delete it.
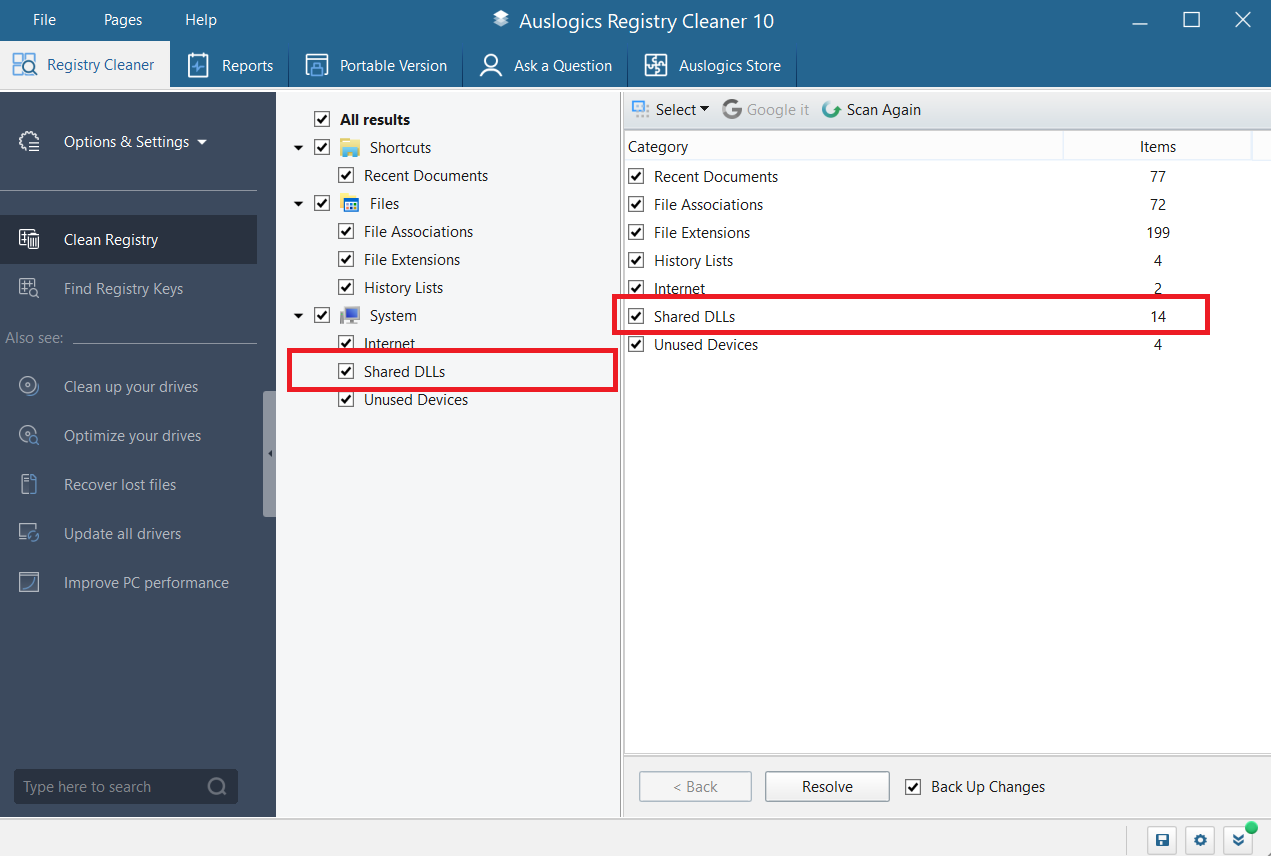
As you may have noticed, this method can be risky and might mess up your computer if you’re not careful. The safest bet is to use trusted third-party tools like
Auslogics Registry Cleaner to automatically find and fix invalid DLLs. You won’t have to worry about deleting something important.
Step 3: Remove startup items in the registry
Startup items are programs that run automatically whenever you turn on your PC. These items can become invalid because of:
- Malware leaving corrupted entries behind.
- Software updates that change file locations or names.
- Uninstalled programs that leave behind registry entries.
Here’s how to clean startup items:
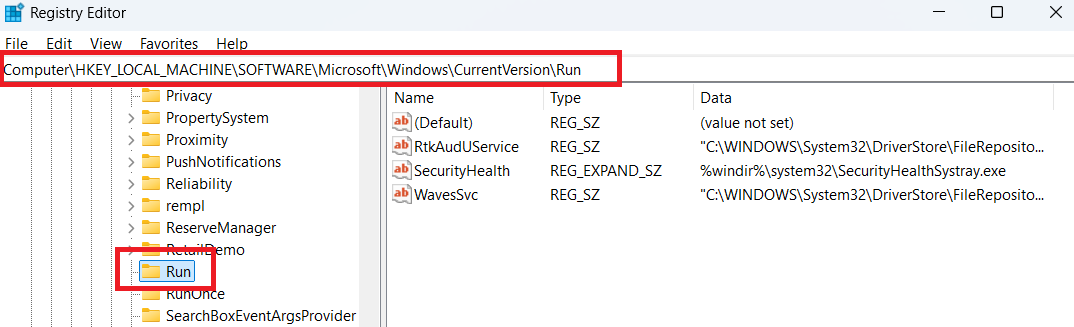
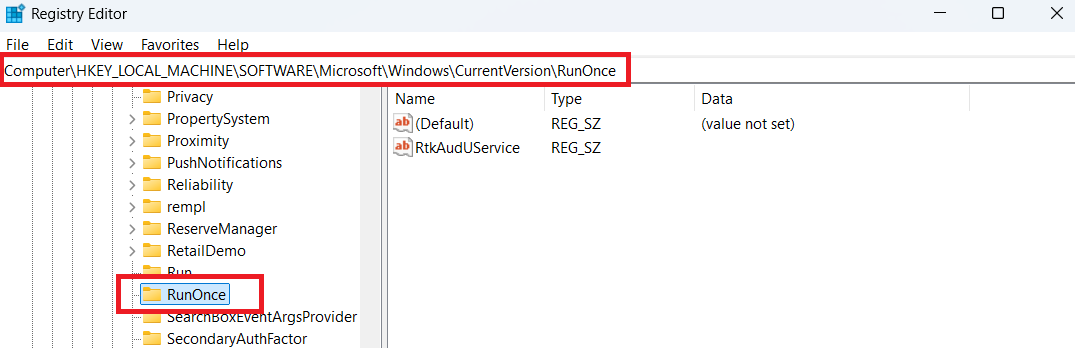
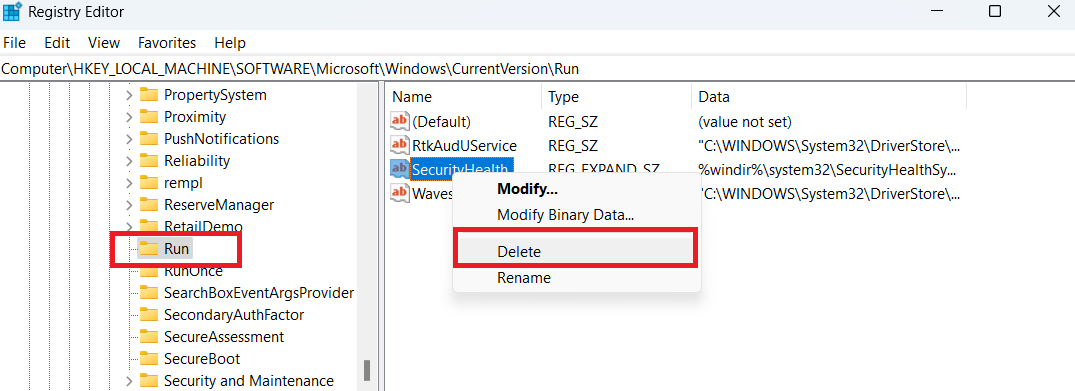
- Go to the following locations one at a time and check the entry paths to see if they’re valid (you can use the File Explorer method discussed in the previous method).
HKEY_LOCAL_MACHINE\SOFTWARE\Microsoft\Windows\CurrentVersion\Run
HKEY_LOCAL_MACHINE \SOFTWARE\Microsoft\Windows\CurrentVersion\RunOnce
HKEY_CURRENT_USER\Software\Microsoft\Windows\CurrentVersion\Run
HKEY_CURRENT_USER\ Software\Microsoft\Windows\CurrentVersion\RunOnce
- After checking all of them, delete the entries that aren’t valid.
PRO TIP
If this method is too complex or risky, you can always resort to the third-party tools, like
Auslogics Registry Cleaner , you trust to resolve these problems.
Download Auslogics Registry Cleaner to automatically perform all the three steps covered in this section. It’s a safer, faster, and more comprehensive solution to conveniently remove invalid startup items, shared DLLs, and more!
Auslogics Registry Cleaner vs. the Registry Editor: Which Is Better to Clean Your Windows Registry?
|
Auslogics Registry Cleaner |
Registry Editor |
| Ease of use |
- User-friendly interface
- Suitable for beginners
- Automated scanning and cleaning
|
- Requires technical knowledge
- Complex and manual process
|
| Safety |
- Built-in safety measures (backup before changes)
- Less risk of accidental deletion
|
- High risk of deleting critical entries
- No safety net unless backed up manually
|
| Speed |
- Quick automated scans
- Detects invalid, duplicate, or unused entries efficiently
|
- Time-consuming as each entry is inspected and modified manually
|
| Control |
- Limited control over what is deleted (depends on tool settings)
- May miss very specific entries
|
- Full control over the registry
- You can target precise entries to delete or modify
|
| Customization |
- Predefined cleaning categories (e.g., invalid DLLs, orphaned software)
- Limited to tool capabilities
|
- Fully customizable
- You decide what to clean based on your needs
|
| Backup features |
- Automatic backups before applying changes
- One-click restoration available
|
- Manual export and backup of registry entries required
|
| Cost |
- Free version available with limited features
- Paid version offers advanced options
|
- Free (built into Windows)
|
| Effectiveness |
- Effective at cleaning common issues
|
- Potentially more effective for advanced users who know what to delete
|
| Risk of damage |
- Lower risk due to automated safeguards
|
- High risk of critical system damage if incorrect keys are deleted
|
| Recommended for |
- Users seeking a simple and automated solution
- Those with limited technical expertise
|
- Advanced users who understand the registry structure and are confident in manual edits
|
Why Should You Clean the Registry on Windows 10/11?
- Improve your system performance. Over time, the Windows registry accumulates invalid or outdated entries, and that can slow down the PC performance. Cleaning the registry removes unnecessary keys that may be causing delays in processing requests.
- Fix errors and system crashes. Corrupted registry entries can cause applications to crash or fail to open, as well as lead to other hard drive errors . That’s why it’s crucial to learn how to clean your registry—it helps remove broken links, invalid keys, and outdated references before they become corrupted.
- Optimize startup times. Many software programs tend to add unnecessary entries in the startup sequence. And that can increase the boot time. When you clean the registry, it removes these startup entries so that the system will have fewer background processes to work with.
- Free up system resources. Unneeded registry entries consume lots of system resources, including RAM usage and processing power. Regular cleaning can get you more space to help your PC focus on tasks that truly matter.
- Fix application issues. Sometimes, the programs you delete leave residual registry entries that conflict with new software installations. With registry cleanup, you can eliminate these conflicts.
When and When Not to Clean Your Windows Registry
Below are simplified guidelines to determine when to clean your computer registry and when it’s not necessary:
| Perform a Windows registry cleanup |
Don’t perform a Windows registry cleanup |
| When there are signs of registry bloat affecting performance. If your PC is lagging or slow, a registry cleanup can help resolve the issue. |
When the system is running okay. If there are no signs of lag or errors, there’s no need to clean the registry. |
| After uninstalling programs that leave residual files. Programs often leave behind registry entries after uninstallation. |
Immediately after major updates. Wait for the system to stabilize after installing major Windows updates. |
| Periodically for old systems. Older systems tend to accumulate more invalid entries over time. |
Without a recent backup. Never clean the registry without creating a registry backup or a system restore point. |
| When resolving performance lags or unusual errors. Registry issues can cause unexpected slowdowns or crashes. |
If using unfamiliar or aggressive cleaning software. Some tools may cause more harm than good. |
| When optimizing startup times. Removing unnecessary registry entries can speed up boot times. |
On newer systems or Windows versions. Modern systems handle registry management better than older versions. |
| When addressing specific application issues. Software crashes or failure to launch may be caused by invalid registry entries. |
If you’re not familiar with registry edits. Manual cleaning requires advanced knowledge and caution. |
| When troubleshooting frequent system crashes or slowdowns. Cleaning the registry can help stabilize your system. |
|
Steps to Take to Avoid Registry Clutter in the Future
Maintaining a clean registry is an ongoing process. You can minimize registry clutter by following the best practices below:
- Uninstall programs completely. When you delete apps and programs, they usually leave behind leftover files and registry entries. Many people make the mistake of just deleting the program files without realizing this doesn’t fully remove the software. That’s why it’s important to uninstall applications and programs the right way to completely remove leftover registry entries.
- Only use reliable registry cleaner software. It’s much safer to use registry cleaning tools like Auslogics Registry Cleaner or CCleaner . Don’t use suspicious software to reduce the risk of introducing harmful changes to your registry.
- Run regular maintenance scans. You can run periodic scans using registry cleaners so that you don’t have to worry yourself with it. However, keep in mind that not all registry cleaners have this feature. In that case, you can use Windows’ in-built Task Scheduler tool to automate the process.
- Make sure your system is updated. Regularly install Windows updates and patches. Keeping your operating system up-to-date ensures that registry entries are optimized and reduces the likelihood of conflicts or errors.
Download Auslogics Registry Cleaner
The program will clean corrupt or outdated entries from the Windows registry to resolve causes of various errors and malfunctions.
If you carefully follow our guide and instructions on how to clean the registry, whether on Windows 10 or 11, you should see an improvement on your computer.
Normally, you shouldn’t have to worry about cleaning your Windows registry, especially for modern PCs, because they can handle many bad entries without causing any issues. But, in some cases, they do.
Always start with the methods that don’t involve using the Registry Editor to be on the safe side. But regardless of the methods you use, always create a backup first.
Is there anything we left out? Let us know in the comments below!
FAQ
You can clear the registry in three primary ways. The first is to use third-party tools like Auslogics Registry Cleaner. This is ideal, especially for beginners. The second is to use built-in tools like DISM or SFC, and the last is to edit the registry manually.
It’s better to go with the first two methods. If you want to go with the Registry Editor option for manual cleanup, make sure you’re experienced and know what you’re doing. That said, whatever method you choose, make sure to create backups before beginning.
The simplest way to clean up broken registry items is to use specialized software like CCleaner or Auslogics Registry Cleaner. These tools can repair invalid keys safely. You can also manually identify and delete entries in the Registry Editor if you’re comfortable with this method. But do perform a backup first, just in case.
A registry cleaner can boost performance in certain cases, such as when there’s registry bloat or invalid entries affecting startup or application response times. However, when it comes to new PC models, the speed improvement may be modest, even with efficient registry management.