Screen flickering is a common issue that happens due to various software or hardware conflicts. However, it can also occur when upgrading your Windows to a newer version . And no brand is exempt, whether Asus, Dell, or HP. I’ll show you how to stop display issues on external monitors. And these solutions should work on your laptop, regardless of the brand. Let’s begin.
Run This Test to Find the Real Cause of Your Flickering Screen
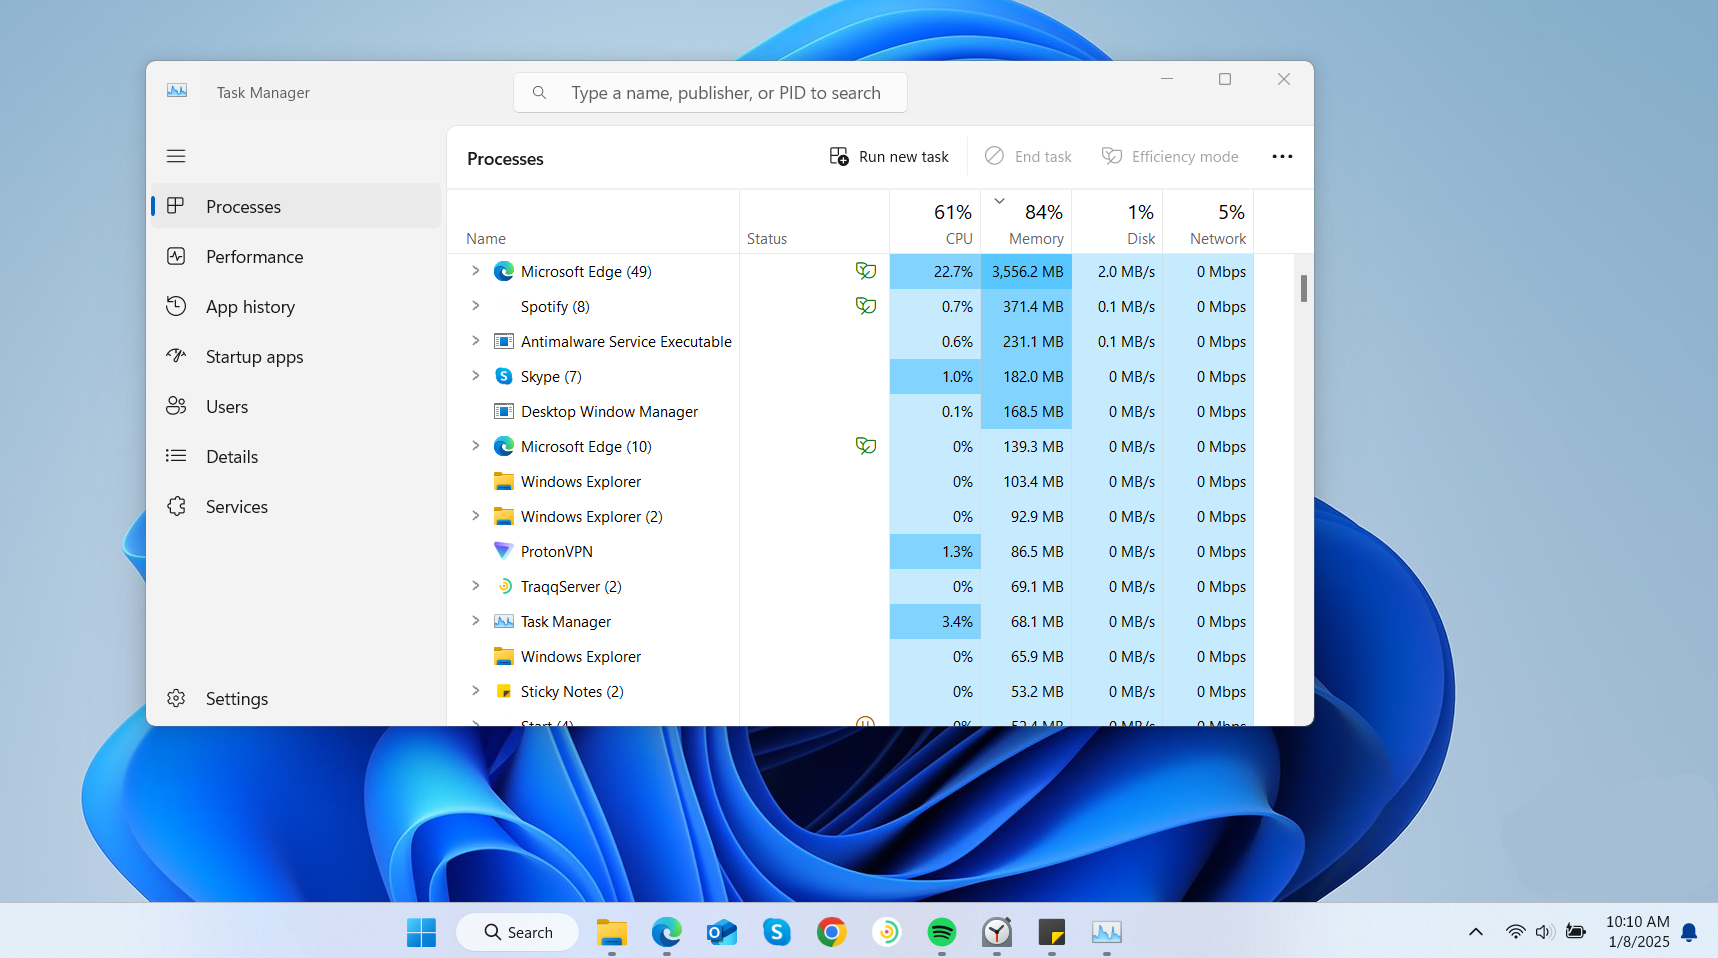
You can use the Task Manager to check if the glitch is a hardware or software problem. The reason is that the Task Manager operates independently of display systems, so it should not flicker when you open it. Press Ctrl + Shift + Esc together to open the Windows Task Manager and carefully observe the screen if it’s blinking. If it’s not, you can proceed with the solutions in the next section to correct the problem.
However, if the screen flickers with the Task Manager window, you may be dealing with a hardware problem. Regardless of the problem, we’ll cover the solutions in this guide.
Types of Screen Flickering and What They Mean
The type of display experiencing the flicker problem can help you pinpoint the underlying cause and guide you to the right solution. Let’s go through them:
The information in this section is based on user experience and common troubleshooting steps and solutions rather than specific research. You can find detailed solutions in the next section, where I dive deeper into how to fix the screen instability on laptops and desktop monitors.
1. Vertical or horizontal lines
When you see vertical lines on your screen, it might indicate a hardware issue. Check the video cables and connectors to ensure everything is secure. Also try updating or reinstalling graphics drivers and verify if that fixes the problem.
If the problem persists, connect your laptop to an external display. If it’s fine, the issue may be with the laptop screen. If you’re using a monitor and you still see the issue, it may need professional servicing.
2. Full-screen blinking
This is mostly caused by driver issues. Updating or rolling back to a previous driver version might help. In addition, try checking the display settings and making sure the refresh rate is set correctly.
3. Partial screen glitches
The problem could indicate serious issues with the hardware. Trying a different monitor or graphics card to determine the faulty component.
4. Glitching during specific tasks
This type of screen flashing could be because of a software conflict. Make sure you update all applications. Changing the graphics settings within specific apps might also help.
How to Fix Laptop Screen Flickering on Windows 10/11 PCs and External Monitors
Fix 1: Check for loose or damaged cables connected to the external monitor
If your laptop is connected to an external monitor, check the condition of the cables. Look at the cord that links the monitor to your laptop, whether it’s an HDMI cable or a display wire.
Make sure that both ends of the cable are firmly inserted into their respective ports. If you notice the cable is damaged (even if only slightly), swapping it out with a spare is a good idea. Try a different cable to see if the display instability still persists.
If the new cable works fine and the display is back to normal, then you found the problem.
On the other hand, if the issue stops on the external monitor while the laptop continues to experience display problems, the laptop might have an internal display cable problem. To fix this, it’s best to seek professional help.
📌 Also read:Monitor Goes Black Randomly? Here’s What to Do!
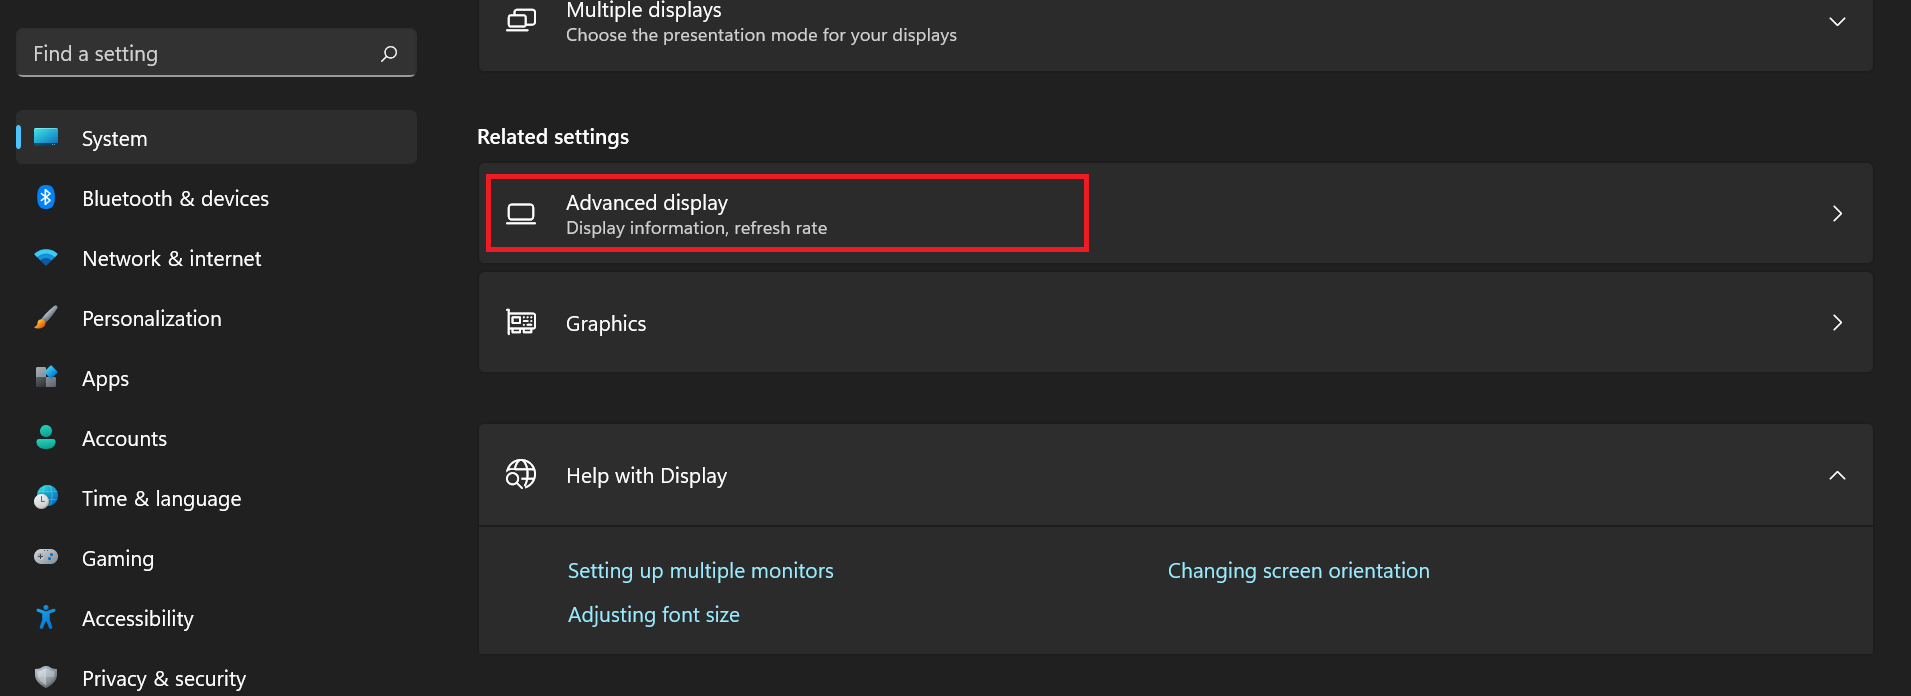
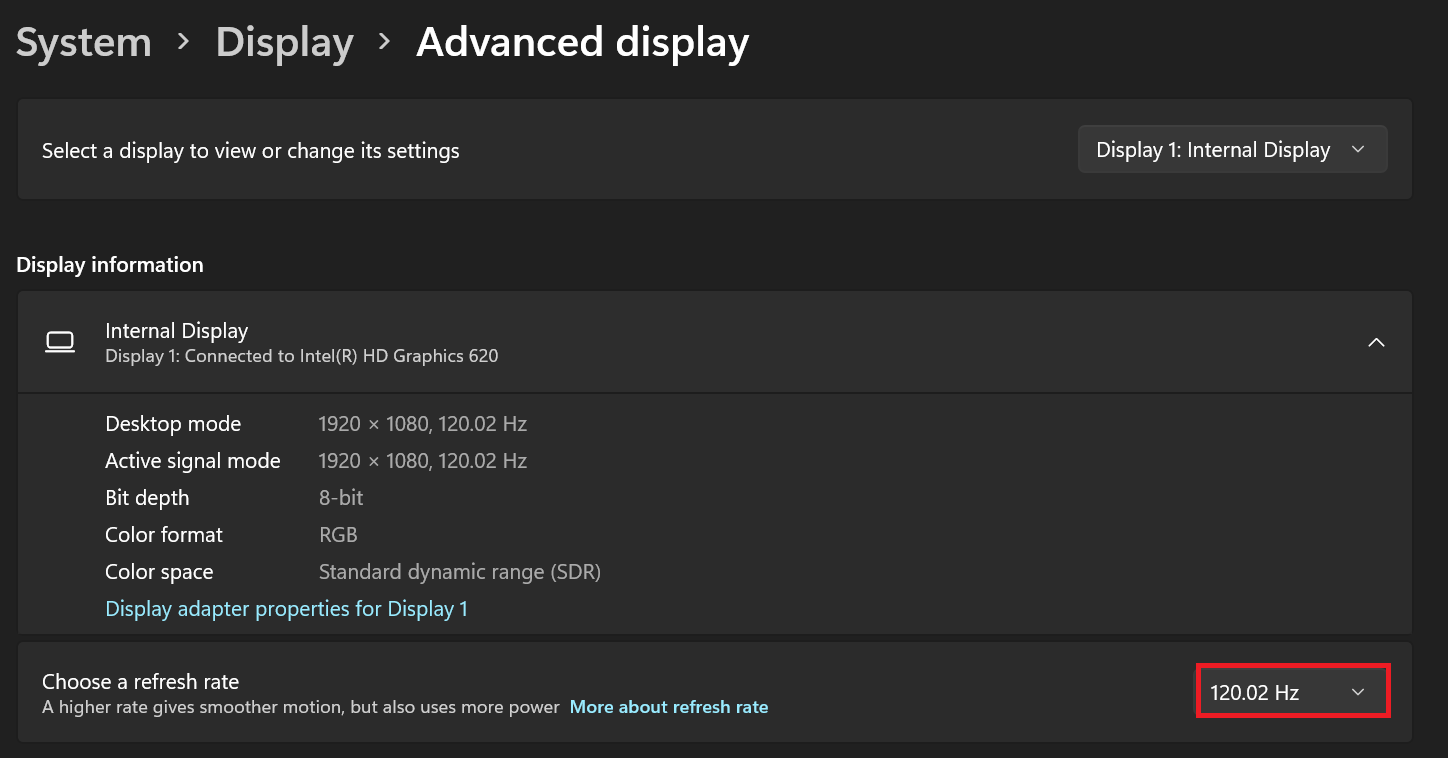
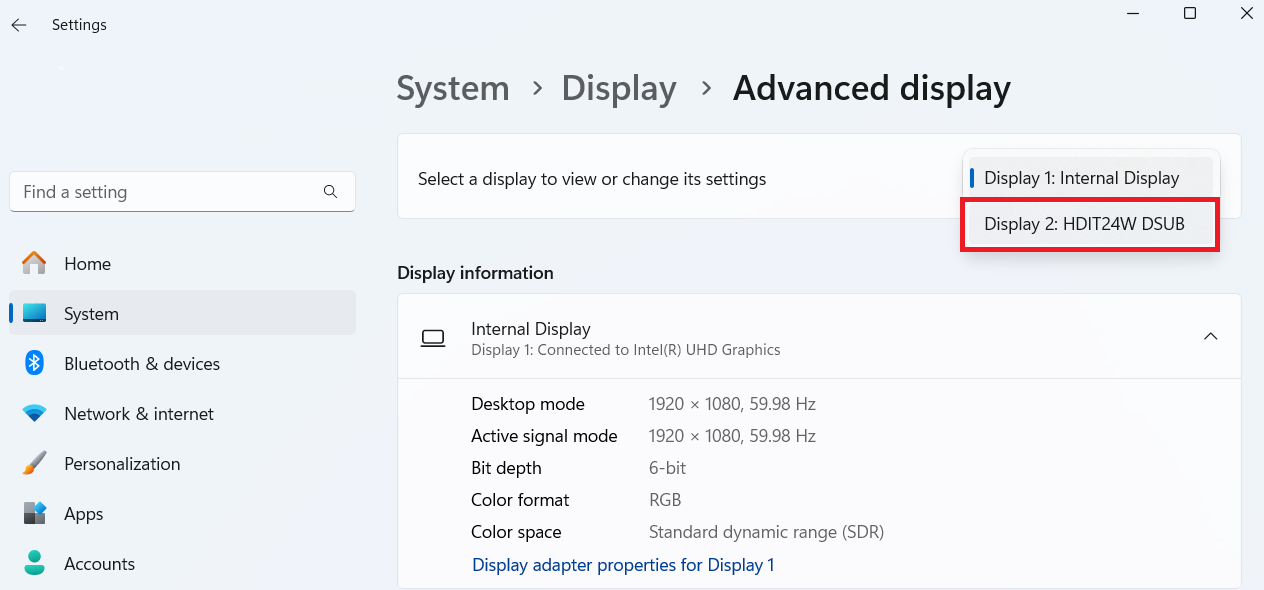
Fix 2: Adjust refresh rate settings
The screen’s refresh rate is the number of times the displayed image is updated per second. The typical refresh rate for consumer-grade displays is 60 hertz (Hz). However, high-end displays can handle refresh rates of 360Hz or more. Some laptop manufacturers may allow you to set the refresh rate above the recommended settings (called overclocking ). It’s not a bad thing, but it can make your screen flicker if the screen was not designed for such frequency or the computer hardware can’t handle it. If your laptop screen is overclocked, you can adjust the refresh rate in Settings. Here’s how to do it:
- Open Settings by pressing
Windows + I and click on System , then Display .
- Click the Choose a refresh rate dropdown and select a lower rate (if your computer allows it).
- The same steps apply if you’re using an external monitor. Just select the monitor display and make the necessary adjustments.
For Windows 10, go to Settings > System > Display > Advanced display settings > Refresh rate and make the necessary adjustments.
Fix 3: Change the screen resolution
If you don’t want to reduce the refresh rate of your computer, adjusting the screen resolution may be a better idea.
When you reduce the refresh rate, you get less fluid visuals. On the other hand, reducing screen resolution will maintain your display’s smooth performance while resolving display issues. Here’s how to do that:
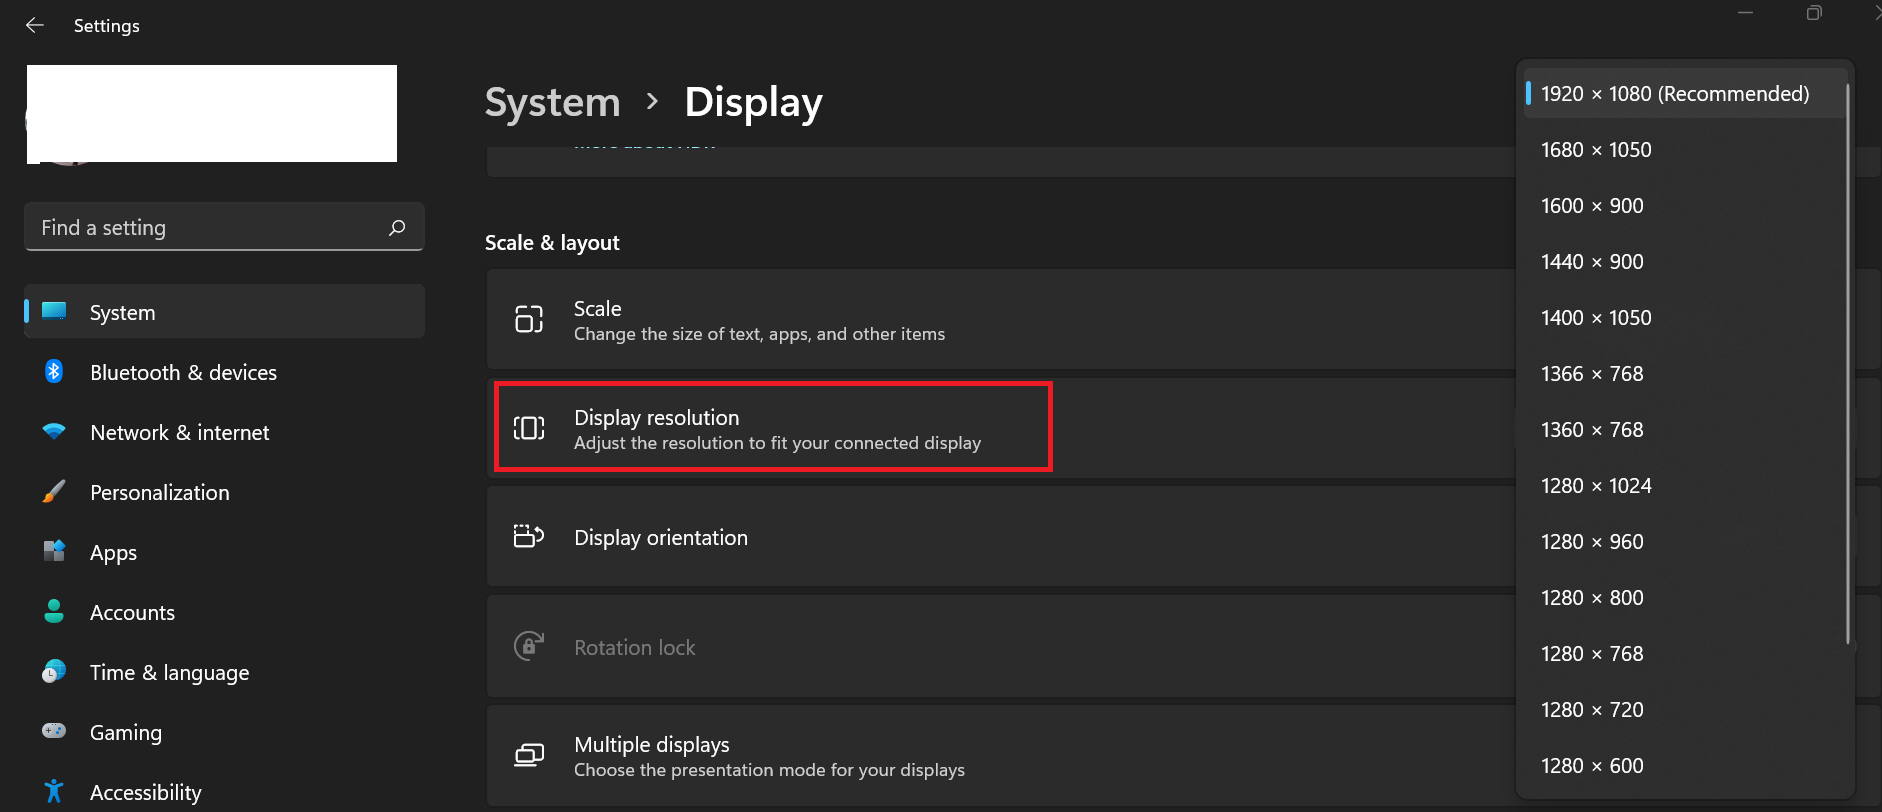
For Windows 11:
- Open Settings, go to System , and open Display .
- Next, scroll down to Display resolution .
- Open the list and select a lower resolution to see if this fixes the screen glitch.
For Windows 10:
- On your desktop, right-click any empty space and select Display settings .
- Scroll down to Scale and layout and click Display resolution . Choose an option from the list displayed.
Fix 4: Check for malware and virus infection
Nothing is far-fetched when it comes to viruses and malware. So, if up to this point you haven’t found a solution, try scanning your computer for malware . You can use the Windows Security tool. Here’s how:
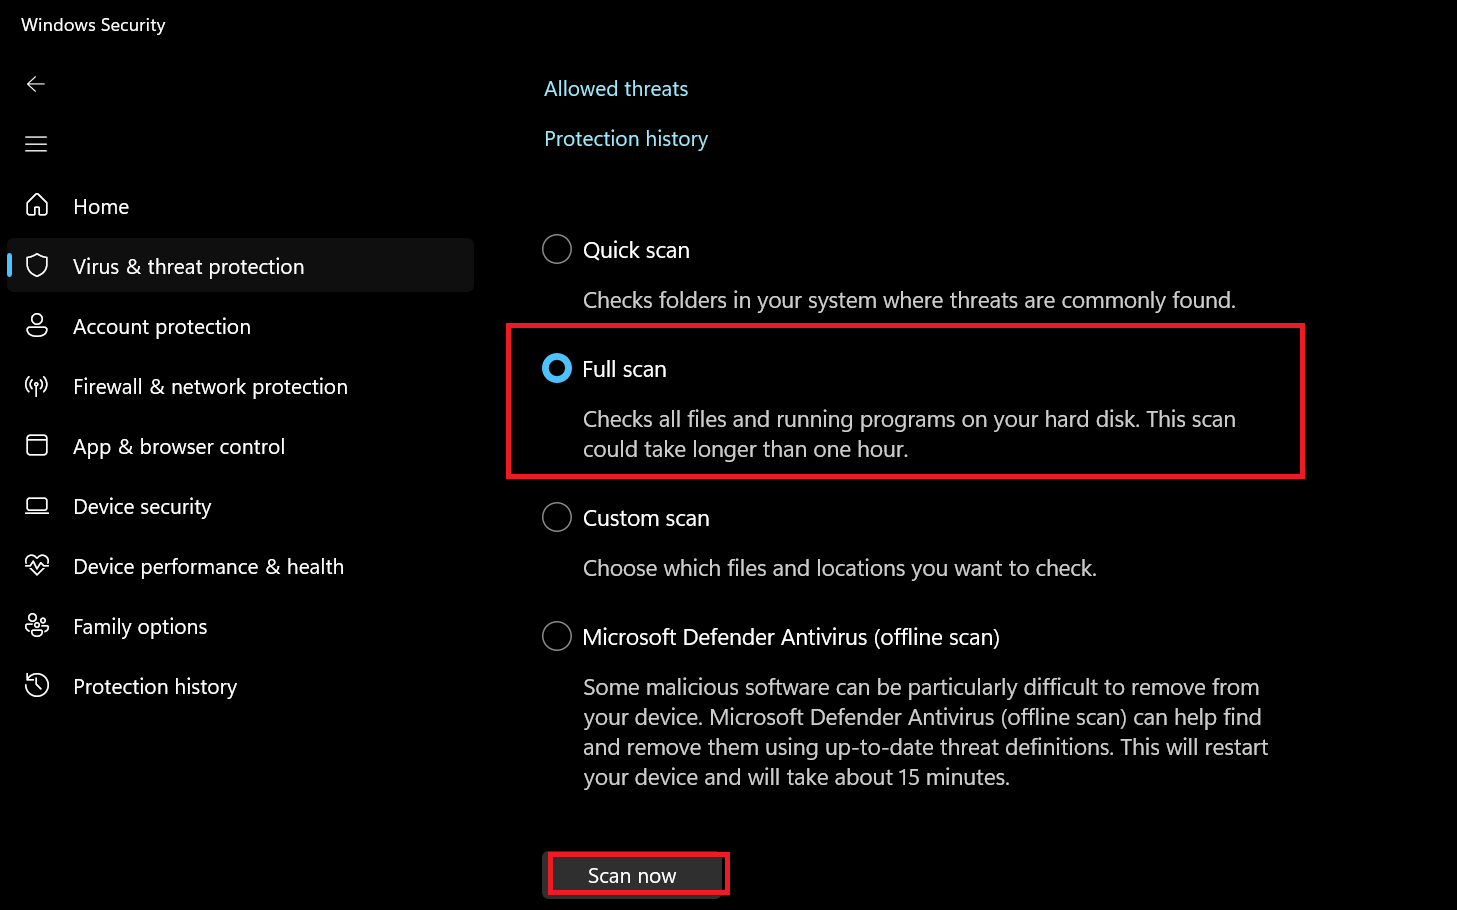
- Search for Windows Security and click Open.
- On the left side of the screen, click Virus & threat protection . After that, click Scan options on your right.
- From the list of options, choose Full scan and then click Scan now .
PRO TIP
Windows Security has improved over the years and does a decent job, but it might not catch everything. For extra protection against malware, consider using third-party tools like
Auslogics Anti-Malware . It’s a great companion to your main antivirus and won’t cause any conflicts.
This tool helps by checking system memory for malicious software, identifying cookies that track your activity, and scanning system and temporary folders for security issues. It’s a smart way to ensure your PC stays safe!
Fix 5: Update your PC display driver
Another way to fix the Dell, HP, or ASUS laptop screen flickering is to update the display driver. If the display driver is outdated, corrupted, or incompatible with your system, it can cause display flickering problems.
Here’s how to update the PC display driver:
Note
Keep in mind that ASUS laptops might experience display problems because of GPU overclocking, while Dell or HP models usually encounter it from outdated display drivers. So, if you’ve overclocked your ASUS PC, try reverting it to see if that resolves the problem.
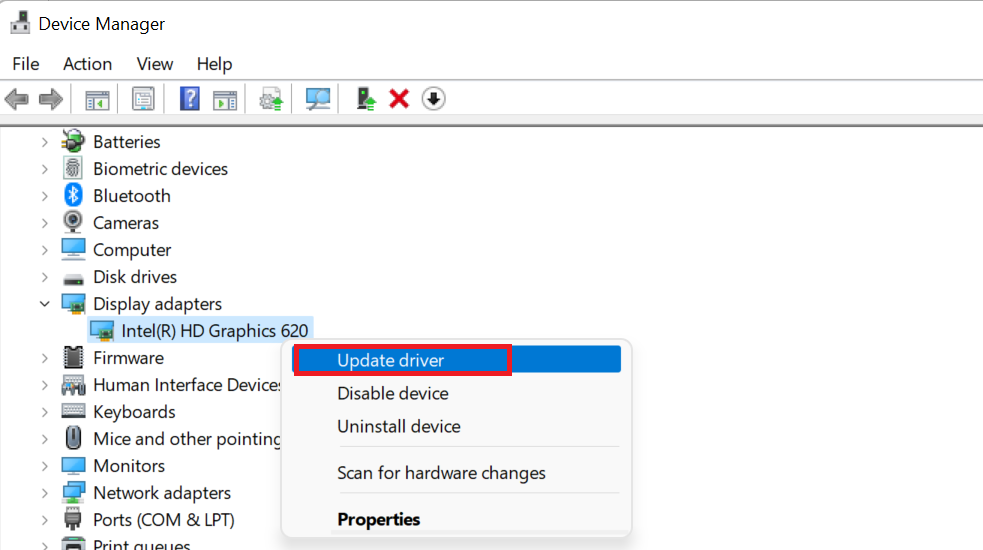
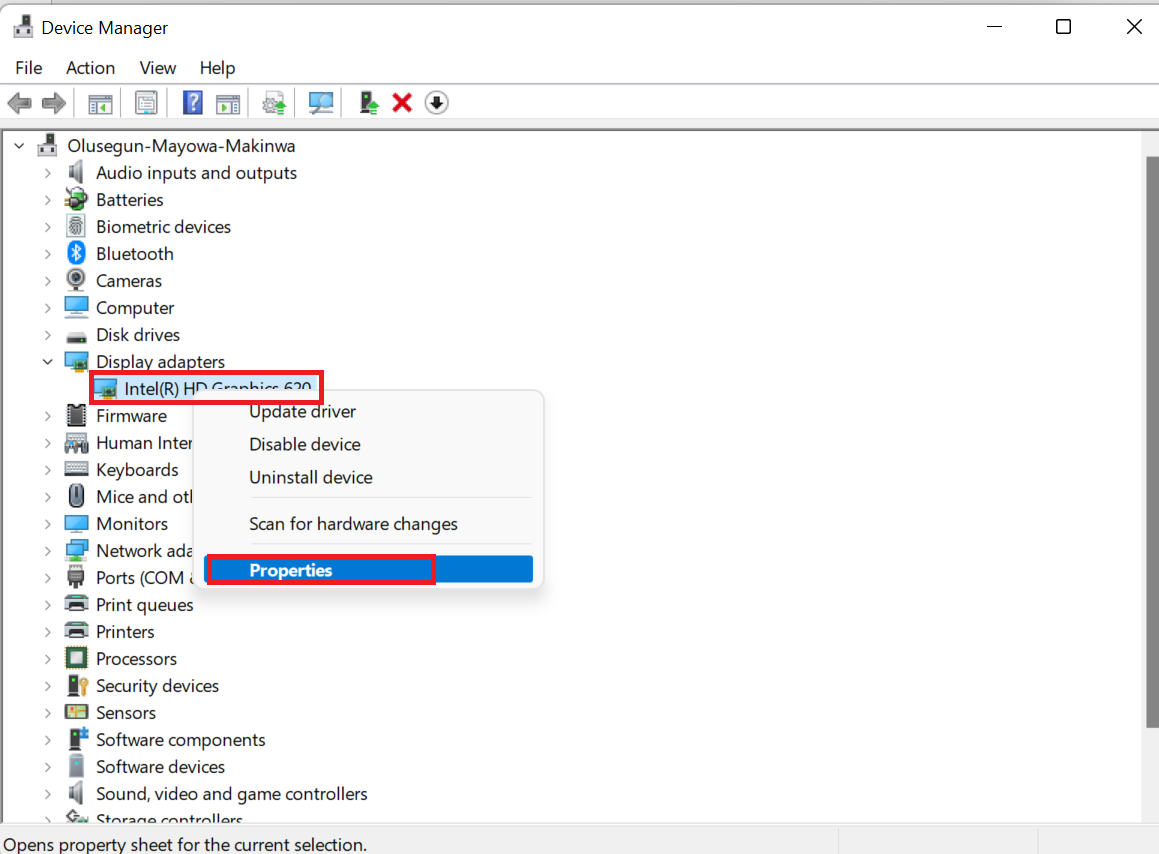
- Enter Device Manager in the search bar and open the program to see your list of drivers.
- Look through the list, find Display adapters , and double-click on it to see your display driver.
- Right-click on the display driver and select Update driver.
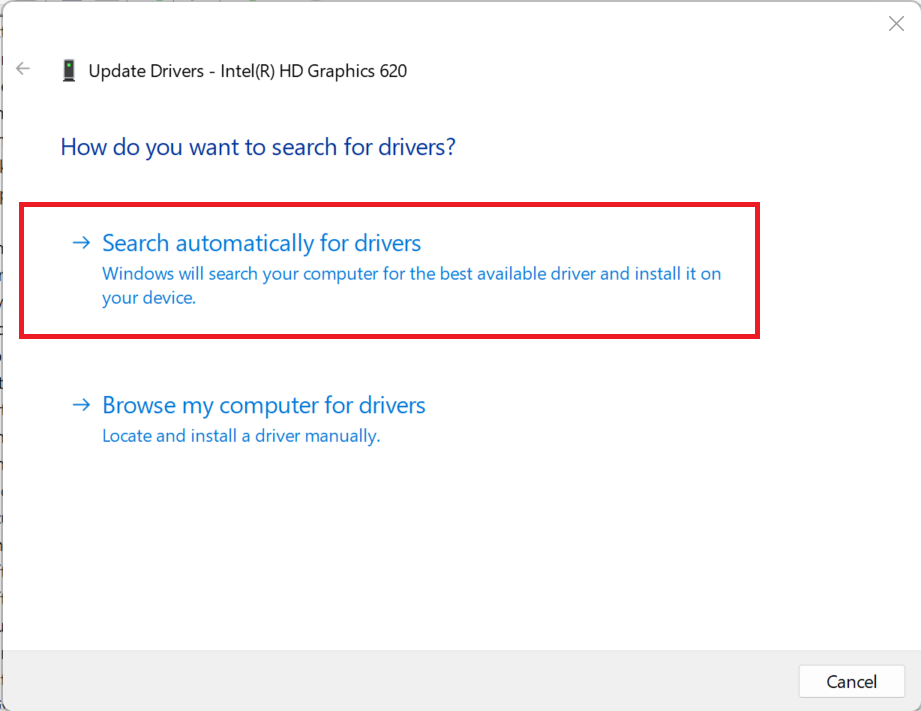
- Choose Search automatically for drivers and let the process finish. If an update is available, it’ll automatically install it.
If you want an easy and effective way of keeping your drivers up to date, try Auslogics Driver Updater . It’s super simple to use and does all the work for you by automatically installing all the updates recommended for your Windows PC.
For the extra layer of security, the program creates a backup of all your drivers.
So it doesn’t just update drivers; it optimizes your hardware, protects it from heat-induced damage, and improves overall PC performance!
Fix 6: Roll back your display driver
Just as an outdated driver can cause problems, installing a bad driver can also create problems. If you noticed the issue after updating a display driver, it might just be that the new driver is not compatible. To remove the driver:
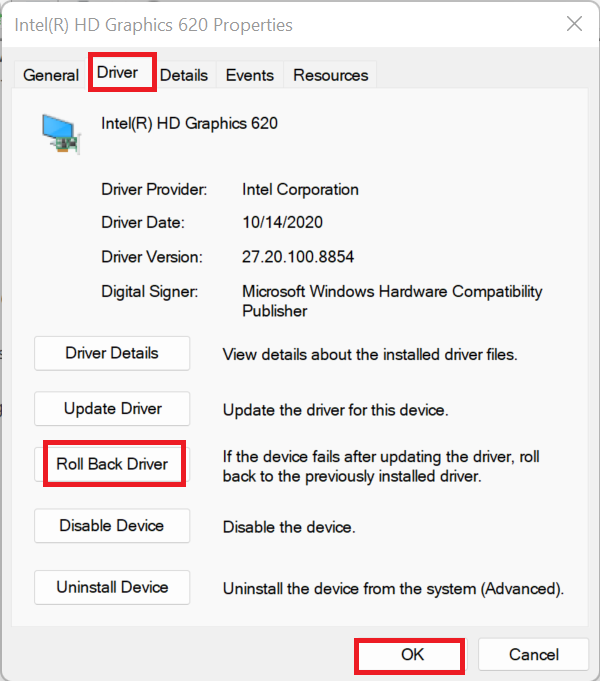
- Open Device Manager again and go to Display adapters .
- Right-click your graphics card and select Properties from the context menu.
- In the properties window, click on the Driver tab. Click the Roll Back Driver button.
- Follow the on-screen instructions to complete the process.
If the option is not available, it means there is no previous driver to remove. In that case, you might need to uninstall the driver (the Uninstall Device option) and install an older version from the manufacturer’s website. To do that, first identify your device model and operating system version .
Go to the manufacturer’s official website and navigate to the Support or Drivers section. Search for your device and find the relevant driver. Select the older driver version you want to install and click Download. After that, click to install and follow the prompts.
Fix 7: Uninstall recently installed apps
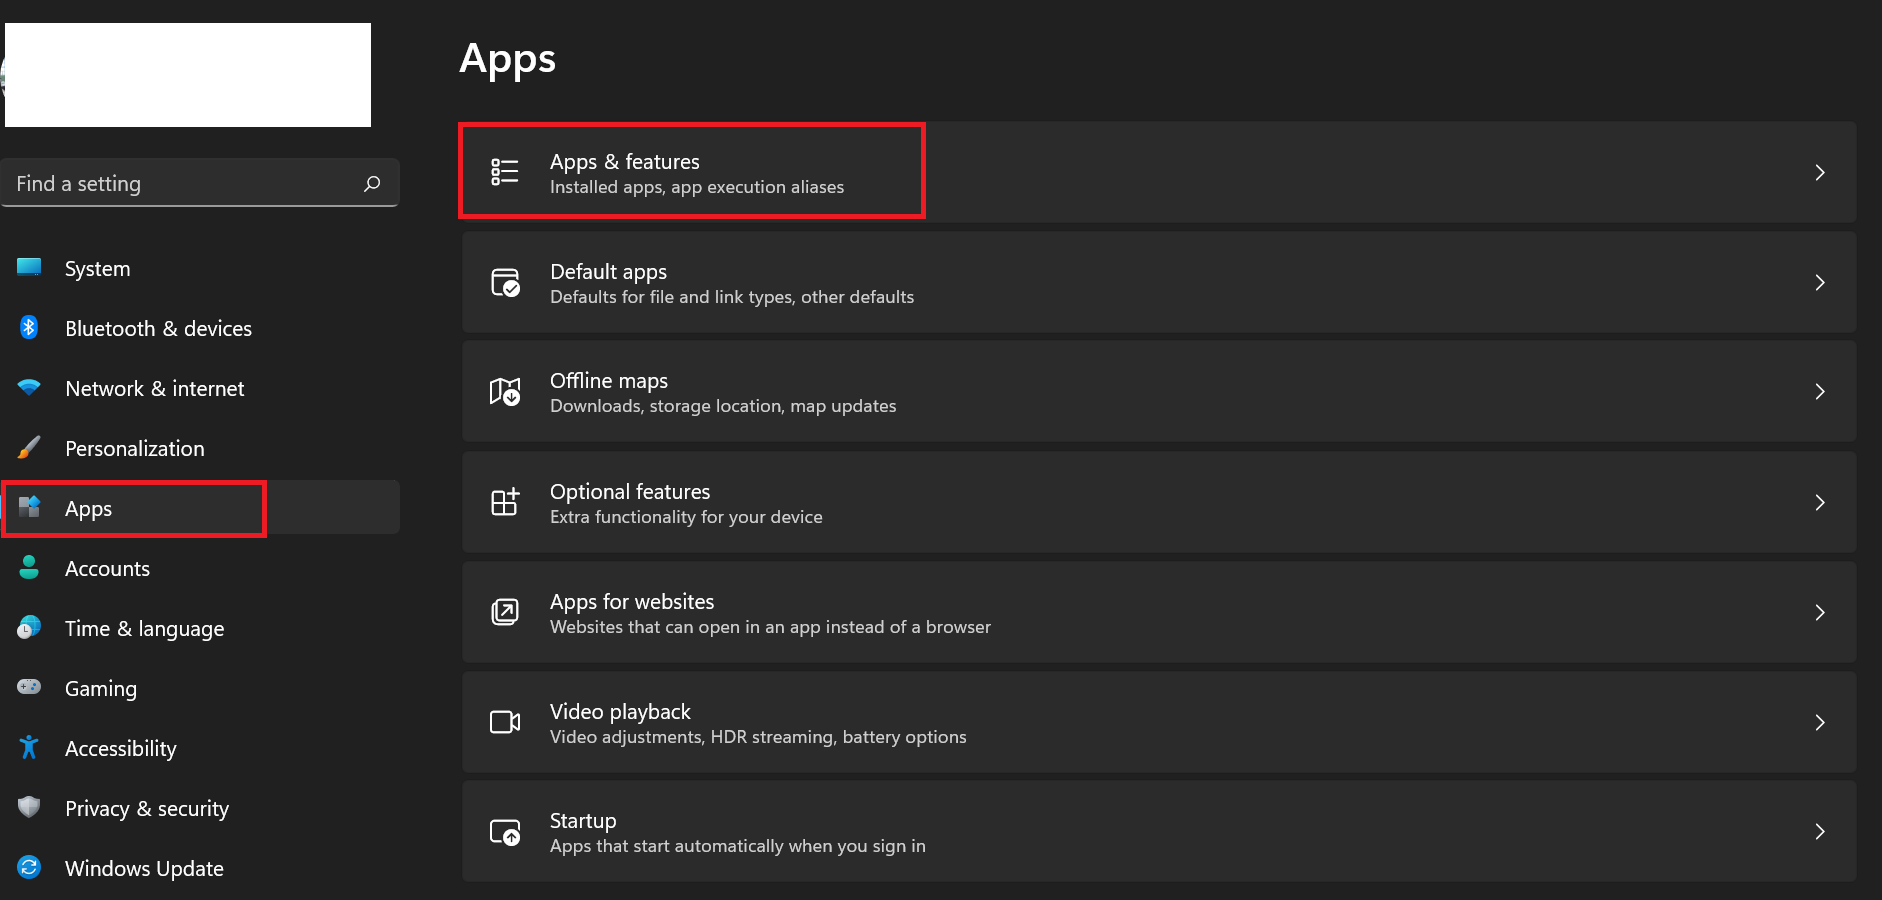
Consider uninstalling programs or apps you recently installed because they may be causing screen instability on your laptop. Here’s how to delete recently installed apps: For Windows 11:
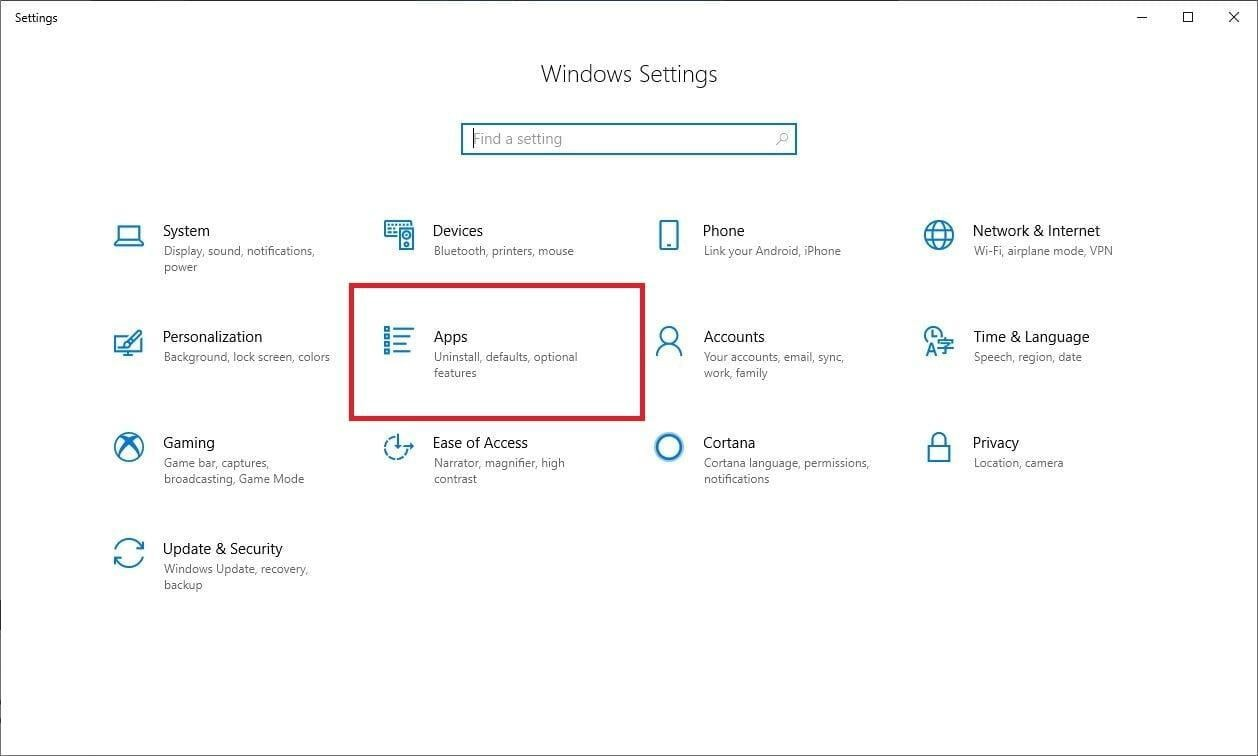
- Open Settings (
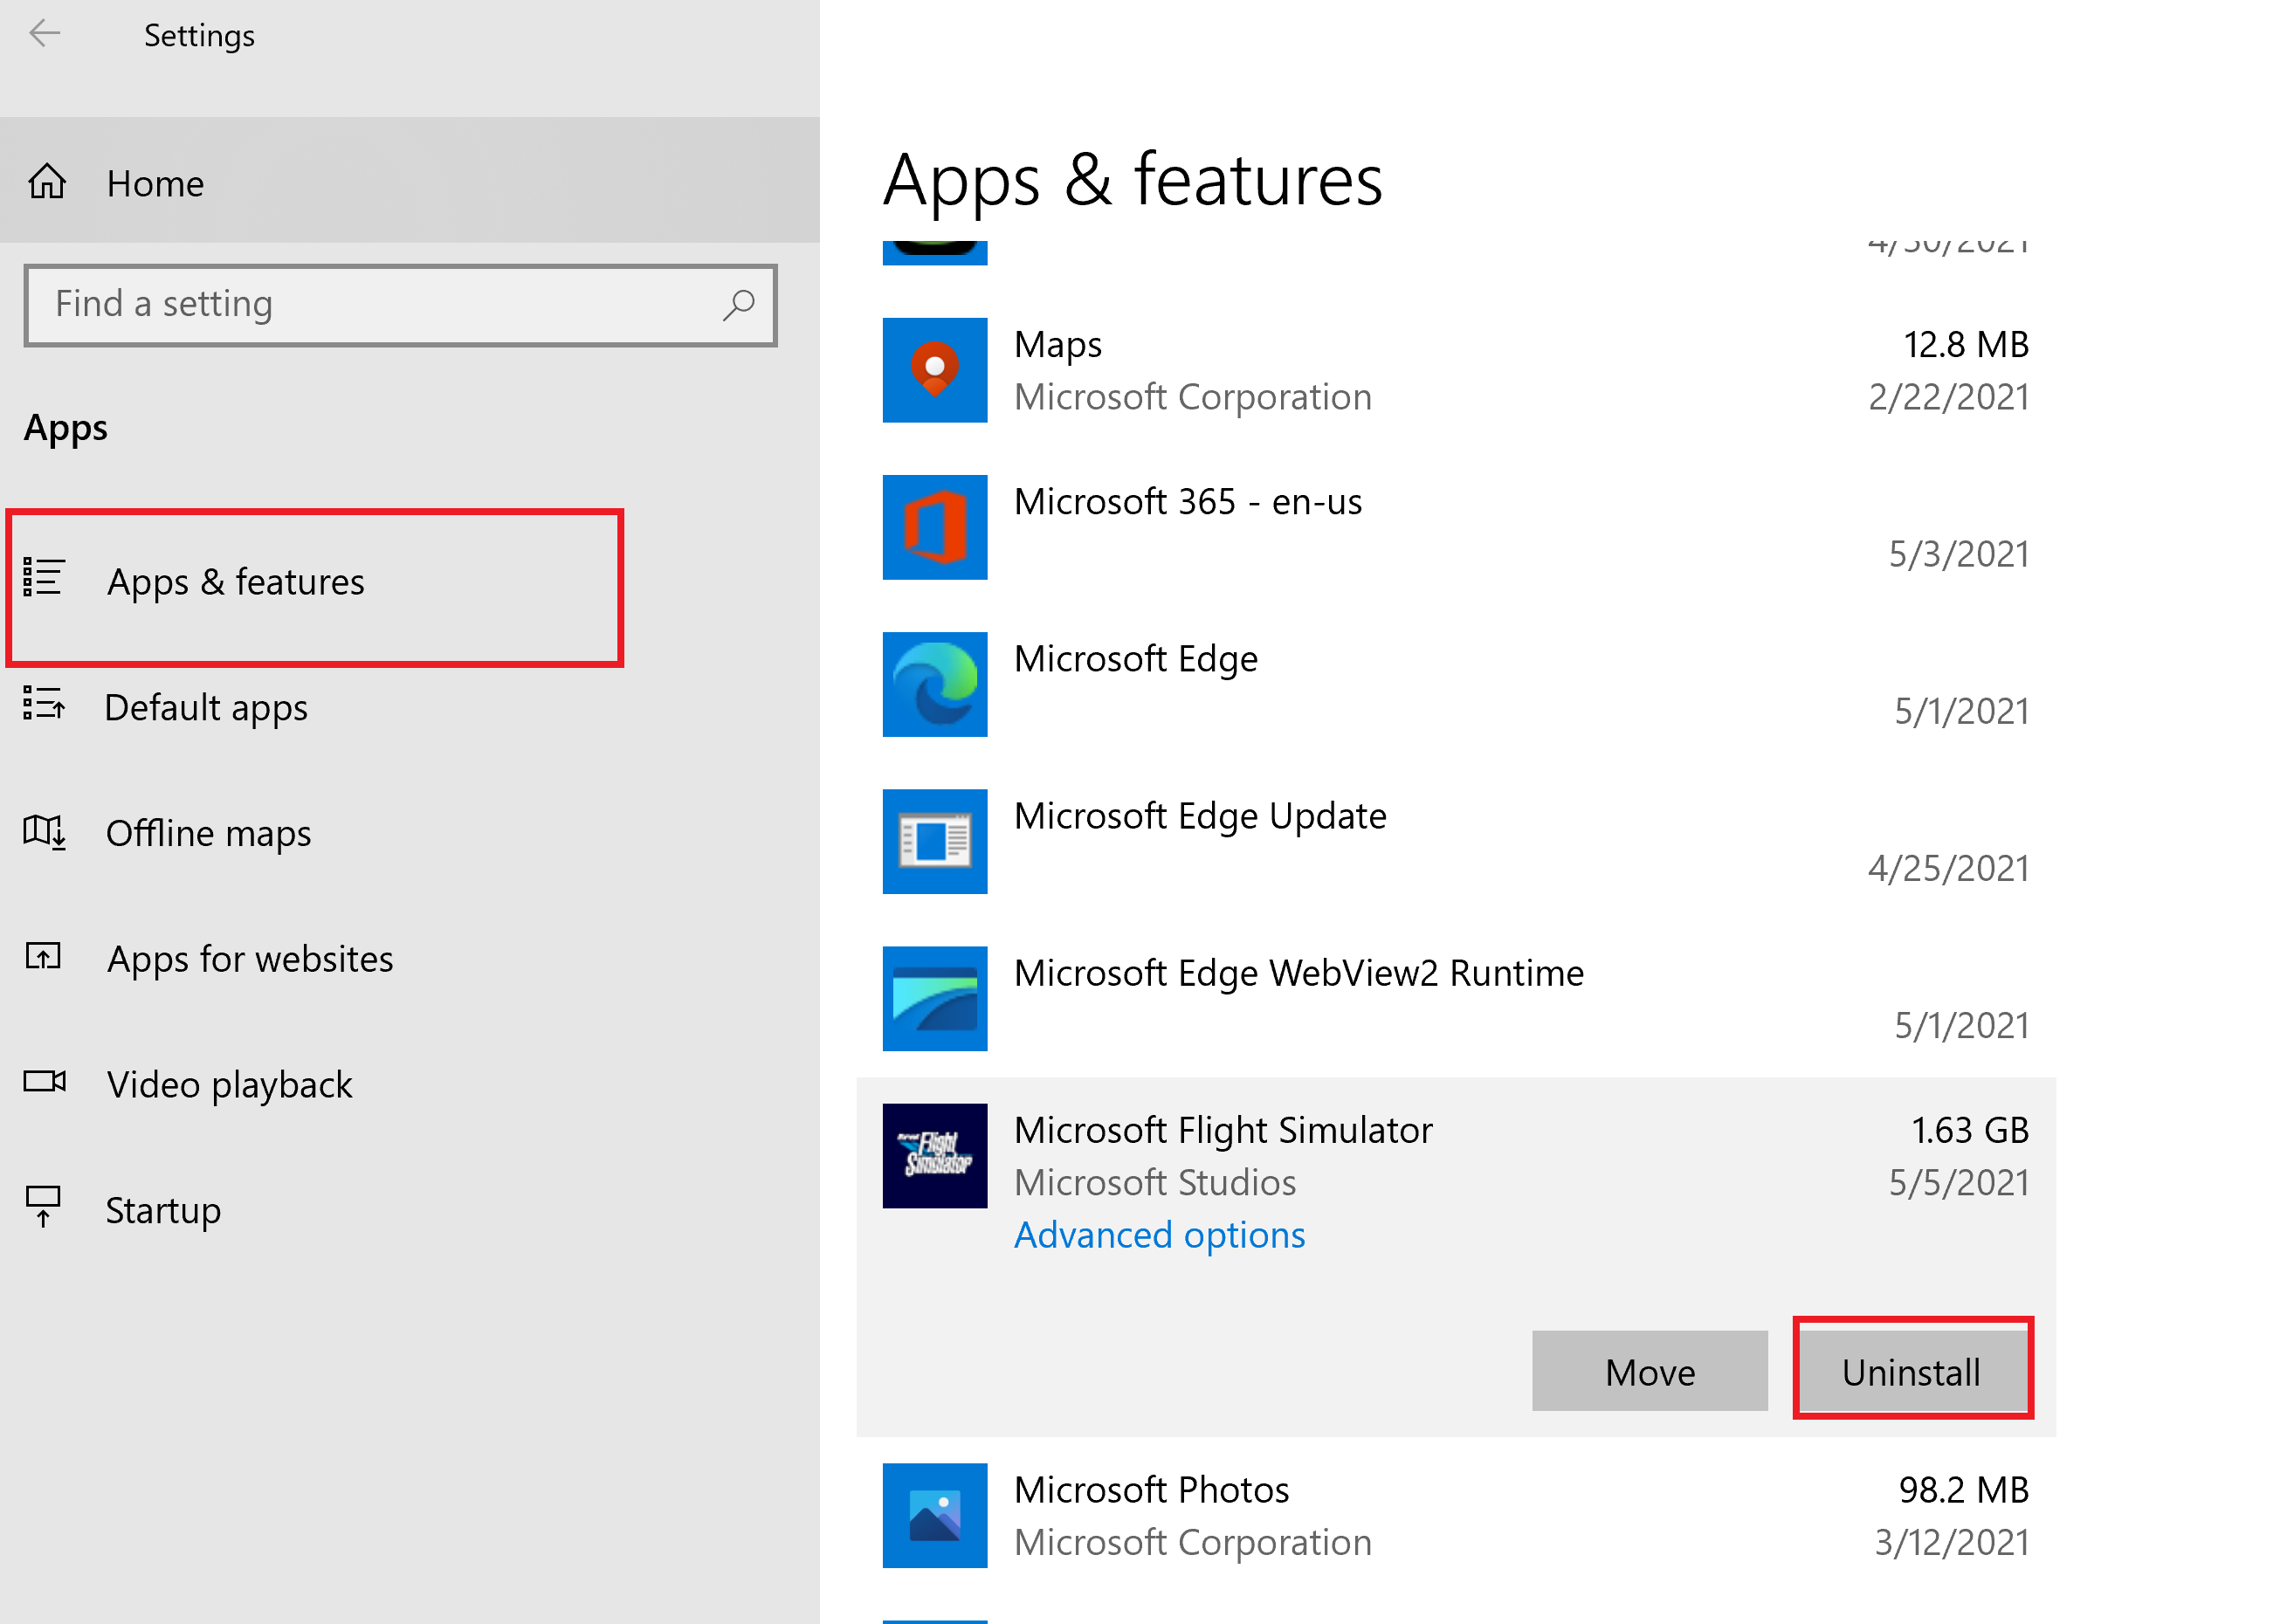
Windows + I) and click Apps on your left. On the right side, click Apps & features .
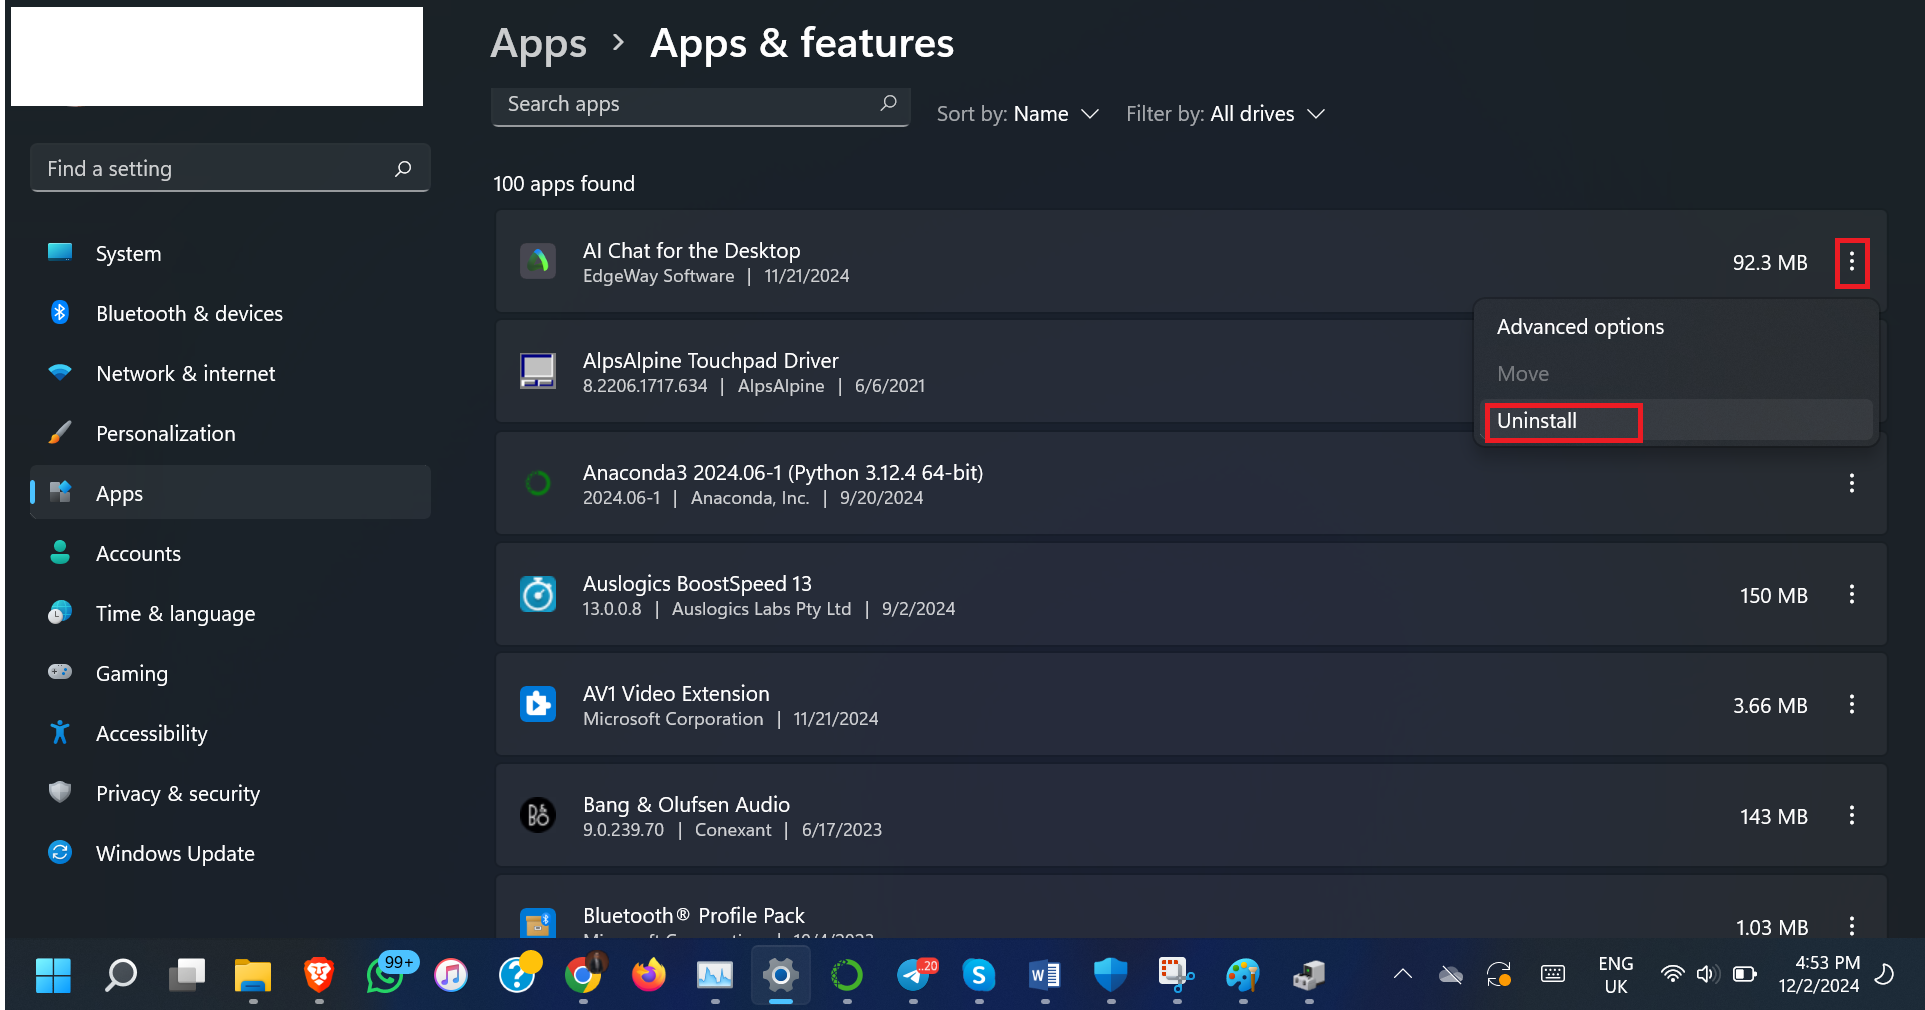
- Carefully go through the programs you recently installed and click on the three dots, then click Uninstall.
- When you remove the apps, restart your computer and check if the screen is fine now.
For Windows 10:
- Press the
Windows key + I shortcut to open Settings.
- Next, click Apps.
- Then go to Apps & features .
- Finally, scroll through and remove the apps you recently installed by clicking on Uninstall.
PRO TIP
Deleting apps usually leaves behind files that can cause conflicts and create more issues. But you can use
Auslogics BoostSpeed 's Uninstall Manager for a cleaner, more efficient removal of unwanted programs.
Unlike the standard process, it thoroughly deletes leftover files, registry entries, and other traces.
Fix 8: Run Windows Update
Old or missing Windows files can make your screen flicker. Updating your Windows canl help you fix these missing files and bugs and add new display drivers that can solve these problems. To update Windows:
- Open Settings by pressing
Windows + I .
- Scroll down and click Windows Update .
- On the right, click Check for updates.
Windows will install the updates and then prompt you to restart when it is done.
The steps for updating Windows are quite similar in Windows 10. Go to Settings > Update & Security > Windows Update and click Check for updates .
Fix 9: Disable GPU acceleration
If your computer has a dedicated graphics card, GPU acceleration can enhance system performance but might also cause graphics issues. Disabling GPU acceleration forces the CPU to handle display tasks, which might be slower but can resolve screen issues on Windows 10 or 11.
This is a temporary solution and might not be ideal as a long-term solution because it’ll affect system performance. On top of that, this method only fixes the symptom but not the underlying cause. However, it should buy you time and address the root cause of the issue with other, more permanent solutions.
Here’s how to go about it:
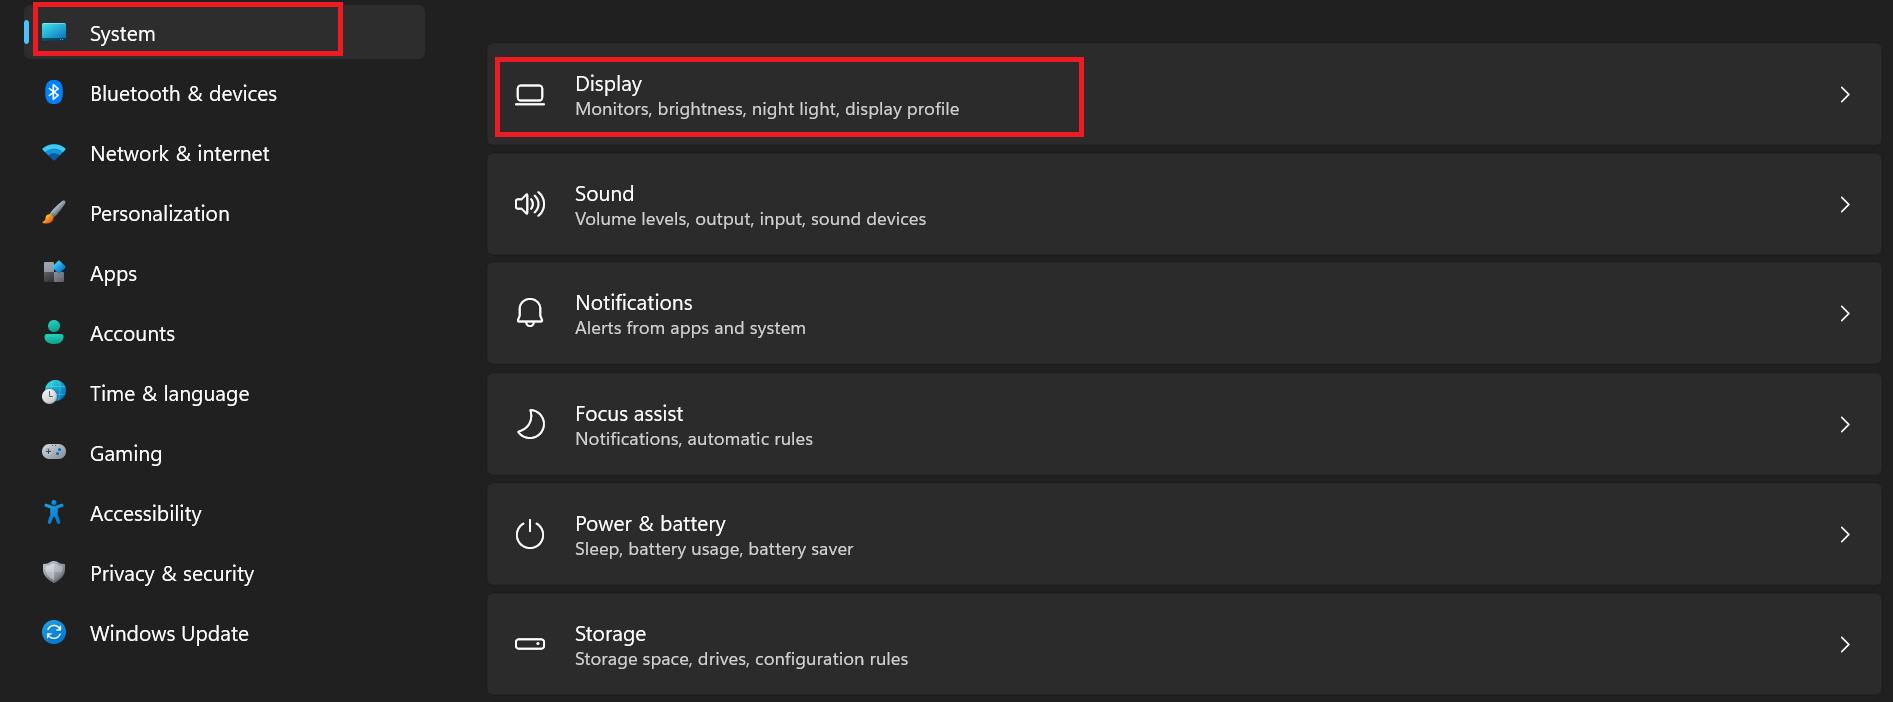
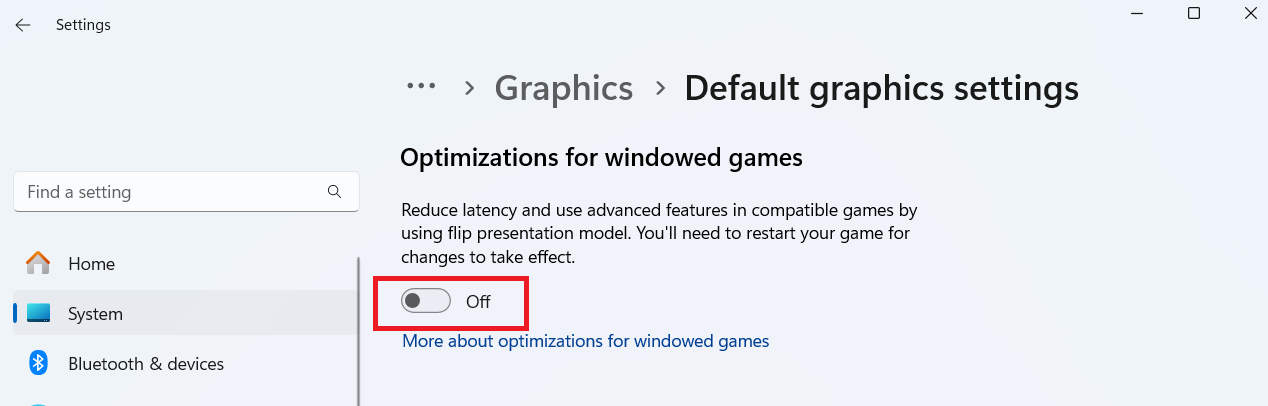
For Windows 11:
- Go to Settings, click System , and then Display .
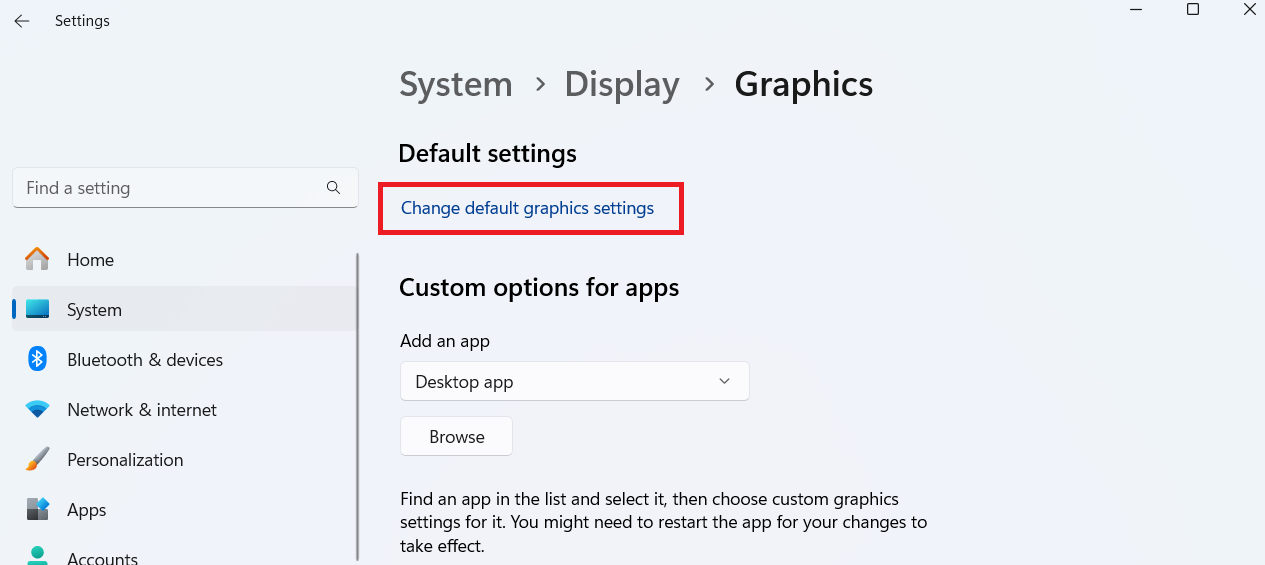
- Scroll down and click Graphics .
- Find the blue text labeled Change default graphics settings .
- Toggle the button under Hardware-accelerated GPU scheduling to O ff .
- Once you are done, restart your computer to complete the process.
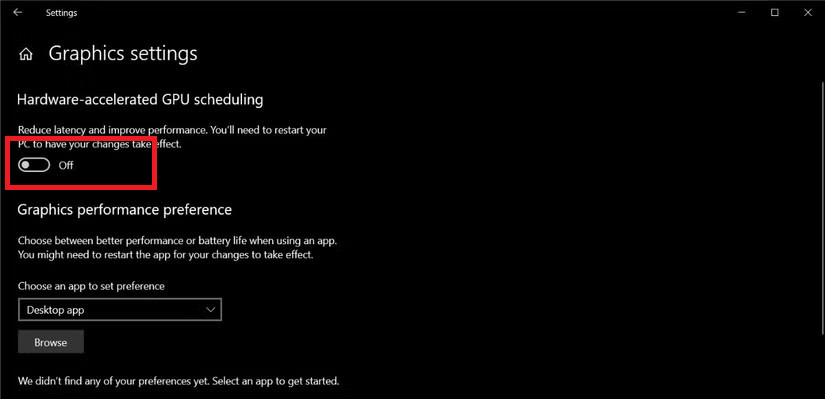
For Windows 10:
- Go to the Settings window and click on System . Then, select Display .
- Click on Graphics settings from the Multiple displays menu.
- Disable the toggle below Hardware-accelerated GPU scheduling.
- Restart your computer and check if the problem has been resolved.
📌 Related read:How to Disable Hardware Acceleration
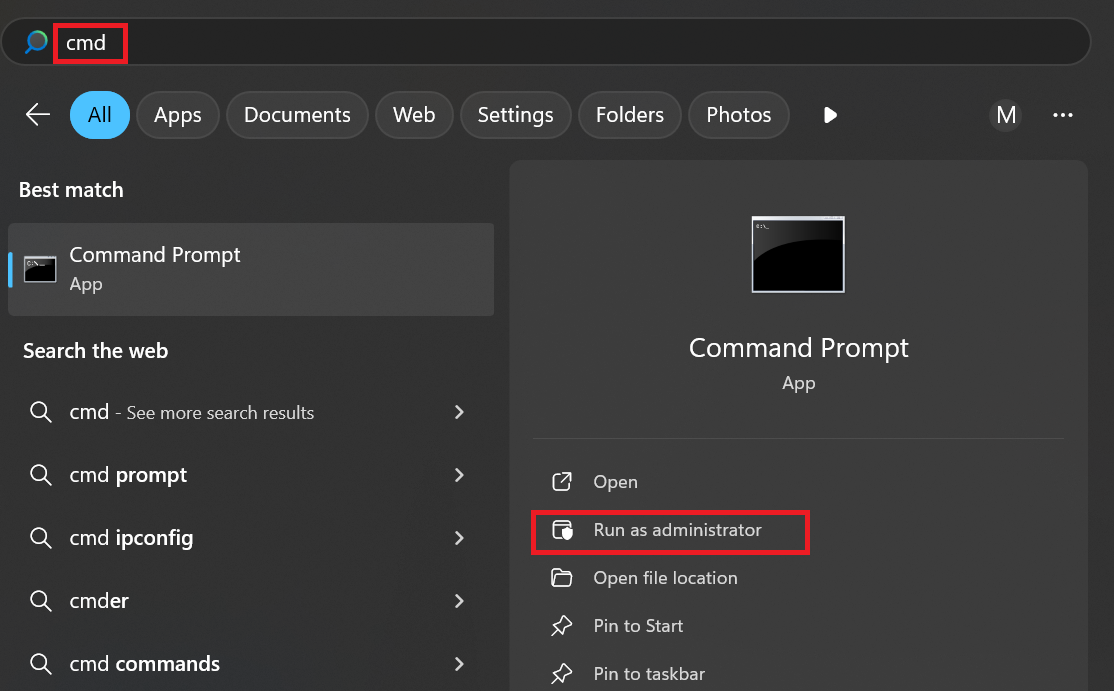
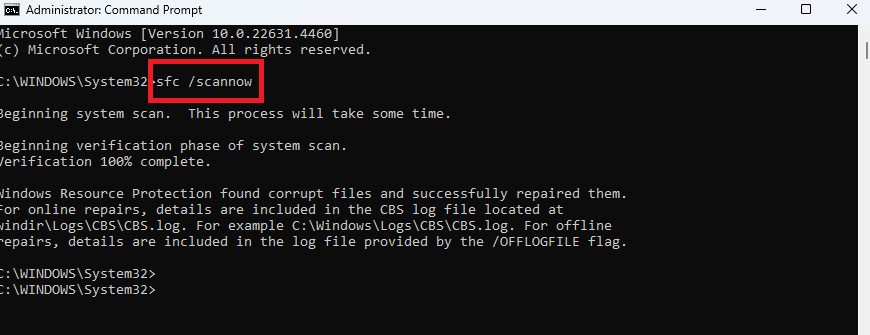
Fix 10: Repair corrupted system files
You can use the System File Checker tool to scan system files for corruption . After scanning, the tool will also attempt to fix missing or corrupted files that may be causing the laptop (Dell or HP) screen to glitch. Follow the steps below to fix it:
- Search for cmd in Windows Search and click Run as administrator .
- Type sfc /scannow and press
Enter.
After the scan and repair, check if your screen is back to normal.
Related read: How to Check For and Fix Disk Errors with CHKDSK Command
Fix 11: Create a new Windows user profile
Occasionally, your user profile might get corrupted, which might lead to the screen blinking. Creating a new user profile typically resolves these issues by offering a fresh environment.
Here’s how to create a new user profile:
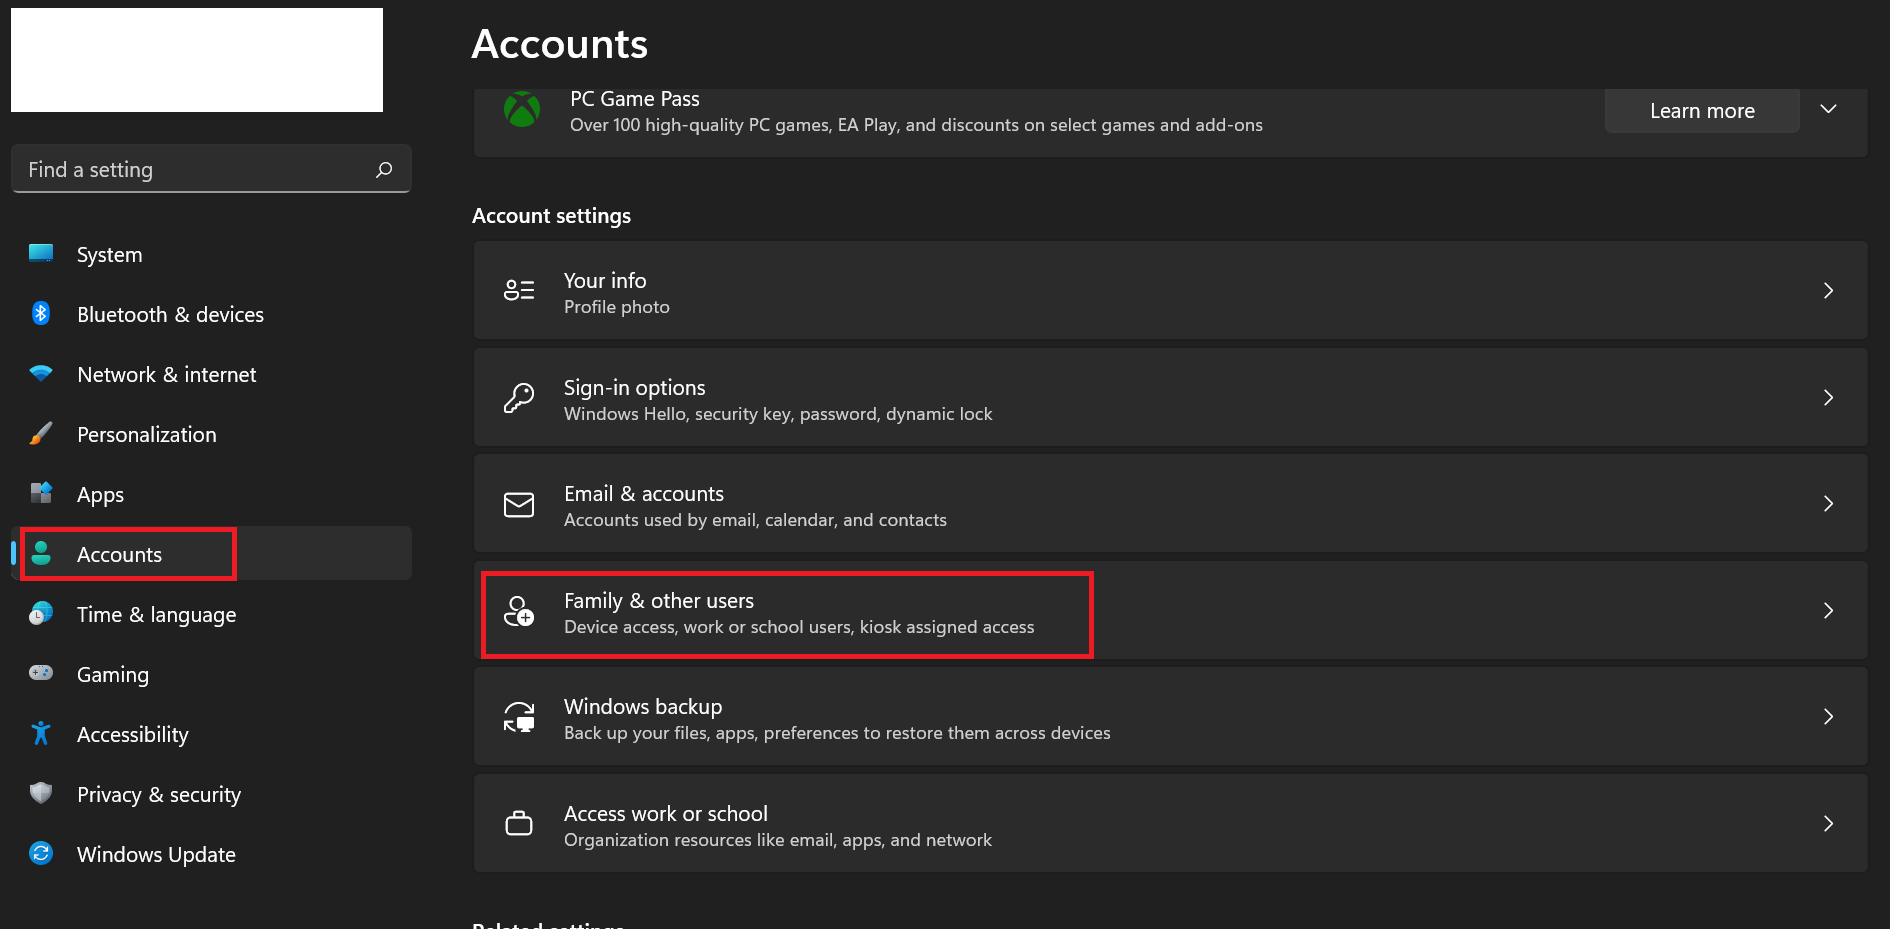
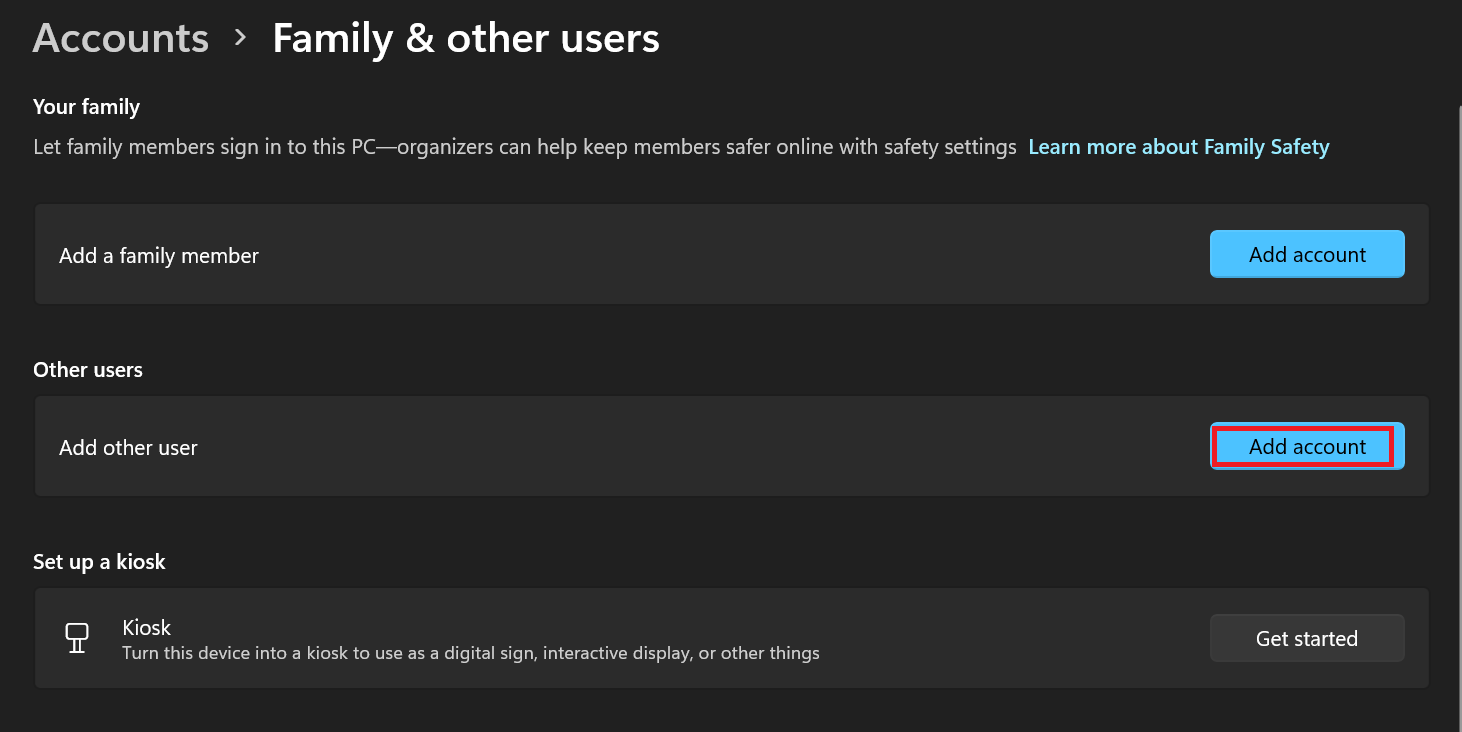
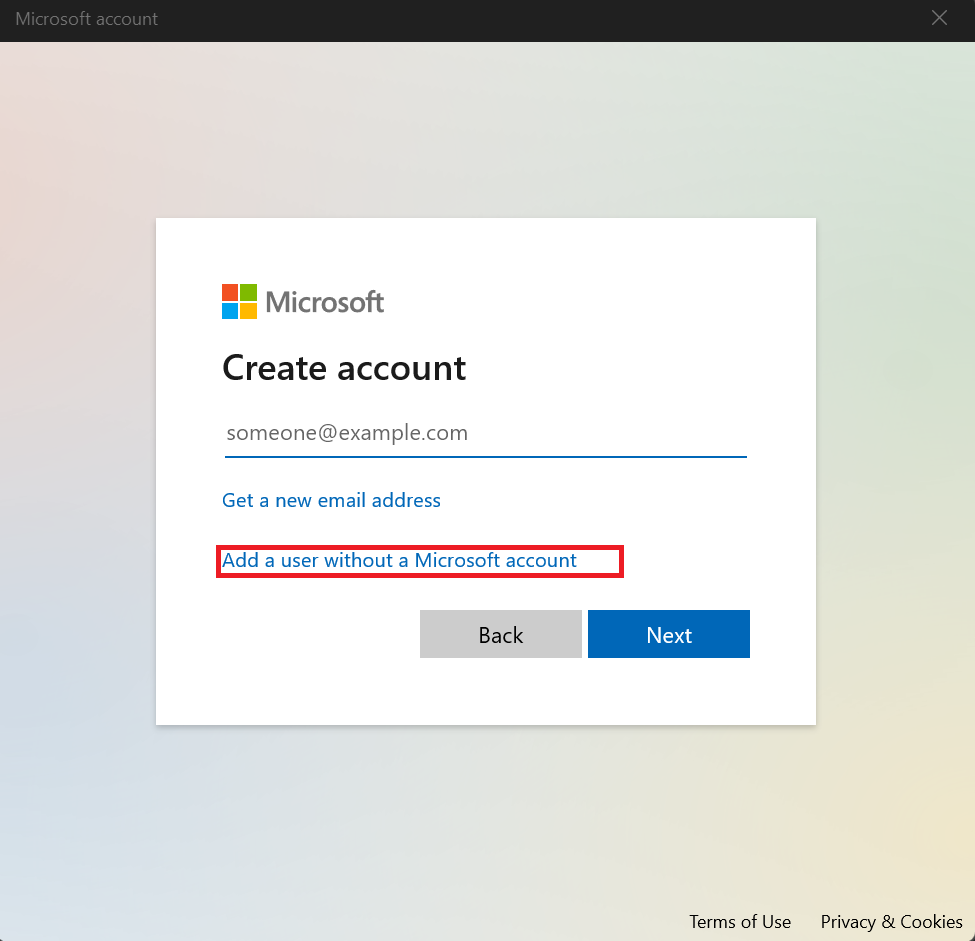
- Open Settings and click on Accounts . In the right pane of the window, scroll down and click on the Family & other users.
- Then, under Add other user, click on Add account .
- If you don’t have the sign-in information for the new user, click I don’t have this person’s sign-in information. Then click on Add a user without a Microsoft account .
- Follow the prompts to enter all the info of the new user and complete the process.
For Windows 10, the steps to create a new user profile are almost the same: Go to Settings > Accounts > Family & other people > Add someone else to this PC > I don’t have this person’s sign-in information > Add a user without a Microsoft account .
If none of the steps discussed in this guide work, contact your laptop/monitor manufacturer’s support team. To get accurate support, you’ll need to specify what kind of laptop you have.
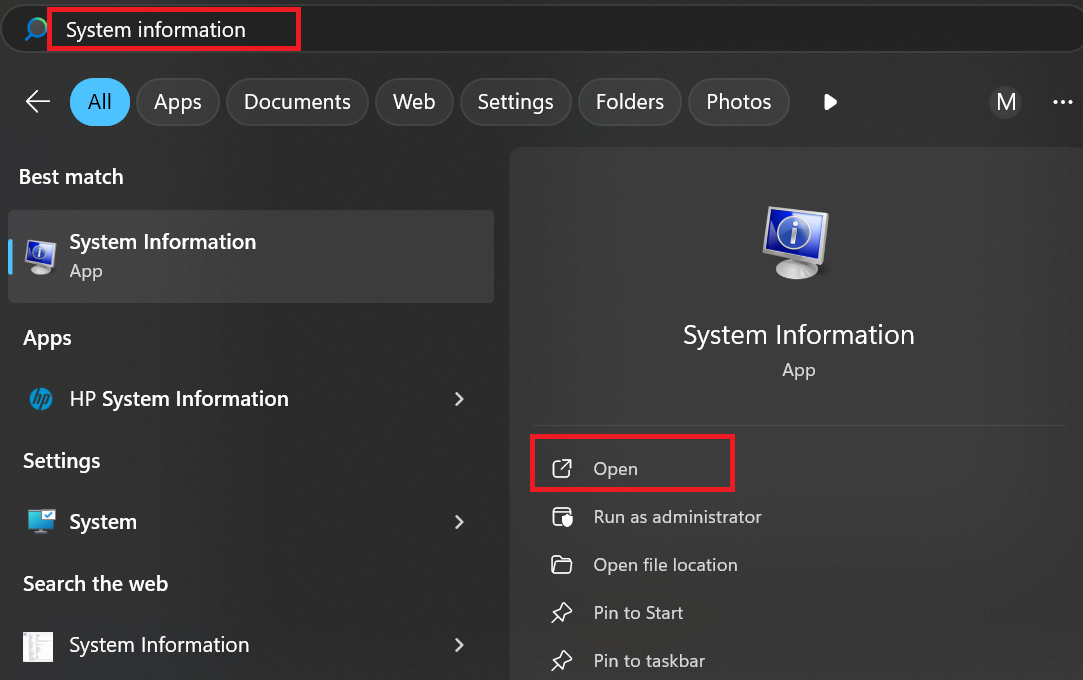
Your laptop model is typically shown on a sticker on the laptop’s underside or in the user manual. Alternatively, you can:
- Enter System information in Windows Search.
- Open the corresponding app, and you will see everything about your computer, including its model number.
- When you contact the support team, explain the problem you’re having with your screen, noting any error messages or repeating patterns you may have noticed.
Here’s a table summary of the solutions we’ve discussed:
| Method |
Description |
Solution |
Best flickering type match |
| Check for loose or damaged cables |
Ensure all cables are securely connected and check for any physical damage to cables connecting your monitor |
- Replace or reconnect cables
|
Vertical or horizontal display disruptions due to external connection issues |
| Adjust refresh rate settings |
Change your monitor’s refresh rate to one compatible with your display and system settings |
- Navigate to Settings > System > Display > Advanced display and adjust the refresh rate
|
Horizontal or wavy glitches caused by an incorrect refresh rate |
| Change the screen resolution |
Modify the display resolution to a setting your hardware can handle efficiently |
- Go to Settings > System > Display and change the resolution under Display resolution
|
Blurry or distorted flashing lines from a resolution mismatch |
| Check for malware and viruses |
Scan your system for malware that might interfere with display processes |
- Open Settings > Update & Security > Windows Security , select Virus & threat protection, and run a scan
- Alternatively, use a third-party tool like Auslogics Anti-Malware
|
Random or intermittent display problems of any type caused by malware |
| Update the display driver |
Install the latest display driver to ensure compatibility and fix bugs |
- Open Device Manager, find Display adapters , right-click your GPU, and select Update driver
- Alternatively, use tools like Auslogics Driver Updater
|
Vertical or horizontal distortions caused by driver-related issues |
| Roll back the display driver |
Revert to an older version of the display driver that worked well previously |
- In Device Manager, right-click your GPU, select Properties , go to the Driver tab, and click Roll Back Driver
|
Vertical or horizontal lines after a driver update |
| Uninstall recently installed apps |
Remove apps that might conflict with system performance or display settings |
- Go to Settings > Apps , locate, and uninstall recently installed apps
- Alternatively, use tools like Auslogics BoostSpeed for a thorough uninstallation
|
Random screen glitches that appear after app installation |
| Run Windows Update |
Ensure your OS and drivers are updated to the latest versions |
- Navigate to Settings > Windows Update and check for updates
|
Fluctuations of any type caused by outdated components |
| Disable GPU acceleration |
Turn off GPU hardware acceleration to reduce graphic rendering strain |
- Open Settings > System > Display > Graphics and disable GPU acceleration
|
Irregular display anomalies caused by GPU rendering issues |
| Repair corrupted system files |
Use tools like SFC or DISM to fix corrupted or missing system files |
- Open the Command Prompt as an administrator, type sfc /scannow, and press Enter
|
General flickering caused by corrupted system files, including lines or waves |
| Create a new user profile |
Switch to a new Windows user profile if the current profile is corrupted |
- Go to Settings > Accounts > Family & other users , click Add someone else to this PC , and follow the prompts
- Then, log in with the new profile
|
Random or unpredictable screen glitches caused by user profile corruption |
| Contact the support team |
Seek professional help for persistent or hardware-related flickering issues |
- Reach out to your laptop/monitor manufacturer’s support team
|
Vertical, horizontal, or hardware-related flickering that resists other fixes |
Why Is My Laptop Screen Flickering?
Your laptop screen can blink on and off due to several factors. Below are some of the main reasons:
- Incompatible or outdated graphics driver. The graphics driver on your laptop bridges the operating system and the screen. Screen fluctuations occur when these drivers are either out of date or incompatible.
- Faulty display settings. Your laptop’s screen flashes because the refresh rate, resolution, or color depth settings aren’t ideal. You can adjust the settings to see if it solves the issue.
- Incompatible applications. Some installed software or applications can interfere with the display, causing the screen to flicker. These can be graphics-intensive apps, malware, or incompatible software. You can determine whether programs are causing issues by removing newly installed software or scanning your PC with reputable anti-malware software like Auslogics Anti-Malware .
- Damaged hardware connections. The problem might be because some display’s physical connections to the motherboard have become loose. You can reseat or repair any loose or damaged connections by consulting the user manual for your laptop or getting in touch with a professional technician.
- Malware infection. Malware and viruses can overload your CPU or GPU. This will cause strain on the graphics card, leading to malfunction. The best way to fix this is to use a third-party malware scanner and remove all malicious programs from your computer.
Helpful Tips to Prolong the Lifespan of Your Screen or External Monitor
- Use a cooling pad. If your laptop’s cooling system is inefficient, overheating may cause screen distortions in your Windows PC. Instead, use a cooling pad or a high stand with built-in fans to keep it from getting too hot . These add-ons let your laptop disperse heat and maintain a consistent temperature, both of which lessen the likelihood of screen problems.
- Keep out of the heat and sunlight. Heat buildup from long exposure to direct sunlight or extremely high temperatures can impair your laptop’s display functionality. So don’t leave your laptop in hot or cold places, such as in front of a heater or near an air vent. Like the rest of its components, your laptop’s screen is most reliable when temperatures are kept at optimal levels.
- Perform regular maintenance. If you perform regular maintenance, you can avoid problems with the screen fluctuations. Use compressed air or a soft brush to remove dust and dirt from your laptop’s vents and fans. Overheating can occur if ventilation is restricted due to dust buildup. Also, maintain stability and compatibility by always using the most recent versions of your operating system, drivers, and other software.
📌 Related read: Expert Tips on How to Clean a Computer
- Adjust your power settings. Incorrect power settings can affect the screen and cause issues. Adjusting the power settings can improve computer performance and reduce power fluctuations. Choose the Balanced or Power saver power plan to keep the screen and other electronics running smoothly.
Download Auslogics Driver Updater
Prevent hardware errors and ensure problem-free device operation with this advanced tool that detects outdated drivers and safely gets them updated.
The Laptop Screen Flickering Problem: Solved
If you follow the steps outlined in this guide, you can fix screen flickering issues on an Asus, HP, or Dell laptop or any external monitor. However, if the problem persists, you may need to upgrade your PC or get a new screen or second monitor, whatever works in your current situation.
We’d love to hear your feedback. Let us know in the comments if these solutions worked for you or if you have any other questions.
FAQ
Laptop screen glitching is often caused by outdated display drivers, incompatible apps, or refresh rate issues. To fix it, update your display driver, uninstall recently added applications, and adjust the refresh rate in your display settings. These steps apply to both Windows 10 and Windows 11 systems.
Yes, laptop overheating can cause a screen glitch. When a laptop overheats, internal components like the graphics card or display hardware may not function optimally, leading to visual issues such as glitching. Ensure proper ventilation, clean dust from vents, and consider using a cooling pad to prevent overheating.
Your laptop screen may flicker for a second due to temporary glitches like display driver hiccups, power supply fluctuations, or background processes. Ensure your drivers are up-to-date and check for loose connections. If the issue persists, it may indicate a hardware fault that requires professional inspection.
![[Easy Fix] How to Fix Laptop Screen Flickering: Tips for HP, Asus, and Dell Users and External Monitors](https://www.auslogics.com/en/articles/wp-content/uploads/2025/01/Easy-Fix-How-to-Fix-Laptop-Screen-Flickering-Tips-for-HP-Asus-and-Dell-Users-and-External-Monitors-568x359.webp)