Is your U SB headset not workin g? This article is for you! These devices are a necessity in our everyday lives, so we can’t afford them to malfunction, especially since it can affect the flow of work.
We’ll walk you through effective means to permanently fix the problem. Go through the guide and choose the method that best works for your situation.
By the end of this article, the “USB headset not detected” issue should be fixed!
Let’s begin.
Why Are My Headphones Not Working on Windows 11/10?
A lot of things can cause your headphones to malfunction. Let’s go briefly through them:
- Connection issues. For instance, c onnectivity problems with your Bluetooth may come from pairing errors, interferences from other devices, or low battery. If you’re connected via USB and your USB-C headphones are not workin g, t he cable may be damaged or simply not fully or properly plugged in.
- System errors. Your system files could be corrupted , or recent software updates may be conflicting with your audio settings. There can also be a conflict between different hardware components.
- Incorrect configuration settings. Sometimes, if your audio settings are not set correctly, your c omputer USB headse t might not work the way you want. For example, if you use the wrong output device or if the volume is too low , the device may appear like it’s not functioning properly, but deep down, there’s nothing wrong with it.
- Your headset is damaged. Over time, wear and tear can break the connectors, fray the wires, or damage the speakers. And this can lead to the U SB headphones not working .
- Your drivers are old. If the drivers are out-of-date, they may not be compatible with the system. And this can cause the sound to distort or Bluetooth options to disappear .
Further reading: How to Download, Install, and Update Bluetooth Drivers
How to Fix the USB Headset Not Working on Windows 10/11
In this section, we’ll walk you through different effective ways to fix the problem:
Solution 1: Boot your PC with your headphones disconnected
One of the reasons why your USB headset is not detected is because it may be interfering with other peripheral devices connected to your system. To fix this, remove the devices and restart your computer.
When that is done, check to see if your headphones are working.
Solution 2: Check if the system volume is on mute
For some weird reason, it could be that your sound is muted, especially if your keyboard has volume keys on it. Quickly check your taskbar right now if it’s muted. If that’s not the case for you, proceed to the next method.
Solution 3: Check if your headset has physical damages
When headphones with a USB connection get worn out, you could have a hard time hearing your music or video game sounds properly. So, analyze if your device has sustained any damage somewhere.
You can also connect it to another device to see if the problem is coming from your computer or headset.
Solution 4: Run the Hardware and Devices troubleshooter
Windows 10 and 11 have a built-in feature to check for any issues with your hardware and various devices.
Important bit
Windows is
retiring the Hardware and Devices troubleshooter . They’ve redirected some of the troubleshooters to the new Get Help troubleshooting platform (if you’re using Windows 11). So, if the steps below don’t work for you, check the other solution.
Run the troubleshooter on Windows 10
- Go to your Control Panel (Win + S, type “Control Panel,” and hit Enter) and click the drop-down arrow beside View by and select and choose Large icons .
- From there, search for Troubleshooting .
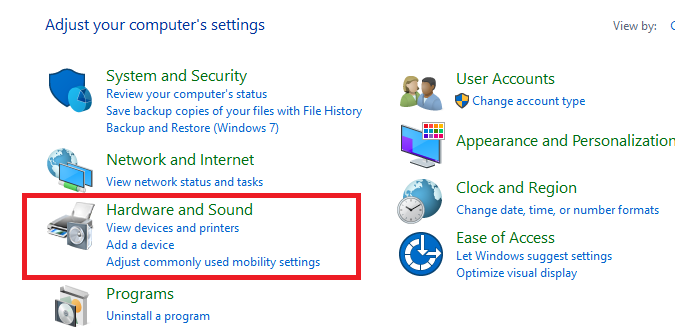
- Select Hardware and Sound.
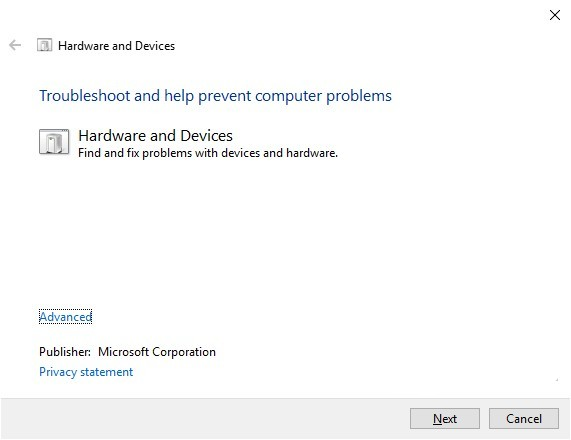
- Finally, select Hardware and Devices and click Next to begin the scanning.
The troubleshooter will search your system for any issues and try to fix them. If the problem is indeed from your headset, it’ll try to correct the issue. You’ll know the result when the scan is complete.
If you’re running Windows 10 build 1809, you won’t find the Hardware and Devices troubleshooter in the Control Panel. However, you can still open the problem using the
Windows Powershell .
Don’t forget to run it as an administrator. When it opens, just enter the command “msdt.exe -id DeviceDiagnostic” and the troubleshooter will open. This also works for Windows 11.
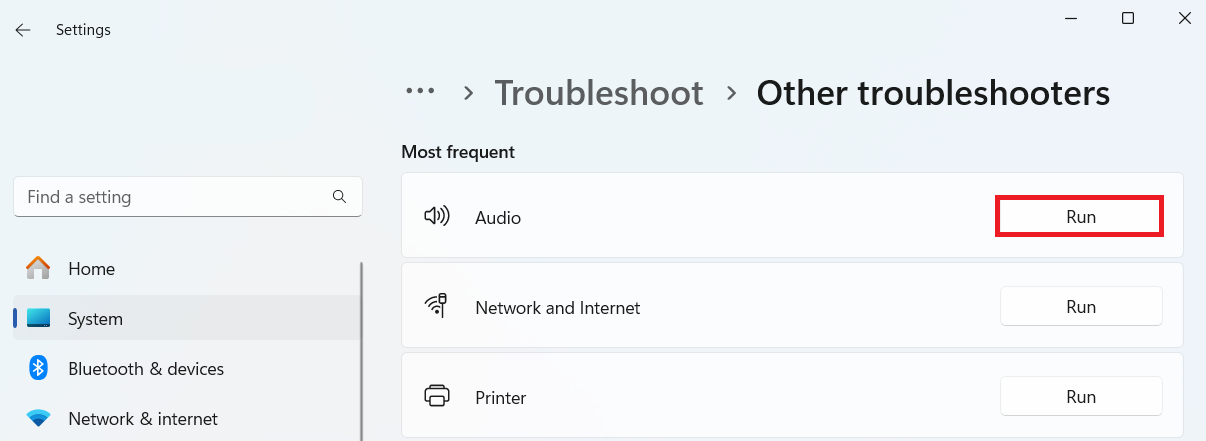
Run the troubleshooter on Windows 11
- Open your Settings window by pressing
Windows + I.
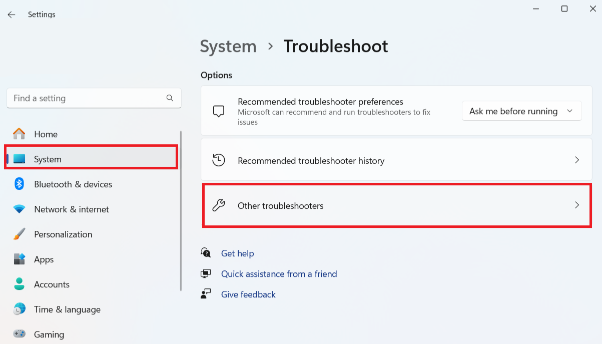
- After that, click on System and select Other troubleshooters.
- Click the Run button next to Audio to initiate the issue detection process.
The system will search for any issues with your audio and suggest ways to fix them. If the U SB headphones are not detected , proceed to the next solution.
Solution 5: Change your default audio device to the USB headphones
Setting the device as a default can sometimes do the trick. Let’s try that if that works for you:
Windows 10
- Go to the bottom-right of your taskbar and right-click the speakers or headphones icon.
- Select Open Sound settings from the options.
- Click the Sound Control Panel under Related Settings.
- When the Sound settings window pops up, choose your USB headset.
- Click Set Default, then select OK to save the changes.
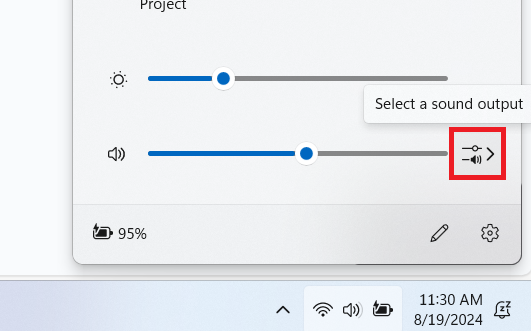
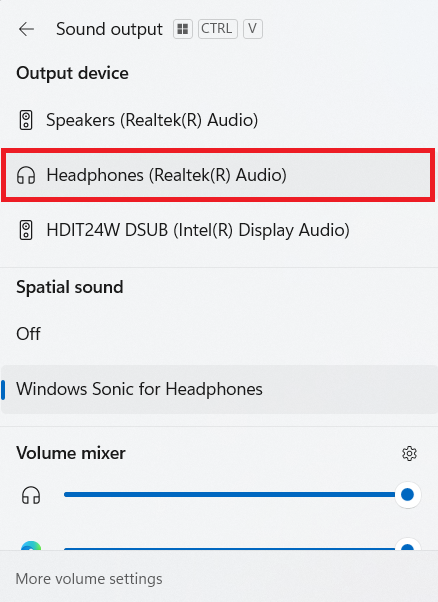
Windows 11
Is your USB headset still not working? Go to the next solution.
Also read: How to Fix Bluetooth Audio Delay on a Windows PC?
Solution 6: Update your audio driver
Another reason why your USB headset not working because the audio driver may be obsolete, corrupted, or just not found.
You can easily resolve this by updating them. One option is to download the new driver updates from the manufacturer’s website, but that is a hassle, especially if you’re not tech-savvy.
Well, let me save you the trouble and show you two easy ways to update your drivers . The last one is particularly simple!
Update drivers with Device Manager
- Tap Windows + R to open the Run dialog box.
- Type “devmgmt.msc” when the window opens and press Enter.
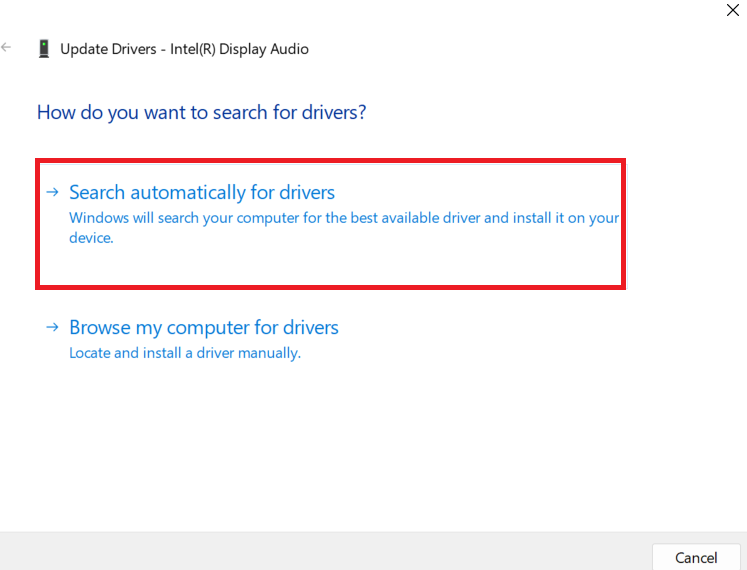
- Expand Sound, video and game controllers , right-click your USB headset, and select Update driver from the list.
- Click the Search automatically for drivers and wait for the process to complete.
Restart the computer. If your h eadphones with USB connecti on are still not functioning, check out the next solution.
Use Auslogics Driver Updater
Device Manager can be a bit of a pain. It’s unreliable and may not even fix the problem. But there’s a better way to fix problems with drivers.
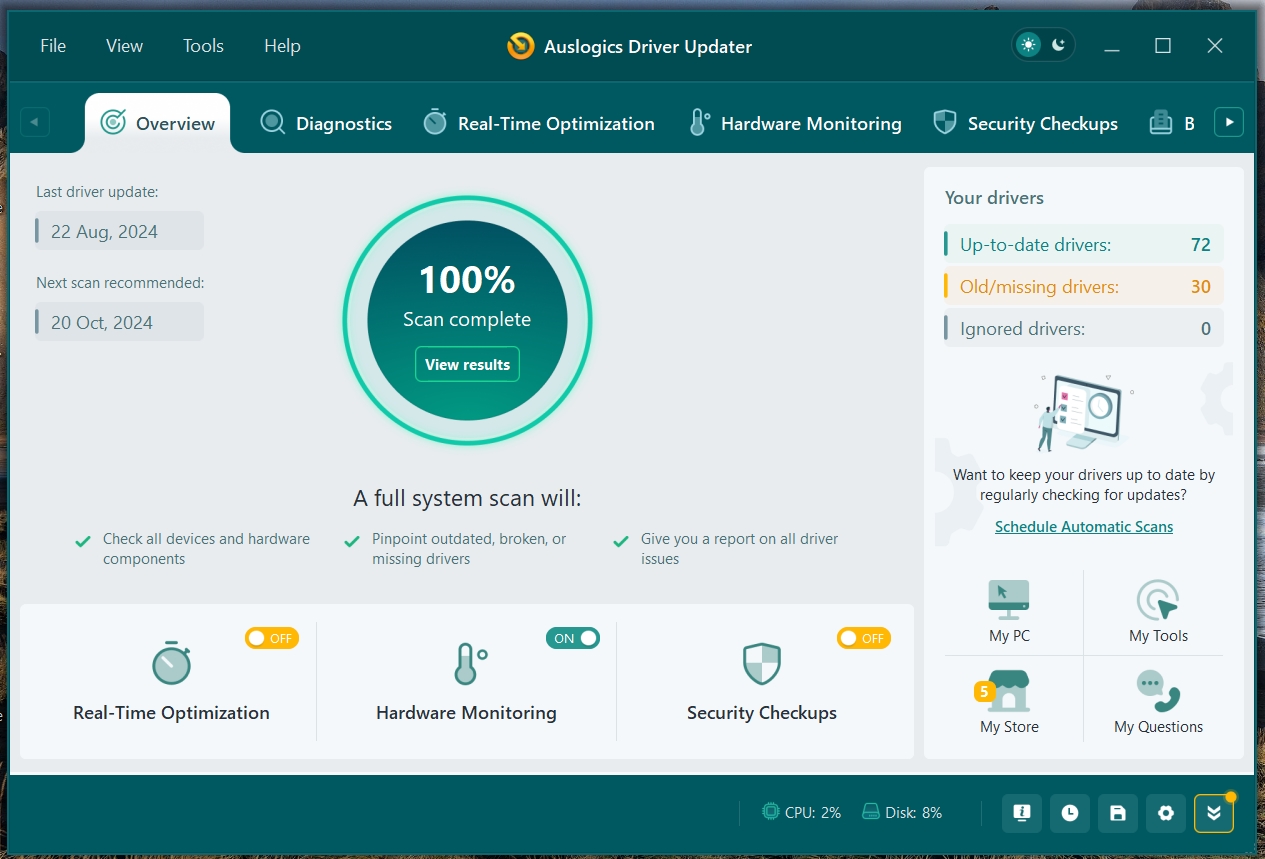
You can use a tool such as Auslogics Driver Updater to take care of everything for you. Just download, install, and run the program.
It’ll automatically analyze your OS version and processor type. From there, you can update all your drivers with just a few clicks.
What’s great about Auslogics Driver Updater is that it addresses all driver-related problems on a computer. So, once the process is complete, you can expect a noticeable improvement in your PC’s performance. You can check the review of Driver Updater before making a decision!
PRO TIP
Auslogics have just released
Driver Updater 2.0 , which offers more comprehensive driver updates.
Now, you can check your CPU, GPU, and disk temperature in real time! On top of that, you can analyze drivers for viruses, use smart algorithms to precisely install only the official manufacturer-recommended updates, and much more!
Solution 7: Adjust your privacy settings
Have you tried configuring your privacy settings? Sometimes, when your USB headset not working it is the fault of this setting.
So, if you want your computer to recognize a USB headset, you need to adjust your privacy settings for peripheral devices.
Here are the steps:
- Press
Win + I to launch the Settings app.
- Next, click Privacy and choose Microphone from the options.
- Check and make sure to allow apps to access your microphone. You can also verify the programs individually to determine the ones you want to grant access to.
Windows 11
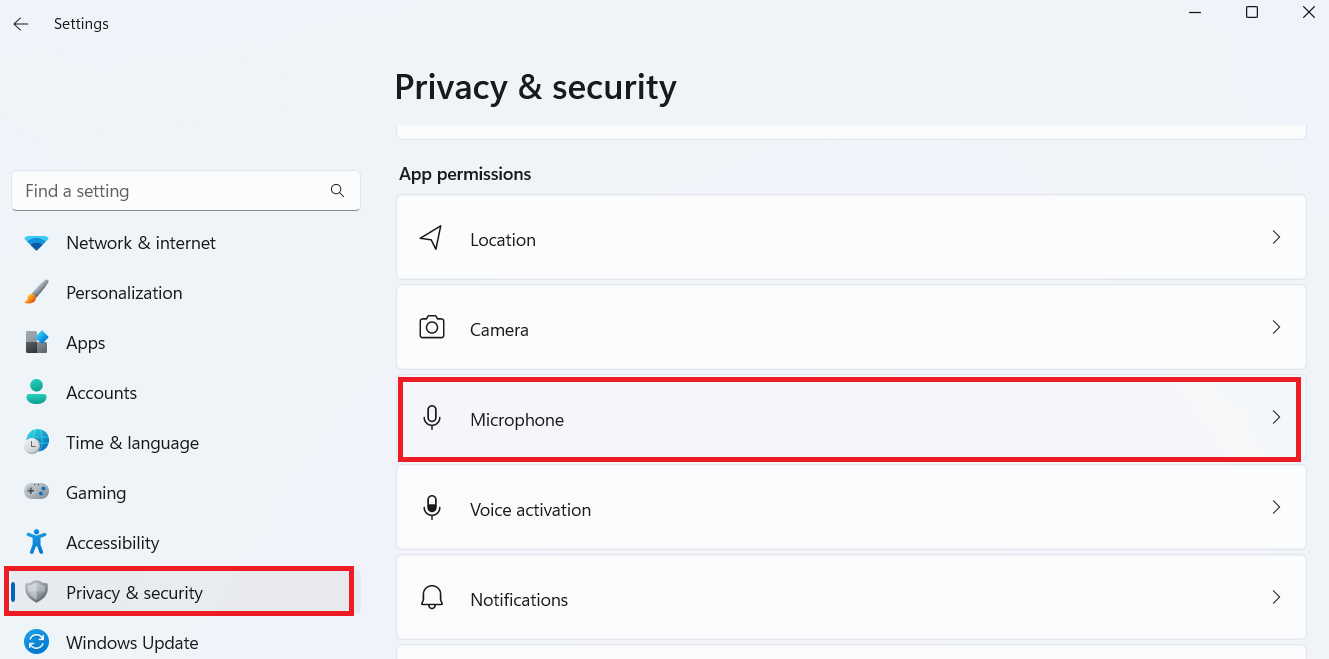
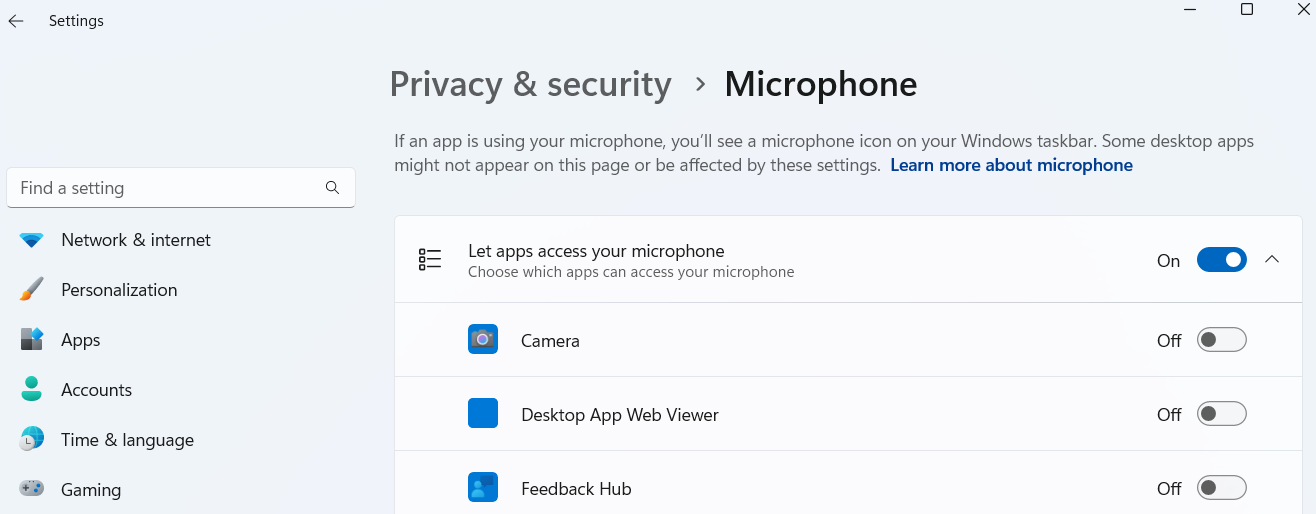
- In the Settings window, select Privacy & security on the left pane and select Microphone .
- You can scroll through the various apps and grant or deny access to the programs you want.
Solution 8: Update Windows
Updating Windows can sometimes fix the issue. Here’s how to get Windows 10 and 11 updated:
- Open the search bar and type “Windows update.”
- Select the appropriate result that appears.
- When the Settings window opens, click Check for updates .
- The system will start searching for updates automatically and install any pending updates.
If the issue doesn’t resolve, try the next method.
Solution 9: Reset your headphones
Some settings may be causing the USB headset to malfunction. The best option is to reset the sound settings to their default state:
Windows 10
- Right-click the speaker icon on your taskbar and select Sounds .
- Go to the Playback tab.
- Right-click your headset and select Properties .
- You’ll see Restore Defaults in the Advanced tab. Click on it.
- Go to the Spatial sound tab and click Restore defaults to reset the headset.
Windows 11
- Click on the search icon on your taskbar, type “Sound settings,” and press Enter.
- Then choose More sound settings .
- Look for your headset among the listed audio devices, right-click it, and select Properties .
- Open the Enhancements tab and click the Restore Defaults
- Repeat the same process in the Advanced and Spatial sound tabs .
- After that, click Apply and select OK to save the changes.
Resetting your headphones should fix the headphones not working on Windows 11 or 10.
Also read: [FIXED] Windows 10 Computer Is Not Recognizing Headphones
Additional Troubleshooting Tips for Your USB Headset
Although it’s essential to know how to enable USB headphones on Windows 10 or 11, making sure the device works at 100% is a different ball game.
We’ve included some steps you can take:
- Click on the sound icon on your taskbar.
- Select your USB headphones from the drop-down menu.
- If you set the sound output device to your headset, test it. To do that, right-click the sound icon on your taskbar.
- Click Open Sound settings .
- Select the Sound Control Panel link, and select your USB headset.
- At the bottom-right portion of the window, click Properties .
- Go to the Advanced tab, then click the Test button.
If you hear the sound coming from your headphones, you’ve successfully fixed the problem.
And what should you do if your Windows computer isn’t recognizing your headphones? Check out this video for a quick fix:
USB Headset Not Working on Windows 10/11: Fixed
If your USB headset is not working, the solutions we’ve gone through should rectify the problem once and for all. We hope that one of these solutions can help you resolve the problem.
Are there other troubleshooting tips you can recommend? Let us know in the comments below!
Also, share this article with your friends who might find it useful!
FAQ
Your drivers may be missing or just plain outdated. Another reason is that the settings are not compatible or there are issues with your system hardware.
Whatever the case, you can use Device Manager to update them. The quickest and most effective way, however, is to use Auslogics Driver Updater.
There are a few reasons why your USB headset mic is not working. What I’d recommend, regardless of the cause, is to troubleshoot the problem and use Device Manager to reinstall or update your drivers.
Your headset jack may be faulty, or it could be a hardware issue. So, check if that’s the case. If not, the problem may be simply an outdated driver, incorrect audio settings, or software conflicts.