A black screen on Windows 11 or 10 may not be the same as the traditional blue screens of death, but it is just as terrifying. Unlike blue screens, black screens can manifest in different ways. Sometimes, your display may go completely blank. Other times, you may experience a black screen with a mouse cursor. Regardless of your system’s behavior, blank, black screens are generally symptoms that point to serious underlying problems. Thankfully, you can trace the root cause of the glitch and get your display back. This article will cover the causes of the Windows 11 and Windows 10 black screens , share how to fix the problem, and explain practices to prevent recurrences.
Causes of the Black Screen of Death
As mentioned, your laptop’s or PC’ s black screen problem results from another software or hardware problem. Let’s cover the possible issues that may be responsible:
Corrupt, outdated, and missing video drivers can turn monitors and laptop screens black since they are responsible for your system’s graphics rendering.
That said, other drivers that help the system communicate with specific hardware devices can also cause conflicts that result in the black screen of death. For example, chipset drivers can trigger problematic issues with your system’s display.
Loose or damaged display cables
Your monitor may be blank because it is not receiving any feed from your cables. You may have recently moved the system or detached and reattached the display cable and left it loose. Another thing worth considering is whether the cord has been damaged.
Windows relies on system files for just about everything, from interacting with device drivers to implementing settings and configurations. When these files become corrupt or go missing, the result can be a blank, black screen .
Issues with internal components can trigger the black screen on Windows 10 or 11 when they malfunction. Hardware devices that can cause the problem include your hard drive, RAM , CPU, and GPU.
Malware or virus infections
Malware programs are often designed to modify system settings, registry entries, and operating system files to steal data, lock down your computer, and cause other issues. So, the black screen of death problem could be your computer’s way of telling you it’s been compromised.
Windows updates are like regular oil changes your operating system requires to run smoothly. However, they often cause problems like black screens when issues are in the code. Sometimes, these problems are specific to some computer models, but they can also affect every Windows system.
If your power supply isn’t delivering adequate watts to components like your GPU and CPU, you may experience black screen problems. Total watts are important graphics card and processor specifications that indicate the voltage required to run these devices.
While you may have the right PSU on paper, aging and defective power supplies can fail to pump out the necessary juice to keep visuals flowing to your screen.
Excessive heat is another problem that can turn your laptop screen black or stop your monitor from displaying pictures. Overheating CPUs and GPUs can force your system to turn off abruptly, which can corrupt system files and user profiles.
Third-party programs that have access to low-level Windows settings can tamper with some configurations or cause driver conflicts that result in the black screen problem.
Your BIOS settings set the groundwork for how your computer’s devices work, including your display. Wrong settings could prevent your monitor from displaying.
Quick Fixes to Try First to Resolve the Blank Black Screen
Now that we’ ve explored the causes of the black screen issue, let’ s apply the knowledge to resolving the problem. How your computer behaves can point you to the most likely fix.
I’ ll group the fixes in different categories so you can identify which methods best suit your situation. But first, let’ s start with dotting some I’s and crossing some T’ s to ensure the problem is not caused by minor oversights or common glitches.
Fix 1: Restart your computer
Restarting your computer
clears temporary conflicts, refreshes the system memory, and allows Windows services to reinitialize. These processes could very well clear the issue causing your computer to be stuck on the blank, black screen. Press and hold your power button until your system goes off, and then turn it on again. If you’re using a desktop, you can turn off the power supply unit and turn it back on after a few seconds.
Fix 2: Check for any loose connections
Take the following steps to confirm that the problem is not caused by loose or faulty cables:
- Turn off your computer.
- Inspect power, display, and internal (for PCs) cables for firm connections and damage.
- Reconnect loose and unplugged cables.
- Use different cables to confirm that your current cables are not faulty. If you use a laptop, consider using different cables for your charger or try out a different charger.
Fix 3: Try connecting to an external monitor
If you use a laptop, use an HDMI or DisplayPort cable to connect your system to an external monitor. That way, you can check if the black screen issue is caused by a faulty screen.
If you use a desktop computer, connect a different monitor to confirm that your current display is not the issue.
Fix 4: Check if the power supply is faulty (desktop PCs)
The best way to check whether your desktop’ s power supply is faulty is by using another unit. If that unit powers your computer without issues, you should consider buying a new PSU.
But before you start, confirm that your power supply cables are attached correctly to your motherboard headers, especially your GPU. That way, you won’ t mistake a functioning PSU for a faulty one.
How to Fix the Black Screen if It Occurs Before Login
The following fixes will help you resolve the problem if you’ ve eliminated power, cable, and display issues and are still experiencing the black screen problem before logging in.
| Method |
Description |
Requirement |
Difficulty level |
| Check BIOS/UEFI settings and apply default configurations |
- Check for recent adjustments in the BIOS that may have caused the issue
- Apply BIOS defaults to revert changes you don’t remember
|
Your keyboard |
Moderate |
| Run startup repair |
- Go to the Advanced Startup environment, select Troubleshoot > Advanced options > Startup repair
|
You can navigate the environment with your keyboard and mouse |
Easy |
| Boot into Safe Mode |
- Go through the Advanced Startup environment to boot into Safe Mode and fix drivers, uninstall applications, disable startup items, and uninstall updates
|
You can enter Safe Mode with your keyboard but may need your mouse to easily move around |
Moderate |
| Reset Windows |
- Use the reset option in the Advanced Startup environment to reinstall Windows
|
You may need an installation DVD or USB if the Advanced Startup reset utility does not work |
Moderate to advanced |
If you can log into your system before seeing the black screen, head to the next section.
Method 1: Check BIOS/UEFI settings
If you recently made changes to your BIOS, your new settings could be why your screen goes black whenever you turn on your computer. Try reversing those changes if you know what they are.
These settings could be your display resolution, RAM configuration, boot sequence, power management, and CPU preferences.
If you can’t point to the changes you’ve made, returning to your BIOS’s default settings should be your next move. This process will revert your settings to your manufacturer’s original configuration that shipped with your system or got deployed during your last BIOS update. The procedure could also be called resetting your BIOS.
You can reset your BIOS through the BIOS or your motherboard. Here’s how to use default settings through the BIOS environment:
- To enter your BIOS, tap the designated BIOS/UEFI key for your computer once you start the system.
- Look around the BIOS interface and tap the keyboard key that indicates applying default settings. Some motherboards will allow you to use your mouse to select the BIOS Defaults, Optimized Defaults, or Restore Settings options.
- Exit the BIOS and restart your system.
While in your BIOS, you should check your boot order to ensure your operating system is configured to boot from your primary hard drive.
If you recently added a new hard drive to your computer, your BIOS might be attempting to boot from that drive.
If you have a desktop computer, you can use the Reset button on your motherboard to restore your default settings. Here’s what you should do:
- Turn off your computer, unplug your power supply unit, and press and hold your power button for 60 seconds.
- Carefully open your system’s case to gain access to your motherboard. If you’ve forgotten how to do that, consult your desktop’s manual. If it’s a custom build, use your PC case’s manual.
- The reset button on the motherboard should be named Reset or Clear CMOS. Depending on your board, it should be located close to the I/O panel where you have your USB and other ports or near the board’s edges.
If you don’t have a reset button, locate the little round (silver) battery on your board and take it out for a few minutes. Replace the battery, and your BIOS will be reset.
Method 2: Run Startup Repair
Startup Repair, also called Automatic Repair, is a built-in pre-boot utility that detects and fixes boot-related issues. The tool kicks in automatically whenever Windows fails to boot properly and senses an issue.
Since your computer is experiencing the black screen problem before you can get to the login screen, some startup files and software components may be affected. The Automatic Repair tool can attempt to resolve these issues. Here’ s how to run it:
- Turn off your computer and turn it back on.
- Once Windows starts to boot, press and hold your power button to force the system to switch off.
- Repeat the process.
- Turn on your computer for the third time and allow it to enter the Automatic Repair screen. If it doesn’t show Automatic Repair, force the reboot one more time.
- Before the Automatic Repair interface appears, Windows should notify you that it is diagnosing your PC.
- Click the Restart button once the Automatic Repair screen shows up.
If you see a message that says, “ Automatic Repair couldn’t repair your computer ,” select the Advanced options button, go to Troubleshoot > Advanced options , and click Startup Repair .
Move on to the next method if you still see the black screen.
📍 Also read:Help! What to Do if Automatic Repair Couldn’t Repair Your PC
Method 3: Boot into Safe Mode
Safe Mode
opens a Windows environment with minimal drivers, services, apps, and settings. This boot process allows Windows to avoid loading the kinds of software components prone to causing boot problems. If your computer successfully opens in Safe Mode, you can attempt to get rid of the root cause of the problem. Here’s how to boot into Safe Mode:
- Go to the Automatic Repair screen by forcing multiple restarts, as explained earlier.
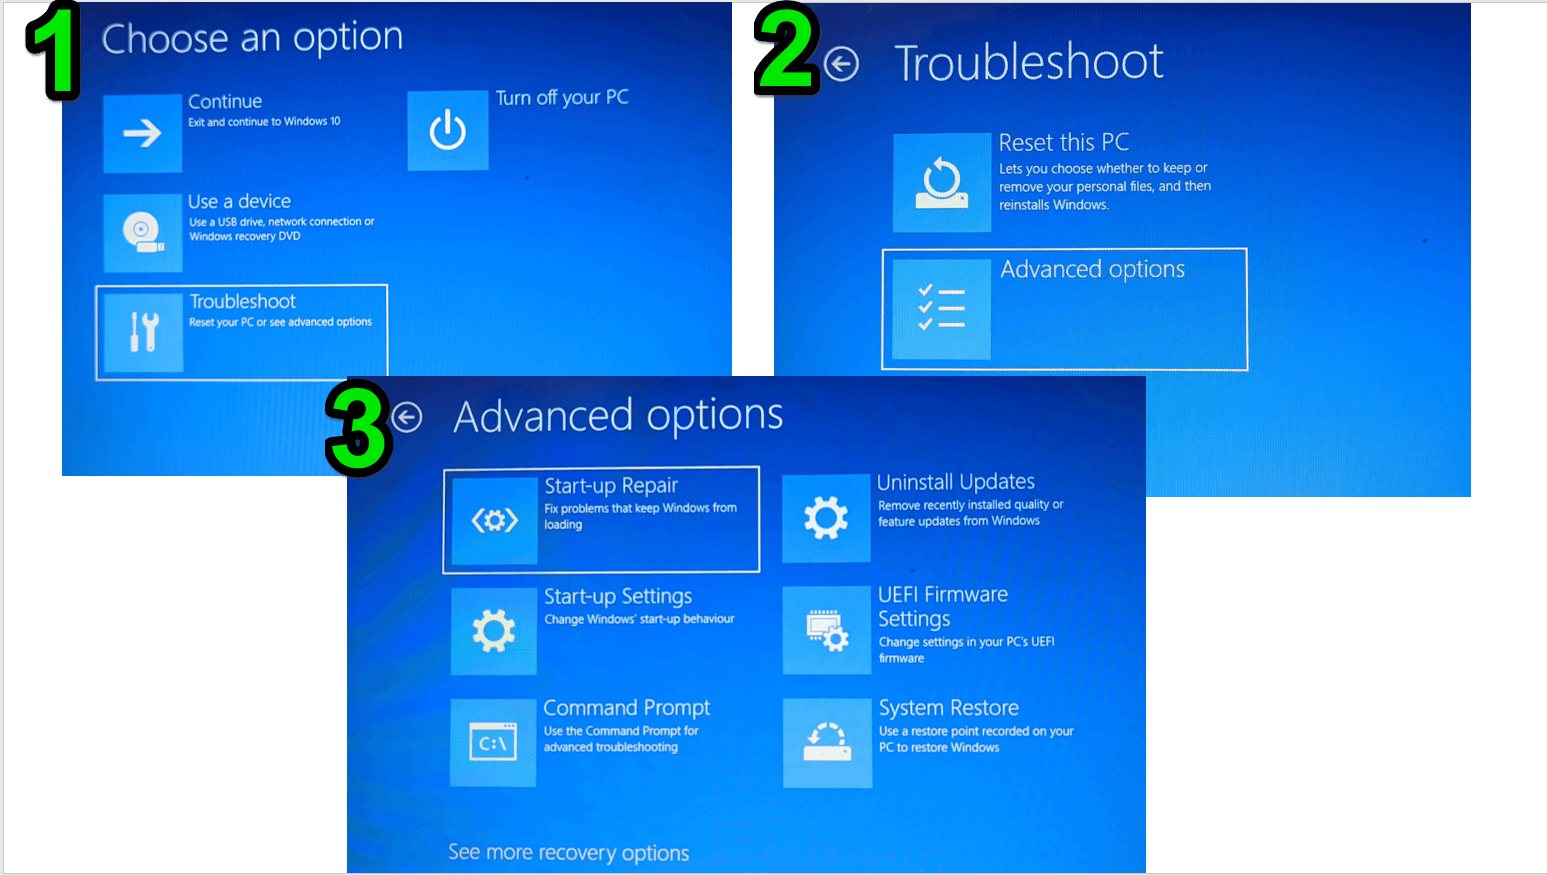
- Click Advanced options .
- When you see the Choose an option screen, select Troubleshoot and click Advanced options .
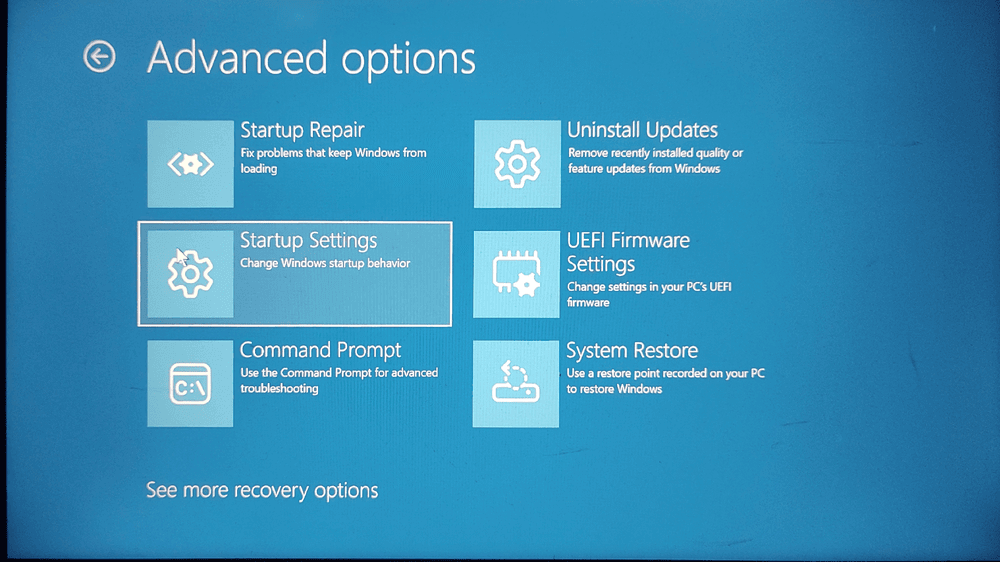
- Next, click Startup Settings.
- Click the Restart button next.
- Select the option for Safe Mode with Networking (5).
Note
If your computer does not boot after you select the 5th option, try option 4 (Safe Mode). However, note that you won’t be able to use the Internet in this mode. If your computer boots, the problem is likely connected to your network card.
Once your PC boots into Safe Mode, consider doing the following:
1. Uninstall applications
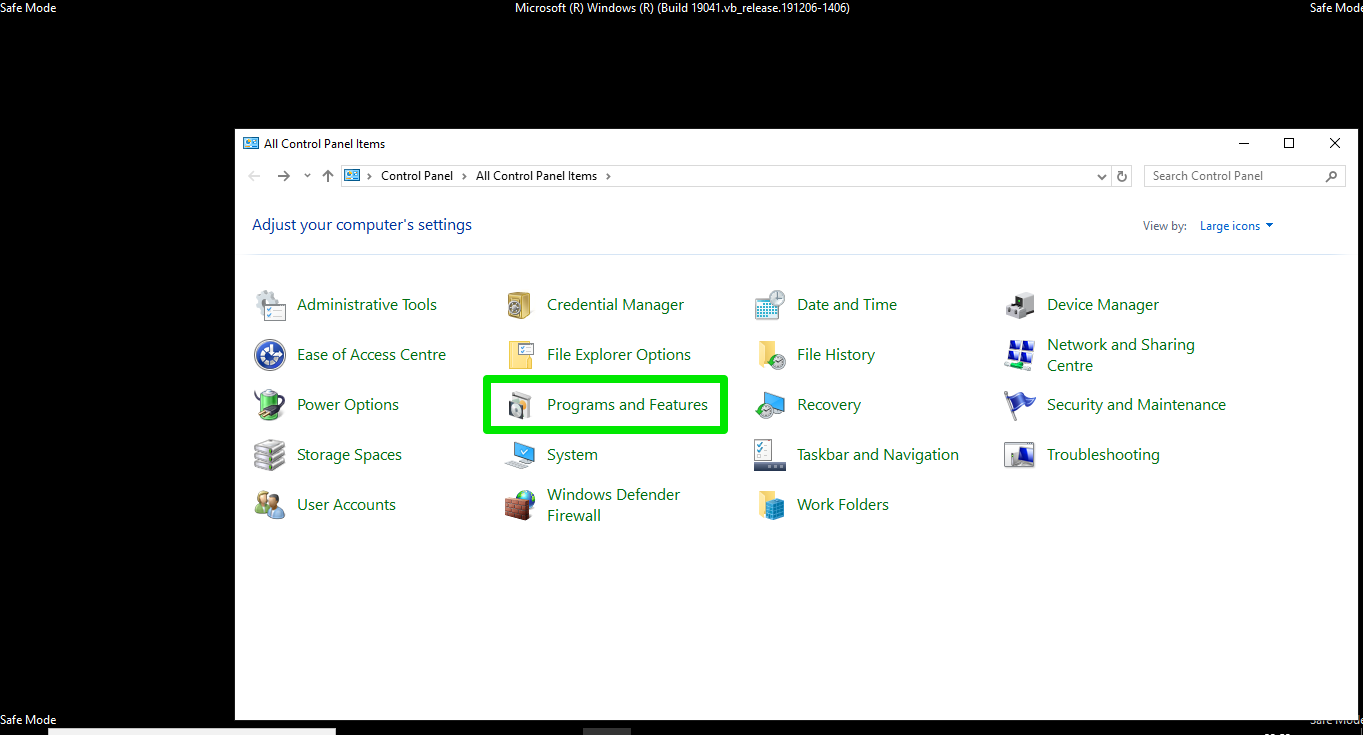
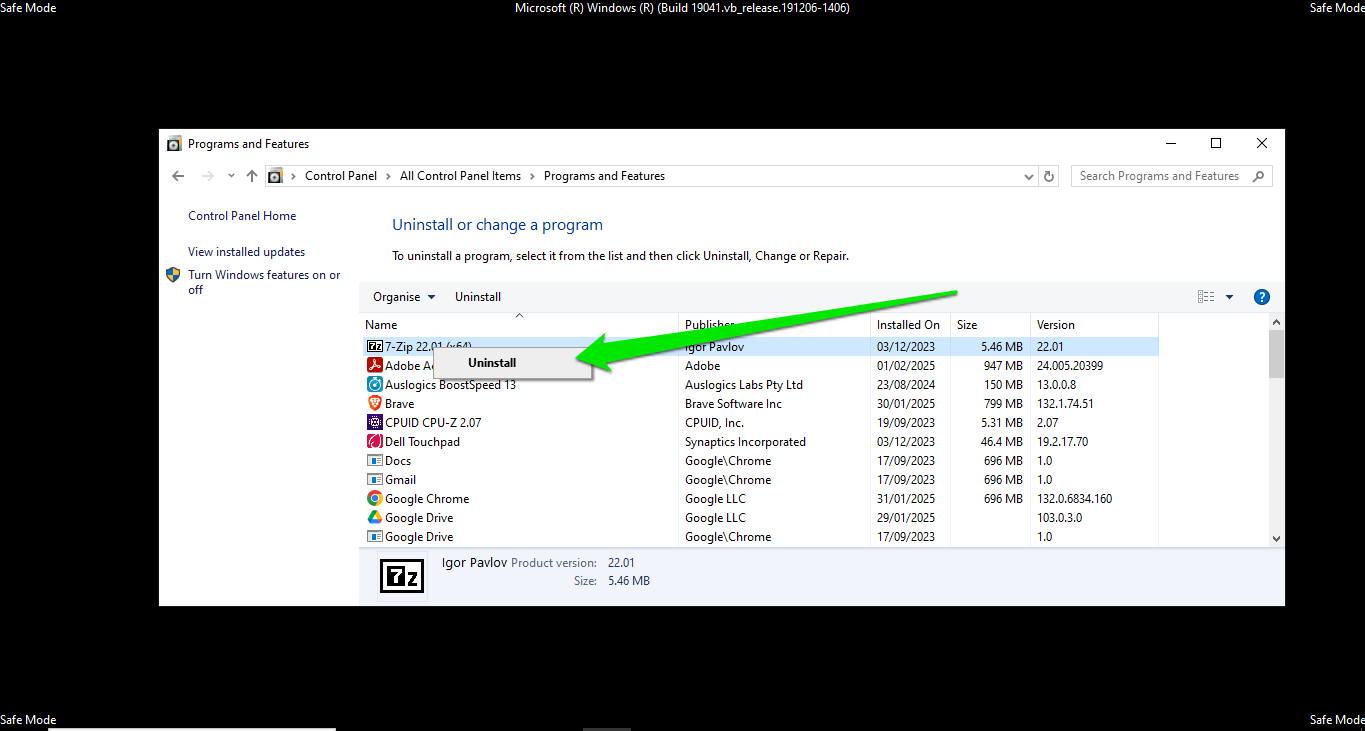
If you recently installed a program before experiencing the black screen problem, remove it and check if the problem is resolved. To uninstall any app in Safe Mode, you can go to the Control Panel and select Programs and Features .
Right-click the program you want to remove and select Uninstall .
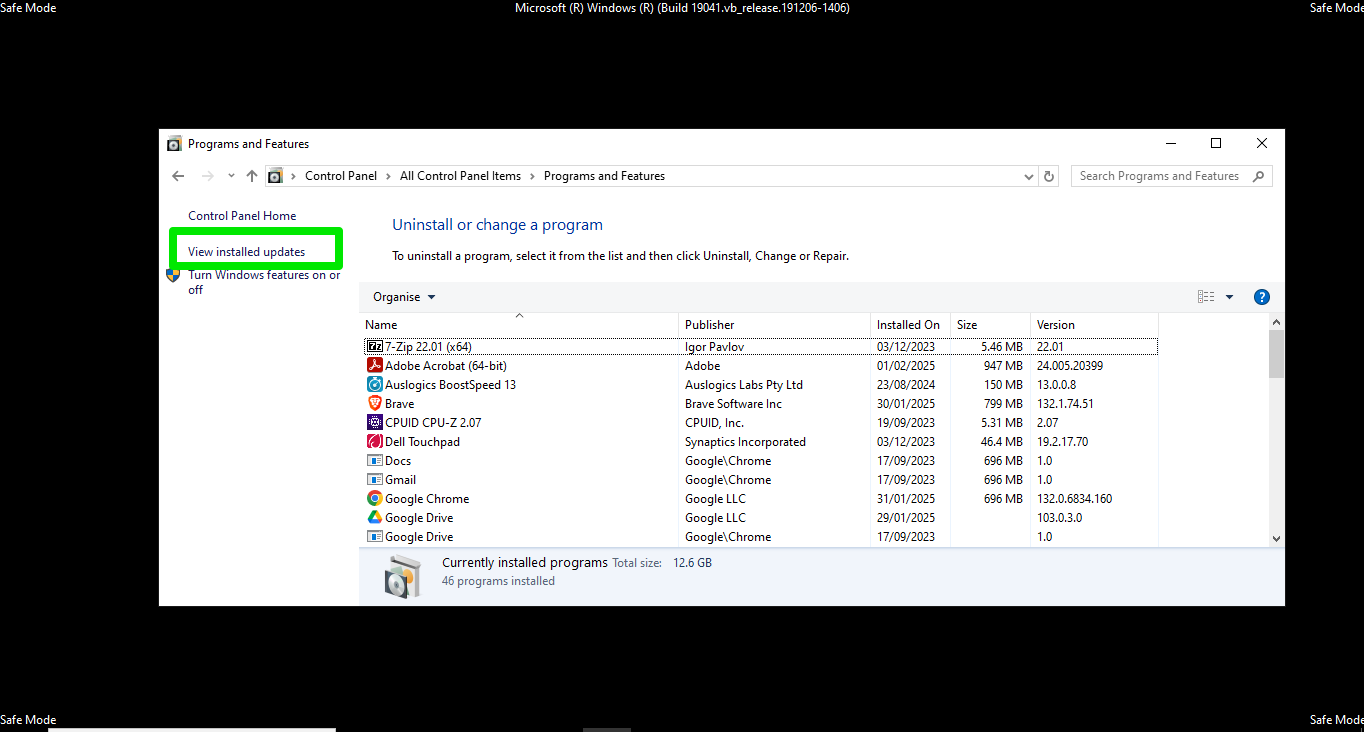
You should also remove any Windows update that was recently installed before you started seeing the black screen, as updates could also trigger such problems. Click
View installed updates in the left pane of the Control Panel’s
Programs and Features window to uninstall Windows updates.
You can also uninstall Windows updates through the Advanced Startup environment. Select Troubleshoot > Advanced options under Choose an option and click Uninstall updates. You may need to provide your password to continue.
2. Disable startup items
Some third-party applications and services that run at startup can prevent Windows from loading correctly. You can find the responsible program by performing a clean boot . However, you should first disable every startup program and restart your computer to confirm that one of these apps and services is causing the problem.
Follow these steps:
- Right-click the Start menu and select Run .
- Type msconfig into the Run dialog box and click OK .
- Go to the Services tab of the System Configuration window.
- Check the Hide all Microsoft services box.
- Click Disable all.
- Click the OK button.
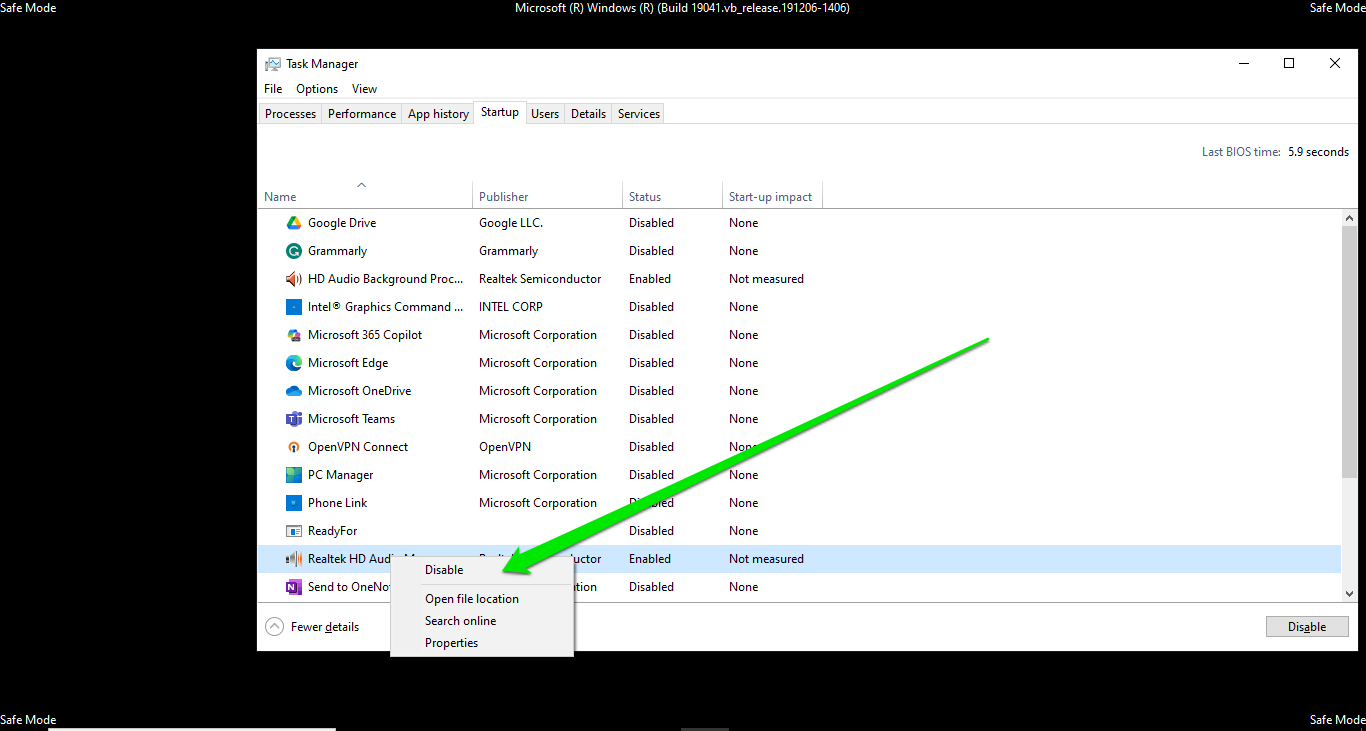
- Head to the Task Manager window (press
Ctrl + Esc + Shift) and switch to the Startup tab.
- Right-click each item and select Disable .
If your PC boots without the black screen, either on Windows 11 or Windows 10, you have to find and remove the specific service causing the problem since your system will be quite limited if you leave all your startup apps permanently turned off. 3. Roll back or update driversRolling back your drivers involves using previous versions of specific driver software. This method will fix the black screen problem if it is caused by a driver you recently updated. Here are the steps to follow:
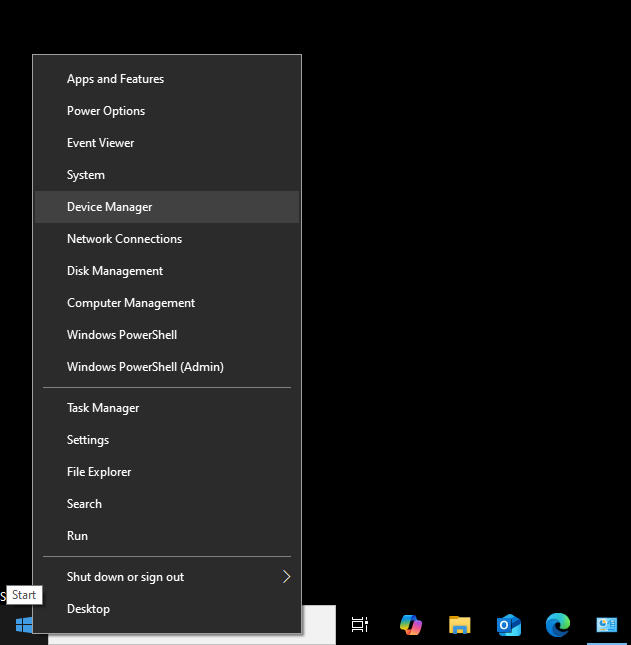
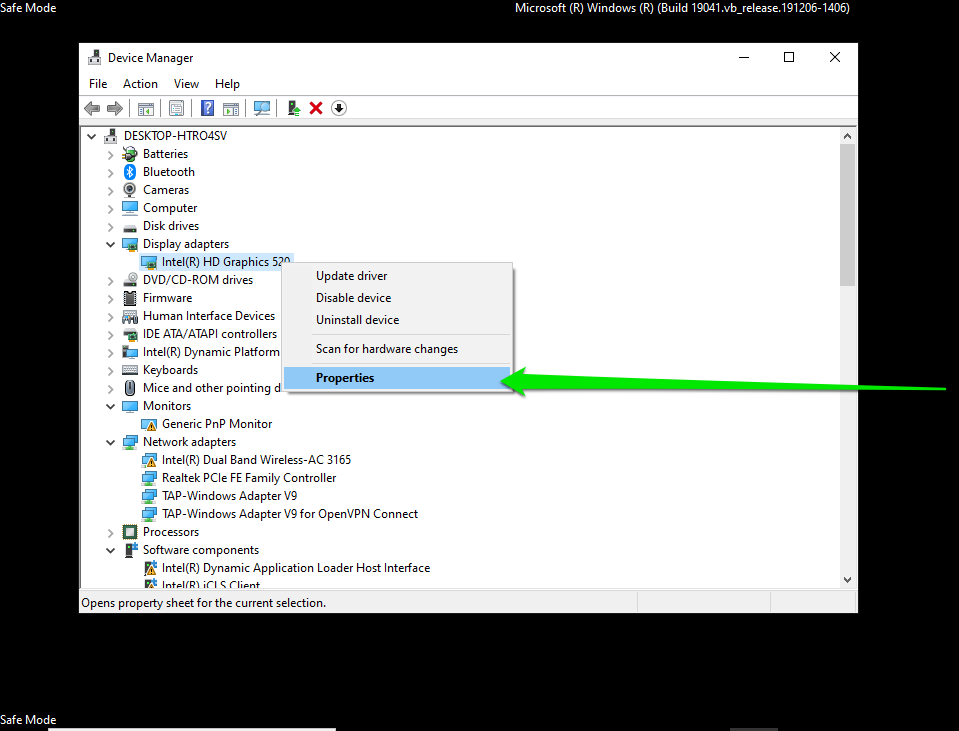
- Right-click the Start button and select Device Manager.
- Expand the category for the device whose driver you want to roll back, right-click the device, and select Properties .
Note
You’ll notice that some devices have exclamation marks when you open the Device Manager in Safe Mode. No need to panic, as their drivers were not loaded when you logged into this environment.
- Go to the Driver tab and select Roll Back Driver .
- Follow the subsequent instructions to complete the process.
- Restart your computer and check if the problem has been resolved.
In most cases, you can use the method above to roll back drivers if you recently installed an update. However, the
Roll Back Driver button may be greyed out if it has been a while since your last update or Windows did not save a copy of the previous driver version.
You can manually download and install the previous version from the device manufacturer’s website. Check for the current driver version under the Driver tab.
If rolling back the driver does not resolve the issue, try installing the latest update . To do that, go to the website of the device’s manufacturer, search for the make and model, and download its latest software package.
4. Run System Restore
You can return your computer to a previous state from Safe Mode when you use the System Restore utility. However, you must have created a restore point when your computer worked without issues.
Here’s how to perform a system restore:
- Type Restore in the Start menu and click Create a restore point .
- Click System Restore .
Sometimes, you may see the System Properties window instead of the System Protection dialog. Here’s a different way to open System Restore :
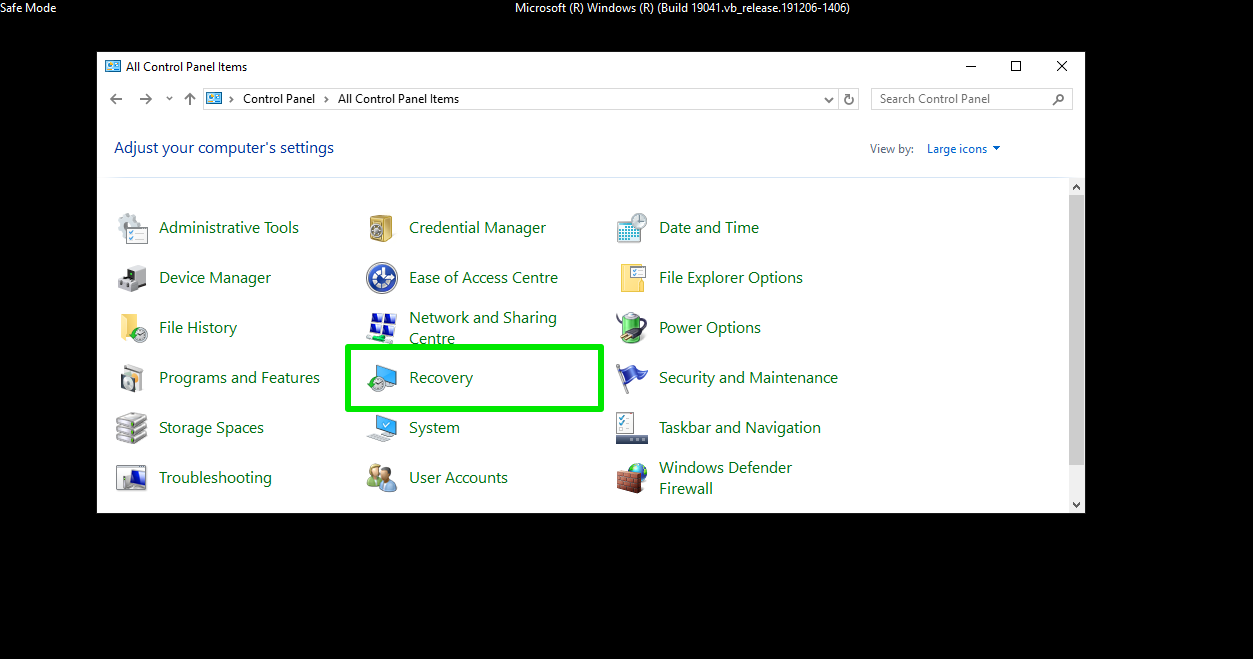
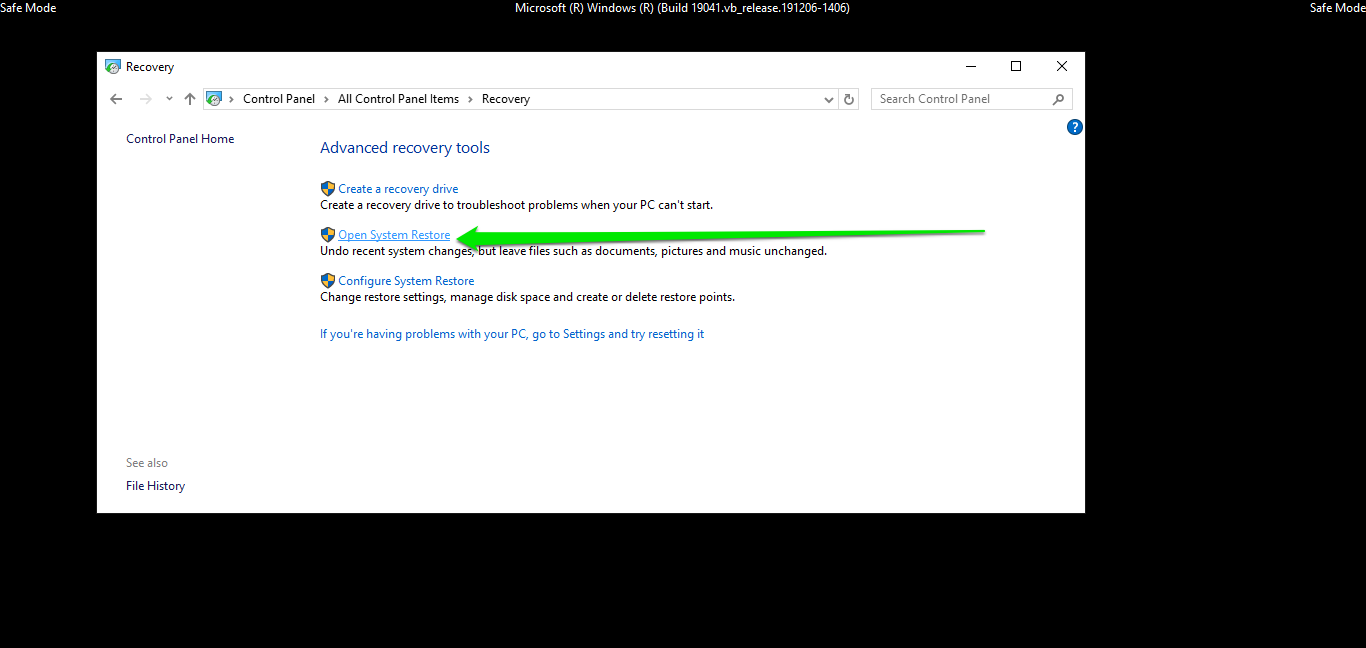
- Open the Control Panel window (you can search in the Start menu).
- Select Recovery.
- Click Open System Restore .
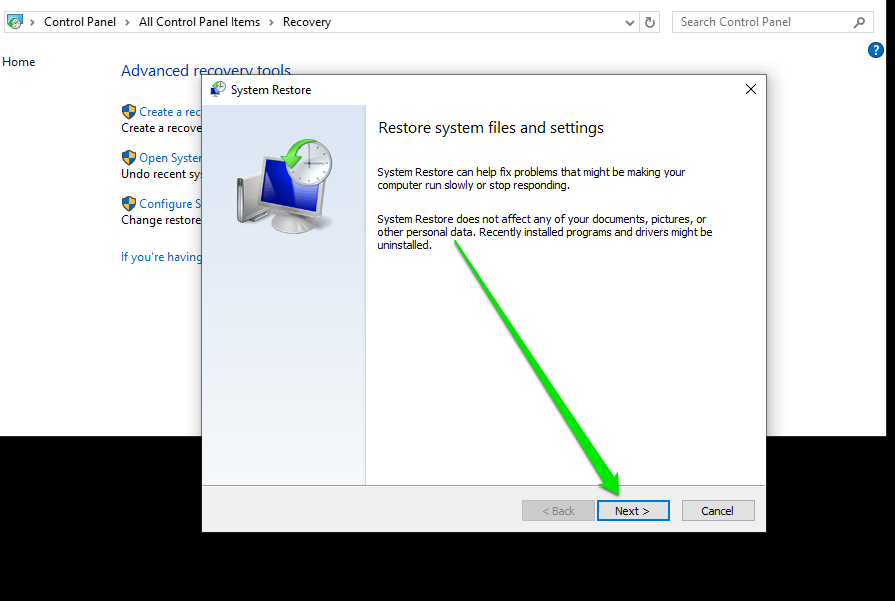
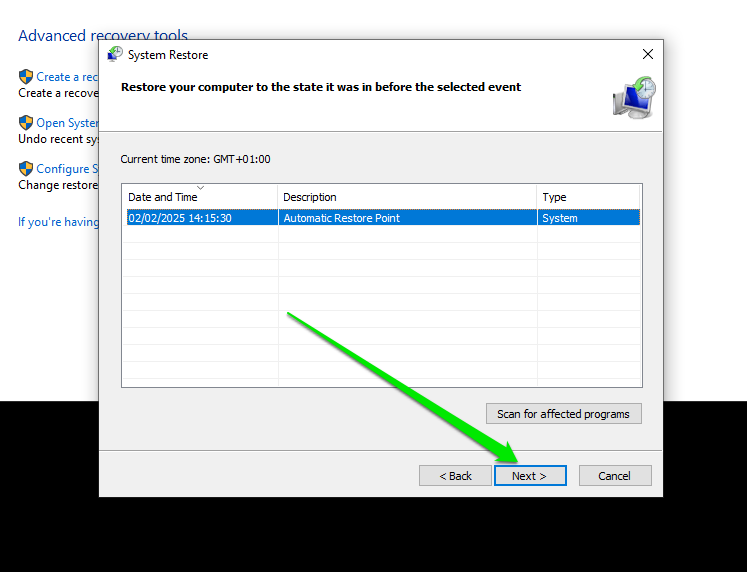
- Click Next , select a restore point, and click Next again.
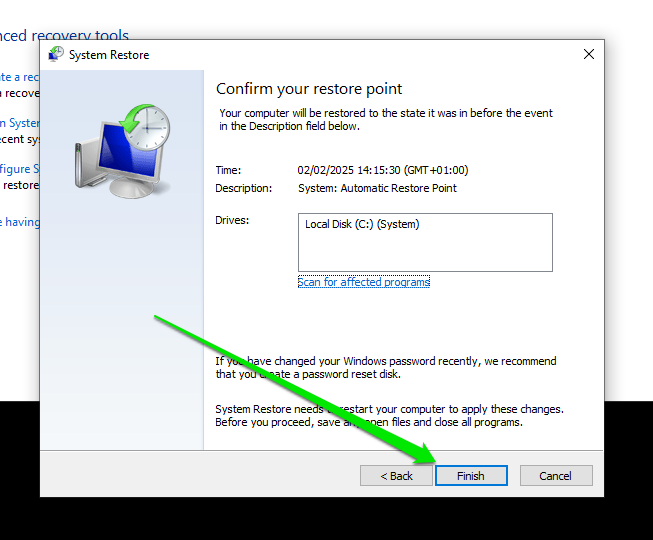
- Now, click Finish and allow your computer to restart.
Note
You can also restore your system from the Advanced Startup screen, just like uninstalling Windows updates.
5. Repair system files
Repairing system files is another operation you can carry out through the Safe Mode and Advanced Startup environments. The process involves opening the Command Prompt and running the System File Checker (SFC) and Deployment Image Servicing and Management (DISM) tools to replace broken or missing system files.
Follow these steps:
- Open the Command Prompt window. If you’re in Safe Mode, type CMD after opening the Start menu and select Run as administrator under Command Prompt.
Note
If you’re opening the Command Prompt window from the Recovery Environment, you may have to log into your Windows account.
- Now, type the following line into the Command Prompt and hit
Enter :
DISM.exe /Online /Cleanup-image /Restorehealth
Note
The DISM tool requires an internet connection to provide replacement files for System File Checker. Ensure you’re logged into Safe Mode with networking to use the tool.
- Next, type sfc /scannow and press the
Enter button.
Method 4: Reset Windows
If booting into Safe Mode and using other methods listed earlier did not resolve the problem, your last option is to reset your computer . Going this route means you’ll lose your applications and maybe your files. Follow these steps:
- After entering the Advanced Startup environment, select Troubleshoot and click Reset this PC .
- On the next page, you can choose to keep your files or remove everything using the corresponding options.
Note
If you don’t have sensitive files on your drive or have created backups, you should consider removing everything to get rid of malware.
- Select the type of installation you want to perform between Cloud download and Local reinstall .
- Click the Reset button on the next screen to start the process.
- You’ll have to enter various preferences once your computer resets.
If the process fails from the Advanced Startup environment, you have to factory reset Windows using a bootable USB or DVD. You can also attempt to reset the PC using your OEM’s preboot recovery utility.
How to Fix Black Screen of Death if It Occurs After Login
The following methods can be applied if Windows boots, but you see a black or blank screen after logging into your user profile.
| Method |
Description |
Requirement |
Difficulty |
| Refresh your screen using a keyboard shortcut |
- Press
Win + Ctrl + Shift + B to restart your graphics card
|
Your keyboard |
Very easy |
| Disable Fast Startup |
- Go to the Control Panel, search for Power, select Change what the power buttons do, and turn off Fast Startup
|
A user profile with administrator privileges |
|
| Restart Windows Explorer |
- Open the Task Manager, right-click Explorer, and select Disable
- You may also have to activate Explorer in the Windows registry*
|
Your mouse |
Easy |
| Fix system files |
- Open the Command Prompt as an administrator, and type DISM.exe /Online /Cleanup-image /Restorehealth
- After that, type sfc /scannow
|
An internet connection for the DISM command |
Easy
*The registry operation is advanced |
| Uninstall conflicting applications and recent updates |
- Go to the Control Panel, select Uninstall a program to remove apps, or click View installed updates to remove recent updates
- You may need to use Advanced Startup if the black screen appears immediately after login
|
Your mouse or keyboard |
Easy |
| Create a new user profile |
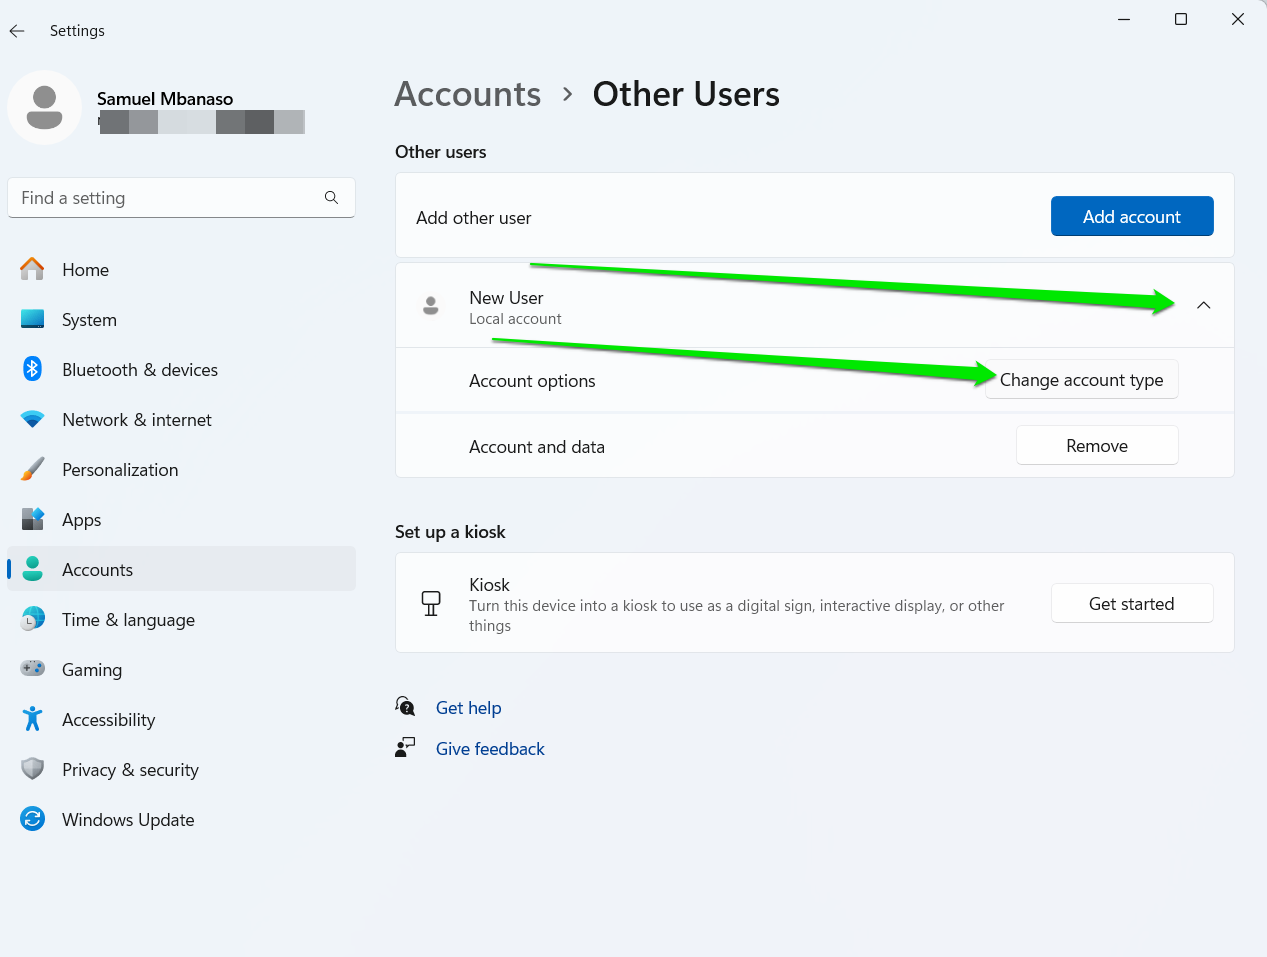
- Open Settings > Accounts > Other users and create a new profile
|
An administrator account |
Moderate |
| Install a new graphics card driver |
- Go to the Device Manager, right-click your graphics card, and select Uninstall device
- Next, download the latest driver from your graphics card manufacturer’s website and install it
|
An internet connection to download the driver |
Moderate |
Method 1: Use the keyboard combination to refresh your system’s screen
Press the Windows key + Ctrl + Shift + B combination to restart your graphics card’s driver. Using the hotkey is like closing an application and relaunching it to clear minor glitches.
You can also press the Windows key + P combination to open the Project mini window and change your external display settings. Windows 11 usually remembers your configuration if you dock your laptop or are using a multi-display setup. As such, you may be seeing the black screen because your computer expects to display on other screens.
Method 2: Disable Fast Startup
Fast Startup is a Windows feature that helps your computer boot faster. It works by saving a system state on your hard drive before shutting down your PC. That means a shutdown is not really a clean slate for your computer. Instead, your system mimics the hibernation stage.
This feature often causes certain memory glitches and application conflicts that result in black screens and other Windows problems. So, try turning off Fast Startup , especially if you see the black screen after logging in or your system wakes from a sleep state or hibernation.
Turning off Fast Startup does not mean your boot time will increase significantly. It only saves about 5 to 10 seconds at best for computers with SSDs.
Here’s how to turn off Fast Startup:
- Open the Start menu, type control , and click Control Panel .
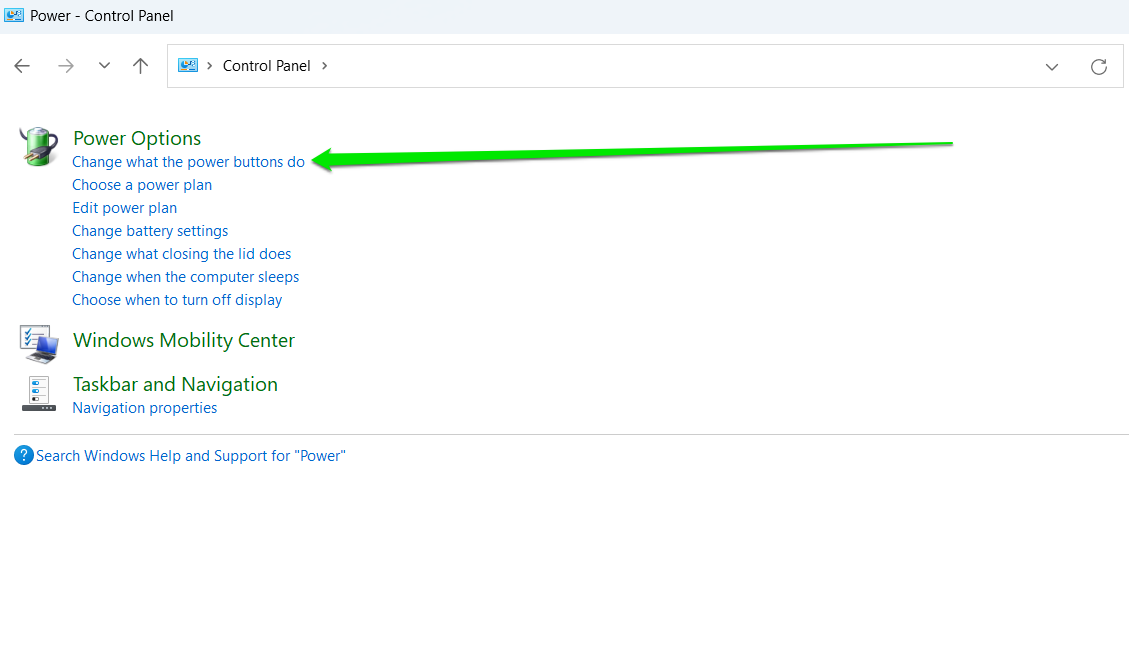
- Go to the Control Panel search bar, type Power, and click Change what the power buttons do.
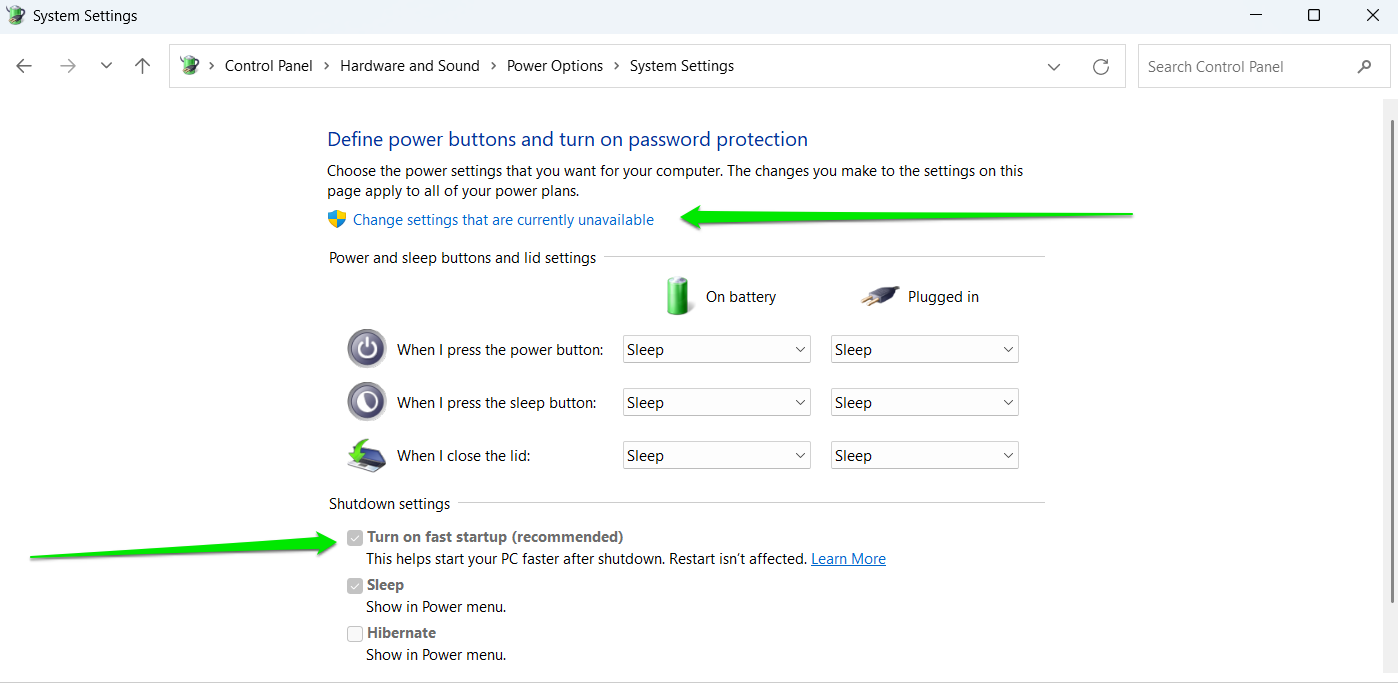
- Uncheck the box beside Turn on fast startup .
If the fast startup checkbox is greyed out, click
Change settings that are currently unavailable at the top of the window.
If you can’t use your computer normally, boot into Safe Mode to turn off the feature.
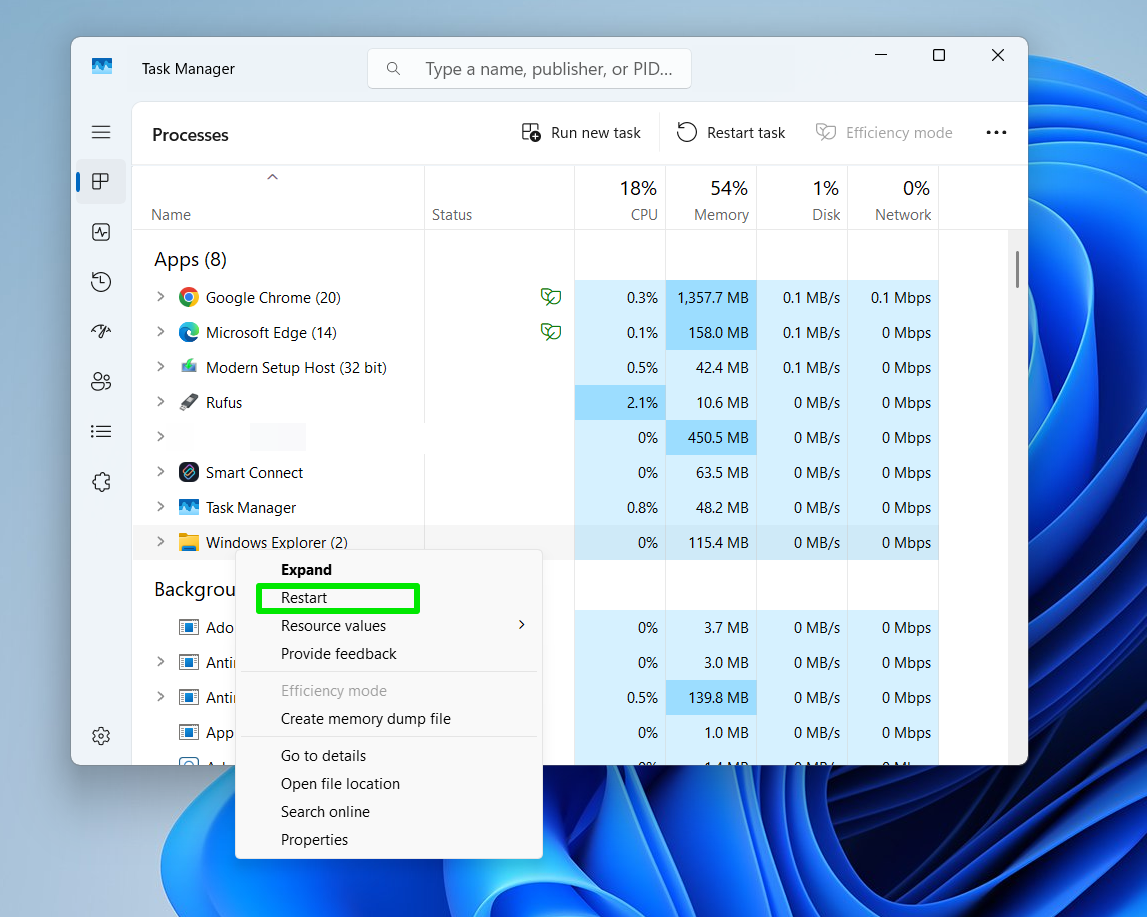
Method 3: Restart Windows Explorer
Windows Explorer
is an integral system application responsible for file management, your desktop environment, the taskbar, the system shell, critical aspects of your user interface, and other essential background processes. It is the first system app that runs once you log into Windows. That means the black screen may be showing up because Explorer continues to encounter issues. Restarting Explorer can help other dependencies to initialize correctly. Open the Task Manager, right-click Windows Explorer , and select Restart .
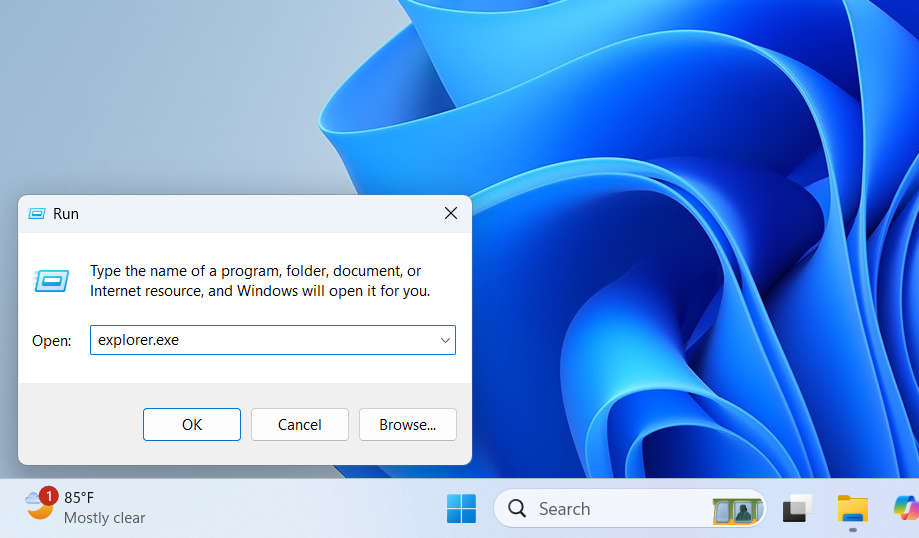
You can also open Run (Win +R), type explorer.exe , and hit the Enter key. You don’t have to see anything on the screen to follow the sequence. Once you hit Enter , your desktop should appear.
If Explorer continues to fail its automatic launch at login, its registry settings may have been misconfigured. You can change things through the Registry Editor . Follow these steps:
Note
The
registry is a high-risk Windows database that stores the operating system’s low-level settings and configurations. So ensure you
back up the Windows registry and create a system restore point before you continue.
- Type regedit after opening the Start menu and click Registry Editor .
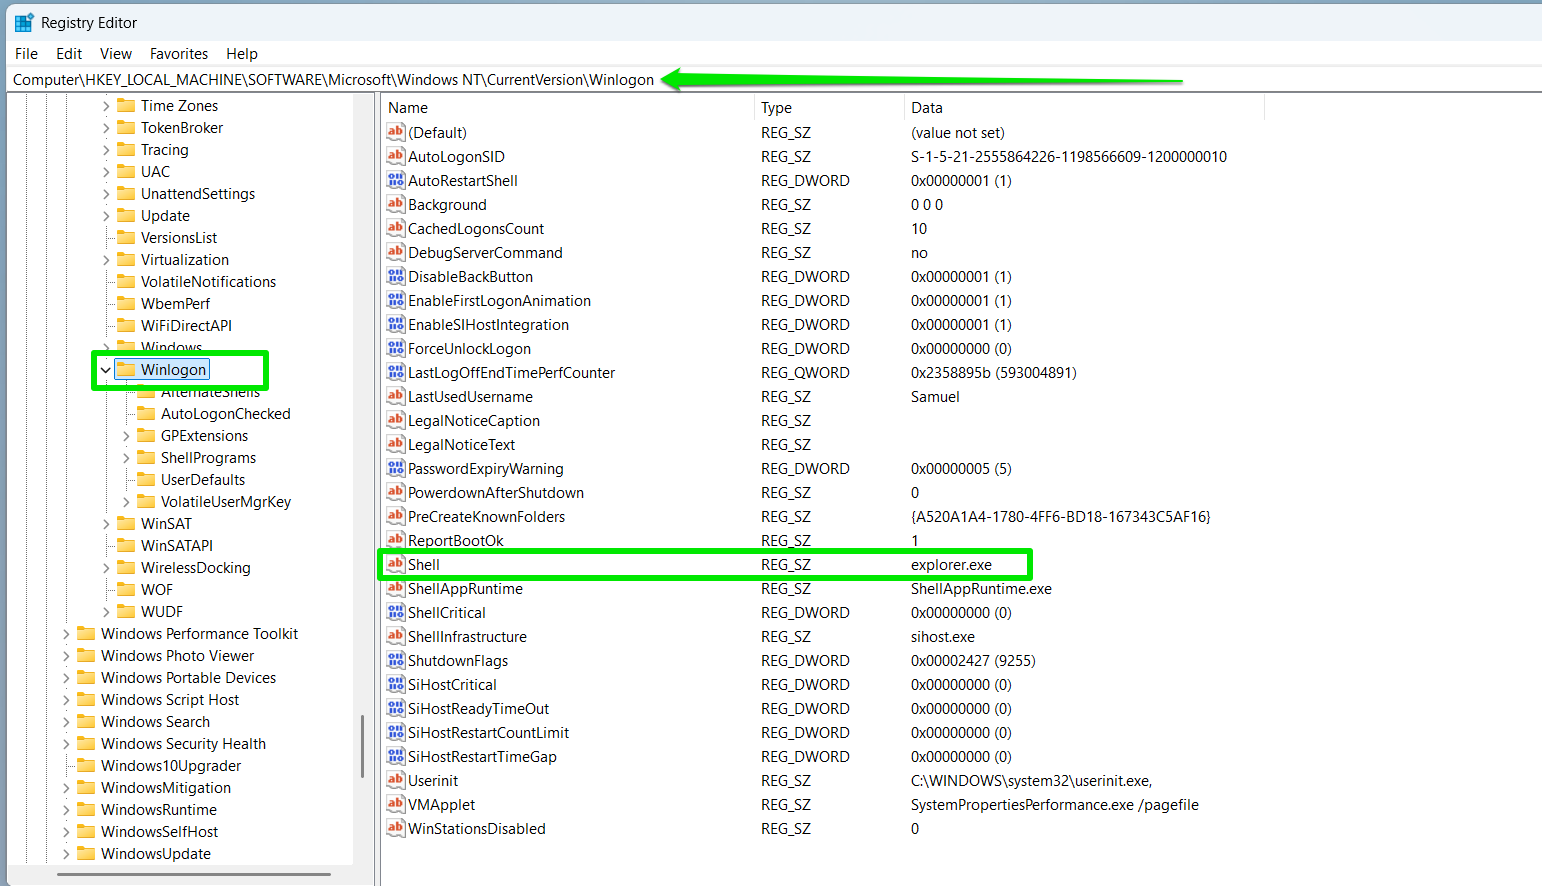
- After the Registry Editor window appears, go to the left pane and navigate to:
Computer\HKEY_LOCAL_MACHINE\SOFTWARE\Microsoft\Windows NT\CurrentVersion\Winlogon
- Select the Winlogon key, go to the right side of the window, and locate the Shell string.
- Ensure the Shell string’s Data entry is explorer.exe.
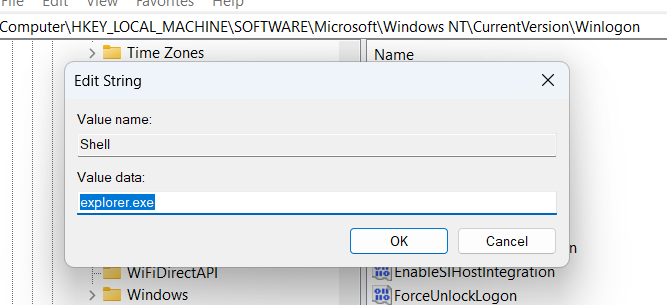
- If it isn’t, double-click Shell , type explorer.exe in the Value data field, and click OK .
- Restart your computer and check if you still see a blank black screen after login.
Method 4: Fix system files
Malfunctioning and missing system files can also trigger a black screen after you log into your computer. You can run the DISM and SFC commands, as shown earlier, to resolve the problem.
Method 5: Uninstall conflicting applications and recent updates
Buggy Windows updates and conflicting apps are other causes of the post-login black screen problem. So, just as you did in Safe Mode, you can go through the Control Panel to remove apps and previous updates.
Selecting View installed updates in Windows 11 redirects you to the Windows Update page in the Settings app.
You may have to go through the Advanced Startup environment to remove recent updates if you face the black screen right after logging in. You can use the forced reboots to get into the repair environment. However, you can also press Ctrl + Alt + Del, click the power icon, hold your Shift key, and click Restart .
Method 6: Create a new user profile
User profiles can become corrupted due to improper shutdowns, system crashes, faulty updates and installations, file system errors, registry issues , and malware infections. The corruption can then cause you to see a blank or black screen whenever you log into your account because Windows may be unable to load essential apps and services like explorer.exe and other shell components. Resolving the issue involves creating a new user profile . Follow these steps:
- Log into a different user account with administrative privileges or try entering your computer through Safe Mode .
Note
If you still can’t access your user profile, consider activating Windows’ hidden administrator account through the Command Prompt window in the Advanced Startup environment. Type net user administrator /active: yes and hit the Enter key.
- Press
Windows + I to open the Settings window.
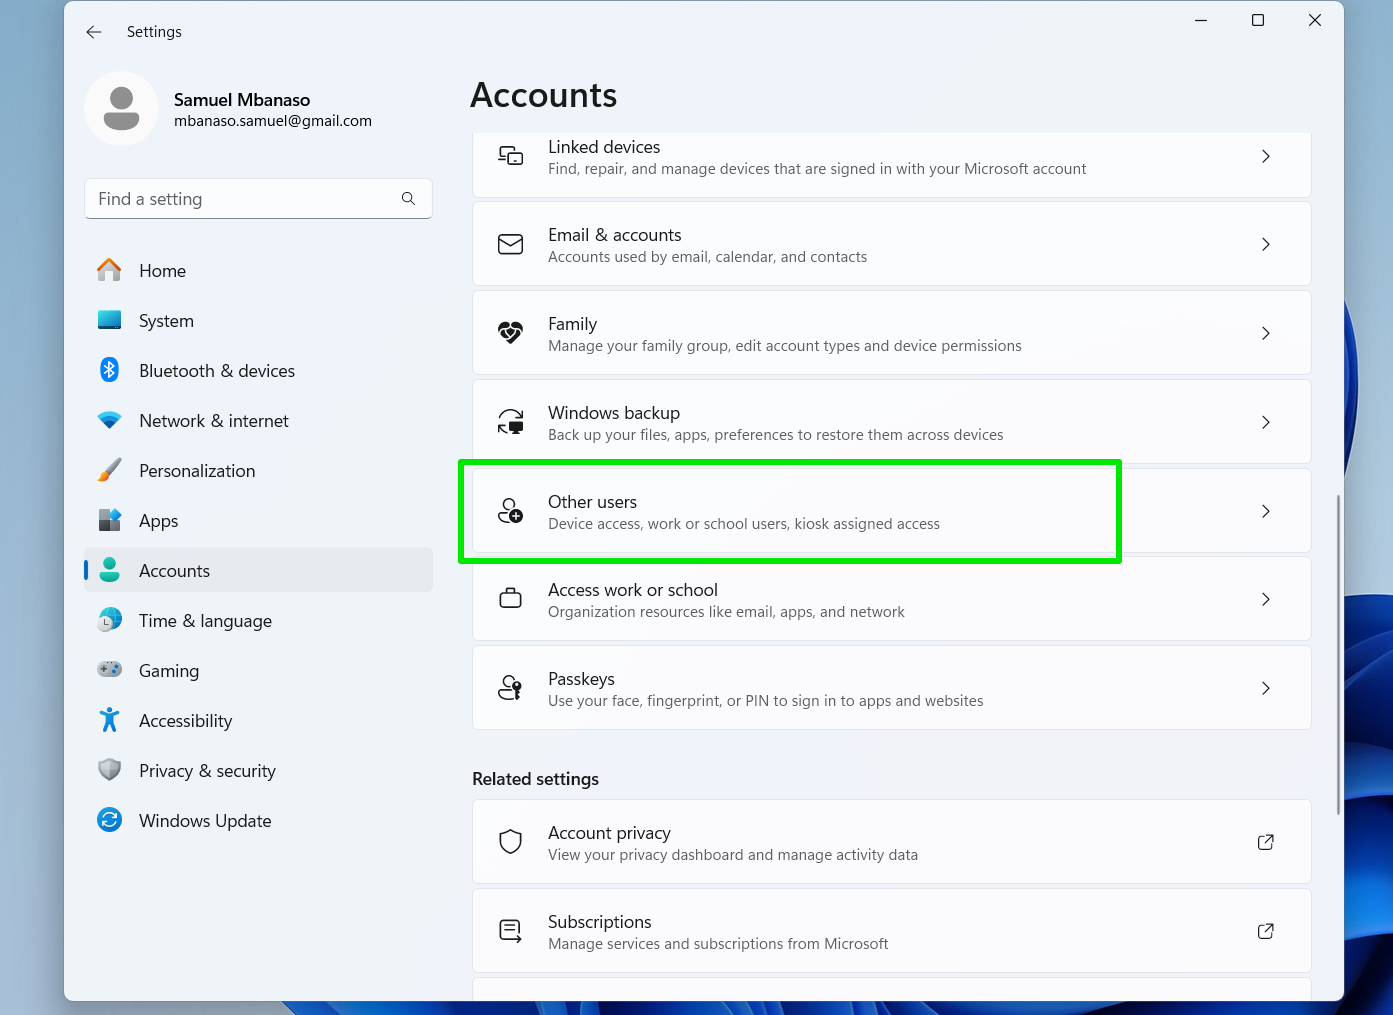
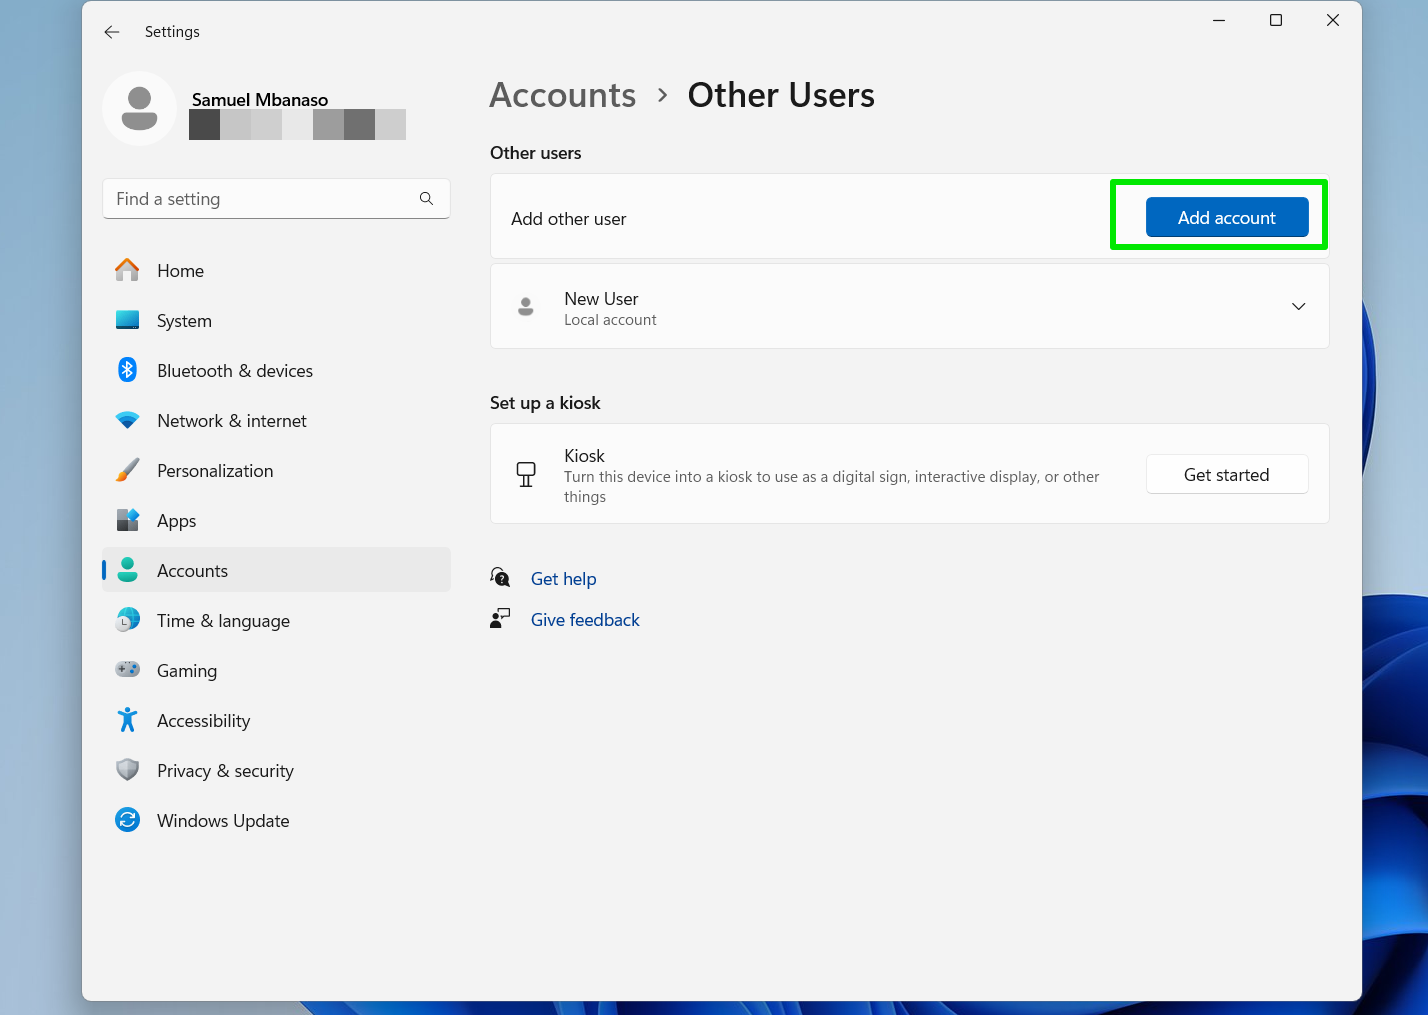
- Click Accounts and select Other users.
- When the Other users page opens, click Add someone else to this PC if you’re on Windows 10 or select Add account if you’re on Windows 11.
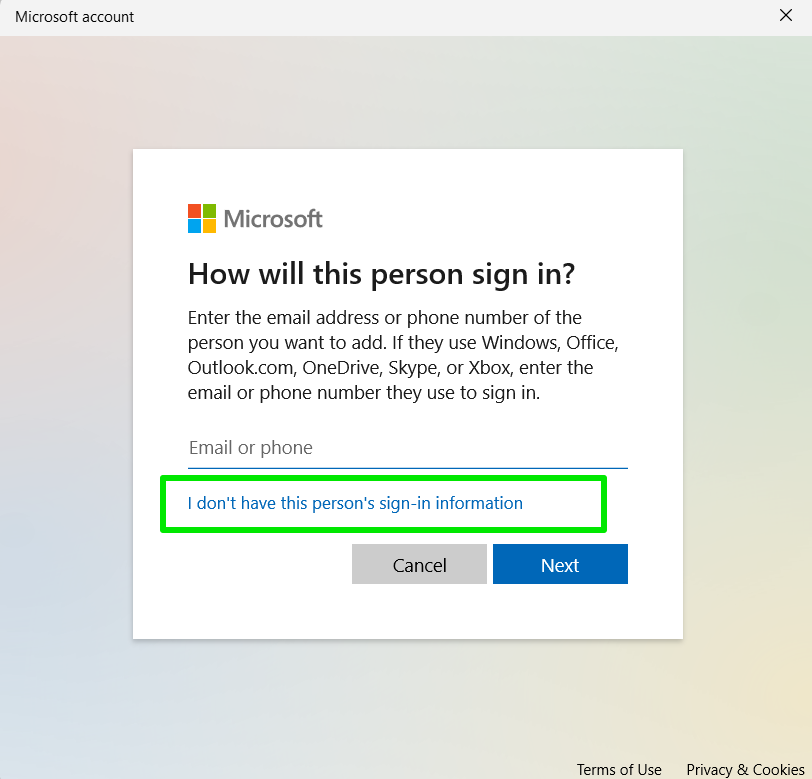
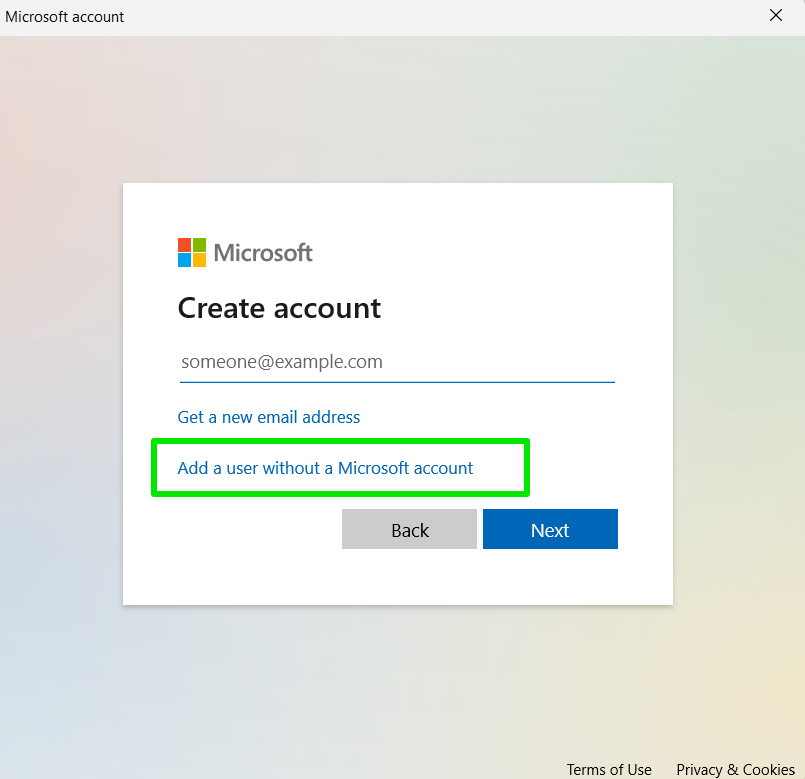
- In Windows 10, you will be required to add a username. The password is optional but recommended. However, the Windows 11 setup page typically asks you to log in using a Microsoft account. If you want to use a local account instead, select I don’t have this person’s sign-in information and click Add a user without a Microsoft account on the next page.
- Follow the subsequent prompts to create the account.
- Restart your computer and log in using the new account to check if the issue has been resolved.
If this method fixes the problem, go to the Settings page, select Accounts > Other users , click the new profile you created, and select Change account type . Select Administrator and click OK.
You should also delete the account that is causing the black screen problem.
Method 7: Install a new graphics driver
A new graphics card driver could solve the black screen issue if other fixes have failed. Since your graphics card is responsible for your computer’s display, its faulty driver could be the reason you keep dealing with this problem.
Uninstalling the current driver and replacing it with the latest version can be the answer. Start by downloading the driver from your video card manufacturer’s website. Now, follow these steps for the uninstallation:
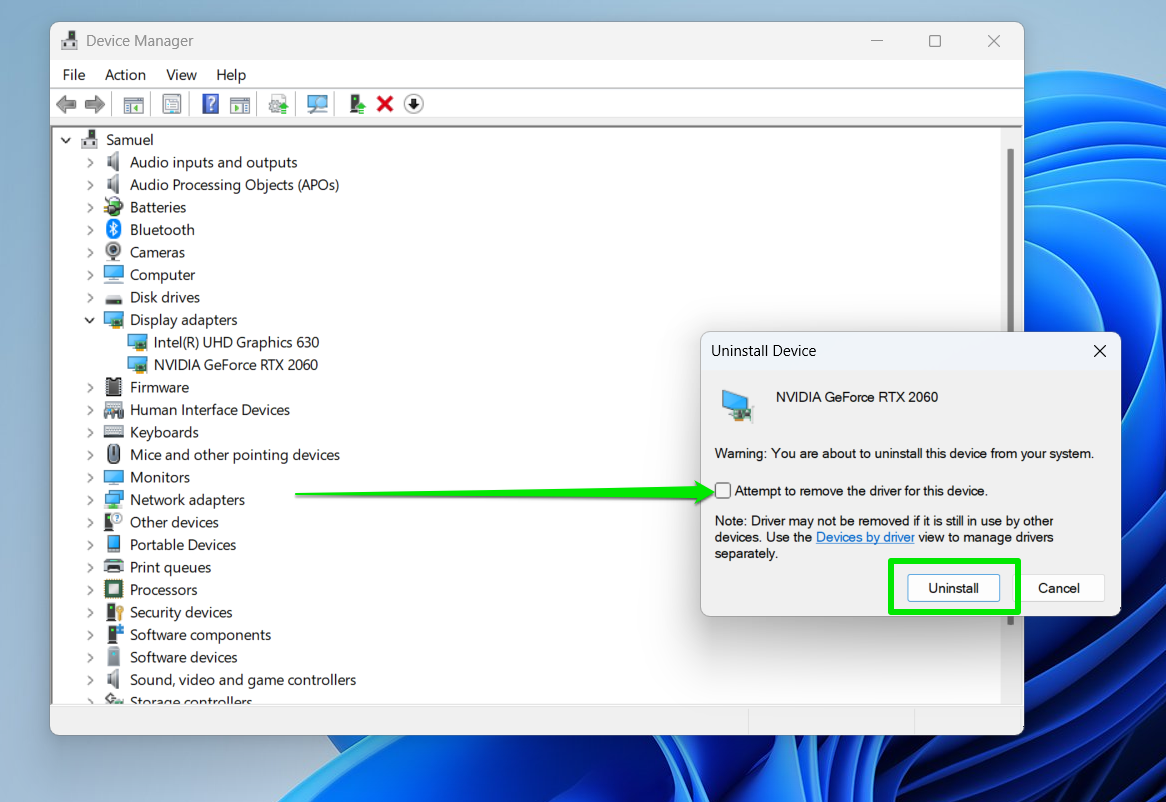
- Launch the Device Manager (right-click the Start button and click Device Manager ).
- Expand Display adapters .
- Right-click your graphics card and select Uninstall device.
- Select Attempt to remove the driver for this device and click Uninstall .
- You can now install the driver you downloaded.
Long-Term Tips to Prevent Black Screens on Windows 10/11
Black screen problems are preventable. For example, disabling Fast Startup is both an immediate and long-term fix. However, there are other things you can do to further reduce the risk of seeing such an issue in the future.
Tip 1: Shut down your computer properly
Abrupt shutdowns can affect system files, drivers, and applications and cause the black screen issue. Even if you want to keep your system turned on for long periods, make sure it is connected to backup power in case the grid fails or fluctuates.
If you use a laptop, properly shut it down to avoid battery death if you want to work for long periods.
Tip 2: Use trustworthy third-party PC maintenance tools
Maintenance tools help you remove temporary and junk files, broken registry entries, and corrupt applications that can cause issues down the line. While these utilities are helpful, some are more trustworthy than others.
So, research the best PC optimization tools , registry cleaners , and uninstallers to identify and pick apps developed by trusted software companies.
Download Auslogics BoostSpeed
Your one-stop PC maintenance and optimization tool, this program will clean, speed up, repair, and tweak your system to ensure maximum speed and efficiency.
Tip 3: Update Windows and drivers regularly
We’ ve long established that corrupt and outdated drivers are among the common causes of the black screen problem. Thus, keeping every device driver on your computer updated can help you avoid the issue.
You can use the following tools to automatically download and install new updates when they become available:
This is crucial because tracking driver updates for every single device can be too time-consuming and almost impossible to pull off.
Auslogics Driver Updater is one of the few reliable programs that updates all your device drivers. Tools from Intel,
NVIDIA , and
AMD mostly focus on manufacturer devices. However, you can also use your OEM’s dedicated program to download and install drivers.
Tip 4: Keep malware away
You don’t have to wait until malware wreaks havoc on your computer to act. You can run full scans using Windows’ antivirus tool or other third-party security applications to get rid of virus infections . Avoid downloading applications and files from websites you don’t trust. You should also be careful about the external hard drives you connect to your computer.
Tip 5: Prevent overheating
Overheating
internal components can easily turn your laptop screen black, just like they can cause a world of other problems for both notebooks and desktops. You can prevent that from happening by performing regular maintenance, such as:
- Getting rid of dust that blocks fans and exhaust pipes
- Reapplying thermal paste once in a while
- Cleaning your cooling system
- Using PC optimization software
You should also avoid overclocking your computer (especially laptops) to voltages beyond your system’s cooling capabilities.
Fixing the Black Screen of Death on Windows Computers
The black screen issue does not signal your computer’ s end, except in rare circumstances when your CPU fails. Even then, you can replace the component. Remember to take preventive measures after resolving the problem this time. Many other underlying glitches and oversights can cause the issue to recur and lead to more serious Windows problems.
Let us know how you resolved the issue in the comments.
FAQ
In some cases, yes. Virus infection can affect system files and apps, third-party apps, and device drivers to trigger the black screen.
In most situations, it is a simple glitch that can be resolved by restarting your computer, properly connecting display cables, reinitializing your graphics, restarting Windows Explorer, and uninstalling certain applications and updates. However, in severe cases, you may have to reset Windows.
Random black screens are usually symptoms of graphics card driver issues, app conflicts, overheating, faulty system files, power supply problems, system settings misconfigurations, and malware.
Contact your system manufacturer for support. If your warranty is still active, you may receive a replacement once the problem is tied to a faulty hardware component.