Onedrive does a good job when it comes to cloud storage. However, some users have found it somewhat intrusive —you could say it takes the job too seriously. For some users, uploading to the cloud without asking seems a little too intrusive. And to add salt to injury, if you exhaust its free storage, you may start to see funny error messages. If you’ve been seeing those annoying red caution signs on your folders or if OneDrive is affecting your PC’s performance, maybe it’s time to part ways. As you will see later in this article, simply uninstalling the app might not be the best method to turn off OneDrive . So what should you do instead? Read on to find out!
What Is OneDrive?
Before you learn how to disable OneDrive on Windows 10 or 11, let’s quickly talk about OneDrive itself.
Microsoft developed OneDrive as far back as 2007 to help users keep files and data safely secured in the cloud. Think of it as your personal online hard drive where you can keep all sorts of stuff—documents, photos, videos, you name it.
Once you save your files in OneDrive, you can access them from pretty much anywhere, whether you are holding your phone or busy on your work computer, but only as long as the device is connected to the Internet .
In addition, OneDrive comes with the following benefits:
- Collaboration: Share files and collaborate in real time with others, making teamwork seamless.
- Security: Benefit from encryption and advanced security features to protect your files from unauthorized access.
- Integration: OneDrive seamlessly integrates with Microsoft Office and other tools, enhancing productivity.
It is important to note that disabling or uninstalling OneDrive means that any changes made to your files locally may not sync to the cloud, potentially causing data loss. You might also lose the ability to share and collaborate on files stored in OneDrive. Also, files that rely on OneDrive for backup will no longer be backed up automatically.
If you are cool with these, let’s move on to the main thing: how to disable OneDrive on Windows 11 or 10 .
How to Disable OneDrive on Windows 10 and 11
When you disable OneDrive on Windows 10/11 , you stop the program from running in the background and using system resources while still keeping the software on your PC. This can improve your computer’s performance and reduce unwanted notifications. Plus, who knows—you can switch it on once more should your opinion change later. The following are options on how to turn off OneDrive :
Method 1: Disable OneDrive via Settings
- Look for a cloud icon in your taskbar at the bottom-right corner of your screen. If you don’t see it, you should click on the arrow to show hidden icons.
- Right-click on the OneDrive icon, then select Settings from the menu that pops up.
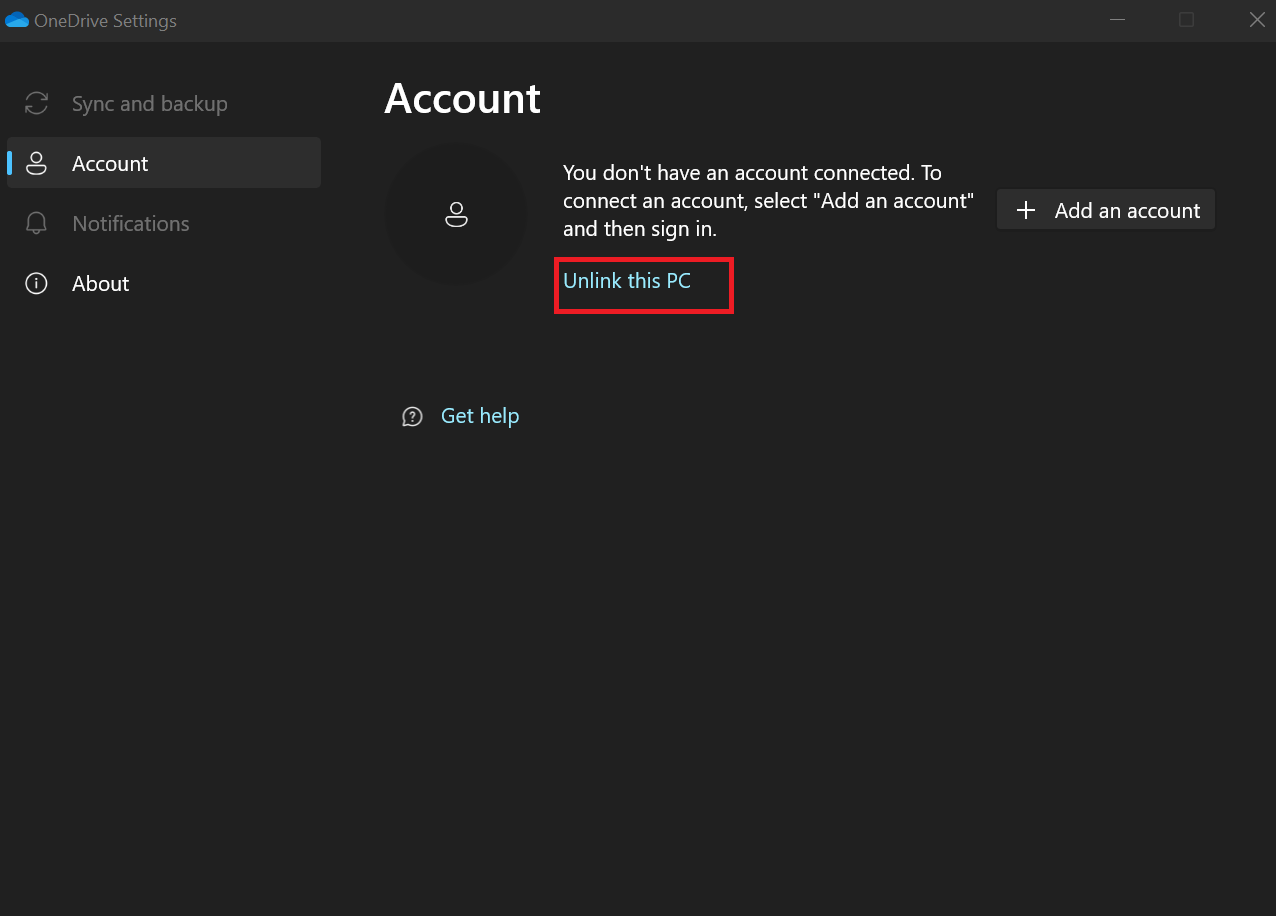
- In the OneDrive Settings window, click on the Account tab. This is where you can manage the accounts linked to OneDrive.
- You’ll see a button that says, “Unlink this PC.” Click on it. This action will stop OneDrive from syncing files with your computer.
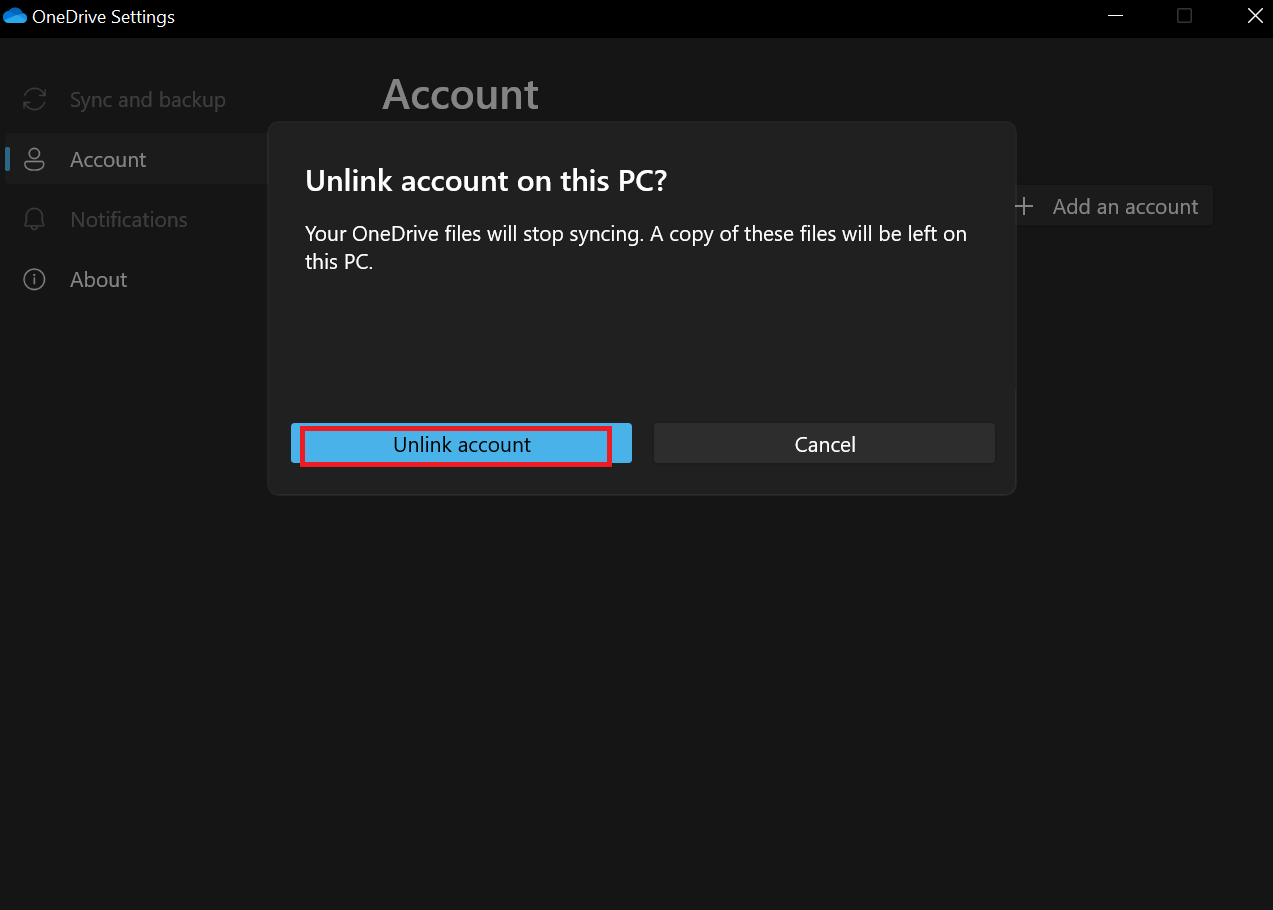
- A prompt will ask you if you’re sure you want to unlink your account. Click Unlink account.
If you did this correctly, you should see a popup window requesting you to enter your email address to sign in to OneDrive. Simply close the window, and that’s it!
Method 2: Disable OneDrive using the Group Policy Editor
You can also use the Group Policy Editor to disable OneDrive on Windows 10/11:
The Group Policy Editor is not available on Home editions of Windows. So if you don’t own the Professional or Enterprise edition, you can skip to the next method.
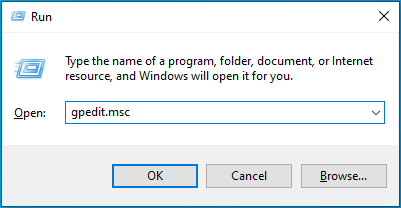
- Press
Windows + R on your keyboard to open the Run dialog box. Type “ gpedit.msc” and hit Enter to open the Group Policy Editor.
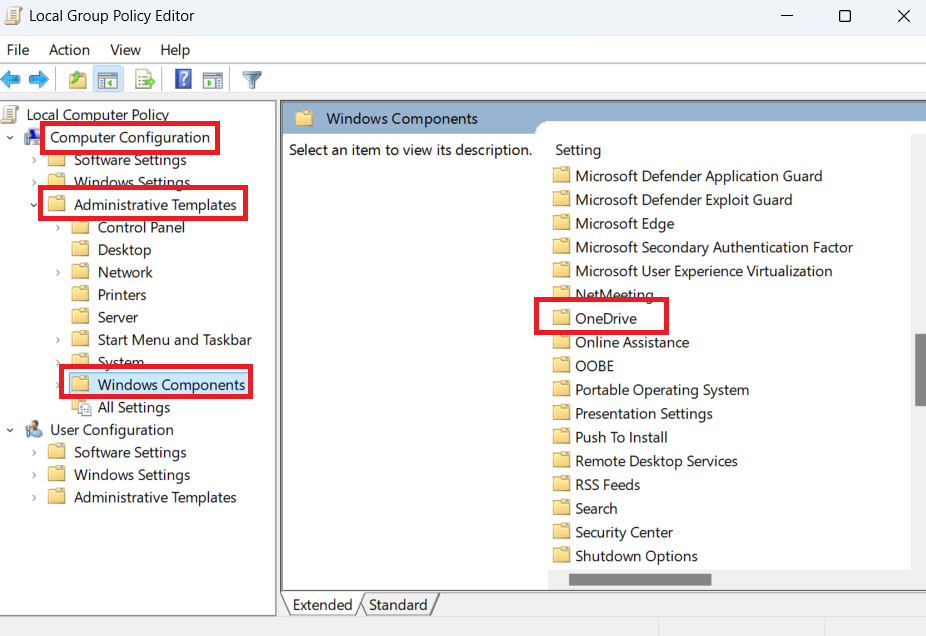
- In the Group Policy Editor, go to Computer Configuration > Administrative Templates > Windows Components. Then, double-click on OneDrive .
- On the right-hand side, look for a setting that says, “Prevent the usage of OneDrive for file storage.”
- Double-click on the Prevent the usage of OneDrive for file storage policy. In the window that pops up, select the Enabled option. Then click Apply and OK to save your changes.
- After you’ve changed the policy, restart your computer to apply the changes. If you did this correctly, OneDrive won’t appear in File Explorer or run in the background anymore.
Method 3: Turn off OneDrive via the Registry Editor
Another method (although risky) is to use the Registry Editor to turn off OneDrive.
Warning
Making incorrect changes to the registry keys can cause serious problems, such as application or system-wide errors like
BSODs , or even prevent Windows from booting properly. To avoid any issues, it’s crucial to
back up your registry files before proceeding.
If you decide to proceed, here are the steps:
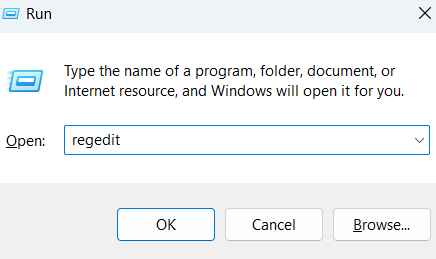
- Start by pressing the Windows and R keys to open the Run dialog box. In the field, type “Regedit” and press Enter. Click Yes if prompted by User Account Control.
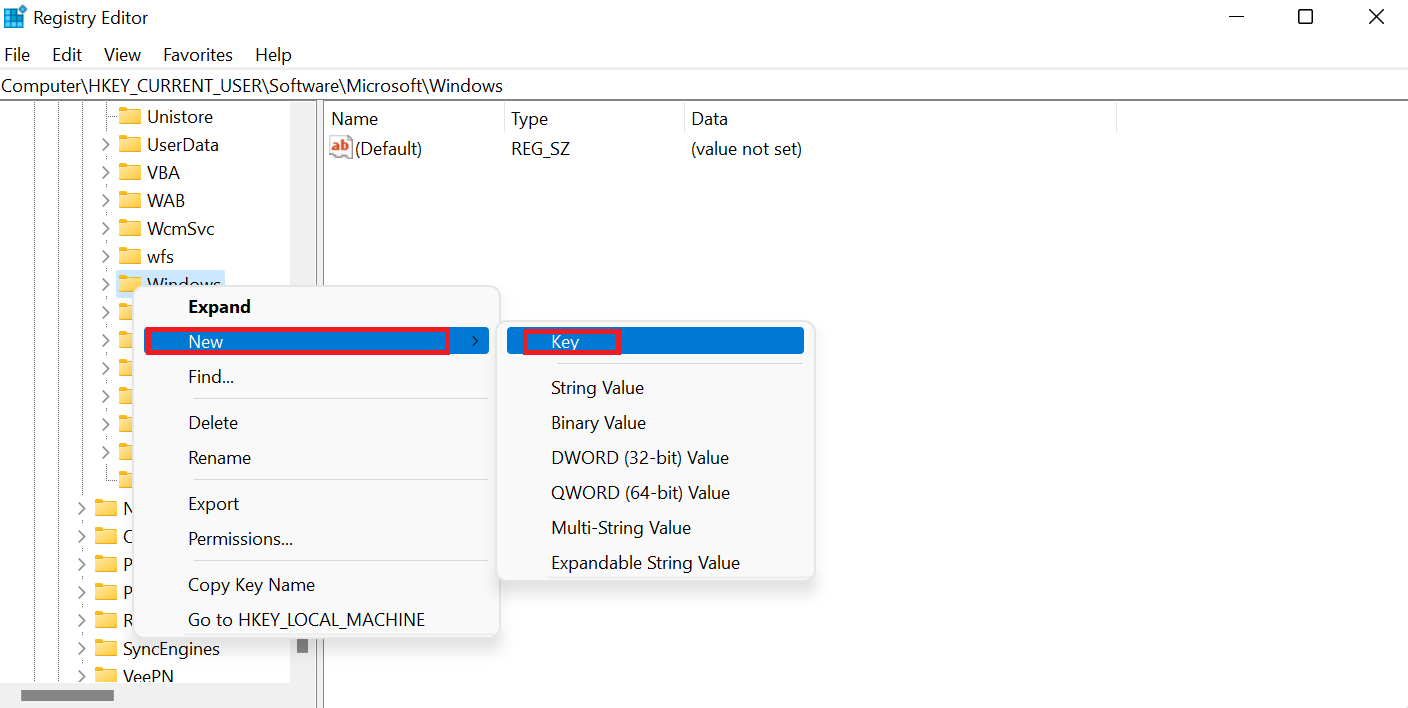
- Right-click on the Windows folder, select New > Key , and name it OneDrive.
- Rename it OneDrive.
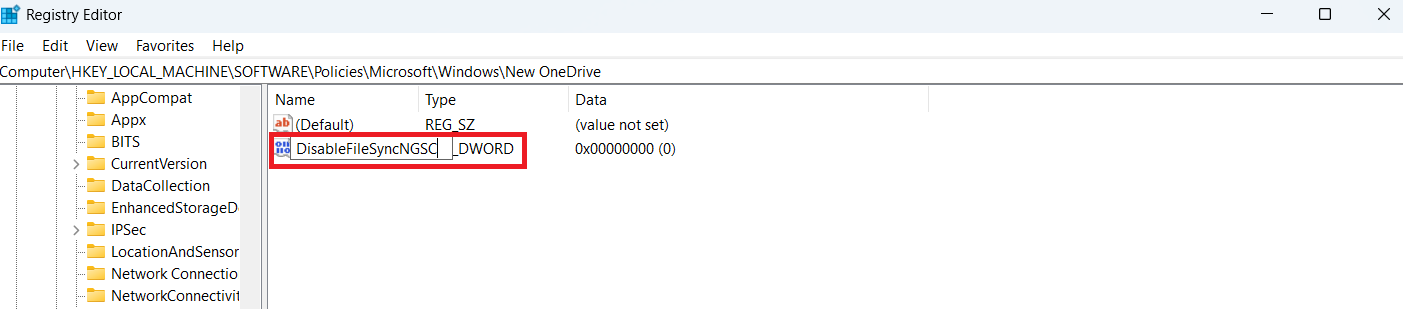
- Next, right-click on the new OneDrive key, select New > DWORD (32-bit) Value, and name it DisableFileSyncNGSC.
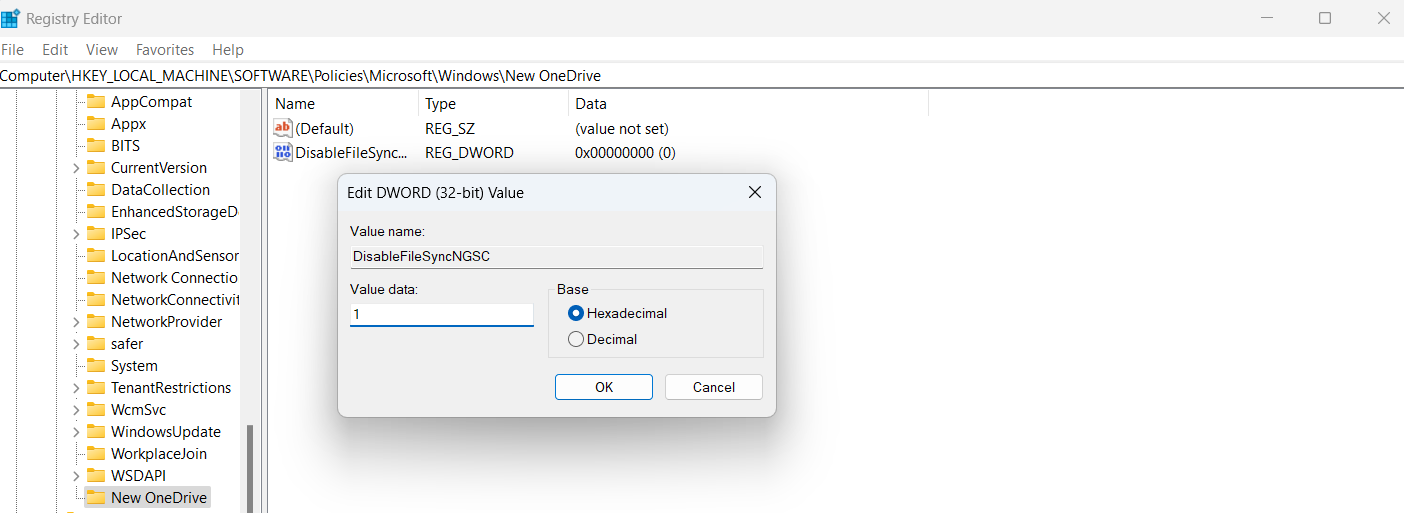
- Double-click on DisableFileSyncNGSC and set its value to 1 . Click OK to save the changes.
- To apply the changes, restart your computer. This will disable OneDrive and prevent it from running or syncing files.
Method 4: Disable OneDrive from startup
If you simply want to stop OneDrive from launching automatically when you start your computer, you can disable it from startup:
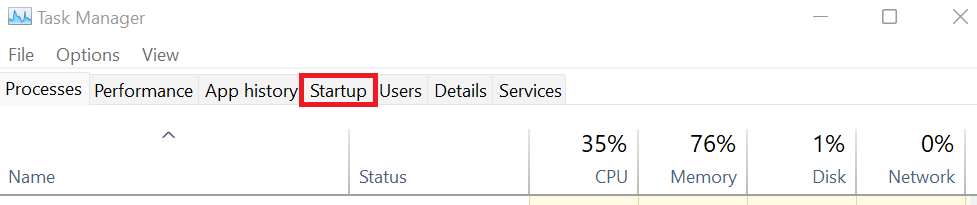
- Right-click on the taskbar and select Task Manager , or press
Ctrl + Shift + Esc on your keyboard.
- In Task Manager, click on the Startup tab. This shows you a list of programs that start automatically when you boot up your computer.
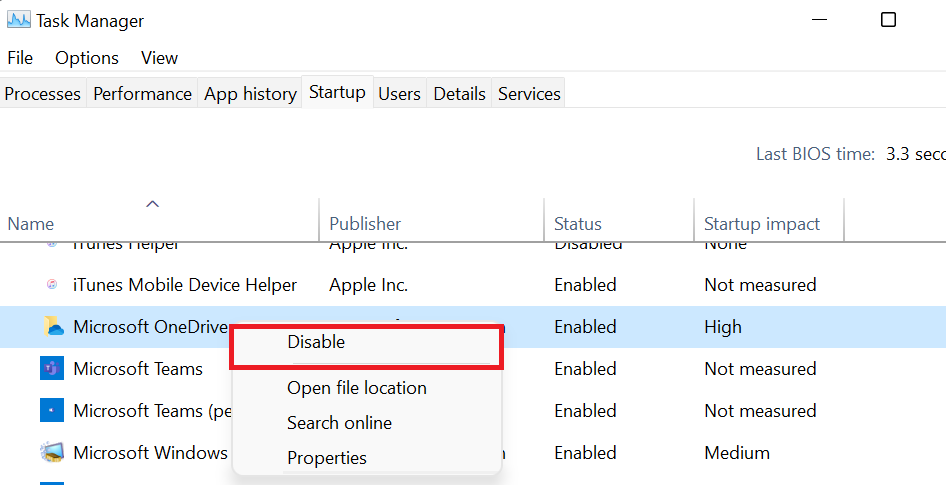
- Scroll through the list to find Microsoft OneDrive .
- Right-click on Microsoft OneDrive and select Disable from the context menu.
This step stops OneDrive from starting automatically when you turn on your computer, but you can still use it manually whenever you need it.
PRO TIP
There is a better way to disable OneDrive or any other app from starting at startup, and that is by using
Auslogics BoostSpeed. This program works as an all-in-one tool: you can stop the app from launching at startup or remove it completely, leaving no residual files that typically clutter your storage and affect both disk space and PC performance.
Best of all, it helps you clean up your PC and maintain it automatically.
How to Uninstall OneDrive from Windows 10/11
If you are tired of OneDrive, you can remove it totally from your computer. Like disabling it, uninstalling will stop it from syncing your files. In addition, you free up some system resources and declutter your system—that’s if you are sure you don’t need its cloud storage services anymore.
Method 1: Use third-party software
Note
Unlike what most people think,
uninstalling a program (especially from Microsoft) will not totally remove such a program from your PC. Often, leftover files, folders, and registry entries remain on your computer, which can take up space and sometimes cause conflicts.
For your OneDrive uninstall, you could go on a manual hunt-and-delete mission for leftover files and registry entries. However, to be honest—that’s going to take you a lot of time. Plus, there’s a huge risk of accidentally deleting something important if you’re not careful.
That’s where tools like Auslogics BoostSpeed’s Uninstall Manager come in handy. The tool helps you get rid of OneDrive; it also sweeps up after it. So, you don’t have to worry about getting rid of those leftover files and registry entries.
Using Auslogics BoostSpeed’s Uninstall Manager is pretty straightforward:
- Download Auslogics BoostSpeed .
- Follow the prompts to install the app.
- Next, proceed to open the app. While opening the app, you might get administrator permission warnings. Accept them and proceed.
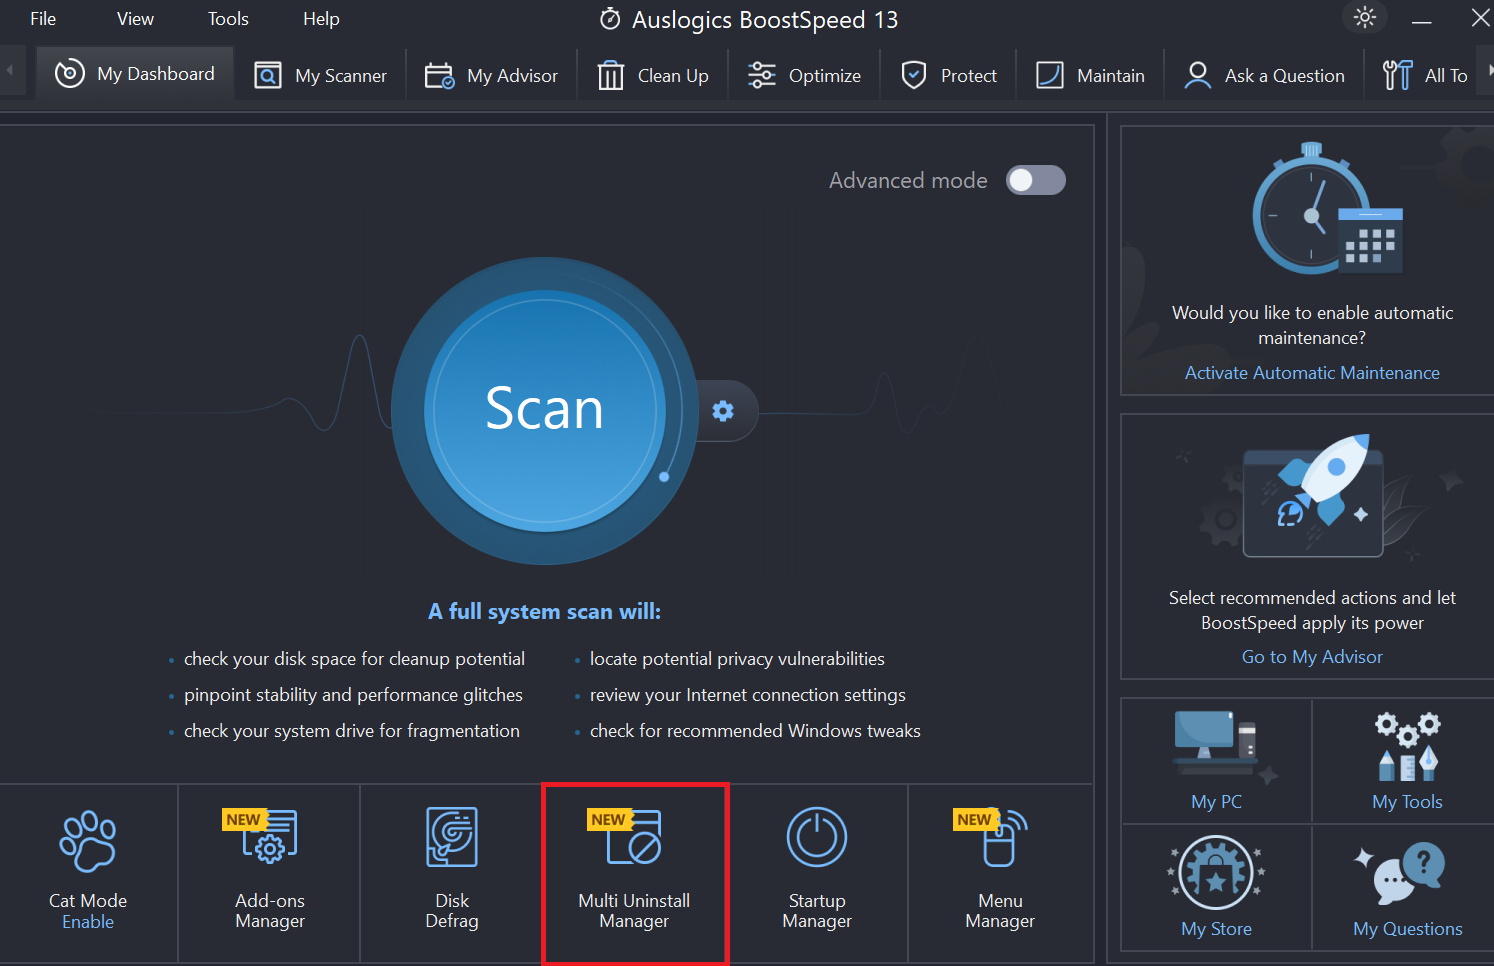
- Navigate to the bottom of the screen and find Multi Uninstall Manager. Click on it; you will see a list of installed applications on your PC.
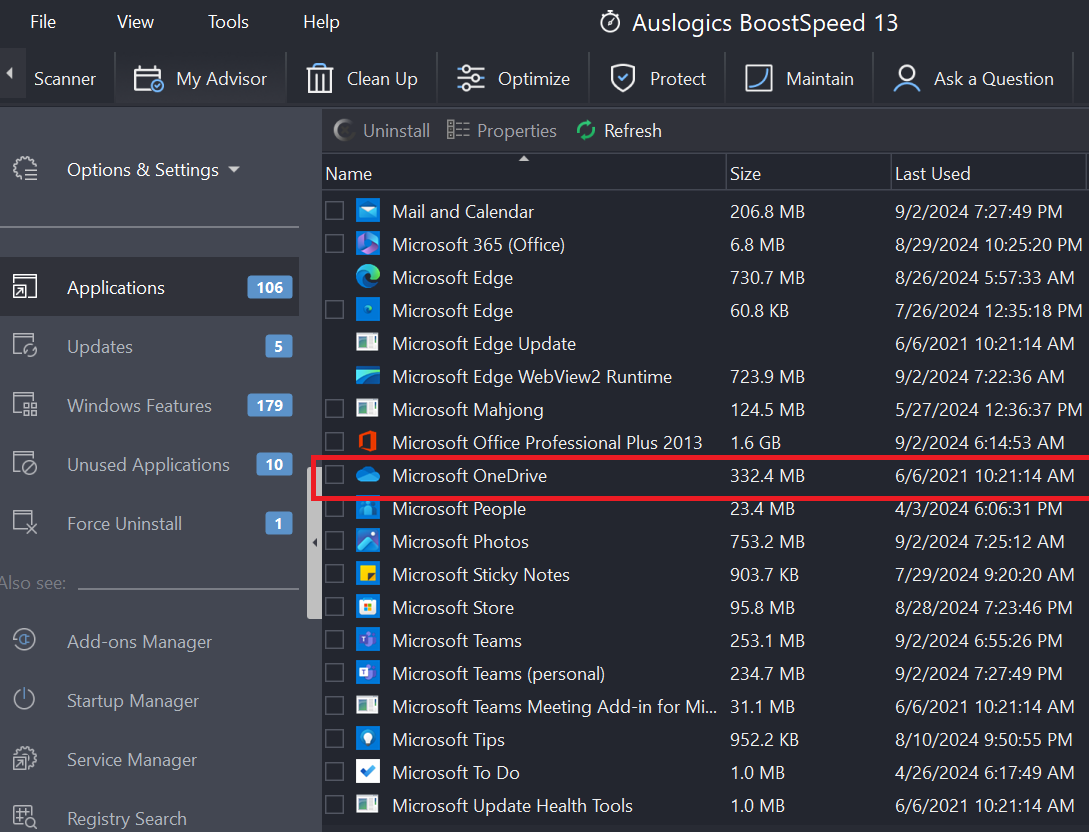
- Find Microsoft OneDrive in the list and select it. Click to uninstall, and the tool does the rest—removing OneDrive and doing a thorough clean-up.
PRO TIP
Auslogics BoostSpeed does more than deleting programs and apps. It can also delete temporary files, old Windows Update files, duplicate files, and even optimize your hard drive and SSD for better performance!
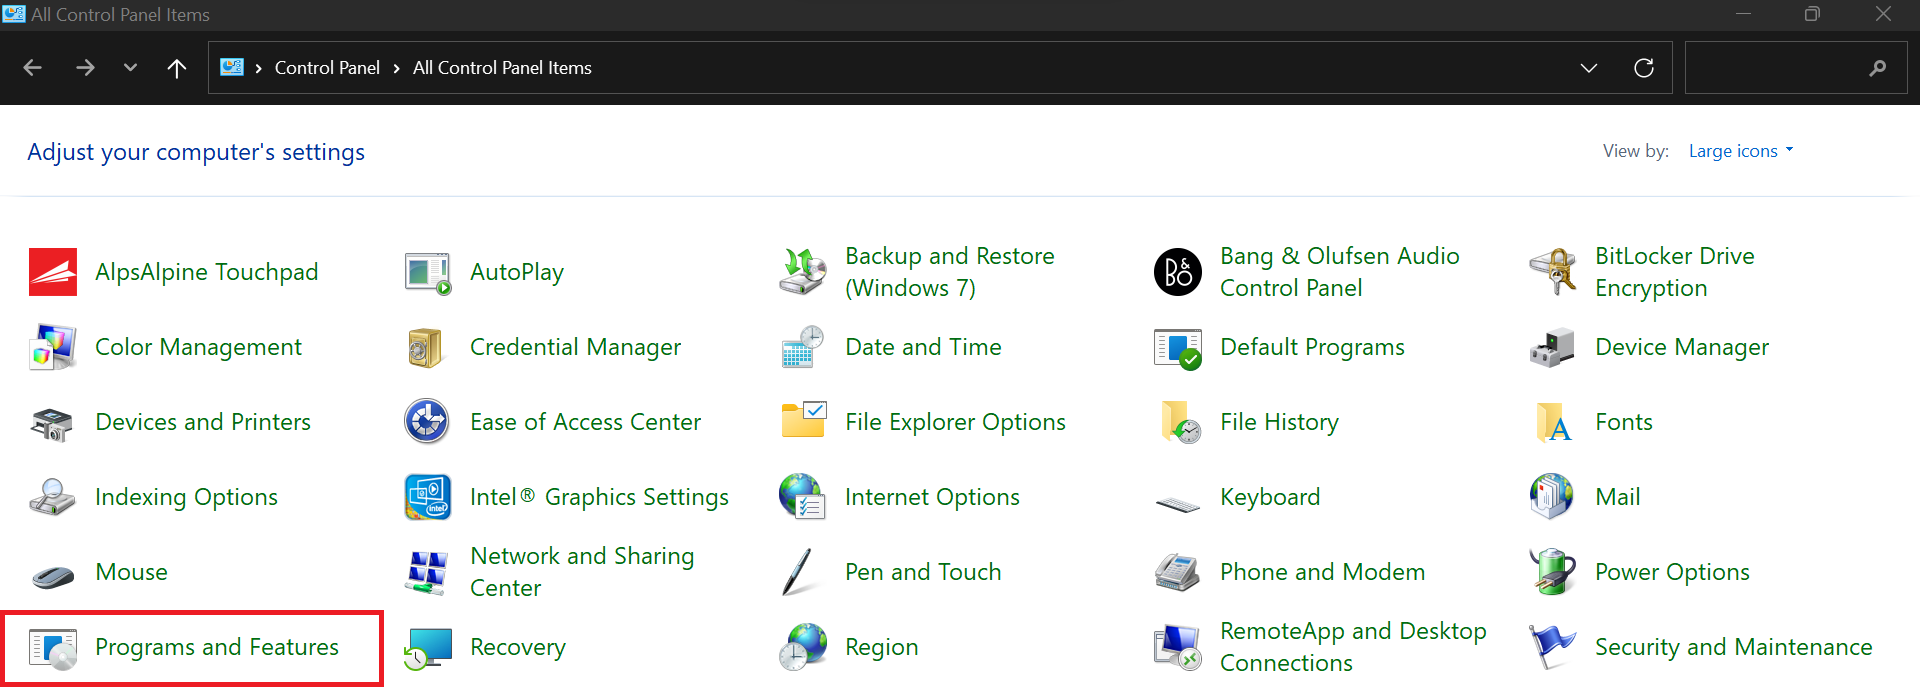
Method 2: Use the Control Panel
Uninstalling OneDrive using the Control Panel is another straightforward method:
- You can do this by typing “Control Panel” in the search box next to the Start menu and clicking on the app.
- In the Control Panel, click on Programs, then select Programs and Features.
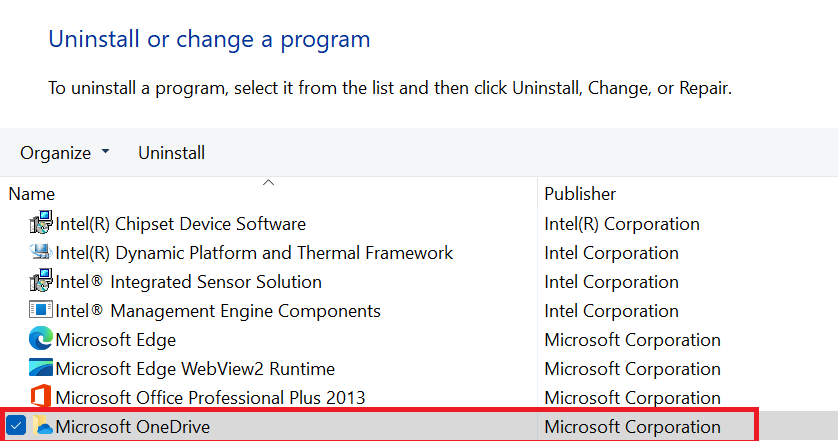
- Scroll down until you see Microsoft OneDrive in the list of installed programs.
- Click on Microsoft OneDrive to select it, then click the Uninstall button at the top of the list. Follow the on-screen instructions to complete the process.
You can use the Control Panel to remove programs from your system, but it still retains leftovers. And this can take up space over time. The best way to fix this is to use
PC cleaners , like Auslogics BoostSpeed.
Method 3: Use the Settings app
The Settings app provides another easy way to uninstall OneDrive:
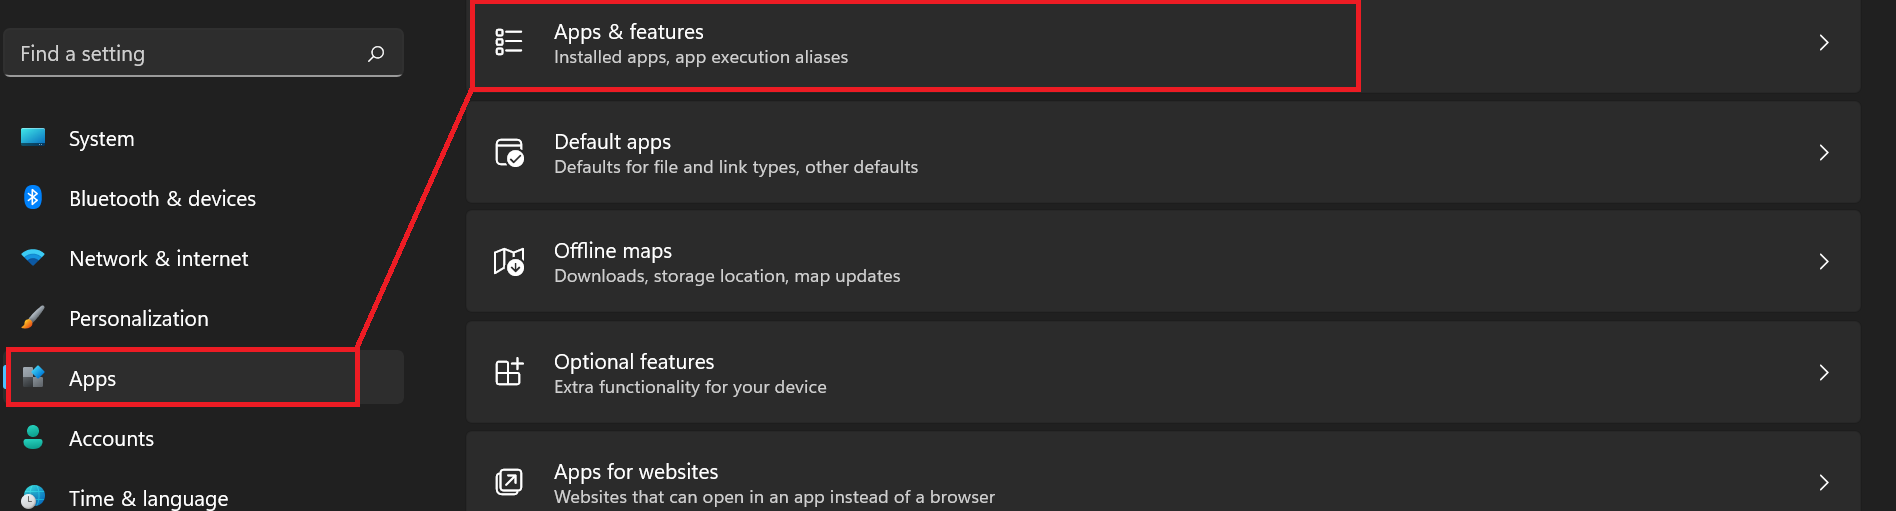
- Click on the Start menu, then click on the gear icon to open the Settings app.
- In the Settings window, click on Apps. This will take you to the Apps & features section.
- Scroll through the list or use the search bar to find Microsoft OneDrive.
- Click on Microsoft OneDrive to expand it, then click the Uninstall button. Confirm any prompts to proceed with the uninstallation.
Download Auslogics BoostSpeed
Your one-stop PC maintenance and optimization tool, this program will clean, speed up, repair and tweak your system to ensure maximum speed and efficiency.
How to Disable OneDrive on Windows 10/11: Explained
As you move forward without OneDrive, you should check your files. Although it rarely happens, ensure your important files are where you want them to be.
Removing OneDrive does not mean you have reached the end of the road for cloud services. There are many alternatives available if you find you need cloud services in the future. And if you change your mind about OneDrive, you can always reinstall it later.
We’d love to hear from you if you have any better ways on how to disable OneDrive on Windows 11 or 10. Share your tips in the comments below.
FAQ
Go to Settings > System > Storage, and under More storage settings, select Change where new content is saved. From there, you can change the default save location from OneDrive to your local drive.
Uninstalling OneDrive won’t delete your files from the cloud—it will only stop syncing between your device and the cloud. The OneDrive folder on your PC will be deleted. But if you need the contents of the folder, you can access them via the OneDrive website.
Whether you should disable OneDrive on Windows 11 or 10 depends on your needs. However, disabling OneDrive on your computer will likely not lead to any problems. If you don't rely on OneDrive and you notice it affecting your PC’s performance, disabling it can be beneficial. If you use it for syncing and backup purposes, it’s better to keep it running.
![[Easy Guide] How to Disable OneDrive and Uninstall It Completely from Windows 10/11](https://www.auslogics.com/en/articles/wp-content/uploads/2024/09/Uninstall-OneDrive-568x359.png)