Every computer, no matter how powerful, will become slow at some point.
Your system can lag when switching between windows, become slow to start, or struggle to keep up with simple tasks. The key is knowing how to bring your PC back to life.
In this guide, I’ll show you how to speed up Windows 10 and 11 using tried-and-true methods I’ve used to boost my computer.
If you’re ready to improve your PC performance, let’s begin!
How to Speed Up Your Windows 10/11: First Tips to Apply
Tip 1: Use a PC cleaner and optimizer
Using a third-party app, such as PC cleaners, is one of the quickest ways to improve your PC’s overall performance. These apps typically offer all the necessary functions in one package and can usually speed up your PC almost automatically. You can choose from several options, including CCleaner, IObit Advanced SystemCare, or Auslogics BoostSpeed.
In this article, we will show you how to speed up a Windows 11 or 10 system using Auslogics BoostSpeed, one of the popular choices among users and trusted by many. Here are some features of BoostSpeed that can help boost the performance of your Windows:
- Junk file cleanup: BoostSpeed specializes in removing temporary files, cache, and logs to free up disk space.
- Drive optimization: You can optimize your hard drive, including solid-state drives, using BoostSpeed’s unique algorithm.
- Registry Cleaner: BoostSpeed cleans out corrupt or broken registry entries to prevent system glitches and improve stability.
- File defragmentation: The program reassembles fragmented files on your drive to help you access your data faster.
- Startup Manager: It identifies and disables unnecessary startup apps, which can speed up boot times.
- Duplicate File Finder: This tool scans your PC for duplicate files and removes them to save disk space.
Let’s take one of its features, Deep Disk Cleaner, and see how it cleans your PC , freeing up essential disk space for your Windows to perform more smoothly.
- First, download Auslogics BoostSpeed from the official website and install it.
- After launching the program, click on Tools, hover your mouse on Disk Tools, and select Deep Disk Cleaner.
- If it’s your first time, you’ll see an orange banner labeled Attention Required. You can click on Scan Now to start analyzing your system.
- After the scan, click on Clean up to delete the junk files.
- After the scan, you can click View detailed report to check everything BoostSpeed detected and eliminated.
- Before we move forward, have a quick look at this table to compare the main advantages of using third-party apps like BoostSpeed and built-in Windows methods:
| Feature |
BoostSpeed |
Windows’ built-in tools |
| Temporary file cleanup |
✅ Yes |
✅ Yes, via Storage Sense and Disk Cleanup |
| Registry cleanup |
✅ Yes |
❌ No built-in tool |
| Large and duplicate file removal |
✅ Yes |
❌ No built-in tool |
| Large and duplicate file removal |
✅ Yes, deep removal |
⚠️ Yes, via Windows Installer, but leaves residual files |
| Startup optimization |
✅ Yes, manages startup impact |
⚠️ Yes, via Task Manager, but manual |
| Scheduled cleanup |
✅ Yes, fully automated |
⚠️ Yes, via Storage Sense, but limited |
| Performance optimization |
✅ Yes, RAM & CPU optimization |
⚠️ Yes, via Task Manager and Performance Monitor, but manual |
| Defragmentation |
✅ Yes |
✅ Yes, via Defragment and Optimize Drivers |
If we sum it all up:
Windows provides tools for many of these tasks, but you need to apply them one by one, which takes time and effort. BoostSpeed or other PC cleaners offer an all-in-one, automated solution for deep cleaning, performance optimization, and maintenance.
Download Auslogics BoostSpeed
Your one-stop PC maintenance and optimization tool, this program will clean, speed up, repair and tweak your system to ensure maximum speed and efficiency.
Tip 2: Clean up your disk space
So obviously, over time, your computer accumulates different types of files and data that take up necessary space on your hard drive, such as temporary files, system cache, temporary internet files, Windows Update files, and more.
So if you do not want to use a third-party app to optimize disk storage, here’s the good news. Windows offers built-in solutions for cleaning up disk space on your PC.
First, there is Disk Cleanup
Disk Cleanup is a built-in tool in Windows 10 and 11 that frees up hard drive space by removing temporary files, system cache, and outdated installation data.
Running Disk Cleanup will help you maintain your computer and boost its performance.
Here’s how to run Disk Cleanup on your PC:
- Type disk cleanup in the search bar and click on the best match.
- Select the drive you want to clean up and click OK.
- Once the tool appears, you’ll see a list of temporary and cache files. Check the box beside the ones you want to clear and click on the OK button.
You can also click on Clean up system files to get rid of junk files created by the operating system.
As you can see, Disk Cleanup is quite handy at getting rid of unnecessary files on your PC—but it requires manual input.
Fortunately, Windows offers a way to automate the cleanup process by switching on a feature called Storage Sense.
What Is Storage Sense?
Storage Sense is an automated storage management feature in Windows 10 and 11 that helps users free up disk space by automatically deleting unnecessary files, such as temporary files, items in the Recycle Bin, and unused cloud content.
Here’s how to enable Storage Sense on your PC:
- Go to Settings > System > Storage.
- Toggle the switch to turn it on.
- You will then be able to customize what types of files you want to delete and how often this should happen.
Disk Cleanup and Storage Sense work together to manage disk space efficiently.
Disk Cleanup offers a manual approach, allowing users to carefully review and select specific files to delete—ideal for one-time, detailed cleanups.
In contrast, Storage Sense automates the process, running in the background to regularly remove temporary files and other clutter, helping maintain storage health over time without user intervention.
Tip 3: Keep Windows up to date
One of the most effective ways to speed up Windows 11 or 10 systems is to ensure that they have the latest updates. Updates from Microsoft include important security patches and performance improvements that can fix any issues slowing your PC down.
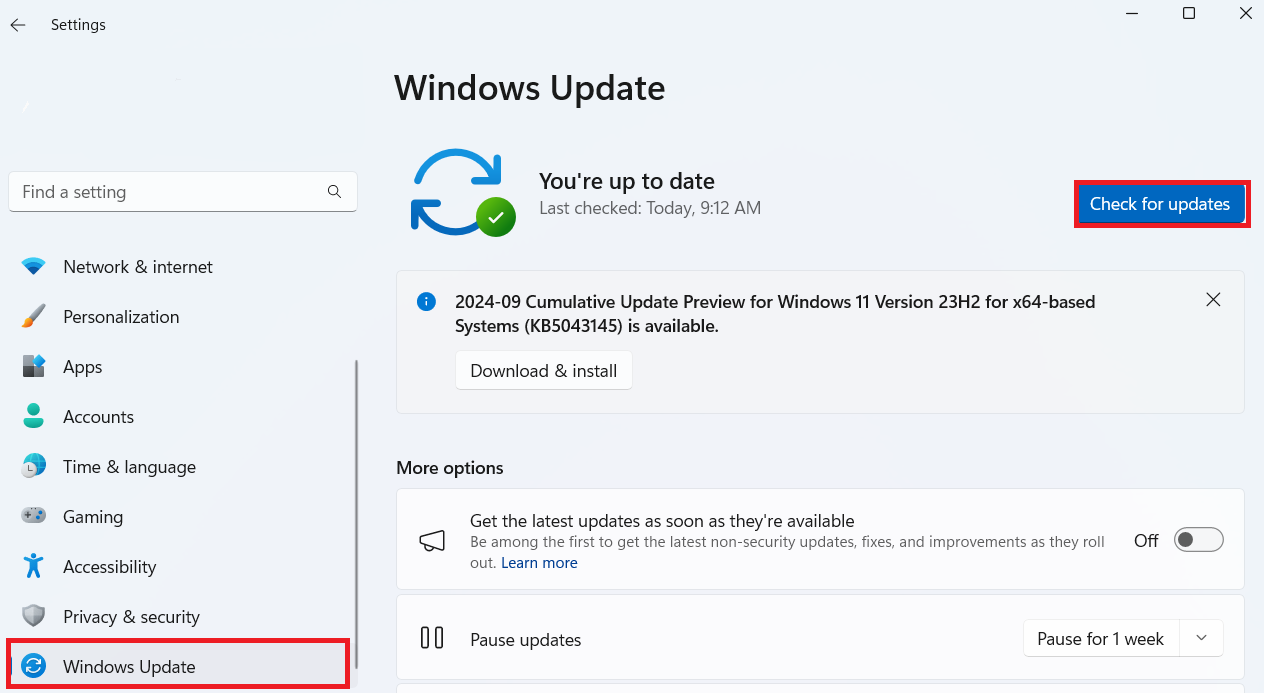
Here’s how to update Windows:
- Go to your Settings window by pressing
Windows + I.
- Scroll down and click on Windows Update. For Windows 10, go to Update & Security > Windows Update.
- Click on Check for updates , wait a bit to see if there are any, and if so, click Download & install to start the process.
Tip 4: Close background applications
Some apps run in the background and weigh your processor down. With a simple settings tweak, you can speed up your computer by disabling these apps and choosing which ones will run in the background. Follow the below steps:
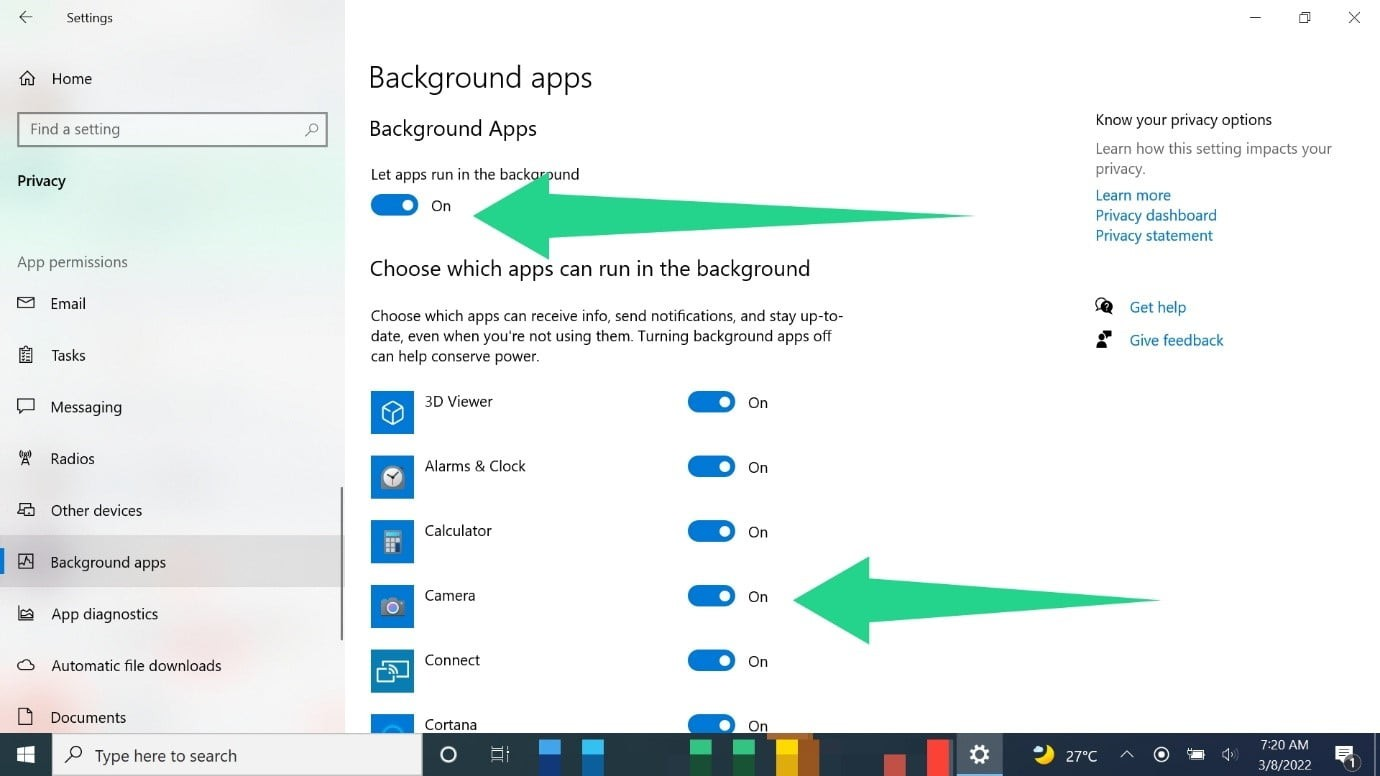
Windows 10
- Launch Settings, click on Privacy , and select Background apps.
- Next, go to the Background apps page and turn on the Let apps run in the background option.
- After that, go to Choose which apps can run in the background and turn individual apps on or off.
- You can quickly turn most applications off by toggling off the Let apps run in the background option.
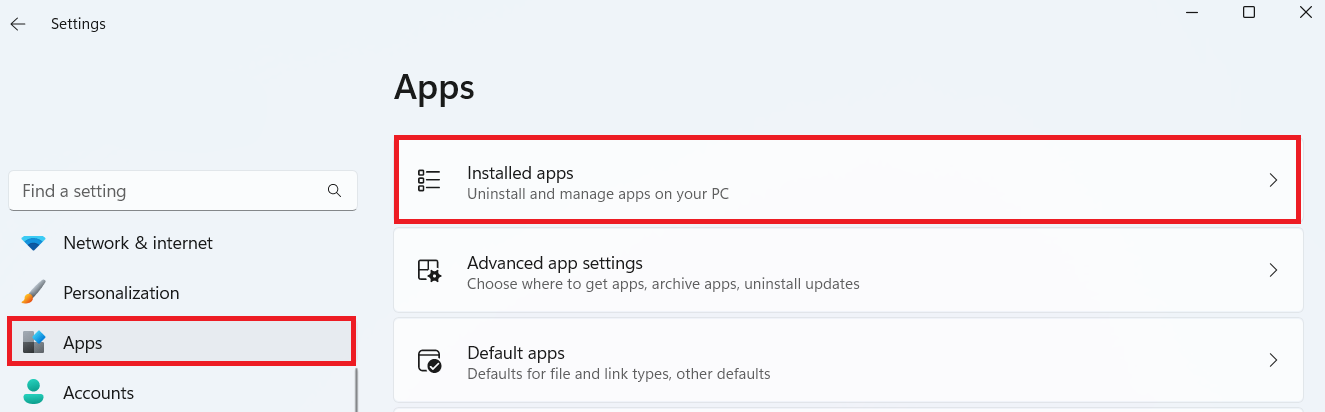
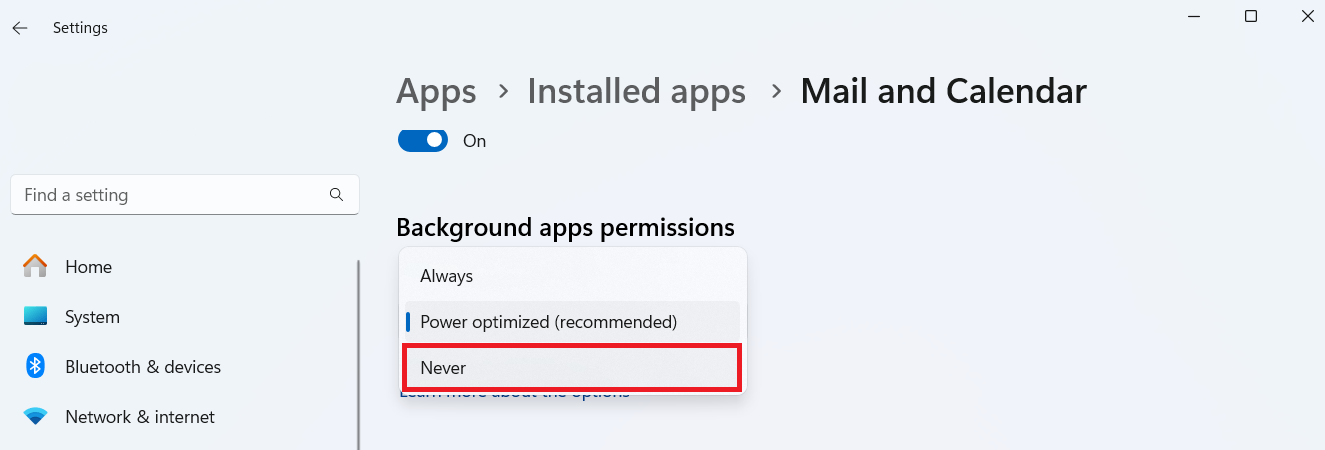
Windows 11
- Go to your Settings window by pressing
Windows + I.
- Click on Apps and select Installed apps.
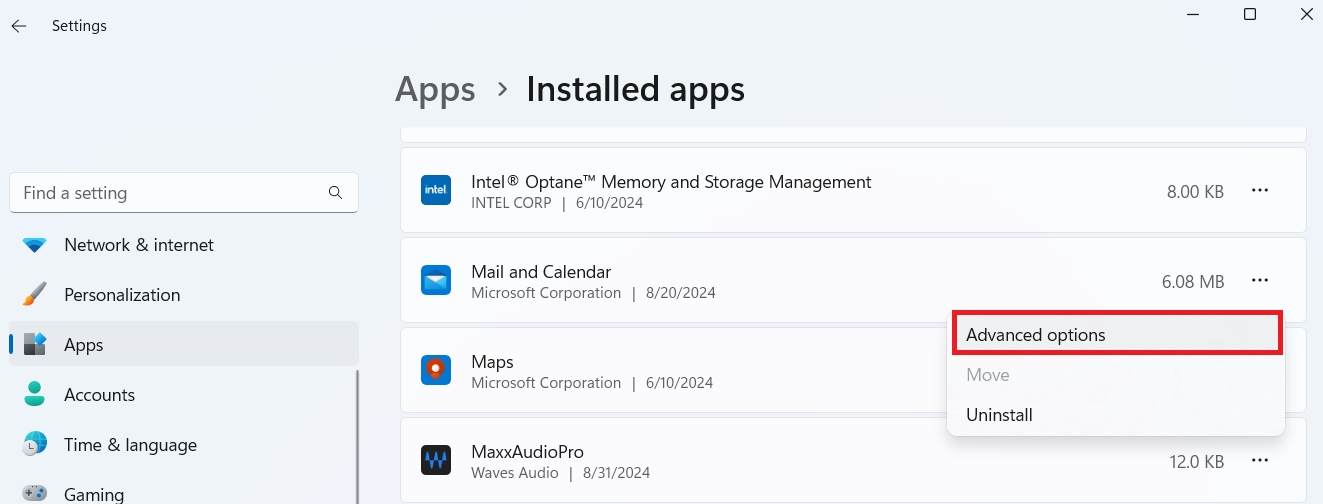
- Select the apps you don’t want running in the background, click on the three horizontal dots, and select Advanced options.
- Go down to Background apps permissions and select Never from the drop-down menu.
Tip 5: Use fewer browser tabs, if possible
Another way to speed up your Windows computer is to open fewer tabs on browsers, especially if you’re not using a high-end computer. Your PC loads these programs and every new web page to your RAM.
So, once your system’s memory begins to fill up due to many open tabs, you’ll start experiencing lags.
Keeping a few tabs open should reduce the strain on the RAM and boost your Windows speed.
Either way, you can clear your RAM if it’s full.
Also read: Hard Refresh Your Browser: Chrome, Firefox, Edge, and Safari
Tip 6: Disable startup apps
Some applications are designed to start running immediately after Windows boots to the desktop. When too many applications launch simultaneously during startup, it will likely take a toll on your computer.
To speed up your PC, consider disabling non-essential startup apps like:
- Spotify, OneDrive, Skype, or Microsoft Teams (unless used immediately)
- Steam or other game launchers.
- Third-party updaters like Java Update Scheduler or software auto-updaters that aren’t critical, and so on.
On the other hand, some startup apps are essential and should not be disabled. This typically includes:
- Security software (Windows Security/Defender, third-party antivirus programs such as Norton, McAfee, Bitdefender)
- System drivers and services (Intel or AMD graphics drivers, Realtek HD Audio Manager, touchpad or trackpad utilities such as Synaptics or ELAN, etc.)
- Network and connectivity tools (Wi-Fi adapters or Bluetooth drivers and VPN auto-start tools)
- OEM utilities such as Lenovo Vantage, HP Support Assistant, Dell SupportAssist, etc.
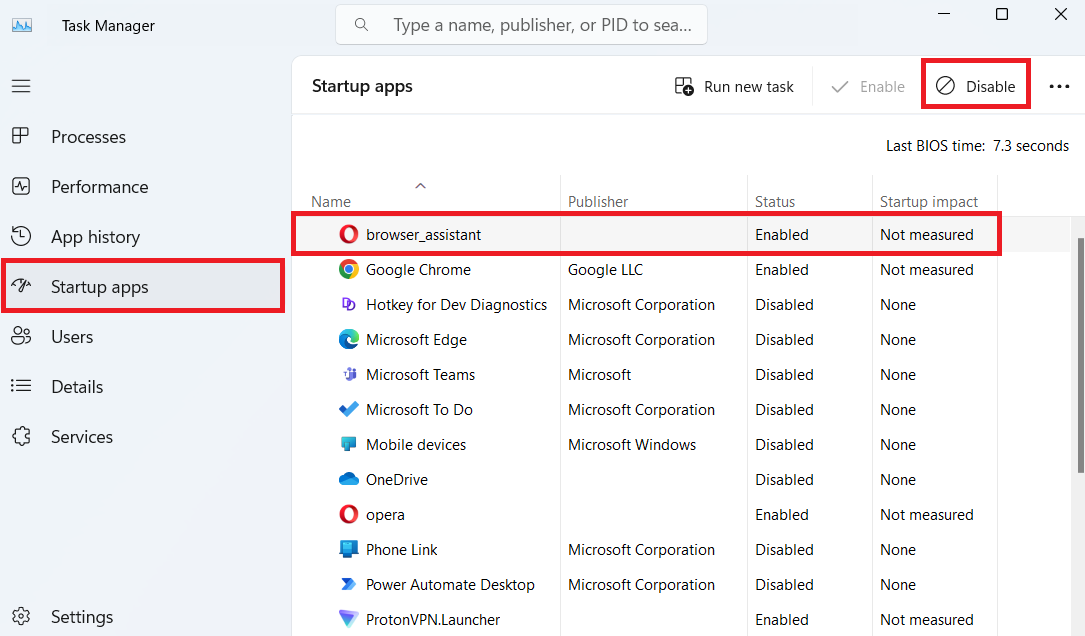
Let’s see how to disable startup programs using Task Manager:
- Press
Ctrl + Shift + Esc on your keyboard to open Task Manager.
- Then, click on Startup apps.
- After that, go through the programs, click on the app you want to deactivate, and select Disable.
If you’re not sure what an app does, Google the name or right-click it in Task Manager > Open file location to understand its function before disabling it.
Related read: How to Speed Up Windows Startup and Make Your PC Boot Faster?
PRO TIP
Using
Auslogics BoostSpeed ’s Startup Manager is a more convenient and user-friendly way to manage startup programs compared to doing it manually through Task Manager.
Instead of digging through system menus and guessing which apps are safe to disable, BoostSpeed gives you a clear overview of all startup items, along with helpful descriptions and performance impact ratings.
This makes it easier to identify and disable unnecessary apps with just a few clicks—helping your PC boot faster without the risk of turning off something essential.
Tip 7: Update your device drivers
Drivers and third-party applications also receive regular updates that you should install. When software drivers, like graphics cards, remain out of date for too long, you’ll begin to notice performance drops.
While Windows Update does install crucial driver updates, it doesn’t always provide the latest versions available.
This means your system could be missing out on important performance improvements or bug fixes. That’s why it’s a good idea to manually check for updates through Device Manager or by visiting the manufacturer’s website for your hardware.
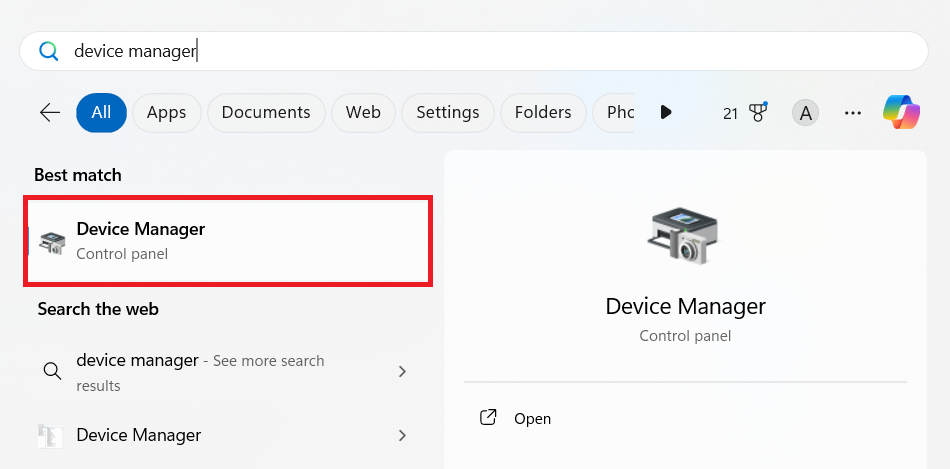
Here’s how to update your drivers via Device Manager:
- Type device manager in the search bar and click on the top result.
- Expand the category of the device you want to update.
- Right-click on the device and select Update driver.
But how do you know which drivers need updating first?
Device Manager helps by marking problematic drivers with a yellow triangle icon.
This symbol indicates there’s an issue with the driver—either it’s outdated, missing, or corrupted. These should be your first priority to update.
There are more options on how to check if your drivers are up to date.
Tip 8: Uninstall unnecessary apps
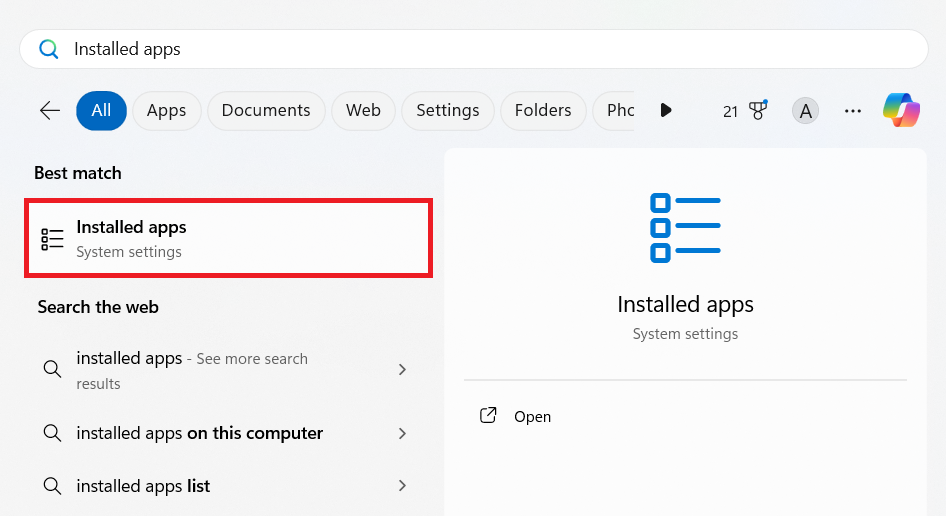
If we are honest with ourselves, there are some programs on our computers right now we barely use. These could be apps you installed yourself or that came with the PC. Regardless, these programs take up space and can reduce your Windows speed. Here’s how to remove those apps:
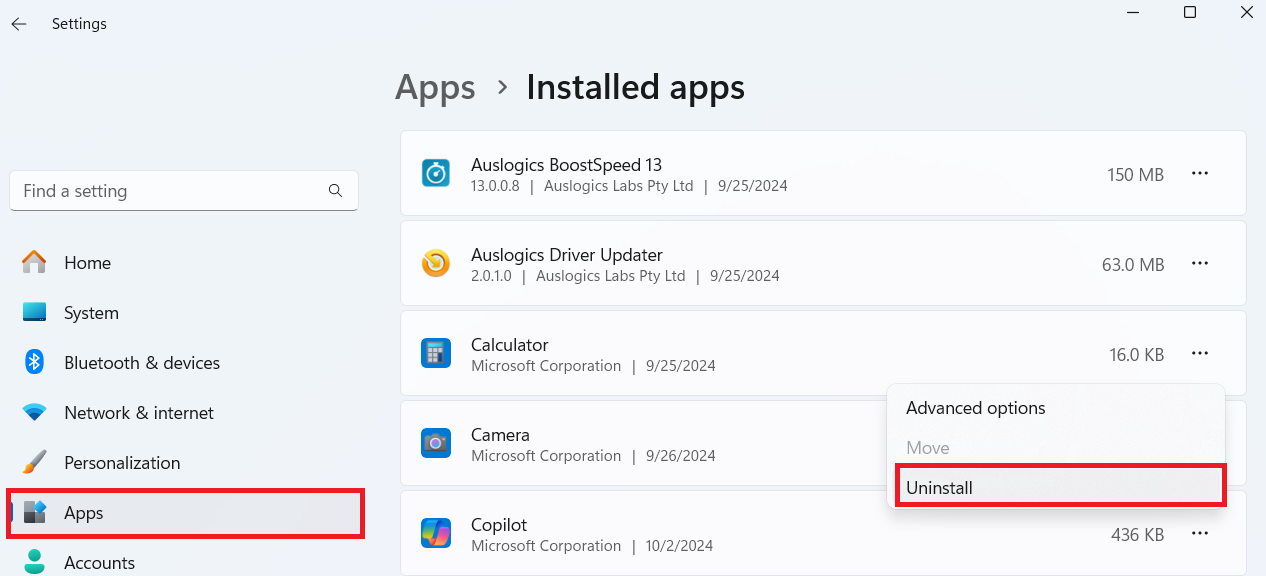
- Go to your search box and type Installed apps. Then click on the result that pops up.
- Next, search for the applications you don’t use, right-click on them, and select Uninstall.
While uninstalling apps via Installed apps is straightforward, this method often leaves behind leftovers—residual files, folders, or registry entries that belonged to the uninstalled program. These leftovers can quietly pile up, consuming valuable disk space and cluttering your system. Over time, they may even interfere with other software or slow down your PC’s performance.
That’s why using a tool like Auslogics BoostSpeed ’s Uninstall Manager is a smarter choice. It goes beyond standard uninstallers by fully removing all associated files and registry traces, ensuring a clean slate. With just a few clicks, you can wipe out unused programs and their digital footprints—freeing up space and helping your system stay optimized.
Tip 9: Disable Windows tips, tricks, and suggestions
Windows has a nifty feature known as tips, tricks, and suggestions that tracks how you use the computer. The OS then provides suggestions based on the information it’s gathered.
In reality, you’ll barely notice that the feature is there. When it shows up, it hardly provides useful info or shows you something you don’t already know.
So, in the end, you’re likely better off without it. Plus, it’s contributing to the slowdown of your PC. Follow the below steps to disable the feature:
Windows 10
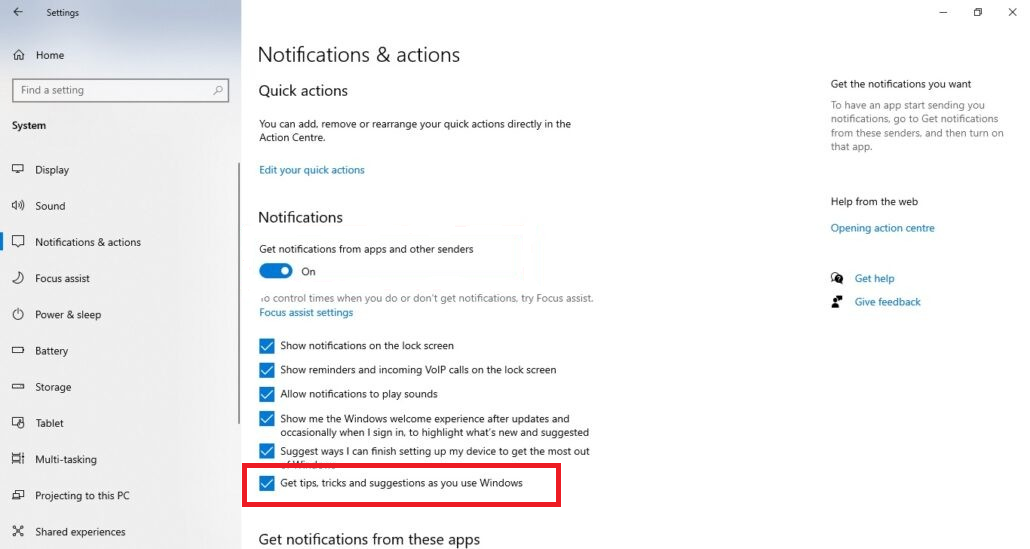
- Launch the Settings app and click on System.
- Next, click on Notifications & actions.
- Now, uncheck the box beside Get tips, tricks, and suggestions as you use Windows under Notifications.
- Finally, restart your PC and check its performance.
Windows 11
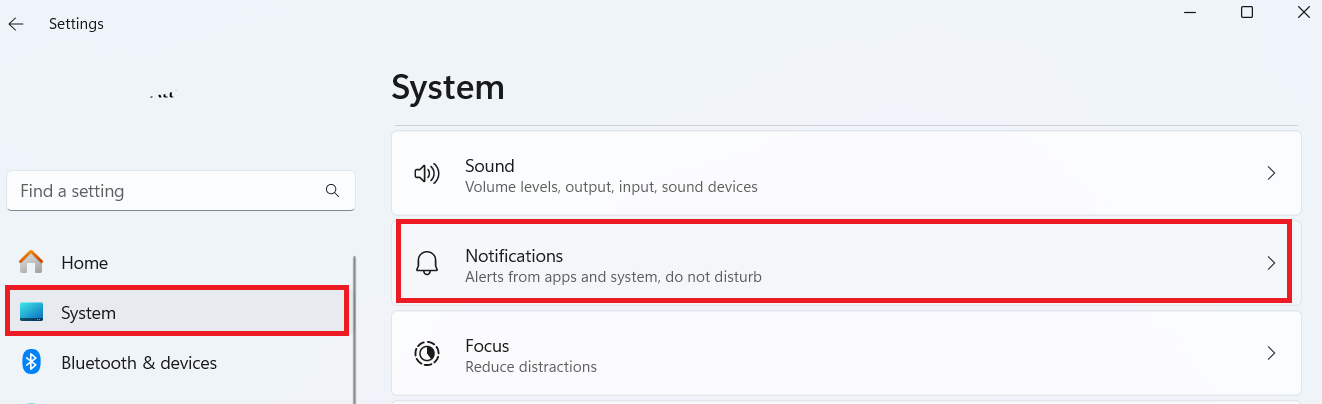
- Open the Settings window and click on System.
- Afterwards, click on Notifications.
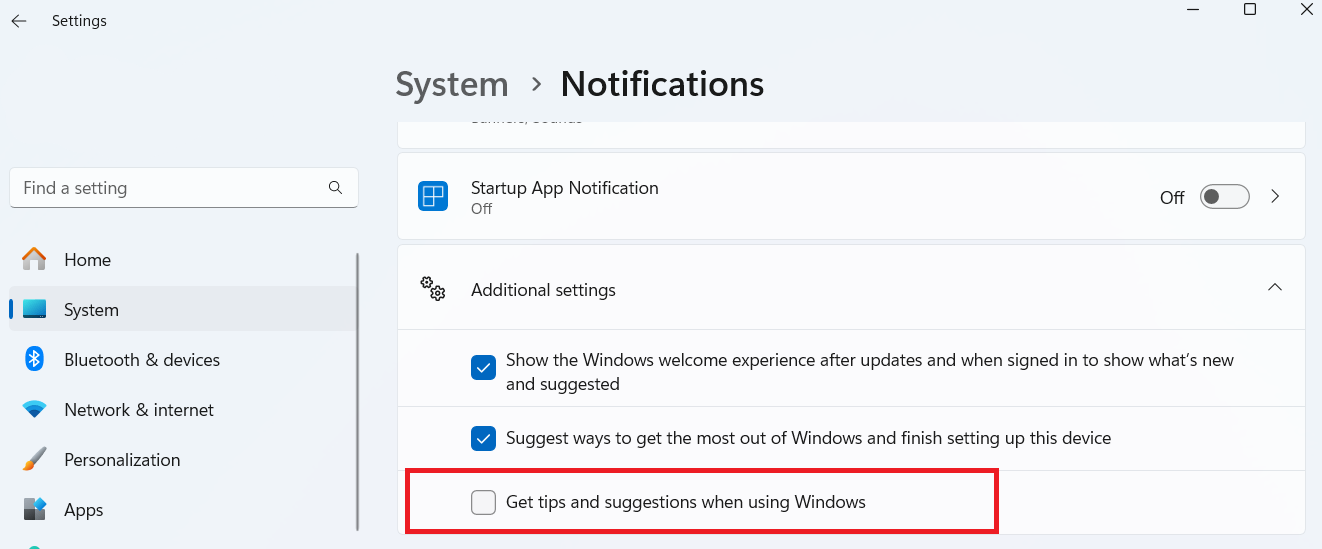
- Scroll down to the Additional settings section and click on it to expand.
- Finally, uncheck the box next to Get tips and suggestions when using Windows.
How to Speed Up Your Windows 11/10: Further Improvements
The solutions in this section focus on the system changes that can speed up your Windows 10 or 11. But it’s nothing you can’t handle because we’ve made it super easy:
Tip 1: Adjust your power settings
Windows manages your system’s performance to conserve battery power. While this is typical in laptops, desktop computers also have power plans intended to prevent overheating . The Power saver plan reduces performance to prolong battery life . You’ll experience periodic lags and slowdowns if you’re on this plan. Changing the plan to Balanced or High performance should speed up your PC.
Note
Remember that you’ll likely be sacrificing a great deal of battery life.
Here’s how to adjust the power plan:
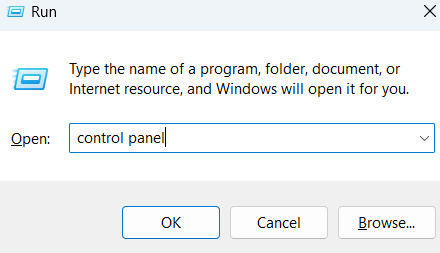
- Press
Windows + R to open the Run dialog box, then type control panel into the text box and press Enter.
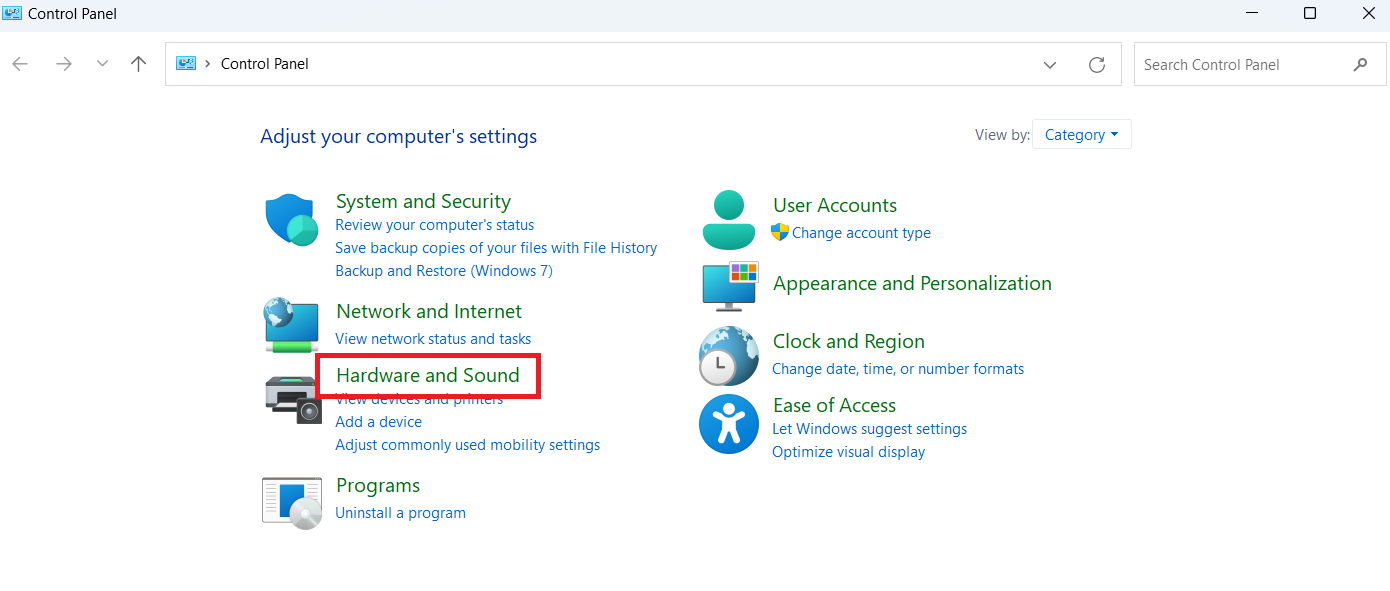
- After the Control Panel window appears, go to Hardware and Sound.
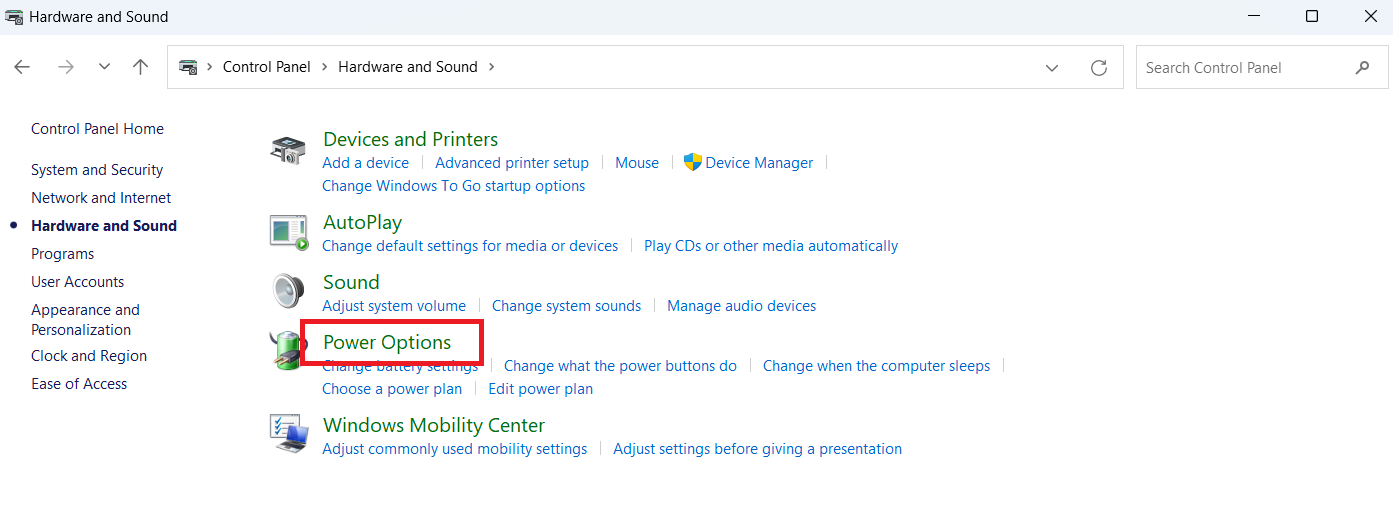
- Then, select Power Options.
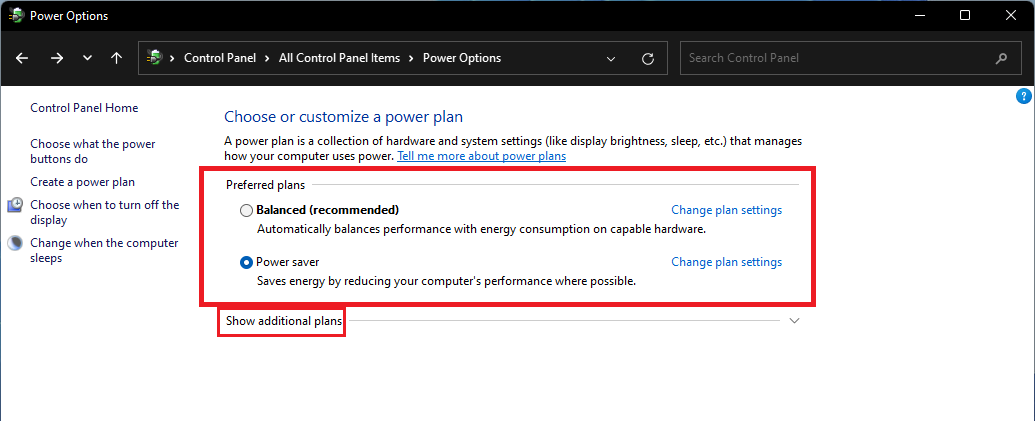
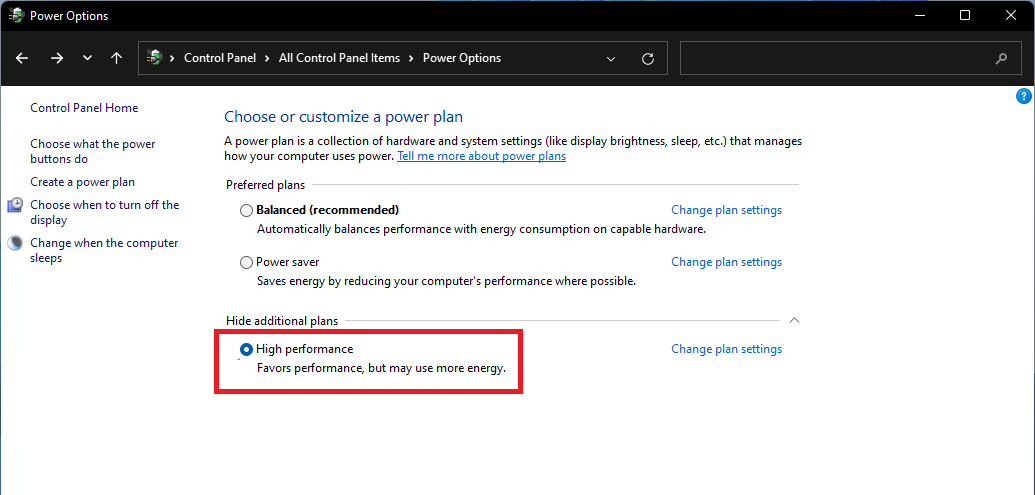
- Next, you’ll see the Balanced and Power saver plans under Choose or customize a power plan.
- If you want to go for the High performance plan, expand the Show additional plans section.
- Now, select the plan you want and exit.
Also read: How to Restore Missing Power Plans Options on Windows
Tip 2: Enable Windows’ Automatic Maintenance
Windows carries out routine maintenance on your computer every day in the background.
This process can keep your PC running optimally for as long as possible.
Some users turn off this feature without knowing it. Also, if you haven’t plugged in your computer during the automatic maintenance, there’s a chance that the process hasn’t been run in a while.
Let’s find out how to enable this feature:
- Launch Control Panel.
- After the program opens, click on the System and Security link. Make sure the View by option is set to Category.
- Next, click on Security and Maintenance.
- Expand the Maintenance section under Review recent messages and resolve problems .
- Click on Change maintenance settings.
- Now, under Automatic Maintenance, choose when you’d like Windows to run the daily checks
- Mark the checkbox next to Allow scheduled maintenance to wake up my computer at the scheduled time.
- Click on the OK button.
Even though Windows’ Automatic Maintenance can help with software updates, system diagnostics, and other basic tasks, it can’t fix deeper issues like fragmented registry entries, hidden performance problems, or software conflicts.
Advanced tools like Auslogics BoostSpeed can properly fix all these issues and get your PC back in shape.
Tip 3: Defragment your hard drive
One of the ways to speed up your Windows is defragging your computer . You can use Windows’ Defragment and Optimize Drives option to defrag your system.
While Windows’ built-in Defragment and Optimize Drives tool is helpful, it applies a more generic approach—especially when it comes to differentiating between HDDs and SSDs. But why does that matter?
HDDs store data on spinning magnetic disks, which means fragmentation—where data is scattered across the disk—slows down read/write speeds. Defragmenting reorders this data, improving performance.
SSDs, on the other hand, have no moving parts. Instead of defragmenting (which is unnecessary and can even reduce lifespan), SSDs benefit from specialized optimization techniques that manage data placement, trim unused blocks, and enhance longevity and speed.
Auslogics BoostSpeed offers dedicated solutions—Disk Defrag and SSD Optimizer—that automatically apply the right optimization based on your drive type, giving you better performance results without the risk of using the wrong method.
Here’s how you can use this BoostSpeed tool to optimize your drive and speed up your system:
For HDDs
- Launch Auslogics BoostSpeed.
- Click on All Tools and select Disk Defrag.
- Click on Defrag to start the defragmentation process.
For SSDs
- Launch Auslogics BoostSpeed.
- Click on All Tools and select SSD Optimizer.
- Click Optimize and wait for the process to complete.
- You can click on Files to optimize for more detailed optimization settings.
Download Auslogics BoostSpeed
Your one-stop PC maintenance and optimization tool, this program will clean, speed up, repair and tweak your system to ensure maximum speed and efficiency.
Tip 4: Prevent OneDrive from syncing automatically
If you have a lot of files, especially large ones, the constant syncing can consume lots of system resources like RAM, CPU, and network bandwidth.
Furthermore, OneDrive can run in the background and compete with other resources. All these can cause your Windows to slow down.
You can temporarily disable automatic syncing to reduce the pressure it exerts on the system. Here’s what you should do:
Windows 10
- Go to the notification area on your taskbar and click on OneDrive.
- Click on More , and select Settings.
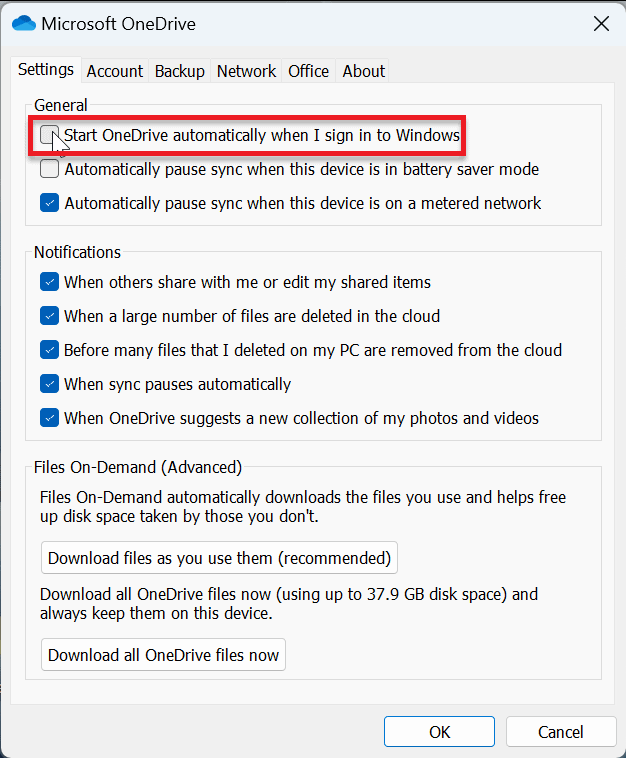
- Select Settings in the pop-up window and uncheck Start OneDrive automatically when I sign in to Windows.
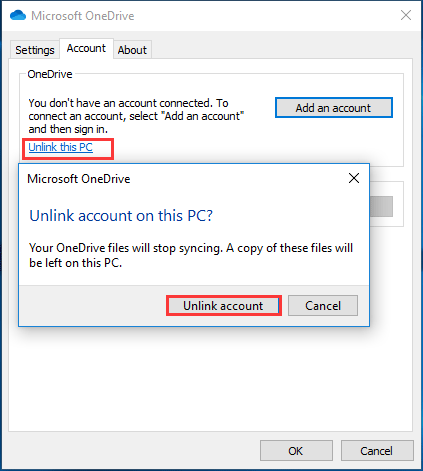
- After that, go to the Account tab and select Unlink this PC and click Unlink account.
When you unlink your account, a pop-up window will appear to enter your email address. Enter the necessary information to complete the process.
Windows 11
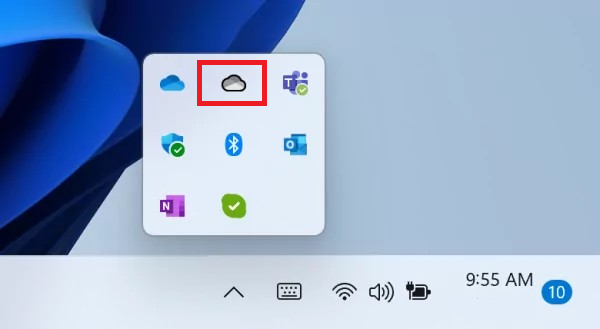
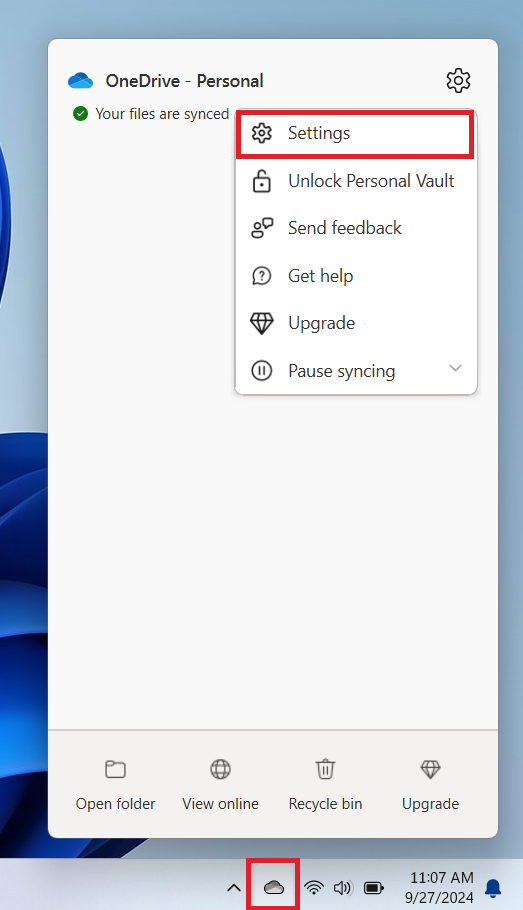
- Click on the OneDrive icon on the system tray.
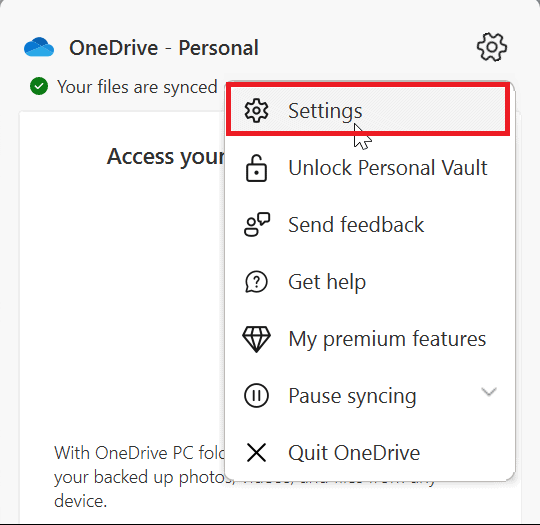
- Then, click on the gear icon and select Settings.
- Click on Start OneDrive automatically when I sign in to Windows to uncheck it.
Note
If you don’t want to use OneDrive anymore, you can always disable or uninstall the program.
Tip 5: Enable OneDrive’s Files On-Demand feature
Let’s face it, OneDrive is pretty useful despite its resource-guzzling nature. The good thing is that you can reduce the toll it takes on your PC without giving it up entirely.
For example, the Files On-Demand feature allows you to save specific files locally and store others on OneDrive.
This way, you can reduce the syncing process to the barest minimum and upload important files you want to back up and share across devices.
Follow these steps:
- Go to the notification area on your taskbar and right-click on OneDrive.
- Click on the gear icon and select Settings.
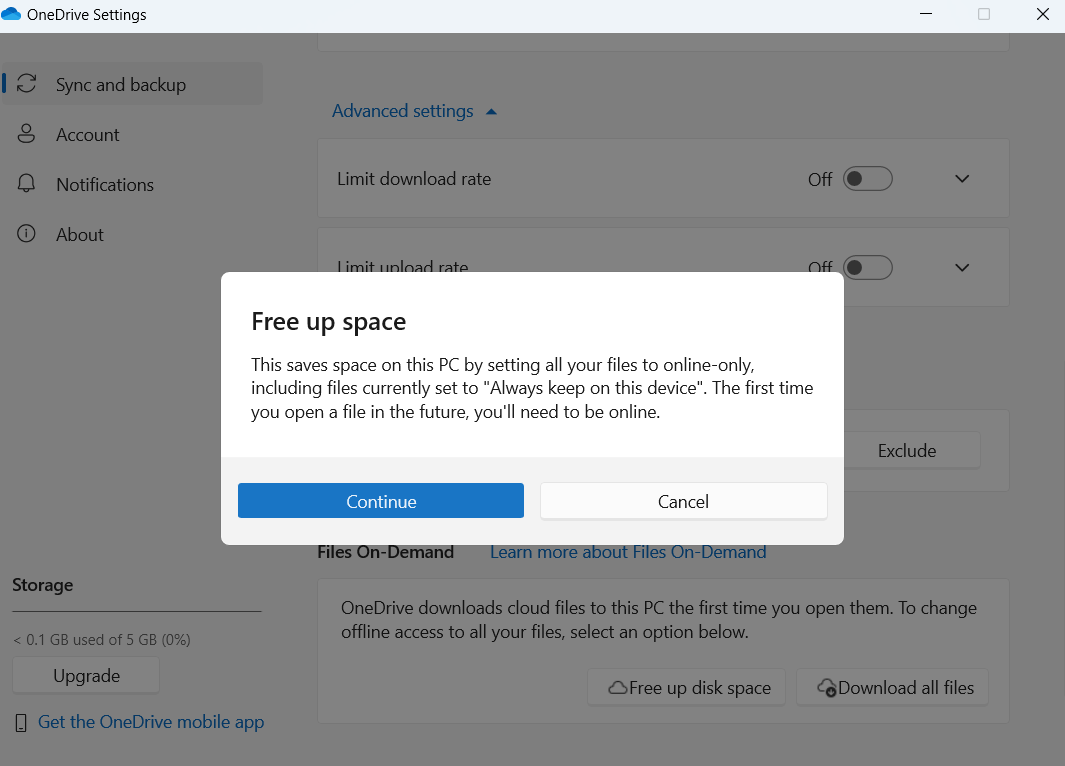
- Click on Sync and backup and select Advanced settings . Then, click on Free up disk space under Files On-Demand.
- You’ll get a prompt after clicking on Free up disk space. Read the information there and select Continue.
- If you want to save a folder on your computer but not on OneDrive, right-click it and select the Always keep on this device option. The file or folder will show a green checkmark to indicate it’s always available locally.
Download Auslogics BoostSpeed
Your one-stop PC maintenance and optimization tool, this program will clean, speed up, repair and tweak your system to ensure maximum speed and efficiency.
Tip 6: Adjust your Windows appearance
Windows has visual effects, like 3D animations and shadow effects, that make it pop. While these bells and whistles enhance the operating system’s aesthetic appeal, they can affect your PC’s performance.
You might want to consider the trade-off between better performance and aesthetics if your computer doesn’t have enough firepower to stay efficient while handling 3D effects.
Thankfully, Microsoft offers a way to cut down on the operating system’s visual appearance to reduce the burden on your CPU.
Follow this process:
- Search for View advanced system settings and click on the top result.
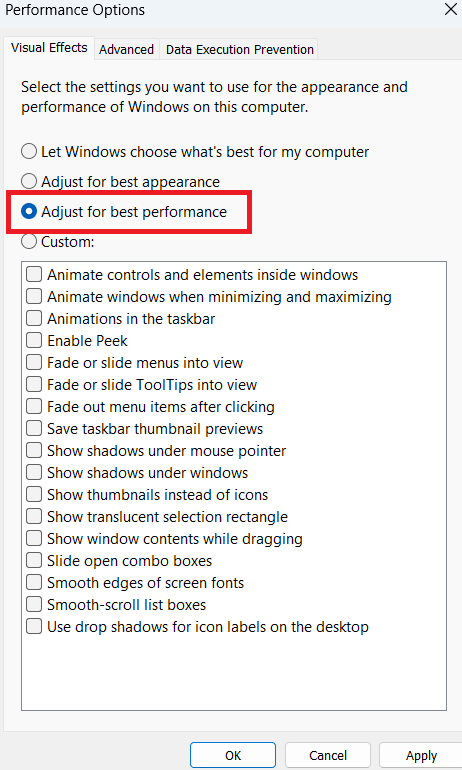
- Click on Settings under Performance in the Advanced section.
- Select the Adjust for best performance option and click the OK button.
You can also choose the visual effects you want to disable and those you’d love to keep.
Restart your computer after making these changes and check if the problem has been resolved.
Tip 7: Disable Game Mode
Game Mode was developed to allocate system resources to games. Essentially, your computer automatically detects that you are running a game and shuts every other application in the background, giving the game more priority.
As great as this feature sounds for gamers, it doesn’t always work. You can experience FPS issues and game stutters instead of improving things.
Here’s how to disable the feature:
Note
The steps are the same for both Windows 10 and 11 users.
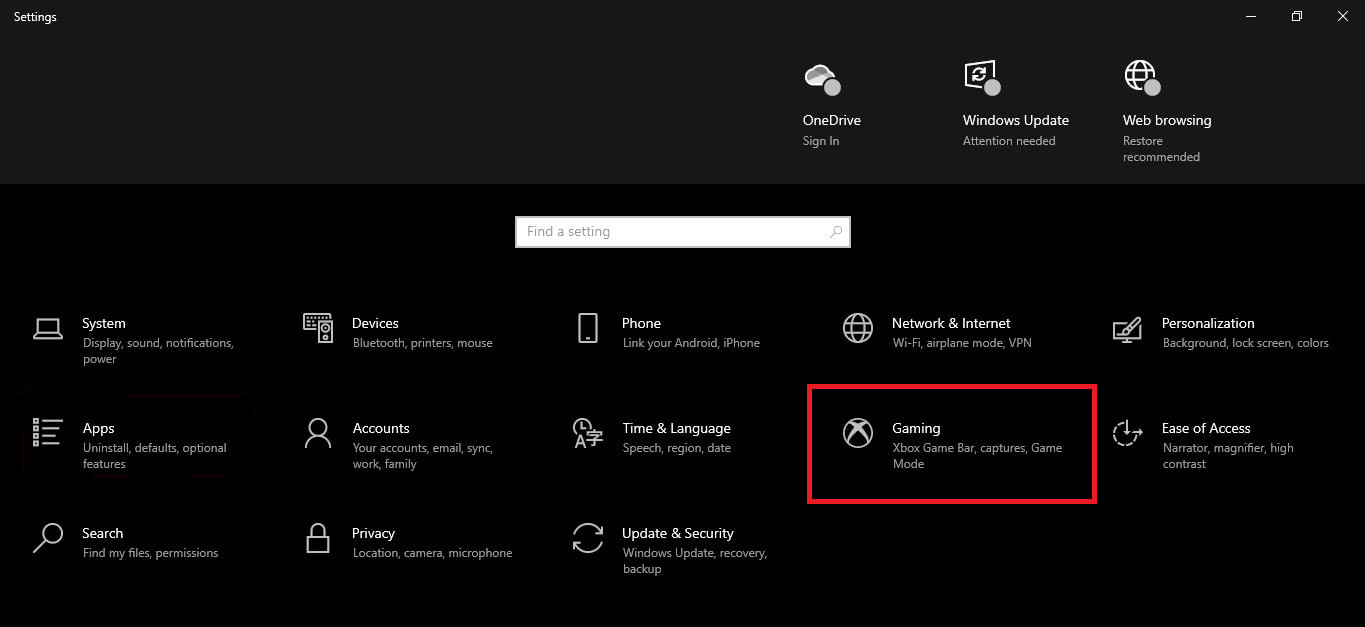
- Launch Settings using the
Windows + I shortcut.
- Click on Gaming once you see the first page of Settings.
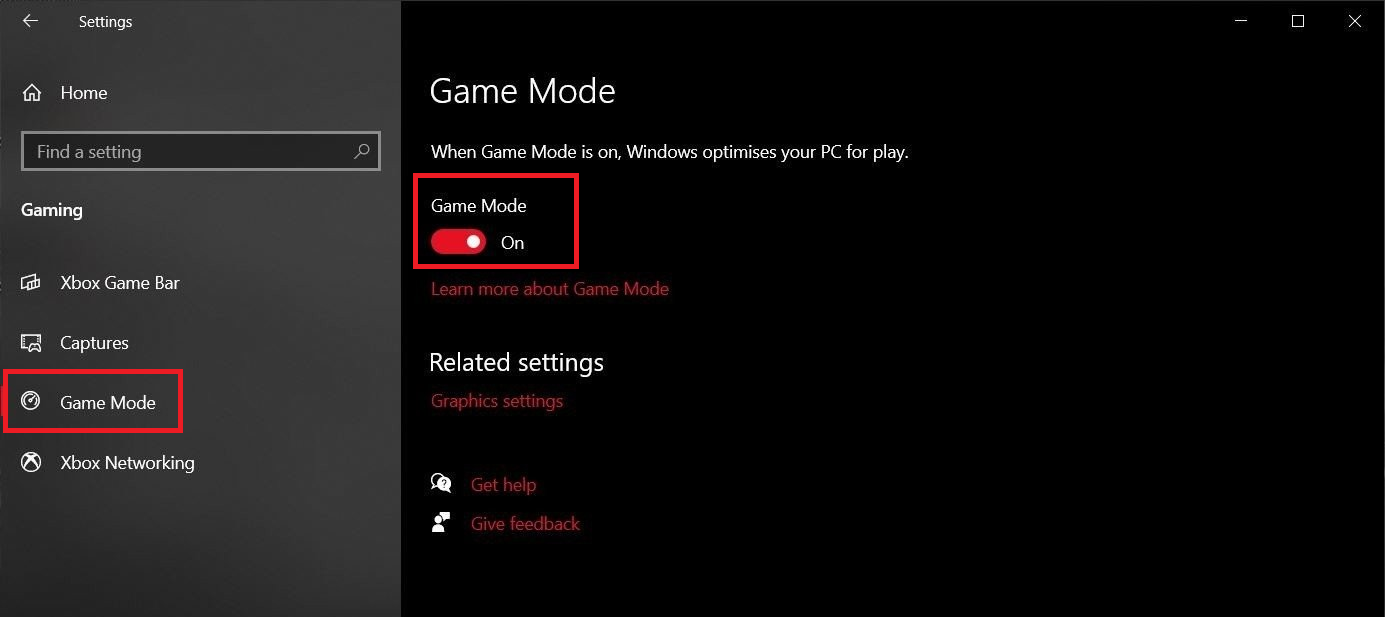
- Select Game Mode in the left pane of the Gaming interface.
- Go to the Game Mode page and toggle off the switch under Game Mode.
Also read: How to Optimize Your PC for High-Performance Gaming
Tip 8: Get rid of bloatware and malware
Most Windows PCs come with pre-installed apps you don’t need—known as bloatware. These programs (like trial software, manufacturer tools, or promos) take up space, slow performance, and often run in the background.
How do you know what to remove?
Go to
Settings > Apps > Installed apps and review anything unfamiliar or unused. Sort by size or install date, and when in doubt, search the app name online. You can also check the
Should I Remove It site for lists of known bloatware by brand (HP, Dell, Lenovo, etc.).
And here’s the thing: while bloatware isn’t always harmful, it can open the door to real threats. Some seemingly harmless apps may collect data, display intrusive ads, or even act as gateways for malware—especially if downloaded from unofficial sources or left outdated. That’s why removing bloatware isn’t just about cleanup—it’s also about protecting your system.
PRO TIP
Some apps are stubborn and don’t get fully uninstalled when you use built-in Windows tools. Tools like
Auslogics BoostSpeed ’s Uninstall Manager erase leftover files and registry entries that clutter your system—giving you more space and better performance.
How to Speed Up Your PC: Advanced Methods for Pros
Tip 1: Disable search indexing
The next tip to speed up your Windows computer involves turning off search indexing.
What is search indexing?
Search indexing is a process where Windows creates a database of all the files, documents, emails, and other data on your PC. This helps the system to retrieve information more quickly when you search for something.
Even though search indexing makes things run smoothly, the process can reduce your PC speed. Search indexing is done in the background, and it’s almost a continuous process that consumes system resources.
The initial indexing process puts more strain on your computer. That’s because the OS has to go through all your files and their properties. It also has to index the text within text files to pick up keywords from the document’s content.
After that, it only indexes newly added files.
That said, if you regularly work with lots of files, indexing can take its toll on your PC.
So, turn off search indexing and check if your system’s performance improves. Follow these steps:
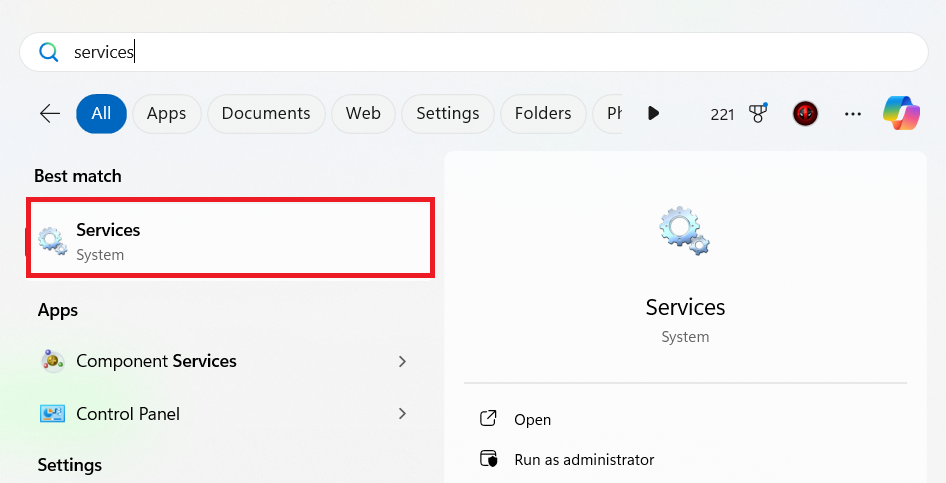
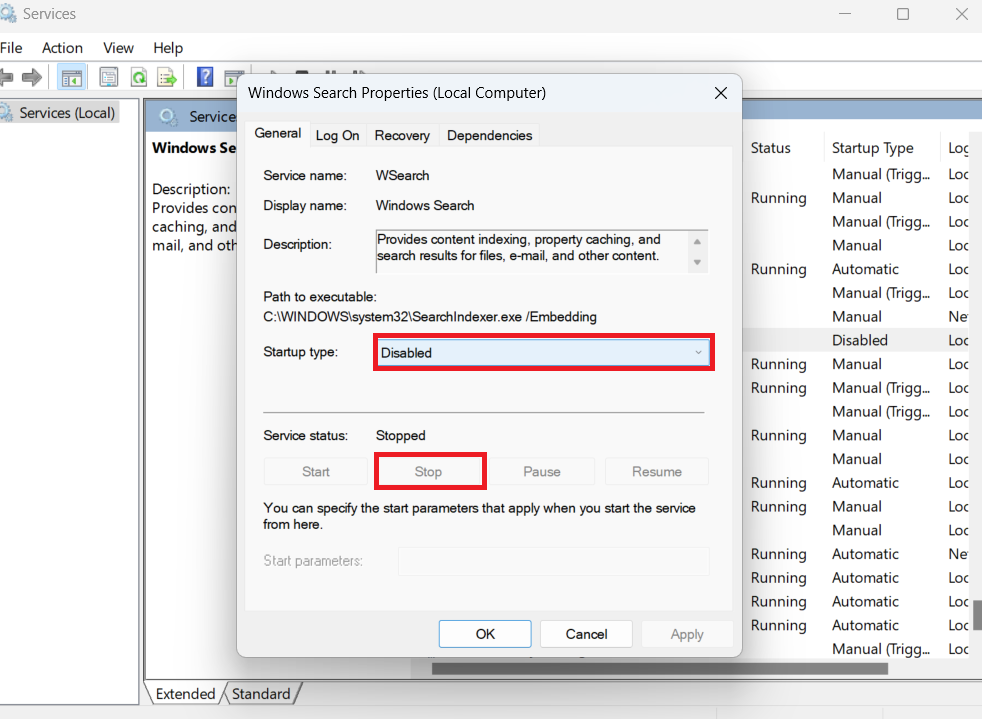
- Open Search and type services . Then, click on the best match.
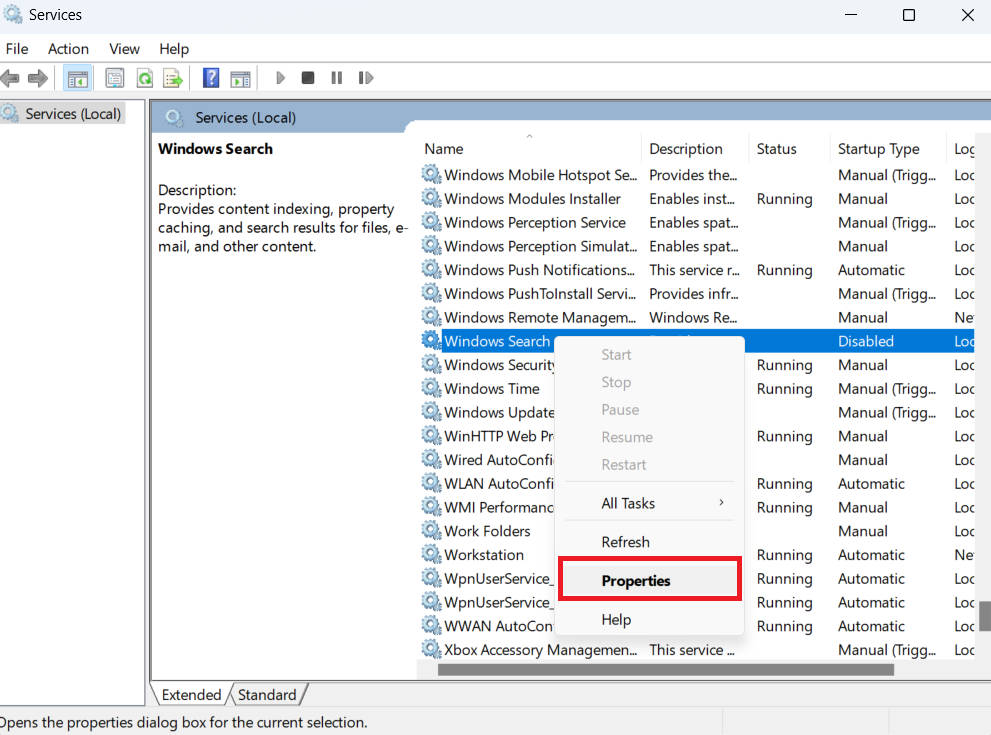
- Scroll down to the Windows Search service and double-click it. Or right-click and select Properties.
- Next, click on the Stop button in the Properties dialog window and select Disabled in the Startup type drop-down menu.
- Now, click on the OK button, restart your PC, and check if performance has improved.
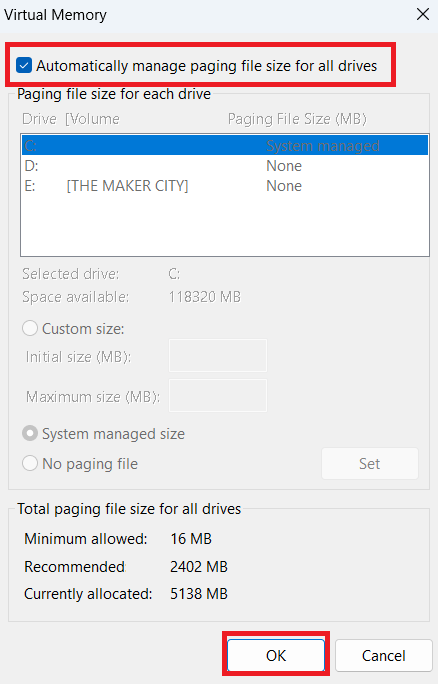
Tip 2: Optimize your virtual memory
Your computer uses RAM to temporarily store files and programs that the CPU needs to work on. However, when it gets full, Windows uses part of your hard drive or solid-state drive as extra memory. This is called virtual memory or a page file.
Normally, Windows manages the page file automatically by adjusting it according to its needs.
However, you can also manage the virtual memory yourself. Here’s how to do it:
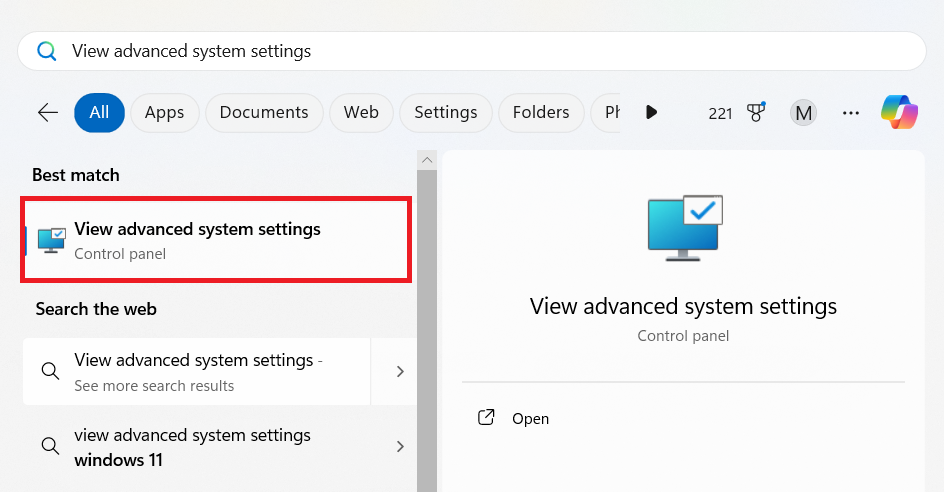
- Type View advanced system setting s in the search bar and click on the best match.
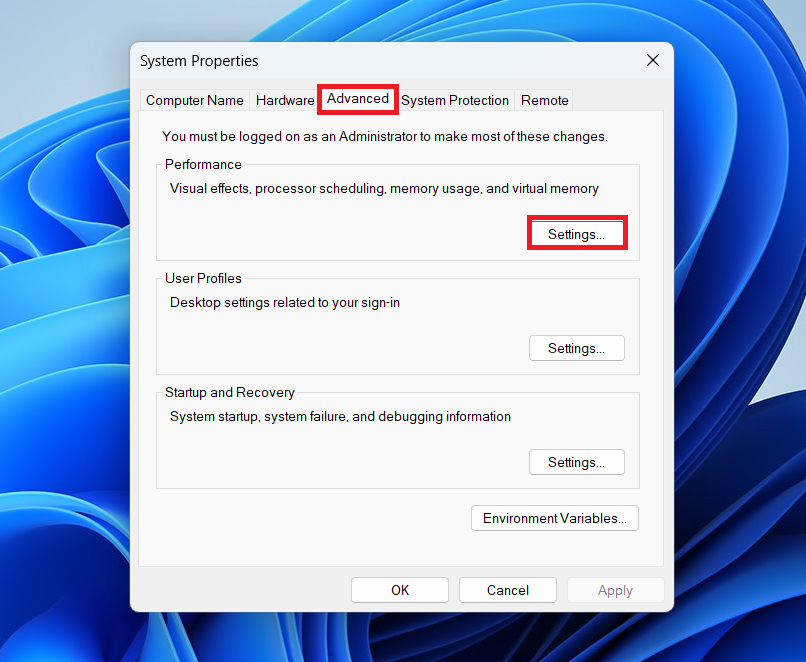
- Click on Settings under Performance once you see the System Properties dialog window.
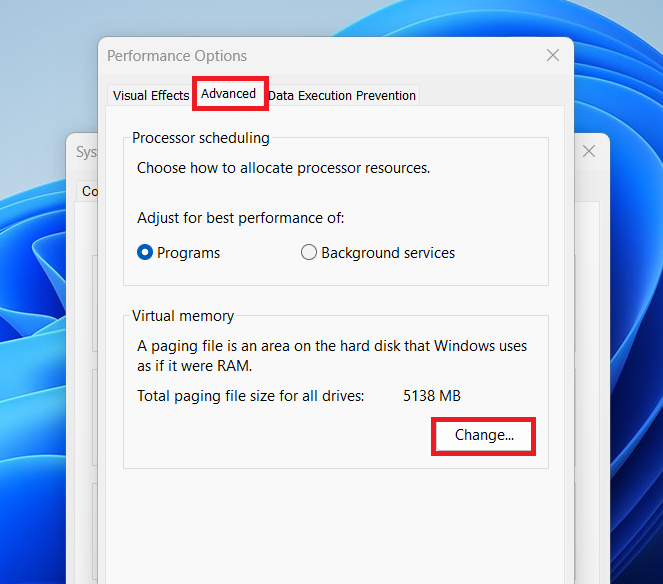
- After the Performance Options window pops up, switch to the Advanced tab.
- Go to the Virtual memory section and click on the Change button.
- Now, make sure the box beside Automatically manage paging file size for all drive s is checked.
- Click on the OK button.
Tip 3: Repair system files
You can speed up Windows 11 and 10 by fixing issues with system files . Windows relies on specific system files to run optimally. While these files are highly protected, they can still be affected by malware and third-party applications.
In addition, you could tamper with them by mistake, causing your operating system to malfunction.
There are instances where system slowdowns and frustrating lags result from missing or corrupted system files.
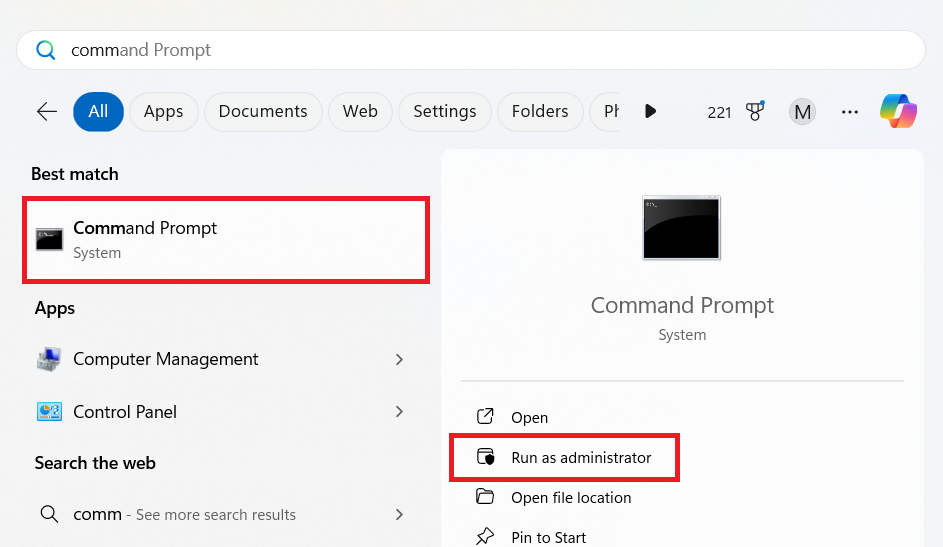
The good thing is that you can replace these affected files using the System File Checker (SFC). Follow the methods below:
- Go to the search bar and type CMD , then right-click Command Prompt in the results and select Run as administrator.
- Click on Yes in the pop-up.
- Type this DISM command and press Enter:
DISM.exe /Online /Cleanup-image /Restorehealth
- After the DISM tool completes its process, which might take a while, type sfc /scannow and tap the Enter keyboard button.
- The SFC will now go through your computer, searching for corrupted and missing system files. It will scan your PC’s protected folders and replace the affected files.
Tip 4: Consider upgrading RAM
If you’re a heavy user or play resource-intensive PC games , having a RAM upgrade can improve PC performance. If your system is struggling to even open multiple apps or browser tabs, this could be a sign that you need more RAM.
For most users, upgrading from 4GB to 8GB or 16GB is okay.
However, for video editors, gamers, or if you’re running other resource-hungry software, you might benefit from going up to 32GB or higher.
We have a detailed guide on this topic. You can check it here: When and How to Upgrade Your RAM on Windows 10/11
Download Auslogics BoostSpeed
Your one-stop PC maintenance and optimization tool, this program will clean, speed up, repair and tweak your system to ensure maximum speed and efficiency.
How to Speed Up Your Computer: Explained
If you are ready to speed up Windows 10 or 11, you don’t have to spend money on expensive upgrades or go through complicated processes. Start by implementing the tips mentioned in this article. Let’s recap.
Try this first
Use a PC cleaner and optimizer (e.g., Auslogics BoostSpeed)
⬇️
Clean up your disk space using Disk Cleanup and Storage Sense
⬇️
Keep your system up to date via Windows Update
⬇️
Close background applications
⬇️
Use fewer browser tabs to reduce RAM usage
⬇️
Disable non-essential startup apps (via Task Manager or Auslogics BoostSpeed)
⬇️
Update device drivers manually or with Auslogics Driver Updater
⬇️
Uninstall unnecessary apps using Settings or BoostSpeed’s Uninstall Manager
⬇️
Disable Windows’ tips, tricks, and suggestions
Further improvements
Adjust your power settings
⬇️
Enable Windows’ Automatic Maintenance
⬇️
Defragment your hard drive or optimize your SSD with Auslogics BoostSpeed
⬇️
Prevent automatic syncing for OneDrive
⬇️
Enable OneDrive’s Files On-Demand feature
⬇️
Tweak Windows appearance settings to reduce visual effects
⬇️
Disable Game Mode (if it’s causing performance issues)
⬇️
Remove bloatware and scan for malware
If you are an experienced user
Disable search indexing to reduce resource usage
⬇️
Optimize your virtual memory settings
⬇️
Repair system files using DISM and SFC tools
⬇️
Consider a RAM upgrade
Remember, you can avoid many manual steps to speed up your PC by starting to use automatic maintenance as part of your daily routine with one of the PC cleaners .
These tools will optimize your machine step by step, and you won’t even notice any slowdown. If this article has been helpful, let us know in the comments, and don’t hesitate to share it or reach out with any questions.
Still have PC-related questions? Don’t hesitate to visit our
Ask a Question forum! Just post your question and share your issue with our specialists—they’ll be ready to give you hands-on help.
FAQ
Your PC might be slowing down due to a buildup of temporary files, too many background apps, outdated drivers, or insufficient system resources. Other common culprits include unnecessary startup programs, low disk space, or even hidden malware. Fortunately, most of these issues can be fixed without expensive upgrades. The guide above offers step-by-step solutions to speed up Windows 10/11 and get your computer running like new again.
To boost CPU performance, start by closing background apps, disabling unnecessary startup programs, and adjusting your power settings to High performance. You can also use tools like Auslogics BoostSpeed to optimize CPU usage and free up system resources. These simple tweaks can help your CPU run faster and more efficiently—without needing a hardware upgrade.
Well, it depends on what you want and your current situation. Are you a gamer or a heavy user like a video editor? Upgrading your graphics card can help. You could also consider replacing your hard drive with an SSD. On the other hand, if you’re a general user, consider installing Auslogics BoostSpeed to optimize your system and increase its efficiency. It has all the necessary tools to keep your PC running smoothly for years to come.
Windows 10 and 11 offer several built-in tools to help clear out junk files and reclaim storage. Start with Disk Cleanup, which lets you manually delete temporary files, system cache, and old update data. Then enable Storage Sense to automate routine cleanups in the background. You can also manage and uninstall unused apps via the Installed apps section in Settings and remove residual files left behind by updates using Clean up system files within Disk Cleanup. For ongoing optimization, don’t forget about OneDrive’s Files On-Demand feature and disabling Windows’ tips, tricks, and suggestions, which can also consume space and resources. These tools work together to keep your PC clutter-free without needing third-party software—though apps like Auslogics BoostSpeed can help if you want deeper, automated cleaning.
Yes, especially if the programs run background processes or consume system resources like CPU and RAM. Many apps, including the ones you don’t usually use, can take up memory and even set themselves to start up when you boot your computer. So, deleting them can free up space and reduce the load on your system.